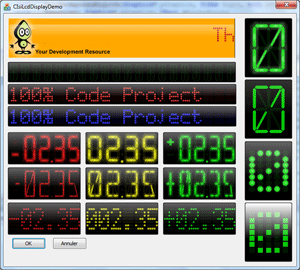
Introduction
I’m an Industrial Development Software Supervisor; that is the reason why I need controls able to display values clearly. 7 or 16 segments control is good for that. I based this control on GDI+ library for 2 reasons, I wanted a nice GUI and I am interested in learning about this library.
Many articles from CodeProject helped me to write this control (I can’t remember all of them). Many thanks to the entire CodeProject community and special thanks to Ambalavanar Thirugnanam for his excellent article Aqua Gauge.
I hope this article will be able to help you in your future project. All modifications, derived work, or anything else able to improve this control are welcome, please let me known about them.
Features
- Draw border
- Font matrix able to manage 256 characters
- Full resizable control
- Display numeric (signed or not) or text value
- Glossy and light effect (to have a nice look)
- Double buffering (no flicking)
- Draw transparent
- Blinking
- Segments (or dots) size adjustment
Using the Code CIsiLcdDispaly Control
Step 1. This control uses the GDI+ library. Before you use it, you must initialize this library. If your application uses another GDI+ component, you probably already did that otherwise you could use the following macro to initialize, friendly, the GDI+ library.
In your CWinApp derived class header, add the DECLARE_GDI_PLUS macro as follows:
class MyApp : public CWinApp
{
private :
DECLARE_GDI_PLUS;
Step 2. Implement the control
- Insert all .h and .cpp files into your project.
- Insert the Font5x7.bmp file as a bitmap resource.
- Add a static control into your dialog resource.
- Add a member variable for that static control.
- Modify the variable declaration.
Change this:
CStatic m_MyLcdCtrl
To this:
CIsiLcdDisplay m_MyLcdCtrl
- Don't forget the
#include at the top of the include file:
#include "IsiLcdDisplay.h".
Step 2B. Dynamic create
If you want to dynamically create this control, please insert the following code in the OnInitDialog() method:
if ( !m_MyLcdCtrl.Create(_T(""),WS_CHILD|WS_VISIBLE, lCRect, this, -1 ) )
{
ASSERT( 0 );
}
Step 3. Set the look of your control
In the OnInitDialog() method, add the following lines according to the desired design.
m_CIsiLcdSample14.LoadMatrix( IDB_MATRIX5x7 ); m_CIsiLcdSample14.SetNbSegment( MatrixDot, FALSE ); m_CIsiLcdSample14.SetValueNbDigit( 6,2 ); m_CIsiLcdSample14.ShowSign( TRUE ); m_CIsiLcdSample14.SetColor( RGB(0,150,0) );
Step 4. Update the value to be displayed
If the StringMode is enabled, you have to use the SetWindowText( _T(“New test”) ); method to update the control, otherwise use the SetValue( dNewVal ) method.
m_CIsiLcdSample14.SetValue( 2.35 );
or:
m_CIsiLcdSample14.SetWindowText( _T("My text");
X*Y Matrix File Format

The matrix is stored in a bitmap file. I chose this format because a 5 x 7 matrix with 256 characters is too big to be edited manually (look at the 16 segments arrays I let you imagine the dimension of a 20x20 matrix). The bitmap is a good file format because you can find a lot of editors and you can edit it directly in Visual Studio. It’s not necessary to develop a specific editor to create a new font matrix. You can use 2, 16, 256 or true color bitmap, but 16 colors bitmap seems to be the best format because we need only 3 different colors (2 colors is enough but editing the matrix with 3 colors is easier). 1 color is used to identify OFF pixels, 1 for ON pixels and the last one to make the difference between each character. The bitmap is organized at 8 lines with 32 characters, you must respect this structure. The maximum character size is fixed to 20x20 because I need a limit to avoid a crash during bitmap analyze.
How is the bitmap analyzed? The first printable character is the space char. All pixels of this character should be OFF, so the first pixel (at the position 0,0 ) must be the background color. After that, I have to know the size of the matrix char (you are not limited in a 5 x 7 matrix). I parse the first line until the background color is found. I use the same technique to calculate the high of font matrix.
Create your Matrix
Step 1: Create a new bitmap (with = x * 32 +32, high = y * 8 + 8) or edit mine. x, y are the dimension of each character. With a 5*7 matrix, the bitmap size is 192*64. If the bitmap doesn’t respect this formula, the LoadMatrix() method will fail.
Step 2: Draw lines separations.
Step 3: Draw characters.
Step 4: Load your new matrix with the LoadMatrix method.
Point of Interest
The light effect gives to the control a nice look (in my opinion; if you don’t like the effect, you can disable it). To do it, it’s really easy.
Step 1: Create Fill the segment path with the ON segment color.
Step 2: Scale up a little bit the segment path to do the glow effect path.
Matrix MatrixGlowH;
MatrixGlowVH.Scale( GLOW_SCALE_Y,GLOW_SCALE_X );
m_pathSegmentH.AddPolygon(SegmentH, 6); m_pathSegmentH_Glow.AddPolygon(SegmentH, 6); m_pathSegmentH_Glow.Transform( &MatrixGlowV );
Step 3: Create the linear brush based on the glow effect path.
REAL fac[] = {
0.0f, 0.25f, 0.4f, 1.0f};
REAL posfac[] = {
0.0f, 0.5f, 0.8f, 1.0f};
PathGlow->Transform( &TmpMatrix );
PathGradientBrush PathBrushGlow( PathGlow );
PathBrushGlow.SetCenterColor( Clr(GetGlowColor()).value);
Color OutColor(0,0,0,0);
int iNbColor = 1;
PathBrushGlow.SetSurroundColors( &OutColor, &iNbColor );
PathBrushGlow.SetBlend(fac, posfac, 4);
Step 4: Fill the path with the brush.
pGraphics->FillPath( &PathBrushGlow, PathGlow);
CIsiLcdDisplay Inherits from CIsiCompBase ?
Step 1: Draw the background:
You have to overload the RebuildGDIbkGnd() method.
virtual BOOL RebuildGDIbkGnd(Graphics* pGraphics, CRect &WindowRect)
{
m_bReGenBackGnd = FALSE;
return TRUE;
}
Step 2. Draw the pointer, bare or anything else to display the value of your control.
virtual void OnPaint(Graphics* pGraphics, CRect &WindowRect ) = 0;
Documentation
Class Methods
void SetBlink( int iPeriod );
Set the blinking period in ms. If this parameter is 0 (default value), the control will not blink.
int GetBlink();
Return current blink period.
void ShowOffSegment(BOOL bShow, BOOL bRedraw = TRUE);
bShow: Specifies whether to show or hide off segments. If this parameter is TRUE, OFF segments are shown. If the parameter is FALSE, OFF segments are hidden. Default value is TRUE. bRedraw: If TRUE, redraw immediately the control.
int IsShowOffSegmentVisible();
Return TRUE if OFF segments are shown, otherwise return FALSE.
void StringMode(BOOL bString, BOOL bRedraw = TRUE);
bString: TRUE if the control must be updated with the SetWindowText() method. FALSE if the control must be update with SetValue() method. Default value FALSE. bRedraw: If TRUE, redraw immediately the control.
BOOL IsStringMode();
Return current mode.
void ShowSign(BOOL bShow, BOOL bRedraw = TRUE);
bShow: Specifies whether to show or hide the sign. If this parameter is TRUE, OFF sign is shown. If the parameter is FALSE, OFF sign is hidden. Default value is FALSE. This method has no effect if StringMode() is enabled. bRedraw: If TRUE, redraw immediately the control.
BOOL ISShowSign();
Return TRUE if sign is shown, otherwise return FALSE.
void HexMode(BOOL bHex, BOOL bRedraw = TRUE);
bHex: Specifies if value must be displayed in hexadecimal format. If this parameter is TRUE, the value is displayed in hexadecimal mode, otherwise decimal is used. Default value is FALSE. This method has no effect if StringMode() is enabled. bRedraw: If TRUE, redraw immediately the control.
BOOL IsHexMode();
Return TRUE if value is displayed in hexadecimal format, otherwise return FALSE.
void EnableValue( BOOL bEnable );
bEnable: Specifies if the current value is valid or not. If this parameter is FALSE, all segments are OFF. Default value is TRUE.
BOOL IsEnableValue();
Return TRUE if current value is enabled.
BOOL SetSegmentSize( float fSize, BOOL bRedraw = TRUE );
fSize: Segments scale factor. 0.5f means 50%, 1.5f means 150%... Default value 1.0f. bRedraw: If TRUE, redraw immediately the control.
This method allows to you to adjust the segments size.
float GetSegmentSize( );
Return the current segments scale factor.
void SetColor (COLORREF cOn,COLORREF cOff = 0, COLORREF cGlow = 0);
cOn: Color when the segments are ON. cOff: Color when the segments are OFF. If this parameter is 0, the OFF color is automatically calculated from the ON color. cGlow: Color of the light effect. If this parameter is 0, the color is automatically calculated from the ON color. If this parameter is RGB(255,255,255) (white), the light effect is disabled.
COLOREEF GetColorSegmentOn( );
Return color when segments are ON.
COLOREEF GetColorSegmentOff( );
Return color when segments are OFF.
COLOREEF GetColorSegmentGlow( );
Return color of the light effect.
vois SetSegmentStyle( SegmentStyle Style, BOOL bRedraw = TRUE );
Style: Set Style of segments
- Segment7: 7 Segments style
- Segment16:16 Segemnts style
- MatrixDot X*Y Dot matrix (Default 5x7)
- MatrixSquare X*Y Square matrix (Default 5x7)
bRedraw: If TRUE, redraw immediately the control.
Important: When using style MatrixDot or MatrixSquare, you must load a font matrix before. Please see the LoadMatrix() method below.
SegmentsStyle GetSegmentStyle();
Return current segments style.
void SetScrollSpeed( int iSpeed );
iSpeed: Delay in ms between each move. If this parameter is 0, the scrolling is disabled.
int GetScrollSpeed();
Return current scrolling speed.
BOOL LoadMatrix ( UINT uiRes);
uiRes: Contains the ID of the bitmap matrix resource.
Return nonzero if success, otherwise 0.
BOOL LoadMatrix ( LPCTSTR lpzFileName);
lpzfileName: A string that is the path of the matrix bitmap file.
Return nonzero if success, otherwise 0.
BOOL LoadMatrix( CBitmap *pBitmap);
*pBitmap: A CBitmap object that is the matrix to be loaded.
Return nonzero if success, otherwise 0.
Based Class Methods
void SetValueNbDigit (int iNbDigit, int iPrecision, BOOL bRedraw= TRUE);
iNbDigit: Number total of digits to be displayed. iPrecision: Number of digit after the decimal point. bRedraw: If TRUE, redraw immediately the control.
void SetValueNbDigit (int iNbDigit, int iPrecision, BOOL bRedraw= TRUE);
iNbDigit: Number total of digits to be displayed. iPrecision: Number of digit after the decimal point. bRedraw: If TRUE, redraw immediately the control.
Important: This method has no effect if the StringMode is enabled.
int GetValueNbDigit ();
Return the number of digits displayed.
int GetValuePrecision ();
Return the current precision of the control.
void Transparent( BOOL bTransparent, BOOL bRedraw= TRUE);
Tranparent: If this parameter is TRUE, the background of the control is not drawn. Default value is FALSE. bRedraw: If TRUE, redraw immediately the control.
BOOL GetTransparent( );
Return current transparent drawing mode.
void ShowGlass( BYTE bShow, BOOL bRedraw= TRUE);
bShow: Level [0;255] of the glassy effect. If this parameter is 0, the glassy effect is disabled. bRedraw: If TRUE, redraw immediately the control.
BYTE GetShowGlass();
Return current level of the glassy effect.
void SetRoundBorder(int iRound, BOOL bRedraw = TRUE);
iRound: Round corners of the control. bRedraw: If TRUE, redraw immediately the control.
int GetRoundBorder( );
Return current round border value.
void SetBkgndColor (COLORREF c, BOOL bRedraw = TRUE);
c: Background color. This parameter has no effect when drawing transparent. bRedraw: If TRUE, redraw immediately the control.
COLORREF GetBkgndColor ( );
Return Background color.
New Features
Now the control can be drawn with a border. The border style is provided by the CGdiBorder class. To modify the aspect of the border, you should call the GetBorder() method to retrieve a pointer on the border object. Modify the design of the border as you like (see below). When finished, you should call the InvalidateBorder() method to update the control.
Border Class Methods
void SetSize(int size);
size: Size (in pixel) of the border. If 0 the border will not be drawn.
int GetSize();
Return the current size of the border.
void SetStyle(BorderStyle Style);
Style: Set the Style of the border.
- Chrome: see below
- Lower: see below
- Raised : see below
- Both: see below
- Bump: see below
- None: No border
BoderStyle GetStyle();
Return the current style of the border.
void SetShape(BorderShape Shape, int round = 0);
Shape: Set the shape of the border.
- Rectange:
- Circle:
- Ellipse:
- RoundRect:
round: Round the corners of the control. This parameter is only used with the RoundRect style.Size (in pixel) of the border. If 0, the border will not be drawn.
BoderShape GetShape();
Return the current shape of the border.
int GetShapeRound ();
Return the current round of the border. Should be used only with the RoundRect shape style.
void SetColor( Color col, int iIndex);
col: .color. This parameter has no effect when drawing transparent. iIndex: Index of the color to be set. Must be GDIBORDER_COLOR_START or GDIBORDER_COLOR_END. See SetBorderStyle.
This method has no effect if chrome style is used.
Color GetColor( int iIndex );
Return the current color of the border.
iIndex: Index of the color to be set. Must be GDIBORDER_COLOR_START or GDIBORDER_COLOR_END. See SetBoderStyle.
Compatibility
This control has been developed under VS2005, but should be compatible with VS6 and of course VS20008 and 2010.
OS Compatibility
This control is compatible with Windows 2000, Windows XP, Windows Vista, Windows 7 (tested) and should be compatible with Window Mobile 6 (not tested).
Important: Under Windows 2000, you must copy the GdiPlus.dll file to the program directory. You can easily find this DLL on the web.
History
- Version 1.0
- Version 1.1
- Added border
- Font matrix able to manager 256 characters
- Version 1.2
- VC6 Compatible
- Static DLL project compatible
SetWindowText bug fixed
My page on Viadeo site: http://www.viadeo.com/profile/0021yyqzlihotz1m?ga_from=Fu:%2Ftableaudebord%2Faccueil%2Findex.jsp;Fb%3AMB%3BFe%3Aname%3B
E-mail: fpailloux@free.fr


 General
  News
News  Suggestion
  Question
  Bug
Bug  Answer
  Joke
Joke  Praise
  Rant
Rant  Admin
Admin 


