Table of Contents
Preface
This article is the submission against CodeProject’s Slack API Challenge. The contest officially began on January 7, 2019 and ends on March 7, 2019.
Slack is no doubt the platform that every developer needs nowadays and is trending in a new way.
It is easy to use and manage, and not only this, we can create our own slack app and add a lot of custom functionality to it. You can learn how to create your own slack app in this article. It is very easy and may hardly take 20 minutes to create your first app.
Chatbot Tutorial Roadmap
Since this is a vast topic and beyond the scope of a single article, I have divided the sections into multiple articles. In the first article, we’ll see how to create a chatbot using Google’s Dialogflow and test the bot in Dialogflow console. We’ll also see how it could be integrated with Slack. The second article will demonstrate how to create a custom chatbot using Microsoft’s bot framework and enable the webhooks in Dialogflow and return the response from the custom bot to Dialogflow intents as a fulfillment response. The third article of the series will demonstrate how to integrate the complete created bot in articles two and three with Facebook Messenger and Slack and test the webhook response in the two environments. Following are the three articles of tutorial about learning how to create a custom chatbot.
- Your first Chatbot using Microsoft’s Bot Framework and Dialogflow API: Day 1 (Dialogflow and Slack Integration)
- Your first Chatbot using Microsoft’s Bot Framework and Dialogflow API: Day 2 (Bot using Microsoft’s Bot Framework)
- Your first Chatbot using Microsoft’s Bot Framework and Dialogflow API: Day 3 (Integrate and test the bot on Slack and Facebook Messenger)
Introduction
From Wikipedia,
“A chatbot (also known as a smartbot, talkbot, chatterbot, Bot, IM bot, interactive agent, conversational interface or artificial conversational entity) is a computer program or an artificial intelligence which conducts a conversation via auditory or textual methods.[1] Such programs are often designed to convincingly simulate how a human would behave as a conversational partner, thereby passing the Turing test. ”
In this article, I’ll demonstrate how to create a custom chatbot using Microsoft’s bot framework and enable the webhooks in Dialogflow and return the response from the custom bot to Dialogflow intents as a fulfillment response. The reader of the article needs to know how to create a bot using Dialogflow and for that, one can follow the last article of this series where it is explained how to create a bot in Dialogflow.
Case Study
Let’s imagine a scenario for our bot creation. Let’s say there is a newly opened Restaurant and they have recently launched their website, Facebook page, Twitter handles and integrated their business with other social media accounts. The restaurant wants to come up with a digital solution to book a table in the restaurant online by the user and they want to create an automated bot to do so. An end user can talk to bot and book a table. The bot will ask all the relevant details before table booking in the restaurant like date, time, number of persons, etc. We’ll create the bot and integrate that with few social media accounts.
“Dialogflow is powered by Google’s machine learning and Give users new ways to interact with your product by building engaging voice and text-based conversational interfaces, such as voice apps and chatbots, powered by AI. Connect with users on your website, mobile app, the Google Assistant, Amazon Alexa, Facebook Messenger, and other popular platforms and devices. Read more…”
You need to follow the last article of this series to set up the Dialogflow account and create a Bot agent with intents. After completing that, you can proceed with creating webhooks and integrating with the Dialogflow agent in this article.
With Microsoft’s Bot Framework, you can “Build, connect, deploy, and manage intelligent bots to naturally interact with your users on a website, app, Cortana, Microsoft Teams, Skype, Slack, Facebook Messenger, and more. Read more..”
We’ll use one prior version of the Bot Framework to create the bot.
- Go to the URL: https://docs.microsoft.com/bs-cyrl-ba/bot-framework/dotnet/bot-builder-dotnet-quickstart for taking care of all the prerequisites before we start. You can install Visual Studio 2017 for Windows if you do not already have it, update all the extensions of Visual Studio 2017 if you already have VS 2017 and then download the three zips by clicking on the links as shown below. These zip files serve as templates for creating the Bot. I’ll also attach the zips as downloadable.
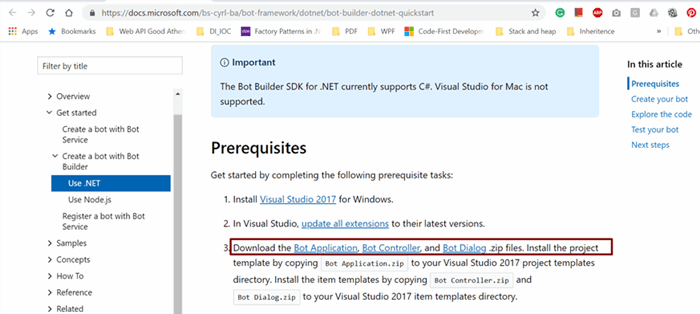
- Once the three zips, i.e., “Bot Application.zip”, “Bot Controller.zip” and “Bot Dialog.zip” are downloaded, put those into the Templates folder of Visual Studio, usually found under Documents->Visual Studio 2017 -> Templates -> ProjectTemplates -> Visual C#.

- Open Visual Studio and click for creating a new project. You’ll see all the new Bot Framework templates to create the Bot Framework type project if you search with the name bot in the project templates. Choose “
BotApplication” as project type, give it a meaningful name, for e.g., “BookATableBot”, choose a location and your solution file name and click OK.
- Once the project is created, the solution structure will look like follows. It will have a similar kind of configuration as for any web API project with some modifications like controller name, here is “
MessagesController”, there is a Dialogs folder and a class named RootDialog.cs.
- To test the Bot, we need to have an emulator and we’ll use here a somewhat older version of the emulator. You can use the latest one as well. Go to the URL: https://github.com/Microsoft/BotFramework-Emulator/releases and download and install the emulator for Windows.
- Now, simply run the application from Visual Studio by pressing F5.
- When the default page is launched which is in my case localhost:3979, then launch the installed emulator and provide the URL for your Messages controller, i.e., by appending api/messages to the launched application URL. So, the URL becomes http://localhost:3979/api/messages. Provide this URL to the emulator.
- Once the URL is provided, you can test the bot by typing anything you want for e.g. “
Hi” and the application will return the response, “You sent Hi which was 2 characters”. Now where is this response coming from?
- If we go back to the solution and see RootDialog.cs class, we see a message there named
MessageReceivedAsync which returns this response.
private async Task MessageReceivedAsync(IDialogContext context, IAwaitable<object> result)
{
var activity = await result as Activity;
int length = (activity.Text ?? string.Empty).Length;
await context.PostAsync($"You sent {activity.Text} which was {length} characters");
context.Wait(MessageReceivedAsync);
}
Now, use your debugging skills to test how the message is returned when the call was made to the Messages controller.
Before we write the response-methods and integrate our bot with Dialogflow, let’s publish the so far created bot to Azure. If you do not have an Azure account, you can create a free trial account. I am also using a free trial account of Azure here.
- Right-click the project in solution explorer and click on Publish as shown below:
- Choose App Service and you can choose to create new app service here and click on Publish, it will land up on a new page to fill up some user information.
- While creating app service, provide the app name of your choice, select the subscription type, resource group (where your related Azure resources will stay), and a hosting plan. Keep hosting plan to the minimal. I have purposely chosen to set Application Insights to None as we do not need it. Click on create.
- Once you click on create and again publish the project, the project will compile and publish the source code to Azure and a new page will be launched with the name starting the app name you provided while creating an application, the URL will be like https://bookatablebot.azurewebsites.net.
That means our bot is successfully published to the Azure server. There are more things to do before we see our bot working with Dialogflow, but those are simple things. Now, we need to register our Bot.
- So far so good, now for registering the published bot, click on the link shown on the launched page after bot published.
- It will open up the page with the URL https://dev/botframework.com.
- Go to the URL: https://dev.botframework.com/bots/new to register your bot.
- Here, few settings are required to be configured before a bot is registered. Fill in the details like display name of the bot of your choice, for e.g., “
Book A Table Bot”, provide bot handle name for e.g., “bookatable” and description which is by the way optional.
- Under the Configuration section, provide the messaging endpoint as the URL of the published bot on Azure append “api/messages” to the URL. You also need to create the Microsoft app id and password to associate this new app to it.
- Click on the link saying, “Create Microsoft App ID and password”, this will open a new page to where you can see the name of the page and app id generated.
- You can generate the password and store app id and password to some safe location as well for future references.
- Go back to Visual Studio, and in the Web.config, provide the
MicrosoftAppId and MicrosoftAppPassword that we got generated.
- Publish again.
- Come back to register bot page and put the owners as the email id used for your Azure account and then click on Register button to Register the bot.
- You can now test your bot using the Test button as shown below. You can also do this registration process directly on Azure or migrate this registered bot to Azure as shown in the red colored bar message in the following image:
It is time now to create a controller to handle the Dialogflow requests. We’ll create controller to handle the requests coming from the agents that we created in Google Dialogflow and return the response from this controller as a fulfillment text.
- Open the Nuget Package manager in the solution for the project and install the
Google.Apis.Dialogflow.v2 package.
- Add a new controller to Controllers folder and name it
DialogFlowController. Add a Post method that takes GoogleCloudDialogflowV2WebhookRequest as a parameter and returns back GoogleCloudDialogflowV2WebhookResponse. - Return the response having
FulfillmentText and Source as the controller name so that we know that the response is coming from our controller and nowhere else. Add a Get method to just return “Hello DialogFlow!”.
- Publish the project again to Azure. Now when the URL is launched, i.e., when the project is published, append “
api/dialogflow”, i.e., the URL of the controller method. When we hit enter, we see the response coming from the Get method of the Dialogflow controller.
- Let’s add the controller response as a response to the user in our
Dialogflow bot by enabling the webhook configuration and enabling fulfillment for the bot. Go to the Fulfillment in Dialogflow console and enable the Webhook configuration. Provide the URL of the API that got developed by bot framework and published on Azure. Now save the configuration.
- Go to the Intents and for
WelcomeIntent (I have renamed the Default Welcome Intent to WelcomeIntent), enable the Fulfillment for the webhook call, so that the fulfillment response comes from the webhook call and not from the default response.
- Save the intent and try to type something and press enter, the response that you’ll get now is “
Hello DialogFlow!”. This response comes from the Post method of the DialogFlow controller as a fulfillment text. So, our Webhook is well integrated and working fine.
This section will have real action. In this section, we'll create a basic project structure to handle intents in the code in our project in Visual Studio and provide the responses as per intent requests. We’ll create a Bot model that will maps to the request and response coming from Dialogflow and process the requests accordingly using the Dialogflow SDK v2.
First, create a model that could be mapped with the incoming agent requests and outgoing responses from our code. Add a new folder in the project and add a new class named BotModel.cs.
Add the following code to the class file:
using System;
using System.Collections.Generic;
using System.Linq;
using System.Web;
namespace BookTableBot.Models
{
public class BotModel
{
public BotModel()
{
Id = "";
Session = new Session();
Request = new Request();
Response = new Response();
}
public string Id { get; set; }
internal Session Session { get; set; }
internal Request Request { get; set; }
internal Response Response { get; set; }
}
internal class Request
{
public string Id { get; set; }
public string Intent { get; set; }
public string State { get; set; }
public List<KeyValuePair<string,string>> Parameters { get; set; }
}
internal class Response
{
public string Text { get; set; }
public string Event { get; set; }
}
internal class Session
{
public string Id { get; set; }
}
}
Now, this file contains four classes, i.e., BotModel class, Session, Request and Response classes with their properties. BotModel class has properties like Id, Session, Request, and Response which are also initialized inside the BotModel constructor. Request class has Id, State, intent, and Parameters as a key-value pair. Response class has Text and Event properties and Session has an Id property. These classes and properties are kept in a way that match the request and response and session attributes of the Dialogflow API.
The next step is to create a model mapper class that will map our bot model to GoogleCloudDialogflowV2WebhookResponse and GoogleCloudDialogflowV2WebhookRequest to bot model. So there would be two methods in that class.
- Create a folder named utilities in the project and add a class named
ModelMapper to that folder.
- Add the following class code for the
ModelMapper class:
using ApiAiSDK.Model;
using BookTableBot.Models;
using Google.Apis.Dialogflow.v2.Data;
using System;
using System.Collections.Generic;
using System.Linq;
using System.Web;
namespace BookTableBot.Utilities
{
public class ModelMapper
{
internal static BotModel DialogFlowToModel(GoogleCloudDialogflowV2WebhookRequest dFlowResponse)
{
var botModel = new BotModel()
{
Id = dFlowResponse.ResponseId
};
botModel.Session.Id = dFlowResponse.Session;
botModel.Request.Intent = dFlowResponse.QueryResult.Intent.DisplayName;
botModel.Request.Parameters = dFlowResponse.QueryResult.Parameters.ToList()
.ConvertAll(p => new KeyValuePair<string, string>(p.Key, p.Value.ToString()));
return botModel;
}
internal static GoogleCloudDialogflowV2WebhookResponse ModelToDialogFlow(BotModel botModel)
{
var response = new GoogleCloudDialogflowV2WebhookResponse()
{
FulfillmentText = botModel.Response.Text,
Source = "BookAtableBot",
};
return response;
}
}
}
The method DialogFlowToModel maps Dialogflow webhook request to model and the method ModelToDialogFlow maps our model to Dialogflow webhook response.
We need to have intent handlers in our project that handles the request for intent, i.e., in our case for WelcomeIntent and BookATable intent. The role of these handlers is to take the parameters from the requested intent and send a response as a fulfillment of the intent.
- Add a folder named Handlers in the project and add two classes named
BookATableIntent and WelcomeIntent:
- In
BookATableIntent, add the following code logic to return the response for the requested intent.
using BookTableBot.Models;
using System;
using System.Collections.Generic;
using System.Linq;
using System.Web;
namespace BookTableBot.Handlers
{
public class BookATableIntent
{
internal static BotModel Process(BotModel botModel)
{
var time = botModel.Request.Parameters.FirstOrDefault(p => p.Key == "time");
var date = botModel.Request.Parameters.FirstOrDefault(p => p.Key == "date");
var number = botModel.Request.Parameters.FirstOrDefault(p => p.Key == "number");
botModel.Response.Text = "Awesome! Your table for " + number +
                         " is booked for " + date + " at " + time + "Have a nice day!";
return botModel;
}
}
}
Here, the Process method takes the model as a parameter and fetches out the request parameters that we got mapped in mapper class and accordingly performs an action like setting up response text and returns the same bot model with a response text as well.
- Similarly, for the
WelcomeIntent, add the following class code:
using BookTableBot.Models;
using System;
using System.Collections.Generic;
using System.Linq;
using System.Web;
namespace BookTableBot.Handlers
{
public class WelcomeIntent
{
internal static BotModel Process(BotModel botModel)
{
botModel.Response.Text = "Hi! Would you like to book a table? If yes, simply type 'Book a table'";
return botModel;
}
}
}
The Process method of this intent takes request model and sets up the response text as "Hi! Would you like to book a table? If yes, simply type 'Book a table'". So, if user types in “Book a table”, our BookAtable intent is called from the Dialogflow API.
In our case, there are only two intents, but there could be a scenario where you could have thousands of intents in a full-fledged bot application. To manage that number of intents in the code could really be a hassle. To maintain that, we need to have an IntentList class that takes care of all the intents. Add a new class named IntentsList to the Models folder.
Add the following class code to that class:
using System;
using System.Collections.Generic;
using System.Linq;
using System.Web;
namespace BookTableBot.Models
{
public class IntentsList : List<KeyValuePair<string, Func<BotModel, BotModel>>>
{
public void Add(string intentName, Func<BotModel,BotModel> function)
{
var intent = this.FirstOrDefault(i => i.Key.ToLower() == intentName.ToLower());
if (string.IsNullOrWhiteSpace(intent.Key))
{
Add(new KeyValuePair<string, Func<BotModel, BotModel>>(intentName, function));
}
}
}
}
The method Add takes the intent name and the function associated with that and checks if the intent list already has that intent. If not, it adds to the list.
In the WebApi.Config.cs, we’’ have a static IntentHandlers variable of type IntentList that will hold all the intents. So, add a variable named IntentHandlers as follows in the WebApi.Config.cs file.
public static IntentsList IntentHandlers { get; private set; }
And in the Register method, initialize this variable.

IntentHandlers = new IntentsList
{
{
"BookATableIntent", (mo)=>Handlers.BookATableIntent.Process(mo)
},
{
"WelcomeIntent", (mo)=>Handlers.WelcomeIntent.Process(mo)
}
};
We, see that we have intent names matching the name of the intents we have in Dialogflow console. Make sure the names match else proper matching at the code would not happen and intent won’t be called.
WebApi.Config.cs Code
using BookTableBot.Models;
using Newtonsoft.Json;
using Newtonsoft.Json.Serialization;
using System;
using System.Collections.Generic;
using System.Linq;
using System.Web.Http;
namespace BookTableBot
{
public static class WebApiConfig
{
public static IntentsList IntentHandlers { get; private set; }
public static void Register(HttpConfiguration config)
{
IntentHandlers = new IntentsList
{
{
"BookATableIntent", (mo)=>Handlers.BookATableIntent.Process(mo)
},
{
"WelcomeIntent", (mo)=>Handlers.WelcomeIntent.Process(mo)
}
};
config.Formatters.JsonFormatter.SerializerSettings.NullValueHandling = NullValueHandling.Ignore;
config.Formatters.JsonFormatter.SerializerSettings.ContractResolver =
new CamelCasePropertyNamesContractResolver();
config.Formatters.JsonFormatter.SerializerSettings.Formatting = Formatting.Indented;
JsonConvert.DefaultSettings = () => new JsonSerializerSettings()
{
ContractResolver = new CamelCasePropertyNamesContractResolver(),
Formatting = Newtonsoft.Json.Formatting.Indented,
NullValueHandling = NullValueHandling.Ignore,
};
config.MapHttpAttributeRoutes();
config.Routes.MapHttpRoute(
name: "DefaultApi",
routeTemplate: "api/{controller}/{id}",
defaults: new { id = RouteParameter.Optional }
);
var appXmlType = config.Formatters.XmlFormatter.SupportedMediaTypes.FirstOrDefault
(t => t.MediaType == "application/xml");
config.Formatters.XmlFormatter.SupportedMediaTypes.Remove(appXmlType);
}
}
}
We have almost everything in place for our bot. The only thing remaining is to call the process methods of intent handlers from the controller based on the needed intent request. For that, we’ll add an IntentRouter that will be called from the Dialogflow controller based on the request type of the intent.
Add a new class named IntentRouter in the Utilities class and add the following code to that class:
using BookTableBot.Models;
using System;
using System.Collections.Generic;
using System.Linq;
using System.Web;
namespace BookTableBot.Utilities
{
public class IntentRouter
{
public static BotModel Process(BotModel botModel)
{
var intentsList = WebApiConfig.IntentHandlers;
var intent = intentsList.FirstOrDefault(i => i.Key.ToLower() == botModel.Request.Intent.ToLower());
if (!string.IsNullOrWhiteSpace(intent.Key))
{
return intent.Value(botModel);
}
if (string.IsNullOrWhiteSpace(botModel.Response.Text))
{
botModel.Response.Text = "Sorry, I do not understand. please try again.";
}
return botModel;
}
}
}
The process method of intent router class takes bot model and tries to match the name of the intent from the intent handlers list and accordingly return the intent for which the request is made.
Finally, modify the Post method of the controller to take the webhook request, map the model and call the Process method of IntentRouter.
using ApiAiSDK.Model;
using BookTableBot.Utilities;
using Google.Apis.Dialogflow.v2.Data;
using Microsoft.Bot.Builder.Luis.Models;
using System;
using System.Collections.Generic;
using System.Linq;
using System.Net;
using System.Net.Http;
using System.Web.Http;
namespace BookTableBot.Controllers
{
public class DialogFlowController : ApiController
{
public GoogleCloudDialogflowV2WebhookResponse Post(GoogleCloudDialogflowV2WebhookRequest obj)
{
var botModel = ModelMapper.DialogFlowToModel(obj);
if(botModel == null)
{
return null;
}
botModel = IntentRouter.Process(botModel);
return ModelMapper.ModelToDialogFlow(botModel);
}
public string Get()
{
return "Hello DialogFlow!";
}
}
}
So far so good, this makes our basic application work. Time to test now but before that, compile the project and publish it again to Azure.
Once published to Azure, we can test the bot in the Dialogflow console itself. We’ll also test the bot on Google Assistant as it could directly be done via Google’s Dialogflow console.
Go back to the Dialogflow console. Make sure you got the webhook enabled for fulfillment and the bot API URL inplaced in the webhook. This was explained earlier in this tutorial. Make sure the fulfillment option is enabled for BookATable and Welcome Intent.
- Open the
WelcomeIntent and in the test window, type “Hi”. The response will come from our intent handler as follows with the response text as "Hi! Would you like to book a table? If yes, simply type 'Book a table'"
- Now follow the instruction of Welcome intent response and type “
Book a table”. The default response will ask for the date, time and number of persons.
Finally, when you provide the mandatory parameters, i.e., number of persons, time and date, it returns the response as follows:
The response is coming from our webhook. To ensure that, click on the Diagnostic Info button at the bottom.
We get to see all the requests and response for our intent. Check Fulfillment Response and the Source inside it. It comes from our webhook.
And Fulfillment Status as follows which says Webhook execution successful.
You can test the bot in Google assistant as well.
- In
Dialogflow console, go to Integrations section and click on “See how it works in Google Assistant” button.
- This will open Google Assistant emulator, where you can type in or provide an audio input. Click on “Talk to my test app”.
- It returns the response from the welcome intent.
- Type, “
Book a table”.
- It will ask all the mandatory parameters input as follows:
- And finally, it will return the response from the webhook. Awesome! 😊
In this detailed article, we learned what a chatbot is, how to create your own bot using Microsoft’s Bot framework. We also learned how to enable webhooks in Dialogflow console for the fulfilments and return the response from the webhook instead of defaulted text. We tested the bot in Dialogflow console and with Google Assistant. In the next article of this series, we’ll learn how to integrate this bot with the social media accounts like Slack, Facebook messenger, etc.


 General
  News
News  Suggestion
  Question
  Bug
Bug  Answer
  Joke
Joke  Praise
  Rant
Rant  Admin
Admin 


