Introduction
C# Web Browser actually provides an Internet Explorer control, which has different properties, methods, and events.
Please follow the link to get more ideas about Web Browser Capabilities to a Windows Forms Application, also I would like to suggest overview on Events and Delegates.
Today, we are going to explore those capabilities by creating sample Windows Form application, which has two steps:
- First, we will create the application, and
- Second/Last, we will deploy it by creating a setup file (using InstallShield 2015)
Let's Create the Application
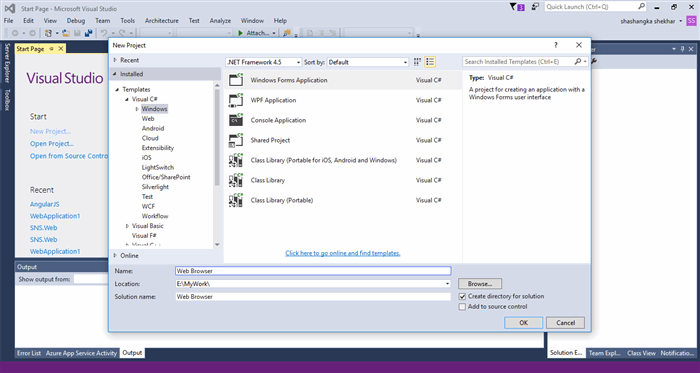
Ok, let's open Visual Studio 2015(IDE) click : [File > New > Project], the new window will appear like the below image.
Figure: 1.0
Click on Windows Form Application and hit "OK" button at the bottom right. After finishing this process, a project with an empty form will be loaded.
Figure: 1.1

Next, we will set the properties of the form StartPosition to CenterScreen and then change the WindowState to Maximized.
Now, we need to add ToolStrip control. ToolStrip control provides Windows toolbar controls. Ok, let's go to the Toolbox and in the Menu & Toolbar section, it will appear, drag and drop it into the form.
Figure: 1.2
Before we going to the next task, first we need to add some icon to project resources, to do that right click on project name: [ Properties > Resources ] now change the browsing file type to Images from top menu like below image:
Figure: 1.3
Now, adding our icons which were pasted in resource folder earlier, browse and import those icons here, which we will use to create our browser control button. Click [ Add Resource > Add Existing File > Browse ].
Figure: 1.4
Let's open Form1 now it's time to create some button in ToolStrip control. To add a new button, click on ToolStrip control and click on dropdown icon, then click Button. This is our previous button.
Figure: 1.5
A new button is added now in the ToolStrip control, to set the icon right click : [ Button > Set Image ] then select Project resource file, icon will set to the button (our Previous button). Following the same way, let's create another two buttons Home and Next button.
If you want to change the control name, then right click on ToolStrip control and go to properties. In this app, I kept it as it is.
Let's add a comboBox to the ToolStrip control.
Figure: 1.6
Now, set the size of the comboBox by going to the properties of the control.
Figure: 1.7
Following Fig: 1.5, let's create the next three buttons, Go, Reload and Print button.
We are done with our action button of our browser, now let's focus on the browser page load option. We need to add a web browser control to our form window.
Go to [ ToolBox > Common Controls > WebBrowser ], now drag & drop the web browser control to the form, like below.
Figure: 1.8
Now one more thing we need to add into the form is statusStrip. This will show the page load progress while user put URLs and hit the Go button.
Go to [ ToolBox > Menus & ToolBars > StatusStrip] now drag & drop the statusStrip control to the form, like below.
Figure: 1.9
We are almost done with the UI Design. We need to add progress bar to the statusStrip control. Right click on statusStrip control and go to [ Properties > Items ] click on Collections a window name Items Collections Editor will appear, now add progress bar and status label here like the below figure:
Figure: 1.10
Remove text properties value "toolStripStatusLabel1" from status label, click Ok. Finally, we are done with our UI design,
Now, let’s add some mechanism with this form control and view the website by user request. Double click on Form1 controlBar. It will load Form1_Load method.
private void Form1_Load(object sender, EventArgs e)
{
    toolStripButton1.Enabled = false;
    toolStripButton2.Enabled = false;
}
In this method, the two lines will disable access to the Next & Previous buttons on form startup. Below code sample is the main mechanism to load and display web pages in our web Browser control.
private void myBrowser()
{
    if (toolStripComboBox1.Text != "")
        Url = toolStripComboBox1.Text;
    webBrowser1.Navigate(Url);
    webBrowser1.ProgressChanged +=
    new WebBrowserProgressChangedEventHandler(webpage_ProgressChanged);
    webBrowser1.DocumentTitleChanged +=
    new EventHandler(webpage_DocumentTitleChanged);
    webBrowser1.StatusTextChanged += new EventHandler(webpage_StatusTextChanged);
    webBrowser1.Navigated += new WebBrowserNavigatedEventHandler(webpage_Navigated);
    webBrowser1.DocumentCompleted +=
    new WebBrowserDocumentCompletedEventHandler(webpage_DocumentCompleted);
}

private void webpage_DocumentCompleted(object sender, WebBrowserDocumentCompletedEventArgs e)
{
    if (webBrowser1.CanGoBack) toolStripButton1.Enabled = true;
    else toolStripButton1.Enabled = false;

    if (webBrowser1.CanGoForward) toolStripButton2.Enabled = true;
    else toolStripButton2.Enabled = false;
    toolStripStatusLabel1.Text = "Done";
}

private void webpage_DocumentTitleChanged(object sender, EventArgs e)
{
    this.Text = webBrowser1.DocumentTitle.ToString();
}

private void webpage_StatusTextChanged(object sender, EventArgs e)
{
    toolStripStatusLabel1.Text = webBrowser1.StatusText;
}

private void webpage_ProgressChanged(object sender, WebBrowserProgressChangedEventArgs e)
{
    toolStripProgressBar1.Maximum = (int)e.MaximumProgress;
    toolStripProgressBar1.Value = ((int)e.CurrentProgress < 0 ||
    (int)e.MaximumProgress < (int)e.CurrentProgress) ?
    (int)e.MaximumProgress : (int)e.CurrentProgress;
}

private void webpage_Navigated(object sender, WebBrowserNavigatedEventArgs e)
{
    toolStripComboBox1.Text = webBrowser1.Url.ToString();
}
This sample piece of code will reload the webpage while clicking on Reload button.
private void toolStripButton4_Click(object sender, EventArgs e)
{
    webBrowser1.Refresh();
}
This sample piece of code will navigate to forward the webpage while clicking on Forward button.
private void toolStripButton2_Click(object sender, EventArgs e)
{
    webBrowser1.GoForward();
}
This sample piece of code will navigate to backward the webpage while click on Back button
private void toolStripButton1_Click(object sender, EventArgs e)
{
    webBrowser1.GoBack();
}
This sample piece of code will navigate to the Home webpage while clicking on Home button.
private void toolStripButton5_Click(object sender, EventArgs e)
{
    webBrowser1.GoHome();
}
This sample piece of code will Show Print Preview the webpage while clicking on Print button.
private void toolStripButton6_Click(object sender, EventArgs e)
{
    webBrowser1.ShowPrintPreviewDialog();
}
Finally, the combined Class is as follows:
public partial class Form1 : Form
{
    String Url = string.Empty;
    public Form1()
    {
        InitializeComponent();
        Url = "http://www.msn.com";
        myBrowser();
    }

    private void Form1_Load(object sender, EventArgs e)
    {
        toolStripButton1.Enabled = false;
        toolStripButton2.Enabled = false;
    }

    private void toolStripButton3_Click(object sender, EventArgs e)
    {
        myBrowser();
    }

    private void myBrowser()
    {
        if (toolStripComboBox1.Text != "")
            Url = toolStripComboBox1.Text;
        webBrowser1.Navigate(Url);
        webBrowser1.ProgressChanged +=
        new WebBrowserProgressChangedEventHandler(webpage_ProgressChanged);
        webBrowser1.DocumentTitleChanged += new EventHandler(webpage_DocumentTitleChanged);
        webBrowser1.StatusTextChanged += new EventHandler(webpage_StatusTextChanged);
        webBrowser1.Navigated += new WebBrowserNavigatedEventHandler(webpage_Navigated);
        webBrowser1.DocumentCompleted +=
        new WebBrowserDocumentCompletedEventHandler(webpage_DocumentCompleted);
    }

    private void webpage_DocumentCompleted(object sender, WebBrowserDocumentCompletedEventArgs e)
    {
        if (webBrowser1.CanGoBack) toolStripButton1.Enabled = true;
        else toolStripButton1.Enabled = false;

        if (webBrowser1.CanGoForward) toolStripButton2.Enabled = true;
        else toolStripButton2.Enabled = false;
        toolStripStatusLabel1.Text = "Done";
    }

    private void webpage_DocumentTitleChanged(object sender, EventArgs e)
    {
        this.Text = webBrowser1.DocumentTitle.ToString();
    }

    private void webpage_StatusTextChanged(object sender, EventArgs e)
    {
        toolStripStatusLabel1.Text = webBrowser1.StatusText;
    }

    private void webpage_ProgressChanged(object sender, WebBrowserProgressChangedEventArgs e)
    {
        toolStripProgressBar1.Maximum = (int)e.MaximumProgress;
        toolStripProgressBar1.Value = ((int)e.CurrentProgress < 0 ||
        (int)e.MaximumProgress < (int)e.CurrentProgress) ? (int)e.MaximumProgress : (int)e.CurrentProgress;
    }

    private void webpage_Navigated(object sender, WebBrowserNavigatedEventArgs e)
    {
        toolStripComboBox1.Text = webBrowser1.Url.ToString();
    }

    private void toolStripButton4_Click(object sender, EventArgs e)
    {
        webBrowser1.Refresh();
    }

    private void toolStripButton2_Click(object sender, EventArgs e)
    {
        webBrowser1.GoForward();
    }

    private void toolStripButton1_Click(object sender, EventArgs e)
    {
        webBrowser1.GoBack();
    }

    private void toolStripButton5_Click(object sender, EventArgs e)
    {
        webBrowser1.GoHome();
    }

    private void toolStripButton6_Click(object sender, EventArgs e)
    {
        webBrowser1.ShowPrintPreviewDialog();
    }
}
We are done with our Web Browser application, now we will focus on creating a new Setup project to deploy the application to install.
Output
Figure: 1.11
Let's Deploy the Application
We need to Install InstallShield, this is a InstallShield Limited Edition for Visual Studio 2015. Get it from here InstallShield 2015.
To deploy the application, we will create a new setup project. Go to Solution Explorer, right click on Solution, add new project. In the Add new project window, browse menu to Other Type Projects
Figure: 1.12
It will load Project Assistant window which will guide to create the setup file. Provide the application information in the first tab. After providing all information, let's move to Installation Requirements, we will check yes in software to be installed section (bottom). We will include Microsoft .NET Framework 4.5 Full package.
Figure: 1.13
Navigate to next tab which is Application Files. In this section, we will include our project output. To include, please click on Add Project Outputs button. Check primary output like the below figure.
Figure: 1.14
Next, we will add application shortcut icons to launch our application. Go to Application Shortcuts and click New and in next popup window, browse for a destination file.
Browse [ProgramsFileFolder] > WebBrowser.Primary output.
Figure: 1.15
Rename it and check on [create shortcut on Desktop]. Here you can use a icon file to appear on desktop by checking on [User alternate file icon].
Create another shortcut to create uninstall the application by clicking on [Create an uninstallation shortcut] and rename it.
Next, we have Application Registry tab to create a key in the registry. As this is a sample web browser, we will keep this stage as it is.
In our next tab which is last tab is Installation Interview is to configure and display license agreement dialog.
We are all done. Let's build our application and Install the setup file, right click on Setup project and click Install.
Figure: 1.16
Installation steps will appear.
Figure: 1.17
Installation completed successfully.
Figure: 1.18
Finally, the application shortcut icons.
Figure: 1.19
Hope this will help. :)


 General
  News
News  Suggestion
  Question
  Bug
Bug  Answer
  Joke
Joke  Praise
  Rant
Rant  Admin
Admin 


 , try using another engine.