Introduction
In this article, we are going to do a comparison of two methods for doing a table in ASP.NET WebForms. Namely:
GridView and- dynamic HTML table
The purpose of this article is to present an alternative way to do a table as to the traditional way of GridView.
This article serves as a side by side comparison as for how the dynamic HTML table can be achieved for replacing GridView in action.
The Coding
First of all, let's use a simple class object as a container to hold data.
public class Member
{
    public int Id { get; set; }
    public string Name { get; set; }
    public DateTime DateRegister { get; set; }
    public int Gender { get; set; }
    public int Status { get; set; }

    public Member(int id)
    {
        Id = id;
        Status = 1;
    }

    public Member(int id, string name, DateTime dateRegister, int gender)
    {
        Id = id;
        Name = name;
        DateRegister = dateRegister;
        Gender = gender;
        Status = 1;
    }

    public Member(int id, int status)
    {
        Id = id;
        Status = status;
    }

    public string GenderStr
    {
        get
        {
            switch (Gender)
            {
                case 1:
                    return "Male";
                case 2:
                    return "Female";
                default:
                    return "Other";
            }
        }
    }

    public string DateRegisterStr
    {
        get
        {
            if (DateRegister == DateTime.MinValue)
                return "---";
            return DateRegister.ToString("dd MMM yyyy");
        }
    }

    public string DateRegisterData
    {
        get
        {
            if (DateRegister == DateTime.MinValue)
                return "";
            return DateRegister.ToString("yyyy-MM-dd");
        }
    }

    public string SelectGender(int g)
    {
        if (g == Gender)
            return "selected";
        return "";
    }
}
Some helper methods:
public class helper
{
    public static List<Member> GetMemberList()
    {
        List<Member> lst = new List<Member>();

        lst.Add(new Member(1, "James", new DateTime(2022, 11, 11), 1));
        lst.Add(new Member(2, "Amy", new DateTime(2022, 11, 10), 2));
        lst.Add(new Member(3, "Smith", new DateTime(2022, 10, 8), 1));
        lst.Add(new Member(4, "Cait", new DateTime(2022, 9, 7), 2));

        return lst;
    }

    public static DateTime ConvertToDate(string input)
    {
        DateTime date = DateTime.MinValue;

        try
        {
            if (!string.IsNullOrWhiteSpace(input))
            {
                string[] da = input.Split('-');
                int year = Convert.ToInt32(da[0]);
                int month = Convert.ToInt32(da[1]);
                int day = Convert.ToInt32(da[2]);

                date = new DateTime(year, month, day);
            }
        }
        catch { }

        return date;
    }
}
Round 1: Build a Simple Table
Let's build a simple table as below:

The GridView Method
The front page:
Note: Always switch off ViewState if not using the "state" function, by applying the property of EnableViewState="False".
<asp:GridView ID="gv1" runat="server"
 AutoGenerateColumns="false" EnableViewState="false">
    <Columns>
        <asp:BoundField HeaderText="ID" DataField="Id" />
        <asp:HyperLinkField HeaderText="Name" DataTextField="Name"
         DataNavigateUrlFields="Id"
         DataNavigateUrlFormatString="ViewMember.aspx?id={0}" />
        <asp:BoundField HeaderText="Gender" DataField="GenderStr" />
        <asp:BoundField HeaderText="Date Register" DataField="DateRegisterStr" />
    </Columns>
</asp:GridView>
The code behind is given below:
var lst = helper.GetMemberList();
gv1.DataSource = lst;
gv1.DataBind();
The Dynamic HTML Method
The front page:
Apply some basic styling at the header:
<style type="text/css">
    .tb1 table {
        border-collapse: collapse;
    }

    .tb1 th {
        border: 1px solid black;
    }

    .tb1 td {
        border: 1px solid black;
    }
</style>
Then, body components:
<div class="tb1">
    <asp:PlaceHolder ID="ph1" runat="server"></asp:PlaceHolder>
</div>
The code behind:
var lst = helper.GetMemberList();

StringBuilder sb = new StringBuilder();

sb.Append(@"
<table>
<tr>
<th>ID</th>
<th>Name</th>
<th>Gender</th>
<th>Date Register</th>
</tr>
");

foreach (var m in lst)
{
    sb.Append($@"
<tr>
<td>{m.Id}</td>
<td><a href='ViewMember.aspx?id={m.Id}'>{m.Name}</a></td>
<td>{m.GenderStr}</td>
<td>{m.DateRegisterStr}</td>
</tr>
");
}

sb.Append("</table>");

ph1.Controls.Add(new LiteralControl(sb.ToString()));
Round 2: Apply Theme or Styling
Let's take this design as example:
The GridView Method:
You can either use the limited pre-designed default colors (the quick way), like this:
Or manually code it at the front page like:
<asp:GridView ID="gv2" runat="server" AutoGenerateColumns="False"
    EnableViewState="False" CellPadding="10" ForeColor="#333333" GridLines="None">
    <AlternatingRowStyle BackColor="White" />
    <Columns>
        <asp:BoundField HeaderText="ID" DataField="Id" />
        <asp:HyperLinkField HeaderText="Name"
         DataTextField="Name" DataNavigateUrlFields="Id"
         DataNavigateUrlFormatString="ViewMember.aspx?id={0}" />
        <asp:BoundField HeaderText="Gender" DataField="GenderStr" />
        <asp:BoundField HeaderText="Date Register" DataField="DateRegisterStr" />
    </Columns>
    <EditRowStyle BackColor="#7C6F57" />
    <FooterStyle BackColor="#1C5E55" Font-Bold="True" ForeColor="White" />
    <HeaderStyle BackColor="#1C5E55" Font-Bold="True" ForeColor="White" />
    <PagerStyle BackColor="#666666" ForeColor="White" HorizontalAlign="Center" />
    <RowStyle BackColor="#E3EAEB" />
    <SelectedRowStyle BackColor="#C5BBAF" Font-Bold="True" ForeColor="#333333" />
    <SortedAscendingCellStyle BackColor="#F8FAFA" />
    <SortedAscendingHeaderStyle BackColor="#246B61" />
    <SortedDescendingCellStyle BackColor="#D4DFE1" />
    <SortedDescendingHeaderStyle BackColor="#15524A" />
</asp:GridView>
Or you can also apply the class directly by applying two properties to the GridView component:
CssClass="table1" GridLines="None"
Example:
<asp:GridView ID="gv2" runat="server" CssClass="table1" GridLines="None"
     AutoGenerateColumns="False" EnableViewState="False">
    <Columns>
        <asp:BoundField HeaderText="ID" DataField="Id" />
        <asp:HyperLinkField HeaderText="Name" DataTextField="Name"
       DataNavigateUrlFields="Id" DataNavigateUrlFormatString="ViewMember.aspx?id={0}" />
        <asp:BoundField HeaderText="Gender" DataField="GenderStr" />
        <asp:BoundField HeaderText="Date Register" DataField="DateRegisterStr" />
    </Columns>
</asp:GridView>
The Dynamic HTML Method
Note: Using CSS to style table is the most "nature" and "native" way in the universe of web development. Hence, this is strongly recommended to code this way rather than the GridView styling.
Use CSS Styling block:
<style type="text/css">
    .tb1 table {
        border-collapse: collapse;
    }

    .tb1 th {
        border: 1px solid black;
        background: #1C5E55;
        color: white;
        padding: 10px;
        border: none;
    }

    .tb1 td {
        border: 1px solid black;
        color: #333333;
        padding: 10px;
        border: none;
    }

    .tb1 tr:nth-child(even) {
        background: #E3EAEB;
    }
</style>
and the body component... same:
<div class="tb1">
    <asp:PlaceHolder ID="ph1" runat="server"></asp:PlaceHolder>
</div>
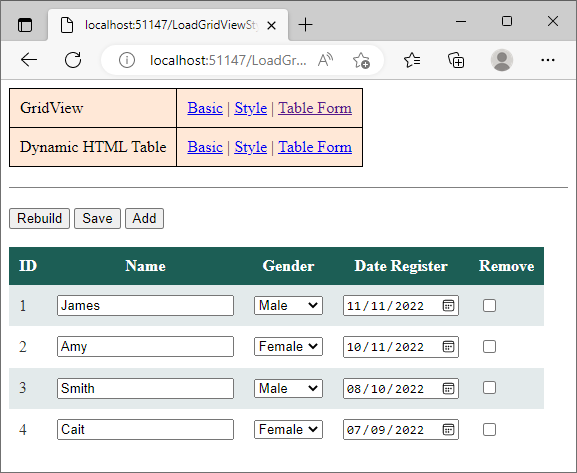
Round 3: Building a Form Table
Let's take this form table as an example:
The GridView Method
Note 1: For this to work, you must enable the ViewState for GridView component.
For example:
<asp:GridView ID="gv3" runat="server" EnableViewState="True"></asp:GridView>
or simply:
<asp:GridView ID="gv3" runat="server"></asp:GridView>
as ViewState is normally turned on by default.
Note 2: ViewState helps to maintain the "state" or the data before and after postback. But there's a drawback, ViewState will increase the page size that's being transmitted to end-user's web browser. The larger the GridView, the larger of page size will be. For more information on ViewState, please do further research on the topic "How ASP.NET ViewState works?" and also research for "Compressing ViewState".
The front page coding:
<asp:GridView ID="gv3" runat="server" AutoGenerateColumns="False"
    CellPadding="10" ForeColor="#333333" GridLines="None">
    <AlternatingRowStyle BackColor="White" />
    <Columns>
        <asp:BoundField HeaderText="ID" DataField="Id" />
        <asp:TemplateField HeaderText="Name">
            <ItemTemplate>
                <asp:TextBox ID="txtName" runat="server"></asp:TextBox>
            </ItemTemplate>
        </asp:TemplateField>
        <asp:TemplateField HeaderText="Gender">
            <ItemTemplate>
                <asp:DropDownList ID="dropGender" runat="server">
                    <asp:ListItem Value="1" Text="Male"></asp:ListItem>
                    <asp:ListItem Value="2" Text="Female"></asp:ListItem>
                    <asp:ListItem Value="0" Text="Other"></asp:ListItem>
                </asp:DropDownList>
            </ItemTemplate>
        </asp:TemplateField>
        <asp:TemplateField HeaderText="Date Register">
            <ItemTemplate>
                <asp:TextBox ID="txtDateRegister" runat="server" TextMode="Date">
                </asp:TextBox>
            </ItemTemplate>
        </asp:TemplateField>
        <asp:TemplateField HeaderText="Remove">
            <ItemTemplate>
                <asp:CheckBox ID="cbRemove" runat="server" />
            </ItemTemplate>
        </asp:TemplateField>
    </Columns>
    <EditRowStyle BackColor="#7C6F57" />
    <FooterStyle BackColor="#1C5E55" Font-Bold="True" ForeColor="White" />
    <HeaderStyle BackColor="#1C5E55" Font-Bold="True" ForeColor="White" />
    <PagerStyle BackColor="#666666" ForeColor="White" HorizontalAlign="Center" />
    <RowStyle BackColor="#E3EAEB" />
    <SelectedRowStyle BackColor="#C5BBAF" Font-Bold="True" ForeColor="#333333" />
    <SortedAscendingCellStyle BackColor="#F8FAFA" />
    <SortedAscendingHeaderStyle BackColor="#246B61" />
    <SortedDescendingCellStyle BackColor="#D4DFE1" />
    <SortedDescendingHeaderStyle BackColor="#15524A" />
</asp:GridView>
The code behind for loading the GridView:
gv3.DataSource = lst;
gv3.DataBind();

for (int i = 0; i < lst.Count; i++)
{
    GridViewRow gr = gv3.Rows[i];

    var txtName = (TextBox)gr.FindControl("txtName");
    var dropGender = (DropDownList)gr.FindControl("dropGender");
    var txtDateRegister = (TextBox)gr.FindControl("txtDateRegister");

    var m = lst[i];

    txtName.Text = m.Name;
    dropGender.SelectedValue = m.Gender.ToString();
    txtDateRegister.Text = m.DateRegisterData;
}
The code behind for saving the GridView form:
List<Member> lst = new List<Member>();
for (int i = 0; i < gv3.Rows.Count; i++)
{
GridViewRow gr = gv3.Rows[i];
var cbRemove = (CheckBox)gr.FindControl("cbRemove");
if (cbRemove.Checked)
{
continue;
}
int id = Convert.ToInt32(gr.Cells[0].Text);
var txtName = (TextBox)gr.FindControl("txtName");
var dropGender = (DropDownList)gr.FindControl("dropGender");
var txtDateRegister = (TextBox)gr.FindControl("txtDateRegister");
var date = helper.ConvertToDate(txtDateRegister.Text);
int gender = Convert.ToInt32(dropGender.SelectedValue);
lst.Add(new Member(id, txtName.Text, date, gender));
}
The Dynamic HTML Method
The front page body component... same:
<div class="tb1">
    <asp:PlaceHolder ID="ph1" runat="server"></asp:PlaceHolder>
</div>
The code behind for loading the HTML table:
StringBuilder sb = new StringBuilder();

sb.Append(@"
<table>
<tr>
<th>ID</th>
<th>Name</th>
<th>Gender</th>
<th>Date Register</th>
<th>Remove</th>
</tr>
");

foreach (var m in lst)
{
    string name = Server.HtmlEncode(m.Name);

    sb.Append($@"
<tr>
<td>{m.Id}</td>
<td><input name='input_{m.Id}_name' type='text' value='{name}' /></td>
<td>
<select name='input_{m.Id}_gender'>
<option value='1' {m.SelectGender(1)}>Male</option>
<option value='2' {m.SelectGender(2)}>Female</option>
<option value='0' {m.SelectGender(0)}>Other</option>
</select>
<td><input name='input_{m.Id}_date' type='date' value='{m.DateRegisterData}' /></td>
<td><input name='input_{m.Id}_remove' type='checkbox' /></td>
</tr>
");
}

sb.Append("</table>");

ph1.Controls.Add(new LiteralControl(sb.ToString()));
The code behind for saving the HTML table form:
Dictionary<int, Member> dicMember = new Dictionary<int, Member>();
foreach (var key in Request.Form.AllKeys)
{
if (key.StartsWith("input_"))
{
string[] ka = key.Split('_');
int id = Convert.ToInt32(ka[1]);
if (dicMember.ContainsKey(id))
continue;
if (Request[$"input_{id}_remove"] != null)
{
dicMember[id] = new Member(id, 0);
}
else
{
string name = Request[$"input_{id}_name"];
int gender = Convert.ToInt32(Request[$"input_{id}_gender"]);
string dateinput = Request[$"input_{id}_date"];
DateTime date = helper.ConvertToDate(dateinput);
dicMember[id] = new Member(id, name, date, gender);
}
}
}
List<Member> lst = new List<Member>();
foreach (var kv in dicMember)
{
if (kv.Value.Status == 1)
lst.Add(kv.Value);
}
The JavaScript Method
Continue reading Part 2: GridView VS dynamic HTML Table (ASP.NET WebForms)
Pros of Using Dynamic HTML Table
- Very flexible in terms of manipulating the table's structure
- Handle dynamic columns as ease (where the total if columns is unpredictable)
- Very easy to handle header colspan
- Very easy to apply different styling strategy (by using CSS)
- Code is cleaner
- More nature and native to web development
- Multi data field can be easily be arranged and displayed in table cell, including image components
History
- 10th November, 2022 - Initial release
- 11th November, 2022 - Added source code
Programming is an art.


 General
  News
News  Suggestion
  Question
  Bug
Bug  Answer
  Joke
Joke  Praise
  Rant
Rant  Admin
Admin 


