Introduction
There are two ways of creating controls that can be used in an ASP.NET application. The first way is an UserControl (.ascx) and is fairly easy to create as you can use the Visual Studio to position your controls. The disadvantage of UserControls is that they can't be reused easily as you have to copy them from one web application to another web application. The second way is to create a WebControl, these controls are more portable as they exist in a separate DLL and can be added to your palette. However you cannot use Visual Studio to design them via drag & drop.
First attempt
Because I personally prefer the reuse aspect, I decided that I would always create my controls as WebControls as also the future benefit would outweigh the initial costs. So I created my first WebControl which was a DropDownList with a Label control.
using System;
using System.Web.UI;
using System.Web.UI.WebControls;
using System.ComponentModel;
namespace ManyMonkeys.Web.ControlLibrary
{
[DefaultProperty("Text"),
ToolboxData("<{0}:LabelledDropDownList
runat=server></{0}:LabelledDropDownList>")]
public class LabelledDropDownList :
System.Web.UI.WebControls.DropDownList, INamingContainer
{
Label lblHeader = new Label();
[Bindable(false),
Category("Appearance"),
DefaultValue("")]
public string Text
{
get
{
return lblHeader.Text;
}
set
{
lblHeader.Text = value;
}
}
protected override void Render(HtmlTextWriter output)
{
lblHeader.RenderControl(output);
output.WriteLine("<br>");
base.Render(output);
}
}
}
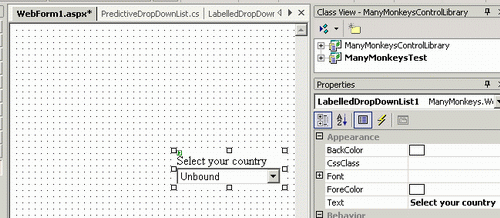
Which once added to the palette and then dragged onto a form, looked like this.
Well that wasn't so hard, was it? Lets run it up and view it in IE.

Ah. Now as you can see from above WYSISYG is not a term we can use anymore, when dealing with Visual Studio. But how do we fix it?
Solution
The clue is in the positioning of the DropDownList control. It has style tags that cause it to be positioned at a specific location on the screen. But they are not being applied in the same way as they are, when viewed in Visual Studio. To fix this, we need to apply the style tags to both the elements that represents the Label and the DropDownList. However it is easier to wrap both the Label and the DropDownList in a <div> tag and apply the styles to it.
protected override void Render(HtmlTextWriter output)
{
output.AddStyleAttribute("LEFT",this.Style["LEFT"]);
output.AddStyleAttribute("TOP",this.Style["TOP"]);
output.AddStyleAttribute("POSITION", this.Style["POSITION"]);
this.Style.Remove("LEFT");
this.Style.Remove("TOP");
this.Style.Remove("POSITION");
output.RenderBeginTag("div");
lblHeader.RenderControl(output);
output.WriteLine("<br>");
base.Render(output);
output.RenderEndTag();
}
Now when you view the control in Visual Studio it looks exactly the same as it did before, however when you view it in IE all is well.
Now it should be noted that you have to call AddStyleAttribute before you start to render you tag using BeginRenderTag, in order to apply the styles to it.
Conclusion
I hope that this small article will help other developers avoid the grief I initially had, when creating WebControls and that they will not be turned off from creating controls that can be reused. I have added this simple fix to many controls that I had originally created as UserControls and now they all exist in a library that I can apply to many web applications. The added advantage is that if I find a bug in a control (usually in the client-side JavaScript), I only have to fix it in one location.
Please spend a moment to rate this article. Your feedback is important to me.


 General
  News
News  Suggestion
  Question
  Bug
Bug  Answer
  Joke
Joke  Praise
  Rant
Rant  Admin
Admin 


