Introduction
This is a small project for Windows applications. It creates a control which simulates a LED light. The LED is round and colorful and it draws itself from the overridden OnPaint method. In addition to its On/Off functionality, it uses a timer to rotate a finite number of colors with individually set intervals. Used with imagination, it will add fancy effects to your application.
Construct it
Create a new project as C# Window Control Library. Before anything else, change the inheritance from UserControl to just Control, rename everywhere UserControl with Led, and delete everything related to InitialiseComponent - Led won't have sub controls. Continue by changing the namespace from whatever to something suitable for your control collection, as TH.WinControls (where TH stands for my initials - but it could be yours). Right click on the Led project in Solution Explorer, select Properties from the pop up menu, and change Default Namespace to the above name. Then add a bitmap to your project, name it like the project as Led.bmp, and before editing its content, select another item in Solution Explorer and then select back Led.bmp. In the Properties pane, change Build Action to Embedded Resource. Only then enter the bitmap editor and start designing a nice bitmap, 16 X 16 with 16 colors, like:

Now, you may build the project and add the control in the Toolbox. At this stage, the control just comes on the palette with no functionality. Add in its constructor the following lines:
private Timer tick;

public Led():base() {
  SetStyle(ControlStyles.AllPaintingInWmPaint, true);
  SetStyle(ControlStyles.DoubleBuffer, true);
  SetStyle(ControlStyles.UserPaint,    true);
  SetStyle(ControlStyles.ResizeRedraw, true);

  Width  = 17;
  Height = 17;

  Paint += new System.Windows.Forms.PaintEventHandler(this._Paint);

  tick = new Timer();
  tick.Enabled = false;
  tick.Tick += new System.EventHandler(this._Tick);
}
SetStyle statements are self explanatory. I'm setting the Width and Height to an odd number for the convenience of having a pixel in the centre of the control. 17 came as the best size for a perfect circle, as our LED will be circular.
Create also the
Timer at this moment, but keep it disabled for the moment. Now, we have to add the two referred handlers -
_Pant, which will draw the control, and
_Tick, which will handle the change of color in the
Flash mode.
Trick: to be able to build each phase, just add empty handlers for _Timer and _Paint. To know what the method signature looks like, create the handler of Paint in the main form, also place there a Timer and create its handler. Then copy the related code in the control's file and adapt the corresponding names:
private void _Paint(object sender, System.Windows.Forms.PaintEventArgs e) {
}
private void _Tick(object sender, System.EventArgs e) {
}
Paint
Add a new property to be able to activate the LED, and two more to be able to specify the colors of the two - active/inactive - states:
private bool _Active = true;
[Category("Behavior"),
DefaultValue(true)]
public bool Active {
  get { return _Active; }
  set {
    _Active = value;
    Invalidate();
  }
}

private Color _ColorOn = Color.Red;
[Category("Appearance")]
public Color ColorOn {
  get { return _ColorOn; }
  set {
    _ColorOn = value;
    Invalidate();
  }
}

private Color _ColorOff = SystemColors.Control;
[Category("Appearance")]
public Color ColorOff {
  get { return _ColorOff; }
  set {
    _ColorOff = value;
    Invalidate();
  }
}
Note the Invalidate call that will make sure that Paint will redraw the component as soon as a time slice will be available for this task.
The _Paint handler is responsible for interpreting the Enable and Active states. Here is its code:
private void _Paint(object sender, System.Windows.Forms.PaintEventArgs e) {
  e.Graphics.Clear(BackColor);
  if (Enabled) {
    if (Active) {
      e.Graphics.FillEllipse(new SolidBrush(ColorOn),1,1,Width-3,Height-3);
      e.Graphics.DrawArc(new Pen(FadeColor(ColorOn,
                 Color.White,1,2),2),3,3,Width-7,
                 Height-7,-90.0F,-90.0F);
      e.Graphics.DrawEllipse(new Pen(FadeColor(ColorOn,
                 Color.Black),1),1,1,Width-3,Height-3);
    }
    else {
      e.Graphics.FillEllipse(new SolidBrush(ColorOff),1,1,Width-3,Height-3);
      e.Graphics.DrawArc(new Pen(FadeColor(ColorOff,
                 Color.Black,2,1),2),3,3,Width-7,Height-7,0.0F,90.0F);
      e.Graphics.DrawEllipse(new Pen(FadeColor(ColorOff,
                 Color.Black),1),1,1,Width-3,Height-3);
    }
  }
  else e.Graphics.DrawEllipse(new
                  Pen(System.Drawing.SystemColors.ControlDark,1),
                  1,1,Width-3,Height-3);
}
To better manipulate colors, I have introduced a helper function - FadeColor - which will blend the color given in the first parameter over the second one with a given ratio. I'll give a default for the ratio as 1 to 1. I'll make the function public and static for being able to use it from outside the component source code and without the need to create a LED; in fact, it has nothing to do with the shape and behavior of it:
#region helper color functions
public static Color FadeColor(Color c1, Color c2, int i1, int i2) {
  int r=(i1*c1.R+i2*c2.R)/(i1+i2);
  int g=(i1*c1.G+i2*c2.G)/(i1+i2);
  int b=(i1*c1.B+i2*c2.B)/(i1+i2);

  return Color.FromArgb(r,g,b);
}

public static Color FadeColor(Color c1, Color c2) {
  return FadeColor(c1,c2,1,1);
}
#endregion
The function works by splitting the two colors in R, G and B components, applying the ratio, and returning the recomposed color. I use this function to blend the LED color in the margin of the bubble, as well as for adding the sparkle that will give the bubble's volume. When the LED is On, the margin is enlightened with White, while - when Off is darkened with Black. The same for the sparkle, but with different ratios.
You may now compile the solution, drag a LED on the test form, change its colors and switch it On/Off directly there in the design mode!

Now Flash It
Now here is the deal: I want to be able to add more that one flash interval, and - why not - more than a set of two On/Off colors. In fact, I want to be able to add as many colors as I want and fire them in sequence like a smooth gradient or an invasive Red-Yellow-Magenta warning. The way to preset this behavior through properties should be easy and error free, while being able to program lengthy sequences by code.
To achieve this, I'll add two properties:
private string _FlashIntervals="250";
public int [] flashIntervals = new int[1] {250};
[Category("Appearance"),
DefaultValue("250")]
public string FlashIntervals {
  get { return _FlashIntervals; }
  set {
    _FlashIntervals = value;
    string [] fi = _FlashIntervals.Split(new char[] {',','/','|',' ','\n'});
    flashIntervals = new int[fi.Length];
    for (int i=0; i<fi.Length; i++)
      try {
        flashIntervals[i] = int.Parse(fi[i]);
      } catch {
        flashIntervals[i] = 25;
      }
  }
}

private string _FlashColors=string.Empty;
public Color [] flashColors;
[Category("Appearance"),
DefaultValue("")]
public string FlashColors {
  get { return _FlashColors; }
  set {
    _FlashColors = value;
    if (_FlashColors==string.Empty) {
      flashColors=null;
    } else {
      string [] fc = _FlashColors.Split(new char[] {',','/','|',' ','\n'});
      flashColors = new Color[fc.Length];
      for (int i=0; i<fc.Length; i++)
        try {
          flashColors[i] = (fc[i]!="")?Color.FromName(fc[i]):Color.Empty;
        } catch {
          flashColors[i] = Color.Empty;
        }
    }
  }
}
FlashIntervals and FlashColors will accept delimited strings, which will be converted to public arrays accessible to the internal code as as well as to external procedures. Any reasonable delimiter will break the input string, and error items will default to Color.Empty for colors that will switch the LED Off, and 25 ms for the interval - small enough not to be troublemaker.
There is no need to have the two arrays with the same length: when the colors table is bigger, the extra items will be ignored, while if there are fewer colors than intervals, extra intervals will switch the LED On and Off. The same for empty colors.
public int tickIndex;
private void _Tick(object sender, System.EventArgs e) {
  tickIndex=(++tickIndex)%(flashIntervals.Length);
  tick.Interval=flashIntervals[tickIndex];
  try {
    if ((flashColors==null)
    ||(flashColors.Length<tickIndex)
    ||(flashColors[tickIndex]==Color.Empty))
      Active = !Active;
    else {
      ColorOn = flashColors[tickIndex];
      Active=true;
    }
  } catch {
    Active = !Active;
  }
}
This would conclude our flash feature if we had a Flash property to switch this mode:
private bool _Flash = false;
[Category("Behavior"),
DefaultValue(false)]
public bool Flash {
  get { return _Flash; }
  set {
    _Flash = value && (flashIntervals.Length>0);
    tickIndex = 0;
    tick.Interval = flashIntervals[tickIndex];
    tick.Enabled = _Flash;
    Active = true;
  }
}
Example how to operate
- To enter the simple flash mode - On/Off, just put one interval value in
FlashIntervals and nothing in FlashColors.
- For a Red/Green mode, do not try to use the previous mode with setting the Off color to Green! The Off state has the bubble border darken and the sparkle on the other side. Instead, enter for
FlashColors - RED,Green and for FlashIntervals - 500,500.
- A more interesting example would be
Red,Off,Yellow,Off,Blue. You may enter exactly this string as Off is not a valid color, or - shorter: Red,,Yellow,,Blue (don't enter space in-between commas - space is also a separator!). For FlashIntervals, enter 500,250,500,250,500,250. Note the extra 250 value for having an Off interval between Blue and Red.
- For a double-pulse light, enter
FlashIntervals as 250,250,250,1000. Will do: quarter sec On, quarter Off, again quarter On, and finally one second Off; then will repeat. You may also program double-pulse of dark with 1000,250,250,250.
- A more interesting example is to produce a gradient of colors. Here it is easier to let the code fill in the values for colors and intervals. Let's assume 40 equal intervals of 50 ms with a gradient going from Yellow to Red and back. To get all colors for the gradient, we could conveniently use the exposed static
FadeColor method. So, just add the following code somewhere in the test-form's code-behind, as in the form's constructor (or add a button):
Color
c; led5.flashColors
= new Color[40]; led5.flashIntervals
= new int[40]; for
(int i= 0; i<20; i++) { c=
  TH.WinComponents.Led.FadeColor(Color.Yellow,Color.Red,
                      (i<=20)?i:20,(i>20)?20:20-i);
  led5.flashColors[   i]=c; led5.flashIntervals[   i]=50;
  led5.flashColors[39-i]=c; led5.flashIntervals[39-i]=50;
}
led5.Flash=!led5.Flash;
I would have finished here, but a couple of details forced me to continue, in fact with a lot more.
Transparency
Is our control really transparent outside the babble? Let's find out! Let's go in the test form and draw a line from corner to corner:
private void Form1_Paint(object sender, System.Windows.Forms.PaintEventArgs e) {
  e.Graphics.DrawLine(new Pen(Color.White,2),0,0,
    ClientRectangle.Width,ClientRectangle.Height);
}
private void Form1_SizeChanged(object sender, System.EventArgs e) {
  Invalidate();
}
(First of all, we learn how to address the coordinates inside the form area using the ClientRectangle. Then we are forced to invalidate the form each time the form resizes. Else, this is what happens:

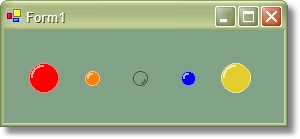
What? - Windows has invalidated only areas that have been added to the original form, and through where the mouse has moved. So, put back the Invalidate call, and make the line wider. Now, what do we learn?

Surprise: the control is not transparent at all! Let's add the following lines to the LED's constructor. (Disable also the big one, just to see how Enable works):
SetStyle(ControlStyles.SupportsTransparentBackColor, true);
BackColor = Color.Transparent;

More likely...
Bonus: External Effects
At this point, our control is quite done. However, let's see what else we could achieve from outside the control code. To do that we have to connect some code to the LED events, and the first event we need to attach code to is Paint. Unfortunately, we have already consumed the Paint event inside the control's code. Well, Paint is kind of delegate - we attach code on with the += operator, so we assume that we can attach other handlers as well. However, in the internal handler, the area of the LED was already rendered - we can only add graphical elements over the bubble. That means we have to change things.
Let's delete the reference to the _Paint handler from the LED's constructor and let's change this method's declaration with the following lines:
protected override void OnPaint(PaintEventArgs e) {
if (Paint!=null) Paint(this,e);
else {
base.OnPaint(e);
Trying to compile this, we find out that the original Paint event cannot be used on the left part of expressions; neither can we call it. Fortunately, we can replace it with a new one:
public new event PaintEventHandler Paint;
And now, we can replace the internal rendering of the control with a completely new one. Let's start drawing an exclamation point inside a triangle - the universal sign of "Attention!". We'll use led5 which we have already programmed to rotate colors through a gradient from Red to Yellow. I'll attempt to change not only the shape, but also make the sign pulsating:
private void led5_Paint(object sender, System.Windows.Forms.PaintEventArgs e) {
TH.WinComponents.Led l = sender as TH.WinComponents.Led;
if (l.Enabled && l.Active) {
int cx,cy,w,h,d;
d = (l.tickIndex<20)?l.tickIndex:39-l.tickIndex;
cx = l.Width/2; cy = l.Height/2;
w = 2*d+8; h = 2*d+8;
try {
Point startPoint = new Point(cx,cy-h/2);
e.Graphics.FillPolygon(new SolidBrush(l.ColorOn),
new Point[] {startPoint,
new Point(cx-w/2,cy+h/2),
new Point(cx+w/2,cy+h/2),
startPoint });
e.Graphics.DrawLine(new Pen(Color.Red,4),cx,cy-h/2+9,cx,cy+h/2-11);
e.Graphics.DrawLine(new Pen(Color.Red,6),cx,cy-h/2+11,cx,cy);
e.Graphics.DrawLine(new Pen(Color.Red,4),cx,cy+h/2-7,cx,cy+h/2-3);
} catch {}
}
}
This exclamation point is not very nice especially when it is small, but at that time, I'll dissolve it in the triangle becoming Red. Also, some error may occur when the shape goes too small, but the empty catch block will take care.
Another challenge: using external bitmap: create a small bitmap file by right-clicking the LED project and adding a new item as a bitmap file. Let's draw a heart and name it that way. I want this heart to beat with double pulses like a real heart. To do that, prepare the Flash mode, assigning 100,250,100,750 to its FlashIntervals property. Now, put the following code on the Paint handler of led1:
Bitmap hart;
private void led6_Paint(object sender, System.Windows.Forms.PaintEventArgs e) {
  TH.WinComponents.Led l = sender as TH.WinComponents.Led;
  Rectangle r = new Rectangle(0,0,40,40);
  switch (l.tickIndex) {
    case 0 : r = new Rectangle(0,0,47,47);
                 hart.RotateFlip(RotateFlipType.Rotate90FlipNone);
                 break;
    case 1 : r = new Rectangle(3,3,40,40); break;
    case 2 : r = new Rectangle(1,1,46,46); break;
    case 3 : r = new Rectangle(3,3,40,40); break;
  }
  e.Graphics.DrawImage(hart,r);
}
To make this code work, we have to load and prepare the heart bitmap somewhere. Let's do that in the constructor of the form:
hart = new Bitmap(@"C:\CS\WinComponents\Led\Hart.bmp");
hart.MakeTransparent(Color.White);
Is it not nice to refer and deliver a file with an executable file, so let's include it in the resources of the assembly. Click on the Hart.bmp file from the test program and, in the Properties panel, change the Build Action to Embedded Resource. Now modify the initialization code:
Stream s =
Assembly.GetCallingAssembly().GetManifestResourceStream("Led.Hart.bmp");
hart = new Bitmap(s);
Note: Led from the resource name Led.Hart.bmp stands for the assembly name of the test program.

Conclusion
I have presented a small project which creates a control simulating a LED light. The LED control draws itself from its OnPaint method. In addition to its On/Off functionality, it flashes rotating a set of colors with preset intervals. In the end, I have added as a bonus, external events to modify the embedded functionality with drawing bitmap stored in the assembly resources. Used with imagination, it can add fancy effects to any application.
Horia Tudosie is Master of Sciences from the Polytechnic University of Bucharest - Computer Sciences.
Horia came in Canada in 1994 and have work in US 4 years since 2003.
He was working with various peculiar languages as Delphi and Forth, but mainly with C++, C#, WPF, and JavaScript. He mainly develops applications and Extensions for GIS.


 General
  News
News  Suggestion
  Question
  Bug
Bug  Answer
  Joke
Joke  Praise
  Rant
Rant  Admin
Admin 


 ), compile it and then reference compiled library in demo project. There are also missing files "h.bmp" in demo, "Led.html" and "Led2.bmp" in led project.