Introduction
There is quite some information on the web on how to make Excel talk to .NET through COM. I will not repeat this here (but you can do a web search on "Call a Visual Basic .NET Class Library from Visual Basic for Applications in Microsoft Office" and you will get several good articles from MSDN). My aim in this tip/trick is to show the steps from XML creation of the Ribbon in Excel to the running of the VB.NET app from a DLL. So, this turorial will have 3 main chapters:
- Excel: VBA and XML
- VB.NET Class Library
- Getting COM to work
Background
Through my work, I often need to extend my Excel calculations with more sophisticated geoscience related calculations. Obviously, some dedicated software exists for these type of calculations, but every now and then it is handy to have some of this 'dedicated' software available under Excel macro buttons.
1. Excel: XML and VBA
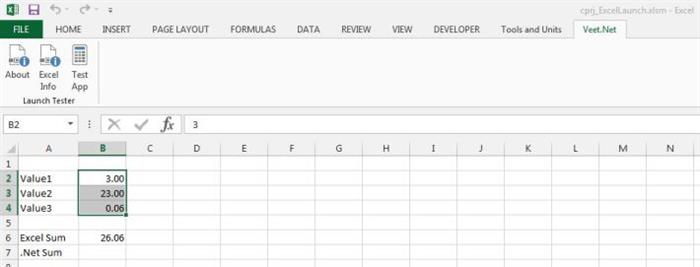
Below is a screen snip from Excel showing the ribbon I created to run my apps from. Make sure that you create a .xlsm workbook to be able to run macro's or use the cprj_ExcelLaunch.xlsm supplied with this article.
To create this ribbon, I use an XML edit called CustomUIEditor (freeware supplied by MS-Office and widely used). The following code snippet shows the ribbon definition in XML if you open file cprj_ExcelLaunch.xlsm. It shows the three buttons on the ribbon together with their callbacks.
<customUI
    xmlns="http://schemas.microsoft.com/office/2009/07/customui"
    onLoad="clb_cprjLaunchRibbon">
    <ribbon>
        <tabs>
            <tab
                id="cprj.launch.tab"
                label="Veet.Net">
                <group
                    label="Launch Tester"
                    id="cprj.launch.group.tester">
                    <button
                        description="About VEET Tools"
                        id="cprj.launch.button.dllinfo"
                        imageMso="AdvertisePublishAs"
                        label="About"
                        size="large"
                        supertip="About Veet.Net"
                        onAction="clb_cprjLaunch"/>
                    <button
                        description="Excel Environment"
                        id="cprj.launch.button.excelinfo"
                        imageMso="AdvertisePublishAs"
                        label="Excel Info"
                        size="large"
                        supertip="Excel Environment"
                        onAction="clb_cprjLaunch"/>
                    <button
                        description="Description: Run the test app"
                        id="cprj.launch.button.test"
                        imageMso="Calculator"
                        label="Test App"
                        size="large"
                        supertip="Run the currently tested app"
                        onAction="clb_cprjLaunch"/>
                </group>
            </tab>
        </tabs>
    </ribbon>
</customUI>
Apart from the various XML decorations, two callbacks are of importance with respect to code execution (and forming the direct link into VBA): clb_cprjLaunchRibbon and clb_cprjLaunch.
When you open the Visual Basic editor (VBA) in the cprj_ExcelLaunch.xlsm workbook, there is a code module called cprjLauncher which declares the above two callbacks shown in the VBA code snippet below.
Option Explicit
Private rbnLaunch As IRibbonUI
Public Sub clb_cprjLaunchRibbon(ribbon As IRibbonUI)
Set rbnLaunch = ribbon
initClass
End Sub
Public Sub clb_cprjLaunch(control As IRibbonControl)
Dim cb As New cprj_ExcelLaunch.ExcelCallbacks
Dim xlapp As Variant
Set xlapp = Application
If control.ID = "cprj.launch.button.dllinfo" Then
cb.ShowDllInfo
ElseIf control.ID = "cprj.launch.button.excelinfo" Then
cb.ShowExcelInfo (xlapp)
ElseIf control.ID = "cprj.launch.button.test" Then
cb.LaunchMyTestApp (xlapp)
Else
MsgBox ".Net Launcher for Excel" & vbCrLf & _
"Did not recognise button", vbExclamation, "Veet Launcher"
End If
End Sub
Private Sub initClass()
End Sub
Callback clb_cprjLaunchRibbon is the interface initialising the ribbon. It can be used as well to start any specific classes that you may need further in VBA but because this tutorial is about VB.NET classes, it has been stubbed out here. Routine clb_cprjLaunch is the main callback (and also interface) which handles any calls made from the ribbon by pushing buttons, etc. It simply uses the ID of the supplied ribbon control to define which action is needed. You can do this in various other ways; this is the most basic way of doing it and limits the amount of VBA needed. One very important statement to note in sub clb_cprjLaunch is Dim cb As New cprj_ExcelLaunch.ExcelCallbacks. Here, the VB.NET COM class is initialised which is the main launcher in the VB.NET code. The variant xlapp is set to the current Excel application (from which you are firing the, in this case, click events) and passed as an argument to the various VB.NET routines; it forms the bridge between commands fired on the Excel ribbon and your VB.NET code. I'll show in section 3 of this tutorial how to set up the reference to the VB.NET COM class.
2. VB.NET Class Library
Supplied in the download is a solution (written with SharpDevelop) containing the VB.NET classes. If you make your own solution, make sure that you compile it into a Class Library (or .dll) and that you register for COM Interop. Also, add a reference to Microsoft.Office.Interop.Excel. Below is a screen snippet of how the solution and project look like in the supplied code:

With the arrow pointing to the heart of the solution: ExcelCallbacks.vb, the COM class which is set in the VBA code above. The class contains the following:
Imports System.Runtime.InteropServices
Imports Excel = Microsoft.Office.Interop.Excel
<ComVisible(True)>
<ComClass(ExcelCallbacks.ClassId, ExcelCallbacks.InterfaceId, ExcelCallbacks.EventsId)>
Public Class ExcelCallbacks
Public Const ClassId As String = "B31A7A03-4CD2-4109-8CE7-6133675DDA5F"
Public Const InterfaceId As String = "5B274BD3-6388-4B40-82F4-0A74CC35B272"
Public Const EventsId As String = "67C6D213-83CC-421D-BCCB-CE4AF8CAF7EE"
Public Sub New()
MyBase.New()
End Sub
Private _xl As Excel.Application = Nothing
#Region " Environment Info "
Public Sub ShowDllInfo()
Dim s As String = "Title: " & Defs.AssemblyTitle
s = s & vbCrLf & "Description: " & Defs.AssemblyDescription
s = s & vbCrLf & "Author: " & Defs.AssemblyAuthor
s = s & vbCrLf & "Product: " & Defs.AssemblyProduct
s = s & vbCrLf & "Company: " & Defs.AssemblyCompany
s = s & vbCrLf & "Copyright: " & Defs.AssemblyCopyright
s = s & vbCrLf & "Version: " & Defs.AssemblyVersion
MsgBox(s, MsgBoxStyle.Information,Defs.DlgTitle)
End Sub
Public Sub ShowExcelInfo(currentExelInstance As Excel.Application)
If Not setXlApp(currentExelInstance) Then Exit Sub
Dim awbook As Excel.Workbook = _xl.ActiveWorkbook
Dim asheet As Excel.Worksheet = CType(awbook.ActiveSheet, Excel.Worksheet)
Dim s As String = "Excel App: " & _xl.Name
s = s & vbCrLf & "Active Workbook: " & awbook.Name
s = s & vbCrLf & "Full name: " & awbook.FullName
s = s & vbCrLf & "Active Sheet: " & asheet.Name
MsgBox(s, MsgBoxStyle.Information,Defs.DlgTitle)
End Sub
#End Region
#Region " Application stubs "
Public Sub LaunchMyTestApp(currentExelInstance As Excel.Application)
If Not setXlApp(currentExelInstance) Then Exit Sub
Dim testApp As New cprj_ExcelLaunch.MyTestApp(_xl)
testApp.AppRun
End Sub
#End Region
#Region " Privates, checks etc. "
Private Function setXlApp(xlInst As Excel.Application) As Boolean
Try
_xl = xlInst
If _xl Is Nothing Then
Debug.Print("Excel app Is Null")
Return False
Else
Return True
End If
Catch ec As Exception
Debug.Print("Error getting excel app: " & ec.ToString)
_xl = Nothing
Return False
End Try
End Function
#End Region
End Class
The first part of the ExcelCallbacks.vb class is the declaration part of the COM interop. I will not dwell on these statements here, except for what is written in the commented parts above it. These lines of code are taken by me out of several MSDN articles; it is not my point of this tutorial. My code starts with the declaration of the Private _xl, a global to the class holding the currently running Excel application. It is the argument passed by VBA in the previous code snip. The private function setXlApp checks the validity of the supplied instance of Excel and returns accordingly.
The three public subs ShowDllInfo(), ShowExcelInfo(...) and LaunchMyTestApp(...) are the routines called from Excel's VBA. Note that the routine ShowDllInfo() does not need the Excel instance as an argument because it is only reporting about the VB.NET class. The two info subs get their data partly from a public Module called Defs.vb in the project. They are hooked to the first left two buttons on the Excel ribbon. If you get the two info subs to work, then you are ready for the real stuff: firing a .NET interactive application from Excel: LaunchMyTestApp. The application consists of two classes MyTestApp.vb and MyTestAppForm.vb. I could have chosen to fire the form directly from LaunchMyTestApp, but now I can show some more tricks. MyTestApp.vb looks like this:
Imports Excel = Microsoft.Office.Interop.Excel
Imports System.Windows.Forms
Public Class MyTestApp
Private _xl As Excel.Application = Nothing
Public Sub New(xlInst As Excel.Application)
_xl = xlInst
End Sub
Public Sub AppRun
Dim frm As New cprj_ExcelLaunch.MyTestAppForm
frm.Init(_xl)
Dim xlMain As New NativeWindow
xlMain.AssignHandle(New IntPtr(_xl.Hwnd))
frm.ParentWindow = xlMain
frm.StartPosition = FormStartPosition.CenterScreen
frm.Show(xlMain)
End Sub
End Class
A small class to start the form but also to get the details of the Excel instance window through the System.Windows.Forms.NativeWindow class. This native window is stored in the ParentWindow property of the intialised form. The real work is done in this form class:
The code is as given below:
Imports Excel = Microsoft.Office.Interop.Excel
Public Partial Class MyTestAppForm
Private _xl As Excel.Application = Nothing
Private _xlAppSelectionChange As Excel.AppEvents_SheetSelectionChangeEventHandler = Nothing
Private _xlWindow As System.Windows.Forms.NativeWindow = Nothing
Private _xlSelectedRange As Excel.Range = Nothing
Private _xlResultRange As Excel.Range = Nothing
Public Sub New()
System.Windows.Forms.Application.EnableVisualStyles()
Me.InitializeComponent()
AddHandler butDoMyJob.Click, Sub() mainCallback("domyjob")
AddHandler butSetResultCell.Click, Sub() mainCallback("setresultrange")
AddHandler Me.Closing, Sub() mainCallback("closing")
End Sub
Public Sub Init(excelInstance As Excel.Application)
_xl = excelInstance
_xlAppSelectionChange = New Excel.AppEvents_SheetSelectionChangeEventHandler_
(AddressOf appSelectionChanged)
AddHandler _xl.SheetSelectionChange, _xlAppSelectionChange
If _xl IsNot Nothing Then
Dim wbook As Excel.Workbook = _xl.ActiveWorkbook
Dim sheet As Excel.Worksheet = CType(wbook.ActiveSheet, Excel.Worksheet)
_xlSelectedRange = CType(_xl.Selection,Excel.Range)
labInfo.Text = "Currently selected cell(s): _
" & sheet.Name & ":" & _xlSelectedRange.Address
labOutput.Text = "Not defined yet"
End If
End Sub
Public Property ParentWindow() As System.Windows.Forms.NativeWindow
Get
Return _xlWindow
End Get
Set
_xlWindow = value
End Set
End Property
Private Sub mainCallback(action As String)
If action = "domyjob" Then
If _xl Is Nothing OrElse _xlSelectedRange Is Nothing Then Exit Sub
Dim wbook As Excel.Workbook = _xl.ActiveWorkbook
Dim sheet As Excel.Worksheet = CType(wbook.ActiveSheet, Excel.Worksheet)
Dim sum As Double = 0
For Each c As Excel.Range In _xlSelectedRange.Cells
sum += CDbl(c.Value)
Next
If _xlResultRange Is Nothing Then
Dim s As String = String.Format("Result of sum = {0} _
but the result range is not set...",sum.ToString("0.00000"))
MsgBox(s, MsgBoxStyle.Information,Defs.DlgTitle)
Else
_xlResultRange.Value = sum
End If
ElseIf action = "setresultrange" Then
Dim wbook As Excel.Workbook = _xl.ActiveWorkbook
Dim sheet As Excel.Worksheet = CType(wbook.ActiveSheet, Excel.Worksheet)
_xlResultRange = CType(_xl.Selection,Excel.Range)
labOutput.Text = "results go to: _
" & _xlResultRange.Address & " on sheet: " & sheet.Name
ElseIf action = "close" Then
Me.Close
ElseIf action = "closing" Then
RemoveHandler _xl.SheetSelectionChange, _xlAppSelectionChange
If _xlWindow IsNot Nothing Then
APIs.SetActiveWindow(_xlWindow.Handle)
_xlWindow.ReleaseHandle
End If
End If
End Sub
Private Sub appSelectionChanged(sheet As Object, range As Excel.Range)
_xlSelectedRange = range
labInfo.Text = "Currently selected cell(s): " & _
CType(sheet, Excel.Worksheet).Name & ":" & _xlSelectedRange.Address
End Sub
End Class
At the top, some global vars of the class (preceded with an '_' and put at the top; habits...), followed by the constructor in which the handlers of the controls are declared).
Next is the sub Init sub which does basically two important things: it sets the global var of the Excel instance and it declares a new delegate handler (from Excel) called AppEvents_SheetSelectionChangeEventHandler taking the private sub appSelectionChanged as an argument. This delegate handler is hooked to the Excel instance event _xl.SheetSelectionChange. So whenever a selection is done or changed in Excel, my little app will know about it... The sub appSelectionChanged will set the global var _xlSelectedRange and update the info labels.
The rest of the class is a callback for the controls on the form. For the sake of the tutorial, this is just a summation of the selected cells (yes, you could do this with a calculator; I hope you understand this wasn't the point of my tutorial). It checks if a result (or output) cells has been defined. If so, the cell value gets updated, if not the result is shown in a MsgBox. It should look something like this:
A last important note: when the form is closing the handler on _xl.SheetSelectionChange is removed and the focus is set back to the Excel instance through the property ParentWindow (or _xlWindow). After the focus has been set, the window handle is released. To put the focus back to the current Excel instance, I make use of an API call in module APIs:
Public Module APIs
<System.Runtime.InteropServices.DllImport("user32.dll")> _
Public Function SetActiveWindow(ByVal hwnd As IntPtr) As IntPtr
End Function
End Module
3. Get COM to Work
This to me is the most 'black box' part. I'm sure you will have to try several times before it works, otherwise you are a true hero. Steps to take:
- Make sure the .NET DLL is visible for COM. You do this by setting the switch
Register for COM Interop = TRUE on the compile tab of the project's properties. Also you should set the COM visibilty in the AssemblyInfo.vb:
<assembly: ComVisible(True)>
- Register the DLL with RegAsm.exe. I always create a little
.bat file for this:
C:\Windows\Microsoft.NET\Framework\v4.0.30319\RegAsm.exe
<path_to_your_project>\cprj_ExcelLaunch\bin\Debug\cprj_ExcelLaunch.dll /unregister
C:\Windows\Microsoft.NET\Framework\v4.0.30319\RegAsm.exe
<path_to_your_project>\cprj_ExcelLaunch\bin\Debug\cprj_ExcelLaunch.dll /codebase /tlb
pause
C:\Windows\Microsoft.NET\Framework64\v4.0.30319\RegAsm.exe
<path_to_your_project>\cprj_ExcelLaunch\bin\Debug\cprj_ExcelLaunch.dll /unregister
C:\Windows\Microsoft.NET\Framework64\v4.0.30319\RegAsm.exe
<path_to_your_project>\cprj_ExcelLaunch\bin\Debug\cprj_ExcelLaunch.dll /codebase /tlb
pause
Do not forget to run this batch as Administrator (I did already a 100k times). Sometimes, it helps to get rid of all the COM clutter in the VBA editor reference tool, to just only run the /unregister option. Then restart Excel; your code will fail miserably; exit Excel again but at least your DLL is out of the registry. Then, re-run the register batch with the /codebase /tlb options.
- Reference the DLL in the Excel VBA Editor (Menu->Tools->References) and browse to the DLL file:
You should recognise the description in the AssemblyInfo.vb:
<assembly: AssemblyDescription(".Net ExcelLaunchTools (VB.Net dll)")>
Good luck and enjoy (if it works)!
Points of Interest
A bit of hardship every now and then, but sense of achievement is immense when it worked (all's relative of course). For me, the highlight was getting native Excel events to be picked up by my .NET app. And finally: COM and Ribbon creation/editing will always be a bit of 'black box' programming.
History
Second tips/tricks on a more in depth topic of the interface between MS-Office and .NET


