Introduction
This is pretty much the same kind of article that I wrote for creating a database-driven Vista gadget. The principles haven't changed, but there are several distinct differences. Sorry for any repetition between this and the last article, I just don't want people to have to read both articles if they're only interested in one of them. Basically, the objective is to create a gadget that pulls data from a database and displays it.
The database I used is SQL Anywhere 10, by Sybase iAnywhere. To access the database, the gadget makes HTTP requests, and this is easy to do with SQL Anywhere because it has a built-in HTTP server that allows SQL queries to be exposed as web services. You can download a free Developer Edition of SQL Anywhere from here.
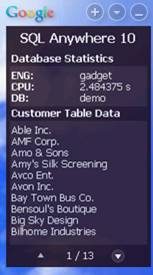
The source code and explanations below will guide you through the creation of the demo gadget that is included with this article. Basically, the gadget pulls data from the sample database included with SQL Anywhere 10, and displays live database statistics as well as a list of data from the Customers table.
Background
A Google Desktop Gadget is a user-friendly, highly graphical utility or widget that allows users to see key information about running applications. Database-driven solutions can use gadgets to display important application information stored inside the database. For example, you can create a small notification gadget to notify users of certain database changes or gather database statistics for performance monitoring. The nice thing about it being a Google Desktop Gadget is that Google Desktop is available for Windows, Linux, and Mac. I haven't really tested this gadget out on Linux or Mac, but the code here is platform independent and should work without a problem. I'm also pretty sure that SQL Anywhere is available for those platforms too.
Running the Demo Gadget
To run the demo, first unzip the files to a folder.
Start up the SQL Anywhere 10 demo database, by running the following command:
> dbeng10 -n gadget "%SQLANYSAMP10%"\demo.db -xs http(port=8888)
Then, install the scripts and webservice by running the following command from the unzipped folder location:
> dbisql -c "ENG=gadget;UID=dba;PWD=sql" demo.sql
Finally, double-click the sqlanywhere10.gg file to install and load the demo gadget.
Creating a Basic Google Gadget
A gadget is nothing more than a micro-sized HTML page. Of course, the HTML you can use is only a subset as defined by the Google Gadget API. The fancy appearance is made possible through transparent images (PNG or GIF), the styling through CSS, and the functionality through JavaScript. Google goes into a bit of detail on how to get started here. But, I'll just recapitulate the basics of what you need.
The Manifest File
First, you'll need to set up your manifest file, which basically just describes the gadget for the Google Desktop and provides information for users to see before they install your gadget. The manifest file MUST have a *.gmanifest extension.
Here's everything you need for the manifest file.
<gadget minimumGoogleDesktopVersion="5.1.0.0">
  <about>
    <name>Your Gadget Title Here</name>
    <description>Your Gadget Description Here</description>
    <aboutText>Your Gadget About Text Here</aboutText>
    <version>1.0.0.0</version>
    <author>Your Name Here</author>
    <authorWebsite>Your Website Here</authorWebsite>
    <id>A UUID Here</id>
    <copyright>Your Copyright Here</copyright>
    <authorEmail>Your Email Here</authorEmail>
  </about>
</gadget>
The main.xml File
Next, you'll need to actually define the main.xml file, which is the body of the gadget. The formatting is achieved through using different properties of the tags, and the functionality is implemented through the use of JavaScript. Keep in mind that Google has only exposed a limited subset of HTML tags for your use.
<view height="300" width="180" onopen="loadMain();">
  <div height="300" name="content" opacity="225" width="180" x="0" y="0"
        background="#221122">
    <div height="50" name="stats" width="170" x="5" y="50" autoscroll="true"
        background="#332233"/>
    <label height="32" name="label1" width="180" x="0" y="0" align="center"
        bold="true" color="#FFFFFF" size="12" valign="middle">SQL Anywhere 10</label>
    <label height="18" name="label2" width="170" x="5" y="32"
        bold="true" color="#FFFFFF" valign="bottom">Database Statistics</label>
    <div height="154" name="data" width="170" x="5" y="118"
        autoscroll="true" background="#332233"/>
    <label height="18" name="label3" width="170" x="5" y="100"
        bold="true" color="#FFFFFF" valign="bottom">Customer Table Data</label>
    <label height="16" name="page" width="56" x="64" y="277"
        align="center" color="#FFFFFF">0 / 0 </label>
    <button height="16" name="down" width="16" x="131" y="278"
        onclick="pageDown()" downImage="img\buttonDown_Off.png"
        image="img\buttonDown_Off.png" overImage="img\buttonDown_Off.png"/>
    <button height="16" name="up" width="16" x="35" y="278"
        onclick="pageUp()" downImage="img\buttonUp_Off.png"
        image="img\buttonUp_Off.png" overImage="img\buttonUp_Off.png"/>
  </div>
  <script src="main.js" />
  <script src="xml.js" />
</view>
The key things to notice are:
- The links to the main.js and xml.js JavaScript files,
<script src="main.js"/> - The three calls to JavaScript functions:
onopen="loadMain()", onclick="pageUp()", and onclick="pageDown()"
The main.js and xml.js Files
Finally, we'll finish off with the JavaScript files. This is what gives the gadget functionality. I will only go over the code that is used for actually retrieving the data from the database.
The global variables are explained:
var statsRequest;
var dataRequest;
var maxDataItemsPerPage = 10;
var currPage = -1;
var numPages = 0;
Because the onopen="loadMain()" is set in the main.xml file, it will call this function when the gadget loads.
function loadMain()
{
    refreshStats();
    setInterval("refreshStats();", 500);
    refreshData();
}
This will call both display functions. The stats will be refreshed every 500ms. This is how to achieve the auto-refreshing for the gadget. JavaScript will keep calling this function every 500 ms. You can make this refresh time as long or short as you like. The following function will be called. I'll go over just the database data function, since the database stats function is nearly identical.
function refreshData()
{
  var url = "http://localhost:8888/GadgetData";

  dataRequest = new XMLHttpRequest();
  dataRequest.onreadystatechange = writeData;
  dataRequest.open("GET", url, true);
  dataRequest.send(null);
}
All that is needed is to create an XMLHTTP request which will retrieve the HTML output from the specified URL. To keep the gadget responsive under all circumstances, you'll want to set the third parameter of statsRequest.open() to true. This will keep the request object running in non-blocking asynchronous mode. You'll see that writeData() is specified as the function to be called when the state of the request has changed.
function writeData()
{
  if(dataRequest.readyState == 4)
  {
    if(dataRequest.status == 200)
    {
      var y = 3;
      var element;
      var xml;
      var items;

      xml = new DataXml(dataRequest.responseXml);
      items = xml.getItems("row");

      for(var i = 0; i < items.length; i++)
      {
        element = data.appendElement("<label>" + items[i] + "</label>");
          element.color = "#FFFFFF";
          element.y = y;
        y += 14;
      }
    }
  }
}
Once the request status is "OK", then all you need to do is format the data and append it to the existing data div.
You'll notice the creation of a DataXml object, so I'll just go over that. You'll find the code in xml.js.
function DataXml(xml)
{
  this.xml = xml;
}
DataXml.prototype.getItems = function(key)
{
  var xml = this.xml;
  var items = [];

  var nodes = xml.getElementsByTagName(key);

  for (var i = 0; i < nodes.length; i++)
  {
    items.push(nodes[i].getAttribute("CompanyName"));
  }

  return items;
}
This is essentially just a simple XML parser. The getItems() member function returns an array of company names.
Creating a Web Service in the Database to Supply the HTML
The JavaScript will try to pull the data from a specified URL as shown above. Therefore, you need to make sure that there actually is some HTML being returned when the gadget submits an HTTP request to that URL. Thankfully, SQL Anywhere 10 does all the work for you, so all you have to do is write out some SQL statements to return the data, and it will take care of the rest.
Once you've connected to the "demo" database in a query editor, run the SQL script, demo.sql. I'll go over what the script is doing for the database data retrieval. The script to set up the database statistics retrieval part is nearly identical.
CREATE PROCEDURE "DBA"."GetGadgetData"()
RESULT (CompanyName LONG VARCHAR)
BEGIN
    SELECT REPLACE(HTML_ENCODE("CompanyName"), ''', '''')
    FROM "GROUPO"."Customers"
    ORDER BY "CompanyName";
END;
All the script does is create a stored procedure. Use the HTML_ENCODE procedure to substitute any invalid XML symbols.
Finally, all you need to do is turn your stored procedure into a web service. This is done with a single SQL statement:
CREATE SERVICE "GadgetData" TYPE 'XML' AUTHORIZATION OFF USER "DBA" _
    AS call GetGadgetData();
Commit your changes. All you need to do now is deploy the gadget.
Deploying Your Gadget
The first thing to do is to make sure that your database is running with an HTTP listener. You can do this by specifying the following startup options when running your SQL Anywhere 10 database. You can set the port to whatever you like, just make sure that it corresponds to the same port used in the URL you specified earlier in the JavaScript file.
> dbeng10.exe yourdb.db -xs http(port=8888)
The -xs http(port=8888) is the part that makes the magic happen. Basically, it tells the database engine to bind to port 8888 and listen for requests. When a request is received, a response is generated based on the associated SQL statements or stored procedure.
To get your gadget installed, simply double click on the *.gmanifest file.
Alternatively, just throw everything into a zip file, and rename the file to *.gg. Double-clicking on it will automatically install and load the gadget!
Points of Interest
Although the objective was just to create a database-driven Google gadget, it has become clear (to me anyways) that the web services feature of SQL Anywhere 10 provides developers with a powerful platform for database-enablement of any kind of application. I suggest reading up more on their product here.
I'm a student at the University of Waterloo in Ontario, Canada. I'm currently pursuing my undergraduate degree in Computer Engineering, and expect to graduate at the end of April 2009. My interests include web development, database-driven applications, and digital hardware design.


 General
  News
News  Suggestion
  Question
  Bug
Bug  Answer
  Joke
Joke  Praise
  Rant
Rant  Admin
Admin 


