Introduction
After growing tired of spending hours zoomed in at 800% magnification using the polygon lasso tool to create combined grayscale and color images in Macromedia Fireworks, I decided that there had to be a better way. Thus I embarked upon creating this application to make my life and hopefully that of others easier. This is a first attempt, and if I receive positive feedback that others would actually like to use this application, I will expand the features available when time permits.
Background
This application uses unsafe code and pointers for image manipulation. Check out the "Image Processing for Dummies" articles by Christian Graus on The Code Project for a good introduction to this technique. Also, for selecting an area of the image, I used code from the article "The Secret of Marching Ants" by q123456789 on The Code Project.
Using the Code
Most images consist of three bands: red, green and blue. Sometimes a fourth "alpha" band is used for transparency, but that is not relevant to this article. Each band contains a value between 0 and 255 for each pixel for a possible 16777216 colors. Therefore, selecting a color to keep in an image is not as simple as just picking a pixel and turning all other pixels that do not match that color to grayscale. Instead, some tolerance level must be used. However, this level can vary greatly depending upon the amount of color variance in the image and what colors the user desires to keep.
I have found that one of the more effective methods of dealing with this is to use a ratio value between the pixel's colors. Once users select a pixel from the image that they would like to keep, the program computes the difference in value between the red and green band, red and blue band, and green and blue band. This then is a ratio that can be used over the entire image to find similar colored pixels, even though the light level may be very different. For example, this would match a pixel that had the values red = 50, green = 80, and blue = 110 to a pixel that had the values red = 180, green = 210, and blue = 240 because the difference between red and green in each is 30, etc.
However, even using the ratio method described above still does not match very many pixels, a maximum of 256. To get a decent color selection, error values must be used on each band difference. Therefore, the program provides three text boxes for the user to provide an error value for the red and green difference, red and blue difference, and green and blue difference. By adding and subtracting this error value from the difference number, a much broader range of colors are included in the match. For example, if the difference between the red and green pixels is 25, and the user enters an error value of 20, all pixels with a difference between the red and green bands of anywhere from 5 to 45 will be within this range.
Another useful feature is that many times the color exists in several locations on the image and the user only wants to keep it in one section. Therefore, some boundary needs to be supplied allowing the user to select a small area from the image to keep in color. For this example program, I have just added simple code for a rectangle, although it could be expanded to any shape. I implemented just the drawing part of "The Secret of Marching Ants" program from The Code Project so that users can see the rectangle as they draw it. This necessitated drawing the image directly onto the form instead of using a picturebox where scrollbars could easily be added. That said, here is the basic image processing function in the program:
private void GrayColor()
{
int height = user_image.Height;
int width = user_image.Width;
int diffRG, diffRB, diffGB;
diffRG = pixcolor.R - pixcolor.G;
diffRB = pixcolor.R - pixcolor.B;
diffGB = pixcolor.G - pixcolor.B;
int RGlow, RGhigh, RBlow, RBhigh, GBlow, GBhigh, xmin, xmax, ymin, ymax;
RGlow = diffRG - Convert.ToInt16(tbRG.Text);
RGhigh = diffRG + Convert.ToInt16(tbRG.Text);
RBlow = diffRB - Convert.ToInt16(tbRB.Text);
RBhigh = diffRB + Convert.ToInt16(tbRB.Text);
GBlow = diffGB - Convert.ToInt16(tbGB.Text);
GBhigh = diffGB + Convert.ToInt16(tbGB.Text);
xmin = rect.X;
xmax = xmin + rect.Width;
ymin = rect.Y;
ymax = ymin + rect.Height;
BitmapData bmData = user_image.LockBits(new Rectangle(0, 0, width,
height), ImageLockMode.ReadWrite, PixelFormat.Format24bppRgb);
System.IntPtr Scan0 = bmData.Scan0;
int nOffset = bmData.Stride - width * 3;
unsafe
{
byte* p = (byte*)(void*)Scan0;
for (int y = 0; y < height; ++y)
{
for (int x = 0; x < width; ++x)
{
if (x > xmin && x < xmax && y > ymin && y < ymax &&
p[2] - p[1] > RGlow && p[2] - p[1] < RGhigh &&
p[2] - p[0] > RBlow && p[2] - p[0] < RBhigh &&
p[1] - p[0] > GBlow && p[1] - p[0] < GBhigh)
{
img_array_backup[y, x] = true;
}
p += 3;
}
p += nOffset;
}
}
user_image.UnlockBits(bmData);
}
Note that it is not altering the bitmap directly, rather pixels that match the selected color within the user's specified error limits are assigned to true on a boolean two dimensional array. This array is used like a mask; all values of true correspond to a pixel that remains in color, otherwise they are turned into a grayscale color. This lets the function run multiple times on the same image and thus allows the user to select multiple colors before generating the final image.
Now that we have an easy way to select the color and area of the image to affect, we now need an easy way for users to interpret what they have and have not already selected. Again, there are several different ways this could be done. I simply passed the user's image and the mask created in the last step to a new form. The user can then select whether to undo the color selection, add another color, or accept the image as final. When adding another color, it inverts the mask so that users see colors they have already selected as grayscale. Once the user is satisfied with the image, the following code is run to create the final image.
private void DrawImage()
{
int width = user_image.Width;
int height = user_image.Height;
BitmapData bmdata = user_image.LockBits(new Rectangle(0, 0, width,
height), ImageLockMode.ReadWrite, PixelFormat.Format24bppRgb);
System.IntPtr Scan0 = bmdata.Scan0;
int nOffset = bmdata.Stride - width * 3;
unsafe
{
byte* p = (byte*)(void*)Scan0;
for (int y = 0; y < height; ++y)
{
for (int x = 0; x < width; ++x)
{
if (!img_array[y, x])
{
p[2] = p[1] = p[0] = (byte)(.299 * p[2] + .587 * p[1]
+ .114 * p[0]);
}
p += 3;
}
p += nOffset;
}
}
user_image.UnlockBits(bmdata);
DrawBackground();
}
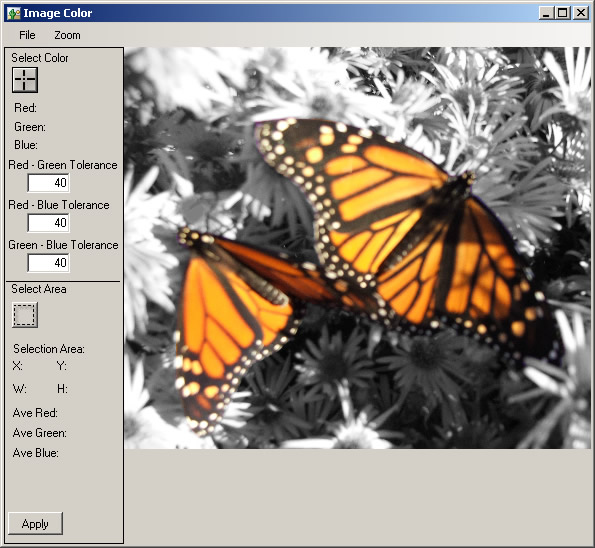
Using the Demo Application
The demo application consists of a simple menu strip allowing the user to open and save images, and zoom in or out on the currently open image. To select a color, click on the crosshair button on the left and then click on the color in the image. The red, green, and blue labels will display the pixel value of the color selected. The error amount can be changed via the three textboxes. If you wish to apply it only to a small area of the image, select the dashed rectangle button and draw the area on the image. If no area is selected, the color will be applied to the entire image. Once the selections are made, hit the apply button. The image with the selected color will be displayed in a new form. Note that the zoom controls on the new form are via a context menu and because the image is drawn on a picturebox within a panel, scrollbars are now available. If the color affects areas or colors in the image you don't want, select the redefine color button. If you would like to add more colors, select the add color button and it will return you to the original form and show your image with the colors already selected now in grayscale. Note that you will have to select the area of the image to affect again. If the image is exactly like you want it, select the create image button and it will return you to the main form and show the final image.
History
- January 25, 2008: Initial release
Matthew Baugher is an electrical engineer from the U.S.A. He is working part time writing image processing software for TerraVerde Technologies while pursing an MBA from Oklahoma State University.


 General
  News
News  Suggestion
  Question
  Bug
Bug  Answer
  Joke
Joke  Praise
  Rant
Rant  Admin
Admin 


