Introduction
For this project, we are going to be using openSuse 11 so that we can develop some code with Qt4. It is entirely up to you if you do this using KDE 4 or with the version of KDE 3.5 that comes with the disk; as long as you have KDE4 and the required libraries installed, that is up to your own personal preference. Personally, for now, I'm sticking with KDE 3.5, as the version of KDE 4 that ships with openSuse 11 is a little bit Vista.
With the latest version of KDevelop 3.5.2, at the time of writing, you can now develop applications using Qt4 that are pretty much the same as the Simple KDE Application template that we have used before. The main difference is in the location of the generated code, which is now placed in the src folder rather than in the debug folder. So, with version 4, if you were to create a widget called test widget, on compilation, a file called ui_testwidget.h would be created in the source folder to control the bindings for your widget.
First of all though, we need to get the application created. To do this, create a new project, and select the Qt 4 Application template.

As you go through the application creation process, you will be asked to enter the correct paths for the Qt 4 build tools.
Just so there's no mistake here, and you should remember that these settings are for openSuse, so I can make no promises for other Linux systems. The path for QMake is usr/bin, and the path for the Qt4 Designer is usr/share/applications.
Once you go through the process and create the application, you will get the readme that says:
READ THIS IN ORDER TO COMPILE THE Qt4 TEMPLATE
----------------------------------------------
Before compiling, check the Qt Options, go to:
Project->Project Options->C++ Support and open the Qt Options tab.
Check that the Qt installation directory is correct for the Qt version you've chosen.
------------------
Andreas Pakulat
July 2006
It is a really good idea to pay attention to this, if only just to check that it is accurate. KDevelop configures these options through the information you created when you set up the application.
Build it, and let it run QMake, and then run it, and you'll get a nice little Notepad style application.
Modifying the Project
There is one basic choice you face when you decide to modify the code, and that is do you develop the application using the GUI implementation tools, or do you just write the code yourself. Personally, I tend to do it half and half in that I will often use the GUI to generate the vanilla code, and then copy that into one of my own files and edit it there, if required.
You'll notice if you look at the generated project that all the code for the demo code is in the class that derives from QMainWindow, which will be whatever you call your project. To add a Widget or indeed any other UI based class, you use File -> New, and the dialog provided.
To add a class, it is better to use the Class Wizard. To use a widget, simply call setCentralWidget in the constructor of the class that derives from QMainWindow.
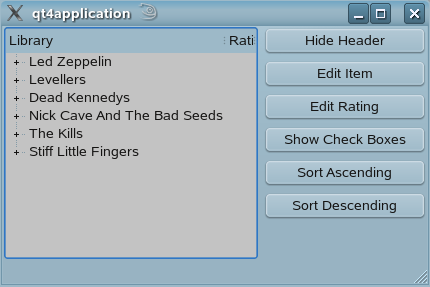
As a demonstration for this class, we are going to take a look at the QTreeWidget class.
The QTreeWidget
The QTreeWidget is your basic file manager style tree widget that just about anyone who has used a computer should be familiar with. It should be noted that this is different from the QTreeView as the QTreeView supports the Qt model/view architecture which is a whole other project, there is plenty of information in the Qt help if you feel like looking it up. The QTreeWidget works pretty much the same way that someone with a Windows background would be familiar with.
For this demo, we are going to use a mock up of an MP3 player library listing, which will look something like this:
To create the QTreeWidget, we use the code:
treeWidget = new QTreeWidget(widget);
treeWidget->setObjectName(QString::fromUtf8("treeWidget"));
treeWidget->setColumnCount( 2 );
treeWidget->headerItem()->setText( 0, QApplication::translate( "widget", "Library",
       0, QApplication::UnicodeUTF8 ) );
treeWidget->headerItem()->setText( 1, QApplication::translate( "widget", "Rating",
       0, QApplication::UnicodeUTF8 ) );
First of all, we create the widget with its parent being the widget that we are going to use as the central widget for the application. Then, we set the column count before adding the column header details.
Adding Items
To add items to a tree widget, you first create the main item/s which will be the parent of the information to be shown, in this case, bands, so we start off with:
QStringList ledZeppelinList( "Led Zeppelin" );
We create a string list to hold the name, and then call:
QTreeWidgetItem *ledZeppelinItem =
   new QTreeWidgetItem( treeWidget,  ledZeppelinList );
This creates the ledZeppelinItem widget and inserts it into our tree view. This will be a parent item as we have set the treeWidget itself as the parent.
QStringList ledZeppelin3List( "Led Zeppelin III" );
QTreeWidgetItem *ledZeppelin3Item =
   new QTreeWidgetItem( ledZeppelinItem, ledZeppelin3List );
To insert a child for the ledZeppelinItem, in this case, the Led Zeppelin 3 album, we just repeat the same sequence, but set the ledZeppelinItem that we added above as the parent. This works exactly the same way when we come to adding the songs, we add them to the ledZeppelin3Item.
This, of course, has only set up our Artist/Album/Song data which will be displayed in the first column.
If you look at the code for setting up the songs, you will see that I have done it in exactly the same way as above, with the code being:
QStringList lz31List( "Immigrant Song" );
QStringList lz32List( "Friends" );
QTreeWidgetItem *lz31Item = new QTreeWidgetItem( ledZeppelin3Item, lz31List );
QTreeWidgetItem *lz32Item = new QTreeWidgetItem( ledZeppelin3Item, lz32List );
With the difference being that afterwards, we have the code:
lz31Item->setText( 1, "***" );
lz32Item->setText( 1, "***" );
which sets the text for column number 1 (zero based) to three stars.
Columns and Headers
Once the information to be displayed is set up, we can turn our attention to the columns and the headers. The columns and headers for the application are set up when we create the tree with the code:
treeWidget->setColumnCount( 2 );
treeWidget->headerItem()->setText( 0, QApplication::translate(
      "Library", "Library", 0, QApplication::UnicodeUTF8 ) );
treeWidget->headerItem()->setText( 1, QApplication::translate(
      "Rating", "Rating", 0, QApplication::UnicodeUTF8 ) );
Here, you can see that we set the column count to two and then called the QTreeWidget::headerItem function to set the text for each header using the number of the column and the text.
Once we have added the items, we use the code:
treeWidget->resizeColumnToContents( 0 );
treeWidget->resizeColumnToContents( 1 );
treeWidget->setHeaderHidden( false );
This sizes the columns so that they show the data and then show the headers. Showing and hiding the headers is then a simple matter of responding to the button click and calling setHeaderHidden with either true or false.
Editing
When it comes to editing the items within the tree, you can have editing turned on by default. With a call to setEditTriggers in the QTreeWidget class in this application, we don't have default edit modes, we make the user specifically ask to edit the item. That way, the tree doesn't go into edit mode when the user isn't expecting it. When the user clicks the Edit Item button, we call:
treeWidget->openPersistentEditor( editItem );
which opens the persistent editor on the currently selected item in column zero. And, when the user press the Edit Rating button, we call:
treeWidget->openPersistentEditor( editItem, 1 );
to open the the editor for the ratings. This is not exactly the way most people will be used to editing ratings for songs, but there is a Qt example provided with the source called Star Delegate.
Sorting
Sorting is another area that is not perfect for the sample application, because if you click the sorting buttons, you will see that we call the code:
treeWidget->sortByColumn( 0, Qt::AscendingOrder );
This will sort all items in the column, and if we were sorting the ratings, it would be perfect, but because we are sorting the artists and albums, the default sort sorts everything including the song titles, which, in this case, isn't necessarily what we would want.
CheckBoxes
If you've ever used the ITunes application, you'll know that each song has a check box besides it that basically tells the application to include the song in playlists either on the computer or for mobile listening. You can see these in the demo by selecting the Show Checkboxes button, and you will get:
Here, you can see that we only add the checkboxes for the songs. This is done with the code:
for( int n=0; n<nAlbumsCount; n++ )
{
QTreeWidgetItem *albumsWidget = artistWidget->child( n );
int nSongsCount = albumsWidget->childCount();
for( int j=0; j<nSongsCount; j++ )
{
QTreeWidgetItem *songWidget = albumsWidget->child( j );
songWidget->setFlags( Qt::ItemIsSelectable | Qt::ItemIsEnabled
| Qt::ItemIsUserCheckable );
songWidget->setCheckState( 0, Qt::Checked );
}
}
At the moment, this is done with a call the setFlags function for the individual QTreeWidgetItem, but I wouldn't be surprised if there is a setCheckBox function provided in some future Qt update.
Conclusion
This concludes our brief look at the QTreeWidget and our introduction to getting started with programming with Qt 4 on KDE 3.5. It is, of course, a personal choice when developing for KDE if you want to switch to Qt 4 now or keep using the 3.5 code base until version 4 of KDevelop is released.
This member has not yet provided a Biography. Assume it's interesting and varied, and probably something to do with programming.


 General
  News
News  Suggestion
  Question
  Bug
Bug  Answer
  Joke
Joke  Praise
  Rant
Rant  Admin
Admin 


