Introduction
Oracle Application Express (Oracle APEX) is a rapid web application development tool for the Oracle database. It works exceptionally well for CRUD applications
that consist mostly of Create, Read, Update, and Delete operations. In this article, I will introduce the steps to create a customized report using Oracle APEX.
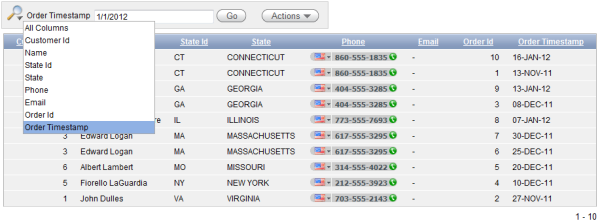
Oracle APEX provides a web-based UI to create reports. Basically, it allows you to create Classic reports and Interactive reports. By creating an Interactive report,
you can allow the end user to filter the data interactively as in the following sample reports.
However, in order to use these interactive functions, end users must have some knowledge about Oracle APEX and I don’t think it is appropriate for high level
managers in an organization. In addition, the built-in filter doesn’t work efficiently for the date data type. Hence, in the next sections, I will introduce the steps
to create an interaction report then apply the custom filter area into it. Below is the screenshot of the custom filter that will be created:

Create a standard interactive report
I assume that you have already created an Oracle APEX application. In case you have not, click on the Application Builder menu and click on the Create Application button,
then follow its directions all the way to the Finish step. The steps below are for creating a report.
- Step 1: Click on your application to open it.
- Step 2: Click the Create Page button.
- Step 3: Select the Report radio button. Click Next.
- Step 4: Select the Interactive radio button. Click Next.
- Step 5: Enter “Customer Report” to both Page Name and Region Name text boxes. Click Next.
- Step 6: Select Do not use tabs. Click Next.
- Step 7: Enter the following SQL to the text area. Select No in Link to Single Row View list. Click Next.
select
c.CUSTOMER_ID,
CUST_FIRST_NAME || ' ' || CUST_LAST_NAME as NAME,
CUST_STATE as STATE_ID,
STATE_NAME as STATE,
PHONE_NUMBER1 as PHONE,
CUST_EMAIL as EMAIL,
ORDER_ID,
ORDER_TIMESTAMP
from	DEMO_CUSTOMERS c
	join DEMO_ORDERS o on c.CUSTOMER_ID = o.CUSTOMER_ID
	join DEMO_STATES s on c.CUST_STATE = s.ST
Step 8: Click Finish.
Now you’ve created a standard interactive report.
Turn off the default Search bar
The first step to customize the search area is to turn off the default filter function of the report by following these steps:
- Step 1: Click on the report under the application.
- Step 2: On the page rendering area, expand Customer Report > Regions > Body nodes. Then right lick
on the Customer Report region and select the Edit Report Attributes menu on the context menu.
- Step 3: Click on the Search Bar tab then select No in the Include Search Bar list.
After this step, you have turned off the default Search bar.
Create the custom filter area
Now, we are ready to create our own filter area with these criteria: Customer Name (text box), State (drop down list), and Order Date (from date – to date). Here are the steps:
- Step 1: Click on the report under the application.
- Step 2: On the Page Rendering area, expand the Customer Report node. Right click on the Regions node and select the Create menu on the context menu.
- Step 3: Select the HTML radio button. Click Next.
- Step 4: Select the HTML radio button again. Click Next.
- Step 5: Enter “Search” in the Title text box. Select Report Filter – Single Row in Region Template drop down list. Enter “5” in the Sequence
text box (so that this filter area will be displayed before the data area whose sequence is 10). Click Next.
- Step 6: Leave the HTML Text Region text area empty. Click Create Region.
You’ve just created an empty search area. If you run the report now, you will see that search icon without any criteria. Follow the next steps to add these criteria to your search area:
- Step 1: Right click on the Search region. Select the Create Page Item menu on the context menu.
- Step 2: Select the Text Field radio button. Click Next.
- Step 3: Enter “P2_Name” into the Item Name text box. Click Next.
- Step 4: Enter “Name” into the Label text box. Enter “10” in the Field Width text box. Select No in the Begin On New Line drop down list (if your search area has
too many items to display in a single row, select Yes to start a search line). Click Next.
- Step 5: Select the default values and select Next all the way to the end. Click Create Item.
You’ve just finished creating the Name criterion. The steps below are for creating the State drop down list:
- Step 6: Right click on the Search region. Select the Create Page Item menu on the context menu.
- Step 7: Select the List radio button. Click Next.
- Step 8: Enter “P2_State” into the Item Name text box. Click Next.
- Step 9: Enter “State” into the Label text box. Select No in Begin On New Line. Click Next.
- Step 10: Select the default values. Click Next.
- Step 11: Enter “--All States --“ to the Null Display Value text box. Enter the following SQL to the List of Values Query text area. Click Next.
select ST, STATE_NAME
from DEMO_STATES
Step 12: Click Create Item.You’ve finished creating the State criterion. Follow the steps below to create the From Order Date criterion:
Step 13: Right click on the Search region. Select the Create Page Item menu on the context menu.Step 14: Select the Date Picker radio button. Click Next.Step 15: Enter “P2_From” into the Item Name text box. Click Next.Step 16: Enter “Order from” into the Label text box. Enter “10” into Field Width. Select No in Begin On New Line. Click Next.Step 17: Enter “MM-DD-YYYY” into Format Mask. Click Next.Step 18: Click Create Item.Step 19: Repeat steps 13-18 to create Order To criterion.After these steps, you already have all the criteria on place. Let’s create the Run button so we can refresh the data based on these criteria.
Step 20: Right click on the Search region. Select the Create Page Item Button menu on the context menu.Step 21: Enter “P2_Run” into the Button Name text box. Enter “Run” into Label. Click the Create button.Now run the report, select some criteria, and click the Run button and … nothing happens. It’s because we have not wired up these criteria to the report query yet. Let’s update the query.
Step 22: Open the report page.Step 23: Right click on the Customer Report region and select the Edit menu.Step 23: Enter the following SQL to the Region Source text area. Click Apply Changes.
select
c.CUSTOMER_ID,
CUST_FIRST_NAME || ' ' || CUST_LAST_NAME as NAME,
CUST_STATE as STATE_ID,
STATE_NAME as STATE,
PHONE_NUMBER1 as PHONE,
CUST_EMAIL as EMAIL,
ORDER_ID,
ORDER_TIMESTAMP
from	DEMO_CUSTOMERS c
	join DEMO_ORDERS o on c.CUSTOMER_ID = o.CUSTOMER_ID
	join DEMO_STATES s on c.CUST_STATE = s.ST
where (:P2_Name is null or lower(CUST_FIRST_NAME) || ' ' ||
    lower(CUST_LAST_NAME) like '%' || lower(:P2_Name) || '%') and
(:P2_STATE is null or CUST_STATE = :P2_STATE) and
(:P2_FROM is null or ORDER_TIMESTAMP >= :P2_FROM) and
(:P2_TO is null or ORDER_TIMESTAMP <= :P2_TO)
Some small customizations
As can be seen in the current report, there will be two columns for State and we should hide the State Code column by using these steps:
- Step 1: Right click on Customer Report region and select the Edit Report Attributes menu.
- Step 2: In the column attributes area, click on Edit (pencil) icon right before the STATE_ID column.
- Step 3: Select Hidden in the Display Type list.
If you run the report now, this column has disappeared.
One more thing you should do to the report is to update the date format of ORDER_TIMESTAMP. In order to do this, follow the
first and second steps
of the State Code column. Then on the Column Definition page, enter ‘MM-DD-YYYY’ to the Number/Date Format text box.
Finally, your report will look like this:
If anyone needs help or have any question about Oracle APEX, it will be welcome, as are any suggestions or modification.
Email: mailto:nhonnguyen@kms-technology.com.
This member has not yet provided a Biography. Assume it's interesting and varied, and probably something to do with programming.


 General
  News
News  Suggestion
  Question
  Bug
Bug  Answer
  Joke
Joke  Praise
  Rant
Rant  Admin
Admin 


