Introduction
In this small tutorial, I will guide you through the steps of making a small plugin for Maya 2012 which utilise a Qt form created using the Qt designer, and how we can add call backs and event triggers to make a user friendly interface for our python scripts. At the end of this tutorial I'll show you an example of the flexibility of Qt and how it can create some dynamic and creative GUI's.
Please be aware this is aimed for Maya 2012, all other versions of Maya are un-tried and un-tested.
Background
Before we start, we need to ensure that we are using either a 32-bit or 64-bit version of Maya 2012, and that we have Qt and PyQt setup for use within Maya. If you haven't got a version of Qt and PyQt set up, you can find a small tutorial on my website here.
If you have had much experience with the C++ version of Qt in the past, you should find that PyQt follows a very similar logic, in the way it handles call backs and the event triggers.
Using the code
So one of the best things of Qt, is the graphical UI designer that comes with Maya 2012 by default. This programme can be found in the same folder that Maya.exe can be, usually C:\Program Files\Autodesk\Maya2012\bin.
UI Desinger
To accomplish this we have two main classes, one of the class’s deals with the storage, adding, removing and getting of the individual shape data, whereas the other class is used more as a structure and stores data such as the colour, line width, position and what shape segment it is with.
To use this programme is fairly self-exploratory, create a blank dialog, drag items (or widgets as they're known in Qt) into the dialog window, position and then assign an objectName and text in the property editor.
What an objectName is, is a unique name for that specific widget, so when we want to use it in PyQt, we will refer to that object by its objectName, so it's useful to give them useful and meaningful names. Each person has their own method of giving out names, for me its usually the text on the widget followed by the type, such as "addBox_Button".
For this demo, I've built a small UI that looks like this:
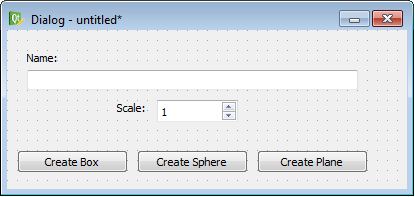
In this UI we have the following items:
| Widget Types | objectName |
QLineEdit | objectName_EditBox |
QPushButton | createBox_Button |
QPushButton | createSphere_Botton |
QPushButton | createPlane_Button |
QSpinBox | scale_SpinBox |
Once this is all designed, we can save it out, I suggest in a common place for scripts, as you need to hardcode in the address of
the file, so don't put it too far out the way!!
Ok, into Maya!!!!!
Maya Side
So we're done the creative part, now for the real part, the python scripting and linking it up!
With Maya 2012 loaded up, let's open up the Python editor and just check that Qt and PyQt is working properly.
We can do this by running a small little command, which if everything is in place, will print "Qt is working fine" to the
console.
from PyQt4 import *
import maya.cmds as cmds

print "Qt is working fine"
If the error "# Error: ImportError: No module named PyQt4 #" shows up, then there is something wrong with your Qt and
PyQt install, so I would go back to the section where I talk about installing this and get this all sorted as you will not be able to
go any further.
Now we've confirmed that PyQt is working within Maya, we can look at the main template script which we can use to load in the .UI
form that we created using the UI designer, and the class skeleton which will support it.
So PyQt has a great function for loading in UI forms, which is under the uic portion of PyQt4. Use the following example to create
the UI within Maya, remember to change the file path to your own file depending on where you save it!
from PyQt4 import QtGui,QtCore, uic
import maya.cmds as cmds

uifile = 'G:/3D work/Python Scripts/Tuts/Intro to Qt/Intro_UI.ui'
form, base = uic.loadUiType(uifile)


class CreateUI(base, form):
    def __init__(self):
        super(base,self).__init__()
        self.setupUi(self)

def main():
    global PyForm
    PyForm=CreateUI()
    PyForm.show()

if __name__=="__main__":
    main()
If we now run this script, you'll see we have the same UI that we designed, but running in a Maya Window.

So now we have the UI being displayed, we have to look at hooking into the event handlers created when something happens. A good
example of this is the event triggered when a button is pressed. We can tell that event to run this particular function within the UI
class every time this particular button is pressed.
Ensuring that the button events are working properly is always a good step, just to make sure everything is named correctly.
So to do this we can put the code directly into the class constructor, so that it will get run when UI is built, (that's within
the __innit__ function) but I personally prefer to have all the event handlers being called within a single function, it keeps my
constructor nice and clean, and it helps me keep track of my code, incise I need to add more.
The code to do this is like so:
QtCore.QObject.connect(self.createBox_Button, QtCore.SIGNAL("clicked()"),self.createBox_Fn)
The "self.createBox_Button" is the objectName of the Qt widget we want to get, so in this case it's the button with the text
"Create Box". The "clicked()" is the name of the event for that widget we want to use, so it's when the button is clicked on. Lastly
the "self.createBox_Fn" is the name of the function we want to run when this event is triggered.
For this example, we're going to have a function called "Establish_Connections" that will hold all the event callers, we set this
up by defining this function within the CreateUI class. While we're doing that, we might as well create 3 new functions that will be
the event functions that each object will use when it gets called. For now these will just hold a simple Print command.
Your code should look like this now:
from PyQt4 import QtGui,QtCore, uic
import maya.cmds as cmds

uifile = 'G:/3D work/Python Scripts/Tuts/Intro to Qt/Intro_UI.ui'
form, base = uic.loadUiType(uifile)


class CreateUI(base, form):
    def __init__(self):
        super(base,self).__init__()
        self.setupUi(self)
        self.Establish_Connections()
    def createBox_fn(self):
        print "Create Box"
    def createSphere_fn(self):
        print "Create Sphere"
    def createPlane_fn(self):
        print "Create Plane"
    def Establish_Connections(self):
        QtCore.QObject.connect(self.createBox_Button, QtCore.SIGNAL("clicked()"),self.createBox_fn)
        QtCore.QObject.connect(self.createSphere_Botton, QtCore.SIGNAL("clicked()"),self.createSphere_fn)
        QtCore.QObject.connect(self.createPlane_Button, QtCore.SIGNAL("clicked()"),self.createPlane_fn)
def main():
    global PyForm
    PyForm=CreateUI()
    PyForm.show()

if __name__=="__main__":
    main()
When we click on each button, we get a specific piece of text printed. So now it's time to expand these sections using good old
Python!
Python!!
Ok, with all the event handlers in place, and Maya creating the UI, it's time to add the bulk of the plugin. As this is more Maya
Python that anything with Qt or PyQt I'm going to skip over this very quickly.
Each of our functions (createBox_fn, createSphere_fn and createPlane_fn) needs code which will run when run.
All we're going to do is add in a simple python command to create these primitives objects if that button is pressed.
- Cmds.polyCube()
- Cmds.polySphere()
- Cmds.polyPlane()
These 3 functions will create the standard primitives, but we want to go even further! So we're going to take the name from the
edit text box, and the scale from the spinner. So to do this we need to get these values.
We can use the self.objectName_EditBox.text() function to get the text that's currently in the text box, and
self.scale_SpinBox.value() will get the value of the spinner control. Armed with these two, we can finish our script.
Currently the text returned by self.objectName_EditBox.text() is a QString, which is different to a python string, but we can cast
it to a python string by encapsulating it by str().
The final code should look like:
from PyQt4 import QtGui,QtCore, uic
import maya.cmds as cmds

uifile = 'G:/3D work/Python Scripts/Tuts/Intro to Qt/Intro_UI.ui'
form, base = uic.loadUiType(uifile)

class CreateUI(base, form):
    def __init__(self):
        super(base,self).__init__()
        self.setupUi(self)
        self.Establish_Connections()
    def createBox_fn(self):
        tempName = str(self.objectName_EditBox.text())
        tempScale =  self.scale_SpinBox.value()
        cmds.polyCube(n = tempName, h = tempScale, w = tempScale, d = tempScale)
    def createSphere_fn(self):
        tempName = str(self.objectName_EditBox.text())
        tempScale =  self.scale_SpinBox.value()
        cmds.polySphere(n = tempName, r = tempScale)
    def createPlane_fn(self):
        tempName = str(self.objectName_EditBox.text())
        tempScale =  self.scale_SpinBox.value()
        cmds.polyPlane(n = tempName, h = tempScale, w = tempScale)
    def Establish_Connections(self):
        QtCore.QObject.connect(self.createBox_Button, QtCore.SIGNAL("clicked()"),self.createBox_fn)
        QtCore.QObject.connect(self.createSphere_Botton, QtCore.SIGNAL("clicked()"),self.createSphere_fn)
        QtCore.QObject.connect(self.createPlane_Button, QtCore.SIGNAL("clicked()"),self.createPlane_fn)
def main():
    global PyForm
    PyForm=CreateUI()
    PyForm.show()

if __name__=="__main__":
    main()
The Power of PyQt
So I keep talking about the power of PyQt and Qt, well I would like to show you a screenshot of an in development tool called
PyNodal. This is a node based widget which is written completely within Maya and PyQt and just shows how much you can do with PyQt
and the flexibly of the whole system, as all the drawing, users clicking, and variables are being controlled through my script.
Points of Interest
Although simplistic in nature, this tutorial will hopeful help some people who are familiarly with Python with Maya break into the
world of PyQt for Maya and allow them to experience a greater freedom and take their tools to the next level.
Geoff Samuel currently employed as a Principal Technical Animator at Rockstar Games in San Diego, specializing in tools and pipelines for animation and motion capture.
For more information please check out www.GeoffSamuel.com


