Introduction
This article explains how to add a Smart Tag feature to a user control. As we all know, user controls are commonly used in Windows Forms applications for reusability purposes providing various functionalities across the project. The Smart Tag facility added to it will have an extra benefit to the developers. They could customize the user controls according to their needs in different forms in the project during design-time by setting various properties and behaviours. This article also demonstrates this concept with a sample and simple application describing the steps in building the necessary components required.
Designer Services
The .NET design-time architecture provides ways for customizing the behaviour and display of components and controls in design mode. It lets developers build customized design-time extensions for components and controls. Developers can provide custom design-time behaviour, value configuration interfaces, code generation for property initialization, and take advantage of services provided by the design-time environment.
Most of the custom components and controls are designable, which means they have settings that users can configure with a graphical user interface (UI) at design time. These settings usually affect instances of the component at run time. For example, add a reference to the assembly System.Design and import the System.ComponentModel.Design namespace. You can create smart tags or a custom designer for any Windows Forms control or component with types in this namespace.
Design-time Architecture
There are three primary design-time support providers: Designers, Type converters, and UI Type editors. I would quickly describe few components in the above architecture that pertain only to this article.
Attributes associate a type or type member with a class that extends design-time behaviour. For example, a DesignerAttribute associates a type with a designer.
A designer can customize the behaviour of a component at design time, including its appearance, initialization, and interaction with the user. A designer can add, remove, or replace properties listed in a property browser for a selected component. A designer can provide user-defined methods that can be linked to certain component events or executed from a custom menu command, or DesignerVerb.
In the System.ComponentModel.Design namespace, DesignerActionList class provides the base class for types that define a list of items used to create a smart tag panel.
Designer commands and the DesignerAction object model provide a generalized way for you to specify a set of actions for a component at design time. Users then access these actions from the design surface, typically by clicking on a component's smart-tag glyph () and selecting one of the offered actions from the smart-tag panel. This model unifies the various ways a designer can offer commands to users.
Smart Tags
The smart-tag feature enables components and controls to display context-sensitive information and commands to users. The smart tag can be thought of as a replacement for designer verbs, because you can choose to display a smart tag item in the smart-tag panel and also in the shortcut menu associated with a component or control.
Designer Command Classes such as DesignerVerb and DesignerActionItem allow us to expose the designer commands in the form of menu commands while developing components and controls.
DesignerAction Object Model
The following is the list of important classes that implement the DesignerAction object model.
DesignerActionItem: Represents a panel item on a smart-tag panel. DesignerActionList: Defines a list of items used to create a smart-tag panel. DesignerActionService: Establishes a design-time service that manages the collection of DesignerActionItem objects for components. DesignerActionTextItem: Represents a static text item on a panel. Derives from DesignerActionItem. DesignerActionPropertyItem: Represents a panel item that is associated with a property in a class derived from DesignerActionList. Derives from DesignerActionItem. DesignerActionMethodItem: Represents a panel item that is associated with a method in a class derived from DesignerActionList. Derives from DesignerActionItem. DesignerActionHeaderItem: Represents a static header item on a smart-tag panel. Derives from DesignerActionTextItem.
Walkthrough for a Sample Application: UserControl with SmartTag
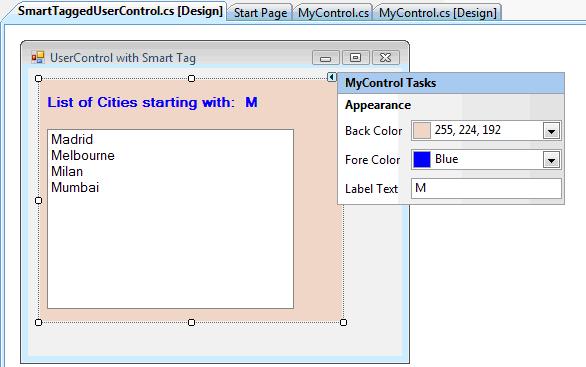
Now, with this understanding of Design-time classes, let me proceed further in developing a Usercontrol that is attached with a SmartTag. In this application, we have a usercontrol with a list of the names of the cities in a listbox and the users may filter out the cities by typing few characters in the text provided in the Smart Tag panel command.
Users may also set the background and foreground color of the usercontrol with the menu commands found in the Smart Tag panel. Thus, the Smart Tag feature built in this usercontrol with three verbs to get/set the values of BackColor and ForeColor of the user control and the Text property of the label control inside it to filter out the names of the cities.
Step 1: Create a Windows Forms Application and add a usercontrol named MyControl to it.
Step 2: Add a label control to the usercontrol surface. Set its Name property to “label2” and Text property to “List of Cities starting with:”.
Step 3: Add another label named “label1”.
Step 4: Add a listbox control and call it as listBox1.
Step 5: Remove the VS generated code for the class MyControl and add the following code to define the usercontrol with required properties. Note that the class is attached with a Designer attribute:
[Designer(typeof(myControlDesigner))]
    public partial class MyControl : UserControl
    {
        public MyControl()
        {
            InitializeComponent();
        }
        public override Color BackColor
        {
            get
            {
                return base.BackColor;
            }
            set
            {
                base.BackColor = value;
            }
        }

        public override Color ForeColor
        {
            get
            {
                return base.ForeColor;
            }
            set
            {
                base.ForeColor = value;
            }
        }
        public string LabelText
        {
            get
            {
                return this.label1.Text;
            }
            set
            {
                this.label1.Text = value;
            }
        }
}
Step 6: Add the following code in the Load event handler of MyControl after declaring an array for storing a list of names of the cities:
string[] cities;
private void MyControl_Load(object sender, EventArgs e)
{
   cities = new string[] { "NewYork", "Mumbai", "Belgrade",
	"Los Angeles", "Chennai", "New Delhi", "Madrid", "Chicago",
	"Las Vegas", "Bangalore", "Sydney", "Melbourne", "Beijing",
	"Calcutta", "Milan", "Austin", "Brisbane" };
}
Step 7: In the TextChanged event handler for the label1 control, add the following code that filters the names of the cities and populate the list box. It uses a LINQ query on the cities array and filters the names that start with the typed characters in the Smart Tag Panel. It is to note that the label1 is updated when the LabelText property of Mycontrol is changed.
private void label1_TextChanged(object sender, EventArgs e)
{
    listBox1.Items.Clear();
    IEnumerable<string /> filtered =
                   from a in cities
                   where a.StartsWith(label1.Text)
                   orderby a
                   select a;
    if (filtered.Count() > 0)
        listBox1.Items.AddRange(filtered.ToArray());
}
Step 8: Now, ControlDesigner class must be defined for MyControl as specified in the attribute in Step 5. This class myControlDesigner is attached with the PermissionSet attribute as it requires a full permission to access Smart Tag features.
[System.Security.Permissions.PermissionSet
(System.Security.Permissions.SecurityAction.Demand, Name = "FullTrust")]
public class myControlDesigner : System.Windows.Forms.Design.ControlDesigner
{
private DesignerActionListCollection actionLists;
public override DesignerActionListCollection ActionLists
{
get
{
if (null == actionLists)
{
actionLists = new DesignerActionListCollection();
actionLists.Add(new myControlActionList(this.Component));
}
return actionLists;
}
}
}
Step 9: The following code creates a list of Smart Tag menu actions/commands for the usercontrol as specified in its constructor. The DesignerActionList class is inherited and the methods are implemented to created Smart Tag items.
public class myControlActionList : System.ComponentModel.Design.DesignerActionList
{
private MyControl colUserControl;
private DesignerActionUIService designerActionUISvc = null;
public myControlActionList(IComponent component)
: base(component)
{
this.colUserControl = component as MyControl;
this.designerActionUISvc = GetService(typeof(DesignerActionUIService))
as DesignerActionUIService;
}
.....
.....
public override DesignerActionItemCollection GetSortedActionItems()
{
DesignerActionItemCollection items = new DesignerActionItemCollection();
items.Add(new DesignerActionHeaderItem("Appearance"));
items.Add(new DesignerActionPropertyItem("BackColor",
"Back Color", "Appearance",
"Selects the background color."));
items.Add(new DesignerActionPropertyItem("ForeColor",
"Fore Color", "Appearance",
"Selects the foreground color."));
items.Add(new DesignerActionPropertyItem("LabelText",
"Label Text", "Appearance",
"Type few characters to filter Cities."));
return items;
}
Step 10: Build the project.
Step 11: Open Form1 designer and drag the usercontrol “MyControl” in the toolbox to the designer surface and see Smart Tag working smoothly.
Note
The complete code for creating a usercontrol with smart tag explained in this sample application is available for download along with this article. You may add the file MyControl.cs file to any Windows Forms application and add reference to System.Design assembly before building the project. Place the usercontrol in any form and see Smart Tag features working for you.
Conclusion
Smart tags are menu-like user interface (UI) elements that supply commonly used design-time options. Most of the standard components and controls provided with the .NET Framework contain smart tag and designer verb enhancements. This article showed you how to add smart-tag support to user controls so that they can be utilized well in Windows Forms applications.
History
- 9th June, 2009: Initial post
- 22nd June, 2009: Added source code
This member has not yet provided a Biography. Assume it's interesting and varied, and probably something to do with programming.


 General
  News
News  Suggestion
  Question
  Bug
Bug  Answer
  Joke
Joke  Praise
  Rant
Rant  Admin
Admin 


