Introduction
There are many resources available that describe building
Apache modules in C (and Perl with mod_perl) but very little for the C++. This
article is designed to address this situation and describe how to build an
application as an Apache module using C++.
It must be said at this point that there’s no escaping C,
Apache and the APR are written in C and we’ll also be writing C to interface to
it. The object here is to encapsulate it and allow our actually application to
be written entirely in C++.
The Development Environment
As with all projects you must start somewhere. So let’s take
some time over getting all setup. Firstly, these articles are squarely aimed to
*nix based users (Linux, FreeBSD, etc.) If you are a Microsoft Windows user there
will be enough information to get you going but only if you are already a
seasoned Microsoft developer. Everything describe here is described in terms of
my own development system with is based on CentOS6.
In my own setup, I have a dedicated server running CentOS6
but you could also use a virtual machine. The CentOS6 server also has X-Window
installed. For the actual development I
use a laptop running Microsoft Windows7. Installed I have Putty and Xming that
allows me to open various tools straight onto my Windows desktop. However, *nix
purists can just use a single machine if they prefer.
To begin with we need to ensure our server is configured
with all the packages we need. On CentOS6 I used yum to install the following
packages:-
- yum groupinstall 'Development Tools'
- httpd-2.2.15-15.el6.centos.1.x86_64
- httpd-devel-2.2.15-15.el6.centos.1.x86_64
- httpd-tools-2.2.15-15.el6.centos.1.x86_64
Note - if you are using a 32bit machine then ensure you load the correct 32bit packages.
Next install Netbeans for C/C++ from http://netbeams.org and install onto your server. You may also
have to install the Java Runtime package as Netbeans uses this.
If you are running native on the server you should now be able to open Netbeans. However if, like myself, you are on Microsoft Windows you will want to install Putty
and Xming. I setup Putty to allow X-Forwarding. Once SSHed into your server,
running Netbeans should throw the IDE onto your Microsoft Windows desktop
inside a nice Xming window.
At this point you could create a standard helloworld.c project just to test your tool
chain and make sure everything works fine.
Our first Apache module, HelloWorld
If you are entirely new to Apache module development then reading the standard Apache helloworld [1] is a good place to start. You should spend a few minutes getting familiar with this tutorial as it’s this we will be implementing in a C/C++ format. Remember, we cannot escape C but we can do a good job of hiding it in
encapsulated objects. So, once you have looked over the Apache tutorial return
here and we’ll begin.
[1]http://httpd.apache.org/docs/2.4/developer/modguide.html
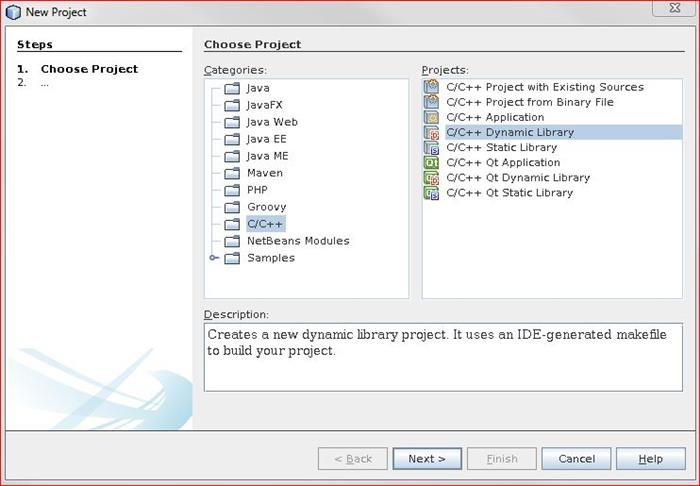
So let’s begin by creating our Netbeans project. Starting with File > New Project we select C/C++ and the project type should be C/C++ Dynamic Library as illustrated:-
In the next screen I entered “mod_foo” as the project name rather than “helloworld” as I will be using this project in future articles.

So now we have a bare project ready to get going. But first we need to setup some project preferences and then construct a reasonable file system layout. First, the
layout:-
Assuming you are in your own home working directory change to your project:-
- cd NetBeansProjects/mod_foo
- mkdir src
- mkdir include
Your layout should look like:-
Now on your project right click and select Properties at the base of the popup context menu. Select “Linker” and then select “Output”. The default Netbeans uses is to call your output “libmod_foo” and we want to change this to “mod_foo” as shown below:-
Next select C Compiler and on Include Directories enter the following:-
- include [see note 1 below]
- /usr/include/httpd
- /usr/include/apr-l
- /usr/local/include
- /usr/include
[1] Note, this is added as a "relative" include and you select the directory you created above. The rest are all system directories that should be standard on your server. Here's a graphic showing these additions:-
So far so good, but be aware that so far we have configured the "Debug (active)" build configuration. When it comes time to build a Release version you will have to
repeat this and add in the properties for a Release build configuration.
The observant will have noticed from the images that I did all this whilst logged in a user root rather than my normal account. The main reason for this is later you will see it does make debugging things easier. But a word of caution here, using the root account on a development system is a security hazard. Make sure your development system is behind a firewall and is well secured physically also (yes, while at the toilet my boss inverted all my screens, just to prove a point!).
Before we actually begin writing the code there is one thing we should do with our Netbeans Project. We are going to be creating class objects that encapsulate Apache and APR interfaces. To structure your project and make it more obvious what is what we will use Netbeans “logical” folder to create an "Apache" directory. In here we will place all our objects that interact with Apache. We do this in both "Source Files" and "Header Files". I also add logical folders for Application to separate out the pure C++ application code from the Apache encapsulating code. See these image for more details:-
Now it's time to create the first two files, mod_foo.cpp and mod_foo.hpp which should be created in the "root" folders of Source Files and Header Files. Make sure you specify the "Folder" ( src or include that we made eariler):-
Finally we should have something that looks like this:-
We can now start by building the "boiler plate" code for Apache and adding in a few other things to make the C++ linkage work fine.
Here are the two files:-
mod_foo.hpp
#ifndef MOD_FOO_HPP
#define MOD_FOO_HPP
#ifdef __cplusplus
#define EXTERN_C_BLOCK_BEGIN extern "C" {
#define EXTERN_C_BLOCK_END }
#define EXTERN_C_FUNC extern "C"
#else
#define EXTERN_C_BLOCK_BEGIN
#define EXTERN_C_BLOCK_END
#define EXTERN_C_FUNC
#endif
#include <httpd.h>
#include <http_protocol.h>
#include <http_config.h>
#endif /* MOD_FOO_HPP */
mod_foo.cpp
#include "mod_foo.hpp"

EXTERN_C_FUNC
int foo_handler( request_rec* inpRequest )
{
    int nReturnVal = DECLINED;

    if ( inpRequest->handler != NULL && strcmp( inpRequest->handler, "foo" ) == 0 )
    {
        ap_rputs( "Hello World from FOO", inpRequest );
        nReturnVal = OK;
    }

    return nReturnVal;
}

EXTERN_C_FUNC
void foo_hooks( apr_pool_t* inpPool )
{
    ap_hook_handler( foo_handler, NULL, NULL, APR_HOOK_MIDDLE );
}

EXTERN_C_BLOCK_BEGIN
module AP_MODULE_DECLARE_DATA foo_module =
{
    STANDARD20_MODULE_STUFF,
    NULL,
    NULL,
    NULL,
    NULL,
    NULL,
    foo_hooks
};
EXTERN_C_BLOCK_END
So, on Netbeans we can build this by pressing F11 and if all is well you will get a successful build. It’s now time to install your module and give it it’s first test run.
In you ssh shell change directory to where Netbeans built your module. On my server it’s here:-
- ~/NetBeansProjects/mod_foo/dist/Debug/GNU-Linux-x86/
And in there you should see a file mod_foo.so which we can install into Apache. Note, if your ssh shell is not root you will need root permissions to do this:-
- # apxs –n foo –I mod_foo.so
The Apache apxs tool should been installed as part of your Apache installation. For a standard 64bit server this installs mod_foo.so to /usr/lib64/httpd/modules/
Now that that module is in place we need to activate it. In /etc/httpd/conf.d create a new file called foo.conf and in it place:-
LoadModule foo_module modules/mod_foo.so
<Location /foo>
    SetHandler foo
</Location /foo>
And finally to run Apache in single process/non-thread mode invoke with httpd –X which will cause Apache to run until you kill it with Ctrl-C and then point your favourite Firefox at <a href="http://localhost/foo">http://localhost/foo</a> and if it all worked you should see your "Hello World from FOO" printed.
Debugging
Before we move on to coding some nice OOPs stuff it’s worth mentioning at this point how one can use the integrated gdb debugger in Netbeans. Clearly doing httpd –X invoked it from the command line. We are not going to try and build all of Apache in Netbeans and run it from there (although you could).
The easiest way is to use Netbeans "Attach to process" under the Debug menu. In the popup dialog filter enter "httpd –X" and you will see your process you start from the command line. Select it and attach. You can then set a breakpoint in the foo_handler() function. When you refresh Firefox it’ll break at that point.
However, on every code change you make you will need to recompile/build, Ctrl-C the httpd –X, re-install mod_foo.so with apxs, restart httpd –X and re-attach. It does sound a lot, however you’ll soon get use to it and it only takes a few seconds to get each iteration going.
Concluding
This concludes part 1 which was all about getting setup. In part 2 of this series we’ll begin to turn this basic start into some nice C++ OOPs style coding techniques.
Hardware, Software Engineer and Systems Architect for more than 25 years cover topics from C/C++, OS (Linux and FreeBSD drivers), MySQL, Apache, PHP and embedded systems using C/C++ and Assembler.


 General
  News
News  Suggestion
  Question
  Bug
Bug  Answer
  Joke
Joke  Praise
  Rant
Rant  Admin
Admin 


