Introduction
Martin Fowler, once, said that the best method to make a project faster is to improve the speed in that 1/10 part of the code where 9/10 of the time is consumed. Let's apply that to project development. Considering that most of our projects are mainly constructed from tables and forms that are linked with the database, if we could make the development of these components faster, the development of the entire projects would be faster.
I created a few components for this purpose that make web (Swing in the future) forms much easier to work with, and make database access transparent, by using JDO. Also tables are much easier to construct and handle.
More concrete:
Wouldn't you like to construct a form like this:
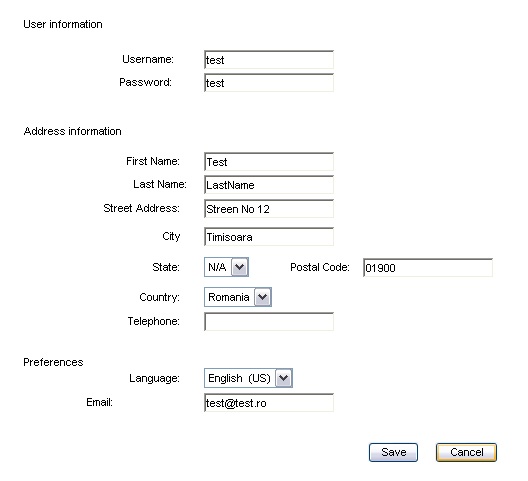
Without worrying about data retrieval, whether it is an insert or update, and save into the database? Or wouldn't you like to build a paged, multi selection, orderable by columns table like this with just a few lines of code:

For the first version, this project extends Echo web framework ( http://www.nextapp.com/products/echo), its components project Echopoint (http://echopoint.sf.net/) and TJDO (http://tjdo.sf.net/).
Before you begin
This tutorial assumes that you have a basic working knowledge of the Java programming language. If you don't, you'll want to read Sun's Java tutorial before you get started with dataGlue. This tutorial also presumes that you are familiar with Echo and JDO concepts (Swing will also be helpful).
You can find Echo tutorial here and here. Information about JDO and open source TJDO.
dataGlue petstore sample application installation
Simply download the petstore.war (details about download at the bottom of this tutorial) and install it as any Java web application. If you're using Tomcat, just copy it into CATALINA_HOME/webapps directory. Change the database URL, username and password in jdo.properties in petstore.war/WEB-INF/jdo.properties. Default is set to MySQL, on localhost, on the "test" database, with username "root" and no password.
First steps
- Create your application instance that shall create your main window. To do this extend
dataglue.application.BaseInstance
import dataglue.petstore.views.*;
import nextapp.echo.*;
import dataglue.application.*;
public class ApplicationInstance extends BaseInstance {
public Window init() {
Window window = new Window();
ContentPane content = new ContentPane();
content.setFont(new Font(Font.ARIAL, Font.PLAIN, 8));
content.add(Filler.createVerticalStrut(30));
content.add(new Main(this));
window.setContent(content);
return window;
}
}
- Create the controller servlet that must extend
nextapp.echo.EchoServer
public class Tutorial extends nextapp.echoservlet.EchoServer {
static {
echopoint.ui.Installer.register();
}
public EchoInstance newInstance() {
return new dataglue.petstore.application.ApplicationInstance();
}
- Edit you web.xml file
You must add you controller servlet and your path for your jdo.properties file where you specify all database URL, driver and other properties. Default is named jdo.properties and is in /WEB-INF/ directory.
="1.0"="UTF-8"
<!DOCTYPE web-app PUBLIC "-//Sun Microsystems,
Inc.//DTD Web Application 2.3//EN"
"http://java.sun.com/dtd/web-app_2_3.dtd">
<web-app>
<context-param>
<param-name>internationalisation</param-name>
<param-value />
</context-param>
<context-param>
<param-name>jdo.properties</param-name>
<param-value>/WEB-INF/jdo.properties</param-value>
</context-param>
<servlet>
<servlet-name>tutorial</servlet-name>
<servlet-class>dataglue.tutorial.Tutorial</servlet-class>
</servlet>
<servlet-mapping>
<servlet-name>tutorial</servlet-name>
<url-pattern>/tutorial</url-pattern>
</servlet-mapping>
</web-app>
- Edit your database properties
Modify you jdo.properties file
javax.jdo.PersistenceManagerFactoryClass=
com.triactive.jdo.PersistenceManagerFactoryImpl
javax.jdo.option.ConnectionDriverName=org.gjt.mm.mysql.Driver
javax.jdo.option.ConnectionURL=jdbc\:mysql\:
javax.jdo.option.ConnectionUserName=root
javax.jdo.option.ConnectionPassword=
javax.jdo.option.NontransactionalRead=true
com.triactive.jdo.autoCreateTables=true
Attention: javax.jdo.option.NontransactionalRead must be set on true. This sample file is for TJDO implementation.
- Create your application panels, such as:
public class TutorialPanel extends Panel{
}
- Deploy, test etc.
Forms
First let us make a very simple example: We have a POJO Customer.java
public class Customer{
private String firstName;
private String lastName;
private String email;
private String username;
private String password;
private String status;
private String addr1;
private String addr2;
private String city;
private String state;
private String zip;
private String country;
private String phone;
private String langPref;
}
Presuming that you are familiar with JDO concepts, we create its JDO description, named Customer.jdo, we compile it and then enhance it using TJDO methods
="1.0"
<!DOCTYPE jdo SYSTEM "file://javax/jdo/jdo.dtd">
<jdo>
<package name="">
<class name="Customer">
<field name="username">
<extension vendor-name="triactive" key="length" value="max 32"/>
</field>
<field name="password">
<extension vendor-name="triactive" key="length" value="max 32"/>
</field>
<field name="langPref">
<extension vendor-name="triactive" key="length" value="max 32"/>
</field>
<field name="email">
<extension vendor-name="triactive" key="length" value="max 32"/>
</field>
<field name="firstName">
<extension vendor-name="triactive" key="length" value="max 32"/>
</field>
<field name="lastName">
<extension vendor-name="triactive" key="length" value="max 32"/>
</field>
<field name="status">
<extension vendor-name="triactive" key="length" value="max 32"/>
</field>
<field name="addr1">
<extension vendor-name="triactive" key="length" value="max 32"/>
</field>
<field name="addr2">
<extension vendor-name="triactive" key="length" value="max 32"/>
</field>
<field name="city">
<extension vendor-name="triactive" key="length" value="max 32"/>
</field>
<field name="state">
<extension vendor-name="triactive" key="length" value="max 32"/>
</field>
<field name="zip">
<extension vendor-name="triactive" key="length" value="max 32"/>
</field>
<field name="country">
<extension vendor-name="triactive" key="length" value="max 32"/>
</field>
<field name="phone">
<extension vendor-name="triactive" key="length" value="max 32"/>
</field>
</class>
</package>
</jdo>
In the end we have an enhanced class called Customer.class, that we shall use.
Now lets make a form, that will be responsible for creating and updating customers into the database. We extend the dataglue.UI.DataForm component. The DataForm is set on XYLayout, which means that components are placed absolute/relative on the browser. We must specify the persistent object class (Customer.class) that shall be bound to the form, and its width and height (540,480) in pixels.
import nextapp.echo.*;
import dataglue.UI.*

public class CustomerForm extends DataForm {
We make two constructors. One shall be used to create and one for retrieving a customer by id, populate form and update the changes, this is done very simple:
public CustomerForm(BaseInstance instance) {
super(instance, Customer.class, 540,480);
}

public CustomerForm(BaseInstance instance,Object id) {
super(instance, id, Customer.class, 540,480);
}
Now we declare the components that we use in this form:
TextField usernameField =null;
TextField passwordField =null;
TextField fname =null;
TextField lname =null;
TextField street =null;
TextField city =null;
TextField code =null;
TextField phone =null;
TextField email = null;

SelectField state =null;
SelectField country =null;
SelectField language =null;

PushButton saveButton =null;
PushButton cancelButton =null;
We must now override initComponents() method from the DataForm that makes the initialization for the components:
protected void initComponents()
{
usernameField = new TextField();
passwordField = new TextField();
fname = new TextField();
lname = new TextField();
email = new TextField();
street = new TextField();
city = new TextField();
code = new TextField();
phone = new TextField();
saveButton = new PushButton(" Save ");
cancelButton = new PushButton(" Cancel ");
state = new SelectField(new String[]{"N/A","CA","FL","NY"});
country = new SelectField(new String[]{"US","UK","Romania","France"});
language = new SelectField(new String[]
{"English (US)","English (UK)","French (FR)","French (CA)","Romanian"});
this.add(cancelButton, new XYConstraints(462, 449));
this.add(saveButton, new XYConstraints(395, 449));
this.add(new Label("Username:"), new XYConstraints(150, 60));
this.add(new Label("Telephone:"), new XYConstraints(155, 322));
this.add( new Label("Country:"), new XYConstraints(167, 298));
this.add(new Label("State:"), new XYConstraints(180, 268));
this.add(new Label("City"), new XYConstraints(190, 237));
this.add(new Label("Street Address:"), new XYConstraints(131, 209));
this.add(new Label("Last Name:"), new XYConstraints(161, 185));
this.add(new Label("First Name:"), new XYConstraints(154, 162));
this.add(new Label("Password:"), new XYConstraints(147, 83));
this.add(usernameField, new XYConstraints(231, 57));
this.add(passwordField, new XYConstraints(231, 80));
this.add(fname, new XYConstraints(231, 159));
this.add(lname, new XYConstraints(231, 182));
this.add(street, new XYConstraints(231, 206));
this.add(city, new XYConstraints(231, 234));
this.add(state, new XYConstraints(231, 265));
this.add(new Label("Postal Code:"), new XYConstraints(318, 268));
this.add(code, new XYConstraints(390, 265));
this.add(new Label("User information"), new XYConstraints(51, 25));
this.add(new Label("Preferences"), new XYConstraints(51, 363));
this.add(new Label("Address information"), new XYConstraints(51, 132));
this.add(country, new XYConstraints(231, 295));
this.add(phone, new XYConstraints(231, 319));
this.add(new Label("Email:"), new XYConstraints(114, 403));
this.add(email, new XYConstraints(231, 400));
this.add(new Label("Language:"), new XYConstraints(157, 379));
this.add(language, new XYConstraints(231, 376));
And now the most important part. The bindings between components and persistent class properties:
this.addSimpleDataBinding(usernameField, "username");
this.addSimpleDataBinding(passwordField, "password");
this.addSimpleDataBinding(fname, "firstName");
this.addSimpleDataBinding(lname, "lastName");
this.addSimpleDataBinding(street, "addr1");
this.addSimpleDataBinding(city, "city");
this.addSimpleDataBinding(code, "zip");
this.addSimpleDataBinding(phone, "phone");
this.addSimpleDataBinding(email, "email");
this.addListDataBinding(state,"state",new String[]{"N/A","CA","FL","NY"});
this.addListDataBinding(country,"country",new String[]
{"US","UK","Romania","France"});
this.addListDataBinding(language,"langPref",new String[]
{"English (US)","English (UK)","French (FR)","French (CA)","Romanian"});
And now we must tell our save button what to do when clicked:
this.saveButton.addActionListener(new ActionListener() {
public void actionPerformed(ActionEvent e) {
formSave();
notifyFormSaved();
}
});

this.cancelButton.addActionListener(new ActionListener() {
public void actionPerformed(ActionEvent e) {
notifyFormClosed();
}
});
}
formSave() transparently makes the appropriate create or update into the database.
notifyFormSaved() - tells all listeners that the form has been saved
notifyFormClosed() - tells all listeners that the form has not been saved, but canceled
This is it!
Simple, no? I think this greatly reduces the time that you need to create a form bound to the database.
The DataTable component.
The purpose of this component is to display results for database queries very easily in a table. This table must also support auto-ordering, pagination, simple/multiple select, auto update and empty result set notifier.
In order to make a query in dataGlue we use:
QueryHandler qh = persistenceService.newQuery(Customer.class,"email!=\"\"",
                                                 "firstName ascending");
This should return all customers who have their emails not "", ordered ascending by their first name.
Now let's create a DataTable to display this, and a listener to listen for selection events in it:
TableRowSelectionListener tableRowListener = new TableRowSelectionListener()
{public void rowSelected(TableRowSelectionEvent e)
{
doSomethingWithSelectedCustomer((Customer)e.getSelectedObject());
}
});

DataTable dataTable = new DataTable(qh, null, Customer.class,
       "There are no customer with email.",10,new DataColumn[] {
new DataColumn("Customer Username","username", 25,
                     Button.class,EchoConstants.LEFT),
new DataColumn("First Name","firstName", 25,
                     Label.class, EchoConstants.LEFT),
new DataColumn("Last Name","lastName", 25,
                     Label.class, EchoConstants.LEFT),
new DataColumn("Email","email", 25, Label.class, EchoConstants.LEFT)
},tableRowListener);
There is no need to close the QueryHandler, because it is closed by the dataTable after information is loaded. This is what you should see:
By default, multi-selection is enabled on the dataTable, there will be 10 results per page, and if result set is empty the message "" shall be displayed instead of an empty table.
If you want to obtain all selected rows, you just use:
Collection selectedCustomers = dataTable.getSelectedObjects();
Simple, isn't it? That's the whole idea, to simplify things.
Download demos, sources and binaries
License
dataglue is OPEN-SOURCE SOFTWARE distributed under the terms of the GNU LGPL License.
This member has not yet provided a Biography. Assume it's interesting and varied, and probably something to do with programming.


 General
  News
News  Suggestion
  Question
  Bug
Bug  Answer
  Joke
Joke  Praise
  Rant
Rant  Admin
Admin 


