The web site URL for this article can be found at http://churchworship.azurewebsites.net.
Developer Challenges
Challenge 1 - Benefits
Challenge 2 - Web Site
Challenge 3 - SQL Azure Database
Challenge 4 - Virtual Machines
Introduction
Windows Azure is a very flexible and robust platform for creating a wide variety of solutions for the cloud. It provides a low-barrier of entry with the tools and resources that are available. Flexible (pay-for-what-you-use) cost structures also make it attractive for everyone, from bloggers to enterprise companies. Windows Azure is also a very scalable solution for small solutions to grow all the way to large, high-traffic and fault-tolerant solutions. Church worship is similar in that churches hold worship services in a wide variety of formats or styles (traditional, contemporary, hybrid) and for congregations of all sizes (from dozens to thousands of people). With the technology that worship attenders own today as well as the growing use of technology in churches, there is an opportunity to take advantage of the Windows Azure platform to enhance the worship experience. I have even seen use of a variety of devices in church worship (smartphones, tablets, etc.). However, these devices are mainly used to just reference Bible passages with downloaded apps and web sites. I feel that these devices can be used for much more during church worship to enhance the experience.
Background
During a church worship service, there is a considerable amount of content that is provided. There are songs that are sung, with words and music. The artists, who compose the contemporary songs, may have an album that includes the songs. There are Bible passages that are read and referenced throughout the worship service. Announcements engage and encourage the worship attenders to participate in the life of the church. And, the worship message that is spoken by the preacher consists of Christian teachings that can be applied to everyday life.
There are churches that utilize projectors and screens to provide some of the content to the worship attender. The preacher may speak or show teaching points or short sentences that drive home the message. But, there is still a lot of content that may be simply spoken and quickly forgotten by the worship attenders. Trying to display all of the content on a projection screen would be difficult to read and comprehend because of how fast it would need to be refreshed. Traditional churches may not interested in utilizing projectors and screens because it may distract from their worship experience. Smaller churches may not be able to afford a projector and screen for their worship services. Worship attenders may use the available paper to jot notes or important points to remember at a later time.
Currently, the main form of tangible communication that a worship attender receives at a service is usually called a bulletin. A bulletin can be one or several sheets of paper with content to inform the worship attender on the things that were mentioned above (order of worship, announcements, teaching points and notes, etc.). But, a bulletin is constrained by the amount of content that the paper can hold. You may see worship attenders taking notes in the paper margins to remind them of some event or activity, or a note may be a Bible passage that is referenced by the preacher.
Imagine if all of the content during a worship service is pushed, real-time to the worship attender. Imagine if the worship attender can save that content for future reference. This could truly connect the worship attender to the church and be more informed. Windows Azure and its tools and resources can provide the connection.
This article will follow the design and development of a way to connect the worship attenders and their devices (smartphones, tablets, etc.) using Windows Azure and the available tools and technologies. Using a variety of tools available in the Microsoft Web stack with Windows Azure will create a compelling solution that can be used by any church, regardless of size and worship style. This is the right time to use the right tools to engage worship attenders on a whole new level.
Design
The goal of the design is to be simple. This solution should be easily accessible by anyone. There are two categories of users: Worship Administrators and Worship Attenders. Worship Administrators will use the solution to coordinate the content creation and real-time delivery to the Worship Attenders. Worship Attenders will be consumers of the content. They will receive the content on their device (smartphone, tablet, etc.) in real-time. The solution will be a one-way communication (from Worship Administrator to Worship Attender). Also, the Worship Attender will have the ability to save the content using a variety of services.
Windows Azure will provide a scalable platform that can grow with the number of users and churches. The available tools and technologies with Windows Azure provide the ability to use the right tool for the right job.
The first thing that I wanted to do is create the web site container within Azure. This container will host the web site that the Worship Administrator and the Worship Attender will use to login in order to send and receive content. Given that I have not done this before, I wanted to create an empty web site to start to see how this works.
So, I logged into my Azure account and went to the portal page to create a new web site, located at https://manage.windowsazure.com. Here is the page that appears, when I selected Web Sites:
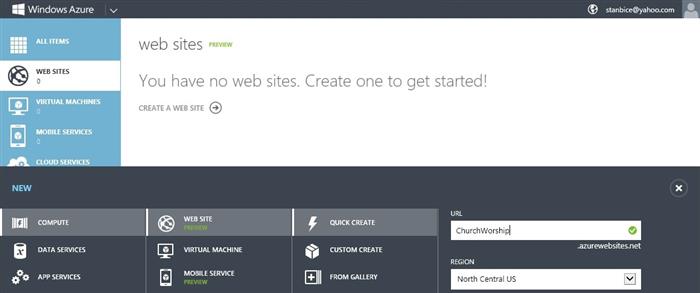
I selected the button to create a new web site and entered a URL. The URL must be unique from all other URL's. Azure will tell you if the URL has already been taken. After Azure creates the web site, you see the web site in your list:

When you go to the web site URL, the default page appears saying that the web site has been successfully created. Now, I can create the Visual Studio web project to begin development.
Creating the Visual Studio Project
The next step that I wanted to do is to create the Visual Studio project that will store the code. There are several project templates that can be used. For this web site, I decided to use the MVC 4 Internet Application template. From the Visual Studio start page, I selected New Project:
Next, I chose ASP.NET MVC 4 Web Application:
Then, I chose Internet Application:
Now, within the Visual Studio Solution Explorer, the project has been created:
Publishing the Web Site to Azure
Now, with the Visual Studio project created, I could have jumped right in and started coding. But, I decided to try my hand in setting up publishing the project to my Azure web site. This proved very streamlined. I really liked that I didn't have to dredge around configuration XML files and project properties. Azure provides the ability to export my publishing settings and import the settings into the Visual Studio project. Right-clicking on the project node reveals a popup menu, where I selected Publish:
The Publish Web dialog appeared and I noticed a link to download your publishing profile. So, I decided to click the link:
I was then taken to the Azure web site profile page, that shows a link to download the publishing profile:
After the file downloaded, I went back to the Publish Web dialog, clicked the Import button, selected the downloaded file and continued to successfully publish the project. I then noticed that there were two files that were added to the Visual Studio project, under the Properties, PublishProfiles folder:
Finally, I directed my browser to the web site and saw that the Visual Studio project was published successfully. Next, I wanted to create the database on SQL Azure.
I chose the MVC 4 Internet Application project template because I wanted to use the forms authentication that the template provides. When you create a new project with this template, a SQL Server 2012 LocalDB is created to store the user profile and membership data. SQL Server 2012 LocalDB is an execution mode database engine that is loaded when a process attempts a database connection. LocalDB is a great database engine for local development, as an alternative to SQL Server 2012 Express Edition. You can find information on SQL Server 2012 LocalDB at the following link: http://msdn.microsoft.com/en-us/library/hh510202.aspx.
So, my next step was to create a database container on Azure and publish the local database, within the Visual Studio web site project, up to the cloud. I went back to my Azure portal and the SQL Database management page:
I clicked the Create a SQL Database link:
I then filled in the form to specify the database settings. The database name, edition and limit database size settings were specified:
After the database was successfully created, the database then showed in the database list:
Publishing the SQL Database to Azure
Before I got into the hard-core development of the web site functionality, I wanted to first make sure that I could deploy my local SQL database, within the Visual Studio web site project, to Azure. In the last section, I stepped through creating the SQL database container to hold the database objects. Now, I wanted to fill the SQL database container with the user profile and membership database that was created by the MVC 4 Internet Application template.
The database that was created in the Visual Studio project is a local database stored in the App_Data directory. Visual Studio does not provide any out-of-the-box features for exporting the database, generating the database scripts or publishing the database.
Looking at the database settings page, I saw that there were options to Install Microsoft SQL Server Data Tools and Download a starter project for your SQL database. I have used SQL Server Data Tools (SSDT) for local and server development and deployment. So, I decided to give these options a try. SSDT uses the Visual Studio environment to provide easy to use database development functions, like source code organization and management, schema comparison and database deployment. For database deployments, SSDT provides the functionality that is very similar to what .NET developers do to deploy web sites and applications.
My goals were to perform database design and development locally on my machine and then easily deploy the database to Azure. I did not want to go through the manual labor of creating Transact-SQL scripts and run them on Azure. I wanted to use a tool that compares the database schemas and publishes the changes automatically and seamlessly.
So, I navigated my browser to the SQL database settings page:
I then clicked the Install Microsoft SQL Server Data Tools link and installed the software. I then clicked the Download a starter project for your SQL database link. I expanded the compressed file (SQLDatabaseProj.zip) in a folder and launched SQL Server Data Tools (SSDT), opening the downloaded starter project. SSDT loaded the starter project. I quickly noticed what the started project included, by looking at Solution Explorer:
I opened the SQLDatabaseProj.publish.xml file and noticed that the database connection settings were already filled in with the values from my Azure SQL database. The database project had no database object scripts, which was what I expected, since the database in Azure was blank.
I now wanted to synchronize my database in the Visual Studio web project with the SSDT starter database project. Then, I wanted to publish the SSDT database project to my Azure SQL database. Schema comparison gives the ability to compare databases, SSDT database projects and database application packages (DACPAC files) and synchronize the database objects.
In SSDT, within SQL Server Object Explorer, I right-clicked the SQLDatabaseProj root node and selected Schema Compare:
In the Schema Compare tab, I clicked the Switch Source and Target button, which is in between the two drop-down lists (the button has two arrows pointing left and right). I clicked the down-arrow for the Select Source drop-down list and chose Select Source:
I checked the Database radio button and clicked the New Connection button:
In the Connection Properties dialog, I entered the Server Name for my LocalDB database instance ((LocalDb)\v11.0). I checked Use Windows Authentication for my server login. Then, I checked Select or enter a database name, and I selected my local database name that is located in the App_Data directory of the Visual Studio web site project. Finally, I tested my connection, which was successful, and clicked the OK button:
Back on the Select Target Schema dialog, I clicked OK. On the Schema Compare tab, the Visual Studio web project LocalDB database is the source. Currently, the LocalDB database has the database tables that I wanted to synchronize to the starter database project. The starter database project is the target because it was empty and will eventually be synchronized with the Azure SQL database. I then clicked the Compare button in the toolbar and the schema compare result was listed:
I then clicked the Update button. The starter database project was then modified. When Solution Explorer refreshed, the database table scripts appeared:
I saved the Schema Compare file, so that I can used it again when the database schema changes. Next, I right-clicked the root node in the starter database project and clicked Publish:
The Azure SQL database settings were already filled in and I clicked the Publish button. The database was then deployed to Azure. I modified the app.config file in the Visual Studio project to change the database connection string to use the Azure SQL database and published the web site to Azure. To test, I logged into my web site (http://churchworship.azurewebsites.net). I clicked the Register link, in the upper right corner. I then created a new user and logged in with the username and password:
In summary, using SQL Server Data Tools (SSDT) really saved a lot of time and effort in synchronizing the databases between the Visual Studio web site project and the Azure SQL database. Now, I was ready for some real development.
We now have a web site and a SQL database in Azure. Everything may work just fine. But, let's say we start seeing a big increase in traffic and we need to ramp up the number of web servers. Maybe, we now want to test in a multiple web server environment, using a load balancer. Using virtual machines can make this happen very quickly.
This section steps through creating several virtual machines. There will be two web servers. The Azure load balancer will be used to distribute the web traffic across the web servers. There will be one database server to maintain the data in SQL Server.
Now, we could use the wizards in the Azure portal to create these virtual machines. But, we are going to use Windows Azure PowerShell cmdlets to create everything. The Windows Azure PowerShell cmdlets will give us the ability to script out the creation of the virtual machines and setup the load balancer. We can take advantage of being able to recreate a similar environment, in the future, using the commands in a PowerShell script in no time. Let's have some PowerShell scripting fun!!!
Collect Information
Our first step is to collect several pieces of information from our account and the Azure environment and store them in variables. Create a folder to store the files that we need (i.e. C:\VM). We need to download and install the Windows Azure PowerShell tool. Go to http://www.windowsazure.com/en-us/downloads. Under the Command Line Tools section, Windows Downloads, click on the Windows Azure PowerShell link. Run the downloaded file (WindowsAzurePowerShell.3f.3f.3fnew.exe) to install Windows Azure PowerShell. This file will install the necessary libraries to execute PowerShell commands for Azure.
Next, run the Windows Azure PowerShell shortcut, and run it as the Administrator. Login to the Azure portal in a browser and go to https://windows.azure.com/download/publishprofile.aspx. This page will download your account's publishing profile. When you create Azure services, you have to set your publishing settings to use. Azure will use this setting to associate your Azure services for billing. Place the downloaded file into the folder that we created earlier (i.e. C:\VM).
We are now going to import our publishing settings file into our PowerShell session. Go to the PowerShell window and enter:
PS C:\>Import-AzurePublishSettingsFile 'C:\VM\[Publish Profile filename]-credentials.publishsettings'
To make sure the publish profile settings were imported, enter:
PS C:\>Get-AzureSubscription
We should see our subscription name, ID and subscription information. Also, there will be several files that are persisted in your user's roaming application data folder on your computer (C:\Users\[Username]\AppData\Roaming\Windows Azure Powershell). These files will give us the ability to now select our subscription, using the Select-AzureSubscription cmdlet, without having to import the publishing settings every time. If you have multiple subscriptions, the Select-AzureSubscription cmdlet can set the subscription to use. Let us now create a variable and set its value with the subscription ID that we will be using:
PS C:\>$subscriptionid = '[Subscription ID]'
Next, we want to select a storage account, using the Get-AzureStorageAccount cmdlet or create a new storage account, using the New-AzureStorageAccount cmdlet. Let's create a new storage account, called churchworshipvm1. We need to pick a location for the storage account to reside within Azure. In the PowerShell window, enter:
PS C:\>Get-AzureLocation
We will choose the East US location. Let's set another variable with this value and another variable for the storage account name. Storage account names must be between 3 and 24 characters, with both lowercase letters and at least one number. Then, we will create the storage account.
PS C:\>$location = 'East US'
<span style="font-size: 9pt;">PS C:\>$storageaccount = 'churchworshipvm1'</span>
PS C:\>New-AzureStorageAccount -StorageAccountName $storageaccount -Location $location
You can now go to the Storage page in the Azure portal and see the storage account entry, that we just created.
Now, we will select the storage account to use when we create the virtual machines:
PS C:\>Set-AzureSubscription -SubscriptionName $subscriptionid -CurrentStorageAccount $storageaccount
Next, we will create the cloud service. The cloud service name must be unique across all cloud services. Let's set a variable and test that the cloud service name does not already exist:
PS C:\>$cloudservice = 'churchworship'
PS C:\>Test-AzureName -Service $cloudservice
If the value 'False' is returned, then the cloud service does not exist. The cloud service will be created when we create the virtual machines.
Create the Virtual Machines
There are two cmdlets that we can use to create virtual machines. New-AzureQuickVM has minimal parameters to quickly create a virtual machine. But, we want to configure several settings. Thus, we will use several cmdlets, starting with New-AzureVMConfig.
We need to select a virtual machine image to create the web servers and the database server. Enter the following in the PowerShell window:
PS C:\>Get-AzureVMImage | select ImageName
This will list the various images that are available. The 'select ImageName' command only shows the name of the virtual machine image. We only need to set variables using the image name. We are creating two web servers using Windows 2012 and a database server using SQL Server 2012 SP1 Standard Edition:
PS C:\>$web1image = 'bd507d3a70934695bc2128e3e5a255ba__RightImage-Windows-2012-x64-iis8-v13.4.12.2'
PS C:\>$web2image = 'bd507d3a70934695bc2128e3e5a255ba__RightImage-Windows-2012-x64-iis8-v13.4.12.2'
PS C:\>$sqlimage = 'fb83b3509582419d99629ce476bcb5c8__Microsoft-SQL-Server-2012SP1-Standard-CY13SU04-SQL2012-SP1-11.0.3350.0-Win2012'
Let's create variables for the server computer names and the Administrator password:
PS C:\>$web1name = 'churchweb1'
PS C:\>$web2name = 'churchweb2'
PS C:\>$sqlname = 'churchsql'
<span style="font-size: 9pt;">PS C:\>$adminpassword = 'churchadmin1!' </span>
Now, we will create the command to configure a new virtual machine for the first web server. But, it will not create the virtual machine, yet:
PS C:\>$webvm1 = New-AzureVMConfig -Name $web1name -InstanceSize ExtraSmall -ImageName $web1image | Add-AzureProvisioningConfig -Windows -Password $adminpassword | Add-AzureEndpoint -Protocol tcp -LocalPort 80 -PublicPort 80 -Name 'web' -LBSetName 'lbchurchworshipweb' -ProbePort 80 -ProbeProtocol http -ProbePath '/'
This long command creates a new virtual machine, based on an image. The command provisions the server as a Windows server with an Administrator password. It also adds an endpoint to expose port 80 publically and uses the port with the load balancer. Let's configure the second web server and the database server:
PS C:\>$webvm2 = New-AzureVMConfig -Name $web2name -InstanceSize ExtraSmall -ImageName $web2image | Add-AzureProvisioningConfig -Windows -Password $adminpassword | Add-AzureEndpoint -Protocol tcp -LocalPort 80 -PublicPort 80 -Name 'web' -LBSetName 'lbchurchworshipweb' -ProbePort 80 -ProbeProtocol http -ProbePath '/'
PS C:\>$sqlvm = New-AzureVMConfig -Name $sqlname -InstanceSize ExtraSmall -ImageName $sqlimage | Add-AzureProvisioningConfig -Windows -Password $adminpassword | Add-AzureEndpoint -Protocol tcp -LocalPort 1433 -PublicPort 1433 -Name 'sql'
The difference with the database server is that we are exposing port 1433 publically for database traffic and the server will not be a part of the load balancer.
Finally, let's create the servers. The New-AzureVM cmdlet will be used to create all three servers in one command. The servers will not be created simultaneously. But, the cmdlet is only called once. Unfortunately, this will not save any time creating all of the servers.
PS C:\>New-AzureVM -ServiceName $cloudservice -Location $location -VMs $webvm1,$webvm2,$sqlvm
Now, when you go to the Virtual Machines portal page, the three servers appear. We can deploy our web application to each of the web servers and deploy the database to the database server. The application should now run just like it does with the Azure web site and SQL Azure database.
Lessons Learned
This was a lot of fun learning about the Windows Azure PowerShell cmdlets. There are cmdlets to create any virtual machine that we need. There are also custom configuration options to setup the virtual machines exactly the way we want with specific ports exposed publically, use the load balancer, add data disks, and several other options.
We can now create a PowerShell script file (with a .ps1 file extension) with the commands we just used. The next time that we need to create a similar environment, we can just modify the necessary variables and execute the script. Here are the lines that the script would have:
$subscriptionid = '[Subscription ID]'
$location = 'East US'
$storageaccount = 'churchworshipvm1'
New-AzureStorageAccount -StorageAccountName $storageaccount -Location $location
Set-AzureSubscription -SubscriptionName $subscriptionid -CurrentStorageAccount $storageaccount
$cloudservice = 'churchworship'
$web1image = 'bd507d3a70934695bc2128e3e5a255ba__RightImage-Windows-2012-x64-iis8-v13.4.12.2'
$web2image = 'bd507d3a70934695bc2128e3e5a255ba__RightImage-Windows-2012-x64-iis8-v13.4.12.2'
$sqlimage = 'fb83b3509582419d99629ce476bcb5c8__Microsoft-SQL-Server-2012SP1-Standard-CY13SU04-SQL2012-SP1-11.0.3350.0-Win2012'
$web1name = 'churchweb1'
$web2name = 'churchweb2'
$sqlname = 'churchsql'
$adminpassword = 'churchadmin1!'
$webvm1 = New-AzureVMConfig -Name $web1name -InstanceSize ExtraSmall -ImageName $web1image | Add-AzureProvisioningConfig -Windows -Password $adminpassword | Add-AzureEndpoint -Protocol tcp -LocalPort 80 -PublicPort 80 -Name 'web' -LBSetName 'lbchurchworshipweb' -ProbePort 80 -ProbeProtocol http -ProbePath '/'
$webvm2 = New-AzureVMConfig -Name $web2name -InstanceSize ExtraSmall -ImageName $web2image | Add-AzureProvisioningConfig -Windows -Password $adminpassword | Add-AzureEndpoint -Protocol tcp -LocalPort 80 -PublicPort 80 -Name 'web' -LBSetName 'lbchurchworshipweb' -ProbePort 80 -ProbeProtocol http -ProbePath '/'
$sqlvm = New-AzureVMConfig -Name $sqlname -InstanceSize ExtraSmall -ImageName $sqlimage | Add-AzureProvisioningConfig -Windows -Password $adminpassword | Add-AzureEndpoint -Protocol tcp -LocalPort 1433 -PublicPort 1433 -Name 'sql'
New-AzureVM -ServiceName $cloudservice -Location $location -VMs $webvm1,$webvm2,$sqlvm
History
- 5/2/2013 - Initial article creation and submission. First Challenge can be found in the Windows Azure Benefits section of this article.
- 5/26/2013 - Added Creating the SQL Azure Database and Publishing the SQL Database to Azure sections for the Third Challenge.
- 6/9/2013 - Added Ramp Up with Virtual Machines section for the Fourth Challenge.
Stan is a Senior Software Engineer with Applied Information Sciences (AIS). He has been delivering software solutions for over 20 years in a variety of industries. Currently, he focuses on designing and developing database solutions, mainly with Microsoft SQL Server. Stan has experience using Microsoft SQL Server Reporting Services (SSRS), Integration Services (SSIS) and Analysis Services (SSAS), including using the MDX query language. He is a Microsoft Certified IT Professional in Business Intelligence Developer 2008 and is a Microsoft Specialist in Programming in HTML5 with JavaScript and CSS3. Stan is also a technical reviewer for Manning Press and has reviewed several very successful and popular programming books. Stan is a Christian, a family man and is active in his church. Stan lives with his family in the beautiful Annapolis, MD area.


 General
  News
News  Suggestion
  Question
  Bug
Bug  Answer
  Joke
Joke  Praise
  Rant
Rant  Admin
Admin 


