As
the Android and iOS platforms continue to diverge, there is growing interest in
libraries that allow developers to build cross platform applications. One of
the most prominent of these libraries is phone gap. In this tutorial, we’ll
build a hardware-aware application that uses Javascript to work with the device
accelerometer.
If
you haven’t yet downloaded the latest version of the PhoneGap framework it’s
amazingly easy. Assuming you have NodeJS installed installation is takes a
single line. Once you have PhoneGap installed we can build your application.
Step
by Step
1)
Create the phone gap application by typing the following in to your command
line:
$ phonegap create accelerate
$ cd accelerate
$ phonegap local plugin add https:
us.apache.org/repos/asf/cordova-plugin-device-motion.git
Note
that the application will be created in what ever folder your command line is
pointed to. Be sure to navigate to your destination folder first! The first
two lines of command line instruction are fairly self-explanatory. They create
the PhoneGap application called accelerate and navigate in to the folder just
created.
The
latest version of PhoneGap uses a remote plug-in architecture, so we have to
manually obtain and install the accelerometer plug-in using the final line of
command line code.
2)
Open the accelerate folder and note the application structure includes a www
folder. This is where we’re going to do our work.
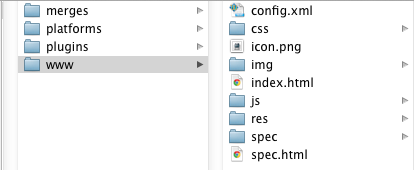
Figure 1: PhoneGap application folder structure
The
PhoneGap create command actually builds a small sample application. You can see
it’s splash screen if you load the index.html page in to a browser. If you
prefer you can actually run the whole application in a mobile device.
To
run the sample app on an Android mobile device, connect your device to your
computer via the USB to miniUSB cable. Issue the following commands with the
command line path pointed at your project folder:
$ phonegap build android
$ phonegap run android
Running
the sample app on an IOS device is actually more complex as the device has to
be properly provisioned through XCode. To provision iOS devices for testing you
must be registered with the Apple Developer program.
We’re
actually going to delete the CSS folder, icon.png, the img folder and the js
folder from the application. You can open index.html in your favorite text
editor. Once you have the file open, remove the code relating to the sample
application. You should be left with something like this:
<!DOCTYPE html>
<html>
    <head>
        <meta charset="utf-8" />
        <meta name="format-detection" content="telephone=no" />
        <meta name="viewport" content="user-scalable=no, initial-scale=1, maximum-scale=1, minimum-scale=1, width=device-width, height=device-height, target-densitydpi=device-dpi" />
        <script type="text/javascript" src="phonegap.js"></script>
        <title>Accelerate</title>
    </head>
    <body>


    </body>
</html>
As
you can see, there are a few meta tags in the head that deal with screen size
normalization. The balance of the code is standard HTML. We’ll first set up an
initialization routine so that we know that the device and PhoneGap library are
both ready before we run any code.
We’re
going to be adding the following <script> element to the <head> of
the document right before the <title>.
<script>
window.onload = function()
{
document.addEventListener("deviceready", init, false);
}
function init()
{
alert("Ready!");
}
</script>
The
init() function will be our entry point into the application. You’ll notice
that the anonymous function associated with the window.onload event attaches a
“deviceready” listener to the application. This event will tell us when the
device and PhoneGap library are ready to interact with the user. For
convenience I also comment out a call to init() in case I want to do browser
testing. Since the “deviceready” event is part of the PhoneGap library, it
would not function in a browser.
This
is a good point to stop and test. Again, with your Android device connected
and your command line pointed at your application folder issue the following
command:
$ phonegap run android
If
you get the expected alert box and everything else is correct, it’s time to
create our UI for the application. (You might want to comment out the alert
box in the init() function at this point.) We’re going to create a fairly
simple UI that shows us the results generated by the accelerometer in the
device. We’re going to add the following HTML inside the body element:
<footer>
<table id="footerTable">
<tr>
                    <td>X: <span id="xOut"></span></td>
                    <td>Y: <span id="yOut"></span></td>
                    <td>Z: <span id="zOut"></span></td>
            </tr>
</table>
</footer>
Add
a style element in the document head to contain the CSS:
<style>
    body {
        margin: 0px;
    }

    #footerTable {
        width: 100%;
    }
    footer {
        position:absolute;
        bottom:0;
        width:100%;
        height:40px;
        background:#ccc;
        }
</style>
In
the PhoneGap library the acceleration object has three methods. They are:
getCurrentAcceleration()
watchAcceleration()
clearWatch()
The
first method, getCurrentAcceleration(), will get a snapshot of the
accelerometer readings when the function is implemented. watchAcceleration()
will return the readings of the accelerometer until a clearWatch() command is
issued. For the purposes of our application we’re going to use
watchAcceleration() so we can view the acceleration over a period of time.
The
watchAcceleration() method returns an ID value that we can later use to stop
the accelerometer. This is important because we don’t want the accelerometer
using valuable resources when it’s no longer needed.
Edit
your code so it appears as follows:
<!DOCTYPE html>
<html>
<head>
<meta charset="utf-8" />
<meta name="format-detection" content="telephone=no" />
<meta name="viewport" content="user-scalable=no, initial-scale=1, maximum-scale=1, minimum-scale=1, width=device-width, height=device-height, target-densitydpi=device-dpi" />
<style>
body {
margin: 0px;
}
#footerTable {
width: 100%;
}
footer {
position:absolute;
bottom:0;
width:100%;
height:40px;
background:#ccc;
}
</style>
<script type="text/javascript" src="phonegap.js"></script>
<script>
var watch = 0;
window.onload = function()
{
document.addEventListener("deviceready", init, false);
}
function init()
{
watch = navigator.accelerometer.watchAcceleration(success, failure, {frequency: 100});
}
function success(accel)
{
document.getElementById("xOut").innerHTML = accel.x;
document.getElementById("yOut").innerHTML = accel.y;
document.getElementById("zOut").innerHTML = accel.z;
}
function failure()
{
alert("Error");
}
</script>
<title>Hello World</title>
</head>
<body>
<footer>
<table id="footerTable">
<tr>
<td>X: <span id="xOut">0</span></td>
<td>Y: <span id="yOut">0</span></td>
<td>Z: <span id="zOut">0</span></td>
</tr>
</table>
</footer>
</body>
</html>
We’ve
added in the foundational code to make the accelerometer work. You’ll notice
that the init() function contains a very important line of code:
watch = navigator.accelerometer.watchAcceleration(success, failure, {frequency: 100});
This
line essentially configures the accelerometer and turns it on. The three
arguments in the watchAcceleration() method provide a call back if the
accelerometer is successful at obtaining device movement information, a failure
callback if the accelerometer fails and a frequency object which sets the
frequency with which the accelerometer is sampled in miliseconds. The watch
variable which is declared globally at the beginning of the script is used to
capture the watch ID.
The
success() and failure() call backs should appear fairly straight-forward. In
the success() call back an acceleration object is passed in to the function and
it contains properties which contain the readings for the x, y and z axis. The
failure() callback simply outputs an error message at this point.
This
would be a good time to test your application again and see if everything is
working correctly up to this point. Again, to build and run your app issue the
following command:
$ phonegap run android
Assuming
everything is working correctly you should see the X Y and Z readouts at the
bottom of your screen update as you move the device. Move the device slowly
and notice how X, Y and Z react when you move the device along different axis.

Figure 2: Note the display at the bottom of the screen
Now
we’re going to make our application a little more interesting. Let’s use the
accelerometer to move an object around the screen. We’ll add the object itself
through the HTML and then use the accelerometer readings to determine the rate
and direction of motion. To get ready, let’s add a canvas to our application
and place an object on it. To add the canvas, we’re going to add a canvas
element to the first line of the body.
<canvas id="myCanvas" ></canvas>
We’re
also going to normalize the html and body’s width, height and margin css
properties just in case. Add the following selector and rules to your CSS.
html, body
            {
                width: 100%;
                height: 100%;
                margin: 0px;
            }
I’m
using an image called “crosshair.png’ for this application. We’re going to
load it to the canvas dynamically in the init() event. You’ll want to set up
cnv, for the canvas context, and target, for the image as globals at the top of
your script.
Revise
your init() function to be coded as follows:
function init()
{
      var iW = window.innerWidth;
      var iH = window.innerHeight;
      cnv = document.getElementById('myCanvas').getContext("2d");
      cnv.canvas.width = iW;
      cnv.canvas.height = iH-40;
      target = new Image();
      target.src = "crosshair.png";
      target.onload = function()
      {
          cnv.drawImage(target, (iW-(target.width))/2, (iH-
          (target.height))/2);
       }
       watch = navigator.accelerometer.watchAcceleration(success,
           failure, {frequency: 100});
 }
There’s
quite a bit going on here, so let’s break the important code down. The iW and
iH variables simply contain the screen size. Obviously mobile devices vary in
their specifications, so we want to be sure to create a canvas that’s
flexible. The cnv variable is used to reference the context object on which
we’ll do most of our work. It’s helpful to think of the canvas as an invisible
layer wrapped around the canvas.
We
use the context object, cnv, to set the canvas’ width and height properties. We
subtract 40 from the height to allow for the output bar we’ve already created
at the bottom of the display. We initialize the target variable as an Image
object and provide it’s source image to the src property.
We
want to make sure the image has loaded before we try to display it, so we setup
an anonymous function that is called when the image object called target
loads. At that point we draw the image and do some simple math to put it I the
center of the screen. Finally we configure the accelerometer.
This
is another excellent time to test your application on your device.
Figure 3: Application after canvas and image have been added.
Now,
we’ll make the image move as the user tilts the device and the accelerometer
reacts. Most of this work will be done in the success() callback function,
however, I made a few changes to the init() function to facilitate a smoother
running application. Here’s the modified init() function:
function init()
{
      var iW = window.innerWidth;
      var iH = window.innerHeight;
      canvas= document.getElementById('myCanvas');
      cnv = canvas.getContext("2d");
      cnv.canvas.width = iW;
      cnv.canvas.height = iH-40;
      target = new Image();
      target.src = "crosshair.png";
      xPos = (iW-target.width)/2;
      yPos = (iH-target.height)/2;
      target.onload = function()
      {
          cnv.drawImage(target, xPos, yPos);
      }
      watch = navigator.accelerometer.watchAcceleration(success,
          failure, {frequency: 25});
}
Once
you’ve modified your init() add canvas to your list of global declarations at
the beginning of the script. You’ll also notice that xPos and yPos variables
are set during the init() process to capture the initial position of the
image. You’ll need to add these to your list of globals as well. Finally, I
reduced the frequency value to 25 so we’re going to get results from the
accelerator every 25 milliseconds. Now on to the success() callback function:
function success(accel)
{
    document.getElementById("xOut").innerHTML = accel.x;
    document.getElementById("yOut").innerHTML = accel.y;
    document.getElementById("zOut").innerHTML = accel.z;
    cnv.clearRect(0, 0, canvas.width, canvas.height);
    xPos += -1*(accel.x * 1.5);
    yPos += (accel.y * 1.5);
    cnv.drawImage(target, xPos, yPos);
}
After
updating the display bar at the bottom of the screen, the clearRect() method is
fired on the canvas object. This clears the canvas prior to redrawing the
image in the updated position. The clearRect() method requires a starting
point and width and height you’d like to clear. We’re clearing the entire
canvas so we provide it’s width and height as arguments.
Next
we update the xPos and yPos before redrawing. xPos has to be negated so that
the image moves in the direction the user is tilting the device. Both the xPos
and yPos are multiplied by 1.5 to move the image slightly faster. Finally
drawImage() is called which draws the image at the new and updated position.
Test
your application one more time and it should move as the device is tiled along
each axis. To challenge yourself create some additional code that prevents the
image from falling off the edge of the screen.
As
you can see, PhoneGap makes it easy to access device hardware, like the
accelerometer, and include it in your Javascript based mobile applications.
Special
thanks to Adobe evangelist Raymond Camden (www.raymondcamden.com) for his generous
assistance.
More Great Resources on PhoneGap
Mark Lassoff 's parents frequently claim that Mark was born to be a programmer. In the mid-eighties when the neighborhood kids were outside playing kickball and throwing snowballs, Mark was hard at work on his Commodore 64 writing games in the BASIC programming language. Computers and programming continued to be a strong interest in college where Mark majored in communication and computer science. Upon completing his college career, Mark worked in the software and web development departments at several large corporations.
In 2001, on a whim, while his contemporaries were conquering the dot-com world, Mark accepted a position training programmers in a technical training center in Austin, Texas. It was there he fell in love with teaching programming.
Previously, Mark was a top technical trainer, traveling the world, providing training for software and web developers. Mark's training clients include the Department of Defense, Lockheed Martin, Discover Card Services, and Kaiser Permaente.
In addition to traditional classroom training, Mark is a sought after video trainer and host. He has authored and hosted video courses for several publishers, including his own company LearnToProgram.tv, Inc.. Mark has authored over 15 online courses and works with students from all 50 states and over 47 countries. Over 10,000 people have learned programming skills from Mark’s courses.
Teaching programming has been Mark's passion for the last 10 years. That passion led Mark to found LearnToProgram, Inc., a publisher of books and video courses designed to teach web, mobile and game development. Mark still actively authors and teaches courses for his company.
He lives near Hartford, Connecticut in a 150 year old converted textile mill.


