Abstract
What does "Dynamic UI" mean for Android* developers? As an Android app developer, you want the UI of your application to adapt to the dynamic nature of the application content. You also want the UI of your application to fit and flow well on the majority of Android devices, regardless of the size of the display, the screen resolution, or the pixel density. Given the variety of Android devices on the market and the challenge of keeping up with the latest Android SDK, this can be a difficult task.
In this document, we will focus on a few Android UI programming techniques that will help you to achieve the goal of a dynamic UI – use of the action bar, tab, and swipe views with dynamic application data to enhance the screen navigation, use of Android fragments to design multiple-pane and master-view layout for screens with different sizes of display, and use of the Android resource system to improve the presentation of graphics and text content for screens with different resolution and density.
Table of Contents
- Introduction
- Sample restaurant menu application
- Action bar, tab, swipe view, and dynamic application data
- Android UI fragment, multi-pane layout, and master-detail view
- Android resource system, graphics and text, screen resolution and density
- Conclusion
- References
Introduction
This document discusses dynamic UI building from 3 aspects:
- Displaying dynamic content with the latest Android UI pattern and controls – At minimum, you want the UI of your application to "live" and "breathe" like the rest of the Android systems. One key is to design your app with the latest Android UI components, controls, and navigation patterns. A certain degree of customization is not a problem, but in general, you want to adhere to the latest Android guidelines and trends. And, how do we present the dynamic application content with this latest UI trend? In this paper, we will demonstrate the use of the latest Android UI components, such as the action bar, tab, and swipe view, to present dynamic application data.
- UI layout and navigation flow – Does it make sense to have the same UI layout for both 4" phone and 11" tablet? To maximize the space from the large display, sometimes you want to consider using different layouts for devices with different sizes of display. In this document, we will discuss the use of Android Fragment to design multi-pane/single-pane layouts and master-detail view to fit screens with different display sizes.
- Display resolution and density – Besides the UI layout, if you use graphics in your app, what can you do to ensure the graphics are not stretched or pixelated on devices with different screen resolutions and pixel densities? What about the font size of a text item? A text item with a font size of 20 may look perfect on a phone, but it could be too small on a tablet. We will discuss what you can do with the Android resource system to handle these issues.
Sample Restaurant Menu App
To illustrate the programming concepts described in this document, I wrote an Android app that allows users to browse a restaurant menu organized by food category. The restaurant menu application provides programming examples of the topics discussed in this document.
Please note, the readers of this document are assumed to have basic knowledge of Java programming and Android development concepts. It is not the intention of this document to provide Android tutorial, rather, it focuses on the few essential UI techniques to help developers to achieve the goal of building a dynamic UI.
Also, the code snippets in the document are sample code taken from the restaurant app. The snippets are chosen to illustrate the programming concepts discussed in the document only. They do not provide a complete view of the application structure and details. If you are interested in a comprehensive view of Android application development provided by the sample application, such as life cycle handling of fragments, UI update of grid item selection, retaining the user selection and application data from a fragment during configuration change, or example of UI styling in the resource, please refer to the Android developer links in the References section for details.
Action Bar, Tab, Swipe View, and Dynamic Application Data
While working on the UI for "Restaurant Menu" application, there are a few design considerations in mind:
- The UI shall allow users to access essential app features from main screen
- The UI shall allow the owner of the restaurant menu application to add/remove food items dynamically
- The UI shall keep a consistent presentation and view switching between food categories
- The UI shall present the food and information of the menu with images whenever possible
- The UI shall allow for the use of gestures that are intuitive to the Android system for screen navigation
The Android action bar, tab, and swipe views are chosen to fulfill the above requirements. In fact, since Android 3.0, these UI elements are one of the most important UI patterns recommended by Android. You will find the use of these UI elements in most of the stock Android applications, such as email, calendar, hangouts, music, and play store. The following screen shots show how we present a browsable restaurant menu with these UI elements.
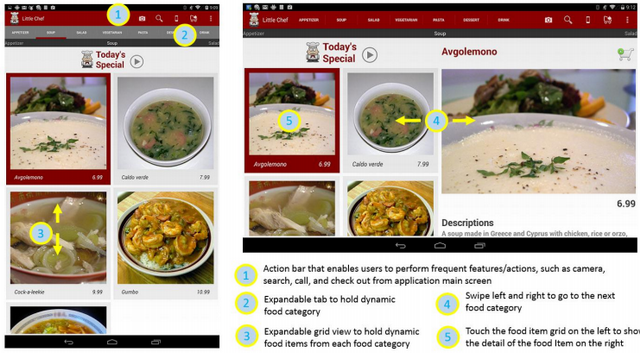
Figure 1 Screen overview of a restaurant menu application
Creating an action bar and tabs with swipe views
This section describes how you can create an action bar and tabs with swipe views for an Android application.
- Add
ViewPager to the layout file of the main screen to handle swipe views for tabs (activity_main.xml)
<android.support.v4.view.ViewPager
    xmlns:android="http://schemas.android.com/apk/res/android"
    xmlns:tools="http://schemas.android.com/tools"
    android:id="@+id/pager"
    android:layout_width="match_parent"
    android:layout_height="match_parent"
    tools:context=".MainActivity" >

    <android.support.v4.view.PagerTitleStrip
        android:id="@+id/pager_title_strip"
        android:layout_width="match_parent"
        android:layout_height="wrap_content"
        android:layout_gravity="top"
        android:background="#333333"
        android:paddingBottom="4dp"
        android:paddingTop="4dp"
        android:textColor="#ffffff"/>
</android.support.v4.view.ViewPager>
- In the MainActivity.java (the main screen of the application), inflate the activity_main.xml layout, retrieve the ViewPager from the activity layout file, create a
ViewPagerAdapter to handle the creation and initialization of each page for the tab, and assign the OnPageChangeListener to the ViewPager
mViewPager = (ViewPager) findViewById(R.id.pager);
mViewPager.setOnPageChangeListener(this);
mPagerAdapter = new PagerAdapter(getSupportFragmentManager(), this);
mViewPager.setAdapter(mPagerAdapter);
- Implement
OnPageChangeListener and handle application related tasks during view change. At minimum, the code should set the selected tab on the action bar when users swipe the view to the next tab.
public void onPageSelected(int position) {
mActionBar.setSelectedNavigationItem(position);
mCurrentViewedCategory = (String) mActionBar.getTabAt(position).getText();
}
public void onPageScrolled(int arg0, float arg1, int arg2) {
}
public void onPageScrollStateChanged(int arg0) {
}
- Define
PagerAdapter (inherits from FragmentStatePagerAdapter) to handle the view for each tab. Pager Adapter is defined as an inner class to MainActivity.java in the sample. "getItem" is called during the initialization of each page. In this case, each page contains a fragment of the master-detail view of the menu data shown as figure 1. The details of fragment programming are discussed in the next section.
Tips
There are two types of PagerAdapter – FragmentPagerAdapter and FragmentStatePagerAdapter. For memory efficiency, the former is recommended if the number of the pager is fixed, the latter is recommended if the number of the pager is dynamically allocated. In the case of FragmentStatePagerAdapter, the pager is destroyed when user navigates away from the page. The sample uses FragmentStatePagerAdapter as the number of food category can change based on the application data.
class PagerAdapter extends FragmentStatePagerAdapter {
UltimateViewFragment ultimateViewFragment;
FragmentActivity mFragmentActivity;
UltimateViewFragment[] fragmentArray = new
UltimateViewFragment[mCategory.size()];
public PagerAdapter(FragmentManager fm, FragmentActivity fragmentActivity) {
super(fm);
mFragmentActivity = fragmentActivity;
}
@Override
public Object instantiateItem(ViewGroup container, int position) {
super.instantiateItem(container, position);
UltimateViewFragment fragment = (UltimateViewFragment)
super.instantiateItem(container, position);
fragment.setGridItemListener((GridItemListener)
mFragmentActivity);
fragmentArray[position] = fragment;
return fragment;
}
@Override
public Fragment getItem(int position) {
Bundle args = new Bundle();
args.putString(MenuFactory.ARG_CATEGORY_NAME,
mCategory.get(position));
ultimateViewFragment = new UltimateViewFragment();
ultimateViewFragment.setArguments(args);
ultimateViewFragment.setGridItemListener((GridItemListener)
mFragmentActivity);
fragmentArray[position] = ultimateViewFragment;
return ultimateViewFragment;
}
@Override
public int getCount() {
return mCategory.size();
}
@Override
public CharSequence getPageTitle(int position) {
return mCategory.get(position);
}
}
- Retrieve the
ActionBar (mActionBar) from the Activity and set the navigation mode to be NAVIGATION_MODE_TABS - Add tabs to the
ActionBar with mActionBar.addTab and initialize the tab title with specified text
mActionBar = getActionBar();
mActionBar.setNavigationMode(ActionBar.NAVIGATION_MODE_TABS);
for (int i = 0; i < mCategory.size(); i++) {
mActionBar.addTab(mActionBar.newTab().setText(
mCategory.get(i)).setTabListener(this));
if (savedInstanceState == null) {
mSelectedItems.put(mCategory.get(i), mMenuFactory.getMenuWithCategory(
mCategory.get(i)).get(0));
} else {
String[] selectedItems = savedInstanceState.getStringArray("selectedItems");
mSelectedItems.put(mCategory.get(i), mMenuFactory.getMenuItem(
mCategory.get(i),selectedItems[i]));
}
}
Tips
The ActionBar API was first introduced in Android 3.0 (API level 11), but it is also available in support library for compatibility with Android 2.1 (API level 7) and above. The sample code uses android-support-v4.jar library. The jar is placed in libs folder under application root directory. If you use Eclipse as your IDE, please add the path to the library in Project Properties->Java Build Path->Libraries
Adding action items to action bar
The action bar contains action items that are used frequently by the user. These action items are located on the top of the action bar to allow easy access. In the sample code, we define a few action items, such as camera, search, call, check-out, and settings, as highlighted in the screen shot below.

Figure 2 Action bar with action items
Here is the how you add action items to the action bar.
- Define the action items in xml under res/menu (e.g. action_bar.xml)
<menu xmlns:android="http://schemas.android.com/apk/res/android" >

    <item android:id="@+id/action_camera"
          android:icon="@drawable/ic_action_camera"
          android:title="@string/action_camera"
          android:showAsAction="always" />
    <item android:id="@+id/action_search"
          android:title="@string/action_search_str"
          android:icon="@drawable/ic_action_search"
          android:showAsAction="always"
          android:actionViewClass="android.widget.SearchView" />
    <item android:id="@+id/action_call"
          android:icon="@drawable/ic_action_phone"
          android:title="@string/action_call"
          android:showAsAction="always" />
    <item android:id="@+id/action_checkout"
          android:icon="@drawable/ic_action_shoppingcart_checkout"
          android:title="@string/action_checkout"
          android:showAsAction="always"/>
    <item android:id="@+id/action_settings"
        android:orderInCategory="100"
        android:showAsAction="never"
        android:title="@string/action_settings"/>

</menu>
- Inflate the action item menu in the code (MainActivity.java)
public boolean onCreateOptionsMenu(Menu menu) {
getMenuInflater().inflate(R.menu.action_bar, menu);
SearchManager searchManager =
(SearchManager) getSystemService(Context.SEARCH_SERVICE);
SearchView searchView =
(SearchView) menu.findItem(R.id.action_search).getActionView();
searchView.setSearchableInfo(
searchManager.getSearchableInfo(getComponentName()));
return super.onCreateOptionsMenu(menu);
}
- Handle the action item click in the code
public boolean onOptionsItemSelected(MenuItem item) {
if (mDrawerToggle.onOptionsItemSelected(item)) {
return true;
}
switch (item.getItemId()) {
case android.R.id.home:
NavUtils.navigateUpFromSameTask(this);
return true;
case R.id.action_search:
return true;
case R.id.action_settings:
return true;
case R.id.action_camera:
return true;
case R.id.action_checkout:
return true;
default:
return super.onOptionsItemSelected(item);
}
Tips
As shown in Figure 1, the action bar contains action items which are frequently performed by users, such as camera, search, and checkout. To keep a consistent look and feel across the system, you can download the Action Bar Icon Pack from https://developer.android.com/design/downloads/index.html and use them in the application resource area.
Action bar styling
Android renders the action bar with a system-defined color which may not always match the color theme of your application. Sometimes, you want to style the action bar with a style and color that is designed for the theme of your application (or business theme color).
For example, the action bar in this sample app is styled with a "maroon" color that matches with the application icon.
Figure 3 Action bar styling example
In this section, we will discuss how to enhance the look of the action bar using Android Action Bar Style Generator.
- The tool is available at http://android-ui-utils.googlecode.com/hg/asset-studio/dist/index.html
- Specify the color of your choice and download the generated resource files from the link. The following is what I use in the sample app.
Figure 4 Action bar style generator
- The tool generates sample resources icons, images, style xml as the followings. Add all resource files to the application resource drawable area, and update AndroidManifest.xml application:theme to use the style xml generated from the tool.
Figure 5 Action bar resources example
<activity
            android:theme="@style/Theme.Example"
            android:name="com.example.restaurant.MainActivity"
            android:label="@string/app_name" >
            <intent-filter>
                <action android:name="android.intent.action.MAIN" />
                <category android:name="android.intent.category.LAUNCHER" />
            </intent-filter>
</activity>
Handling dynamic application data from the UI
The application UI may not always be static, especially when it has the need to present data that could change during the lifetime of the application. For example, a picture album application allows users to view and edit a number of images that could change any time while the device is on. An email application needs to handle the messages which are refreshed every configurable time interval from the server. In this sample restaurant menu application, the food menu is dynamic. The content of the action bar tab and menu grid could change depending on the food category and menu.
One way to deal with dynamic data is to create a data factory, which acts as a translator between the raw data and the UI. The data factory abstracts out the data manipulation logic from the UI which allows the data to change without changing the UI logic. At a high level, the data factory communicates with data sources for raw application data, processes the raw data from various sources (such as network, local file system, database, or cache), and transforms the raw data into data objects which can be used by the UI components.
The following shows a simple flow among UI, data factory, and data sources.
Figure 6 General flows to handle dynamic application content
Tips
Steps in handling dynamic application content
- Identify possible data sources, such as network, local file system, database, or device cache
- Create a data factory that "listens" to the change in data source or query data periodically depending on the needs of the application
- Data factory handles the request of the data update in a separate thread to avoid blocking of the UI thread as data request and process could take time
- UI components registers as a data change listener to the Data Factory, and refreshes UI components when a data change notification is received
- Data Factory manages the listeners of the data change event and provide convenient methods for callers to query data without knowledge of raw data format
To simplify the implementation in the sample restaurant app, food menu data are stored as a string array in Android strings.xml. Each array element contains a record for the food item. In reality, these data records could be defined and stored in a server to allow changes dynamically. Regardless of the source the data, the data format defined in string.xml can be reused. The following shows how application data is processed in MenuFactory.java and how the UI components are initialized with application data.
- Define menu data in strings.xml. Each food item contains a string with category name, menu name, description, nutrition facts, price, and the name of the image. The data field is separated by ",,," delimiter.
<string-array name="menu_array">

    <item>Appetizer,,,Angels on horseback,,,Oysters wrapped in bacon, served hot. In the United Kingdom they can also be a savoury, the final course of a traditional British ,,,Calories 393; Fat 22 g( Saturated 4 g); Cholesterol 101 mg; Sodium 836 mg; Carbohydrate 19g; Fiber 3g; Protein 31g,,,6.99,,,Angels on horseback.jpg</item>

    <item>Appetizer,,,Batata vada,,,A popular Indian vegetarian fast food in Maharashtra, India. It literally means potato fritters. The name \"Batata\" means potato in English. It consists of a potato mash patty coated with chick pea flour, then deep-fried and served hot with savory condiments called chutney. The vada is a sphere, around two or three inches in diameter.,,,Calories 393; Fat 22 g( Saturated 4 g); Cholesterol 101 mg; Sodium 836 mg; Carbohydrate 19g; Fiber 3g; Protein 31g,,,7.99,,,Batata vada.jpg</item>

    <item>Appetizer,,,Barbajuan,,,An appetizer mainly found in the eastern part of French Riviera and Northern Italy.,,,Calories 393; Fat 22 g( Saturated 4 g); Cholesterol 101 mg; Sodium 836 mg; Carbohydrate 19g; Fiber 3g; Protein 31g,,,8.99,,,Barbajuan.jpg</item>

     <item>Appetizer,,,Blooming onion,,,Typically consists of one large onion which is cut to resemble a flower, battered and deep-fried. It is served as an appetizer at some restaurants.,,,Calories 393; Fat 22 g( Saturated 4 g); Cholesterol 101 mg; Sodium 836 mg; Carbohydrate 19g; Fiber 3g; Protein 31g,,,9.99,,,Blooming onion.jpg</item>

</string-array>
- During application start-up, MainActivity.java creates a reference to
MenuFactory as a singleton and loads the data from the Android resource area.
mMenuFactory = MenuFactory.getInstance(res);
mMenuFactory.loadDataFromAndroidResource();
MenuFactory processes the data from strings.xml and transforms them to MenuItem objects used by UI views.
public void loadDataFromAndroidResource() {
if (mMenuItems != null && mMenuItems.size() > 0) {
clear();
}
mMenuItems = new ArrayList<MenuItem>();
mCategoryList = new ArrayList<String>();
String[] menuList = mResources.getStringArray(R.array.menu_array);
MenuItem menuItem;
String[] currentMenu;
String currentCategory = "";
for (int i = 0; i<menuList.length; i++) {
currentMenu = menuList[i].split(",,,");
menuItem = new MenuItem();
for (int j = 0; j< currentMenu.length; j++) {
switch (j) {
case 0:
menuItem.setCategory(currentMenu[j]);
if (!currentMenu[j].equals(currentCategory)) {
currentCategory = currentMenu[j];
mCategoryList.add(currentMenu[j]);
}
break;
case 1:
menuItem.setName(currentMenu[j]); break;
case 2:
menuItem.setDescription(currentMenu[j]);
break;
case 3:
menuItem.setNutrition(currentMenu[j]); break;
case 4:
menuItem.setPrice(currentMenu[j]); break;
case 5:
menuItem.setImageName(currentMenu[j]); break;
}
}
menuItem.setId(Integer.toString(i));
mMenuItems.add(menuItem);
}
}
- MenuFactory.java provides convenient methods for callers to query data related to the UI updates.
public ArrayList<String> getCategoryList() {
return mCategoryList;
}
public ArrayList<MenuItem> getMenuWithCategory (String category) {
ArrayList<MenuItem> result = new ArrayList<MenuItem>();
for (int i = 0; i<mMenuItems.size(); i++) {
MenuItem item = mMenuItems.get(i);
if (item.category.equals(category)) {
result.add(item);
}
}
return result;
}
public MenuItem getMenuItem (String category, int index) {
ArrayList<MenuItem> menuList = getMenuWithCategory(category);
if (menuList.size() == 0) {
return null;
}
return menuList.get(index);
}
public MenuItem getMenuItem (String category, String name) {
MenuItem result = null;
for (int i = 0; i<mMenuItems.size(); i++) {
MenuItem item = mMenuItems.get(i);
if (item.category.equals(category) && item.name.equals(name)) {
result = item;
}
}
return result;
}
class MenuItem {
String category;
String name;
String price;
String description;
String nutrition;
ImageView image;
String imageName;
String id;
public void setCategory(String str) {
category = str;
}
public void setName(String str) {
name = str;
}
public void setDescription(String str) {
description = str;
}
public void setNutrition(String str) {
nutrition = str;
}
public void setImageName(String str) {
imageName = str;
}
public void setId(String str) {
id = str;
}
public void setPrice(String str) {
price = str;
}
public void setImageView(ImageView imageView) {
image = imageView;
}
}
- Initialize the grid menu view with food items from
MenuFactory. The implementation is done in MenuGridFragment.java. In the restaurant application, food items for each category are displayed in a GridView which is embedded in a Fragment. During the fragment initialization, MenuFactory is called to retrieve the food items for each category. The data adapter (ImageAdapter) of the grid view creates and renders each food item during the initialization.
public View onCreateView(LayoutInflater inflater, ViewGroup container,
Bundle savedInstanceState) {
View rootView = inflater.inflate(
R.layout.fragment_menu_grid, container, false);
mMenuList = mMenuFactory.getMenuWithCategory(mCategory);
mGridView = (GridView) rootView.findViewById(R.id.gridview);
mGridView.setAdapter(mImageAdapter);
mGridView.setOnItemClickListener(this);
return rootView;
}
class ImageAdapter extends BaseAdapter {
private LayoutInflater mInflater;
public ImageAdapter(Context c) {
mInflater = LayoutInflater.from(c);
}
public int getCount() {
return mMenuList.size();
}
public Object getItem(int position) {
return mMenuList.get(position);
}
public long getItemId(int position) {
return position;
}
public View getView(int position, View convertView, ViewGroup parent) {
View v = convertView;
ImageView picture;
TextView name;
TextView price;
if(v == null) {
v = mInflater.inflate(R.layout.view_grid_item, parent, false);
v.setTag(R.id.picture, v.findViewById(R.id.picture));
v.setTag(R.id.grid_name, v.findViewById(R.id.grid_name));
v.setTag(R.id.grid_price, v.findViewById(R.id.grid_price));
}
picture = (ImageView)v.getTag(R.id.picture);
name = (TextView)v.getTag(R.id.grid_name);
price = (TextView) v.getTag(R.id.grid_price);
MenuItem item = (MenuItem) mMenuList.get(position);
InputStream inputStream = null;
AssetManager assetManager = null;
try {
assetManager = getActivity().getAssets();
inputStream = assetManager.open(item.imageName);
picture.setImageBitmap(BitmapFactory.decodeStream(inputStream));
} catch (Exception e) {
} finally {
}
name.setText(item.name);
price.setText(item.price);
if (mSelectedPosition == position){
updateGridItemColor(v, true);
} else {
updateGridItemColor(v, false);
}
return v;
}
}
- Initialize action bar tabs with food categories from
MenuFactory
mCategory = mMenuFactory.getCategoryList();
mActionBar = getActionBar();
mActionBar.setNavigationMode(ActionBar.NAVIGATION_MODE_TABS);
for (int i = 0; i < mCategory.size(); i++) {
mActionBar.addTab(mActionBar.newTab().setText(
mCategory.get(i)).setTabListener(this));
if (savedInstanceState == null) {
mSelectedItems.put(mCategory.get(i), mMenuFactory.getMenuWithCategory(
mCategory.get(i)).get(0));
} else {
String[] selectedItems = savedInstanceState.getStringArray("selectedItems");
mSelectedItems.put(mCategory.get(i), mMenuFactory.getMenuItem(
mCategory.get(i),selectedItems[i]));
}
}
Android Fragment, Multi-Pane Layout, and Master-Detail View
Another aspect of a Dynamic UI is how you can design the UI of your Android application so that the same application will fit and flow well on devices with difference sizes (such as tablets and phones). In this section, we will discuss the use of an Android fragment to design multi-pane layout for devices with different display sizes.
Android introduces the concept of "fragment" in 3.0. You can view "fragment" as a way to "componentize" your screen layout. The screen is componentized into multiple UI groups or views. Each UI group or view is implemented as a fragment. Your application decides which UI groups/views and navigation flow is available to users during run time based on the display of the device it is running on.
Multi-pane layouts are a common usage of an Android fragment, in which the screen is presented as a combination of multiple views. Interaction with one view on a screen could result in the update of another view on the screen. Master-detail view is one of the important UI design patterns for this concept. The application presents the overview of the content in a master view with a list or grid view widget. Selecting an item on the grid or list shows the detail view of the item on the same screen or a different screen. On a device with a large display (tablet), both master and detail view could fit on the same screen. On a device with a smaller screen (phone), master and detail view could be presented on different screens.
The restaurant menu app presents menu information for each food category in a grid view. Selecting the grid item shows the detail of the food item on the same screen if the device has a large display, or a different screen if the device has a smaller screen. This design is implemented in 3 Fragments:
UltimateVIewFragment – A fragment which contains a grid view fragment and a detail view fragment, the visibility of inner fragments are determined during run time based on the size of screen (e.g. detail view is only shown if the device has big display)GridViewFragment – A fragment that presents the menu data for each food category in a grid viewDetailViewFragment – A fragment that presents the detail of a food item selected in the grid view
Tips
Most of the code samples on the Android developer site show the implementation of master-detail view with two Fragments embedded inside an Activity, but not with two fragments embedded inside a fragment. In the sample restaurant app, we implemented the latter one. The use of a fragment, instead of an activity, is required by the swipe view of action bar tabs. The sample restaurant code shows you in detail how this can be done with tab swipe view.
Figure 7 Multi-pane, master-detail view for device with different screen sizes
Creations of fragments
This sections describes the steps required to create fragments used in the sample.
- Define the screen layout with a fragment in XML. The following are screen layouts for
UltimateVIewFragment, GridViewFragment, and DetailViewFragment. Please note, the visibility of the detail view below is set to "gone" initially, it should be changed in the respective layout file for devices of different screen sizes. For example, if the device has a larger display, the visibility is set to "visible". See section "Multi-pane and single-pane layouts based on screen size" later on for details.
This section shows screen layout for UltimateViewFragment only. Please see the complete code sample for screen layout for GridViewFragment (layout/fragment_menu_grid.xml) and DetailViewFragment (layout/fragment_disch_detail.xml).
\
<!—UltimateViewFragment screen layout -->
<LinearLayout xmlns:android="http://schemas.android.com/apk/res/android"
    xmlns:tools="http://schemas.android.com/tools"
    android:layout_width="fill_parent"
    android:layout_height="fill_parent"
    android:orientation="horizontal">

    <FrameLayout
        android:id="@+id/grid_fragment"
        android:layout_width="wrap_content"
        android:layout_height="wrap_content"
        android:layout_weight="1"/>

    <FrameLayout
        android:id="@+id/detail_fragment"
        android:layout_width="wrap_content"
        android:layout_height="wrap_content"
        android:layout_weight="1"
        android:visibility="gone"
        android:orientation="vertical"/>

 </LinearLayout>
- Create and initialize fragments programmatically and use
FragmentManager to handle the transactions of fragments. The following code snippet shows the implementation of UltimateViewFragment which creates MenuGridFragment and DetailViewFragment during run time. For details to implement MenuGridFragment and DetailViewFragment, please see the complete sample code.
public void onCreate(Bundle savedInstanceState) {
        super.onCreate(savedInstanceState);

        if (savedInstanceState != null) {
            String tmp = savedInstanceState.getString("selectedIndex");
            if (tmp != null) {
                mSelectedIndex = Integer.parseInt(tmp);
            }
            mCategory = savedInstanceState.getString("currentCategory", mCategory);
        } else {
            mCategory = (String) getArguments().getString(MenuFactory.ARG_CATEGORY_NAME);
        }
        mDetailViewFragment = new DetailViewFragment();
        mGridViewFragment = new MenuGridFragment();

        mGridViewFragment.setCategory(mCategory);
        mGridViewFragment.setOnGridItemClickedListener(this);

        FragmentManager fragmentManager = this.getChildFragmentManager();
        FragmentTransaction transaction = fragmentManager.beginTransaction();

        if (savedInstanceState != null) {
            transaction.replace(R.id.detail_fragment, mDetailViewFragment);
            transaction.replace(R.id.grid_fragment, mGridViewFragment);
        } else {
            transaction.add(R.id.detail_fragment, mDetailViewFragment, "detail_view");
            transaction.add(R.id.grid_fragment, mGridViewFragment, "grid_view");
        }
        transaction.commit();
}
Tips
The fragments should be created during run time of an activity, especially if you plan to swap fragments in and out of a screen dynamically. Fragments can be added, replaced, and removed from the screen using FragmentManager. As shown in the code, the FragmentManager can be retrieved from getChildFragmentManager, not getFragmentManager, since the container of the children fragments is a fragment, not an Activity. Also, during an orientation change, to avoid adding the same fragments on top of each other in UltimateViewFragment, the code should replace the existing fragments with the new fragment using "replace", not "add" from FragmentTransaction.
Communication between fragments and activities
The communication between fragments can be handled by using the listener pattern, which involves two easy steps:
- Defining a listener interface that can be implemented by components which are interested in receiving the notification from other components.
- In the case of multi-pane and master-detail fragments, if a child fragment is sending the notification, the container of the child fragments will register as a listener to the child fragment. Upon receiving of the notification, the parent fragment or activity can take appropriate actions based on the received information.
Here is how it is done in the restaurant app:
- Define a
GridItemListener interface. The interface is implemented by the container of the grid fragment. The grid fragment notifies the parent container when a grid selection happens.
public interface GridItemListener {
public void onGridItemClick(com.example.restaurant.MenuFactory.MenuItem itemSelected, int position);
}
UltimateViewFragment provides a method for caller to register itself as GridItemListener.
public void setGridItemListener(GridItemListener gridItemListener) {
mGridItemListener = gridItemListener;
}
UltimateViewFragment notifies its listener of a change in grid selection.
public void onGridItemClick(MenuItem itemSelected, int position) {
mGridItemListener.onGridItemClick(itemSelected, position);
mSelectedIndex = position;
View detail = getActivity().findViewById(R.id.detail_fragment);
if (detail != null && detail.getVisibility() == View.GONE) {
Intent intent = new Intent(this.getActivity(), DetailActivity.class);
intent.setAction("View");
intent.putExtra("category", itemSelected.category);
intent.putExtra("entree_name", itemSelected.name);
Activity activity = getActivity();
activity.startActivity(intent);
} else {
mDetailViewFragment.update(itemSelected);
}
}
- In the
MainActivity, each tab view is the container parent of the UltimateViewFragment. MainActivity registers itself as the GridItemListener to keep track of the last selected food item for each category.
@Override
public Object instantiateItem(ViewGroup container, int position) {
super.instantiateItem(container, position);
UltimateViewFragment fragment = (UltimateViewFragment)
super.instantiateItem(container, position);
    fragment.setGridItemListener((GridItemListener)
    mFragmentActivity);
fragmentArray[position] = fragment;
return fragment;
}
MainActivity takes appropriate actions in the listener callback when a notification is received.
public void onGridItemClick(com.example.restaurant.MenuFactory.MenuItem
itemSelected, int position) {
mSelectedItems.put(itemSelected.category, itemSelected);
}
Multi-pane and single-pane layouts based on screen size
As discussed above, an Android fragment allows you to define multi-pane layouts for screens. But, how do we use screen size to determine multiple-pane/single-pane layouts, and how do we provide the different screen flows based on the multiple-pane/single-pane design? The Android resource system provides configuration qualifiers for the application to handle multiple screen layouts.
Different layout files are provided in the resource system based on screen sizes. During application start-up, Android will apply the appropriate layout files based on the display size. Before Android 3.2, you can define the layout for small, normal, large, or xlarge screens sizes. Layout files can be defined in res/layout-small for devices with a screen size smaller than 426dpx320dp, or res/layout-xlarge for screen sizes which are larger than 960dpx720dp. The following is the definition of these screen sizes.
- xlarge screens are at least 960dp x 720dp
- large screens are at least 640dp x 480dp
- normal screens are at least 470dp x 320dp
- small screens are at least 426dp x 320dp
Here is how each size is mapped to the actual device size in inches.
Figure 8 Mapping of screen size qualifier to actual display size in inches
Starting in Android 3.2, the above screen size qualifier has been replaced with the use of qualifier sw<N>dp where N is the pixel definition for the screen width. For example, for "large" screen, the layout files can be provided in layout-sw600dp directory.
We can further add "portrait" or "landscape" definition in the resource qualifier. For example, I may want to have a special layout for screen width 600dp and portrait mode only. In this case, a layout-sw600dp-port will be created to store the layout.
The following is the layout structure based on screen size and orientation of the device used in the sample application. For a mid-size tablet, I want to have single-pane layout for portrait mode since the UI may be squeezed if we use multi-pane layout on a mid-size tablet (7" or 8" tablet).
Figure 9 Multiple layout files in resource system for different display sizes
The fragment_ultimate_view.xml layout for different screen sizes is largely the same. This only thing that is different is the visibility of the child fragment. For a mid-size tablet, the ultimate view layout will look like this:
<!—UltimateViewFragment screen layout à
<LinearLayout xmlns:android="http://schemas.android.com/apk/res/android"
    xmlns:tools="http://schemas.android.com/tools"
    android:layout_width="fill_parent"
    android:layout_height="fill_parent"
    android:orientation="horizontal">

    <FrameLayout
        android:id="@+id/grid_fragment"
        android:layout_width="wrap_content"
        android:layout_height="wrap_content"
        android:layout_weight="1"/>

    <FrameLayout
        android:id="@+id/detail_fragment"
        android:layout_width="wrap_content"
        android:layout_height="wrap_content"
        android:layout_weight="1"
        android:visibility="gone"
        android:orientation="vertical"/>

 </LinearLayout>
How do we handle the navigation flow for different layouts? During the application run time, based on the visibility of the view, the application can decide whether to update other views on the same screen (multi-pane) or to start a new screen (single-pane). The following code snippet shows how this is done:
public void onGridItemClick(MenuItem itemSelected, int position) {
mGridItemListener.onGridItemClick(itemSelected, position);
mSelectedIndex = position;
View detail = getActivity().findViewById(R.id.detail_fragment);
if (detail != null && detail.getVisibility() == View.GONE) {
Intent intent = new Intent(this.getActivity(), DetailActivity.class);
intent.setAction("View");
intent.putExtra("category", itemSelected.category);
intent.putExtra("entree_name", itemSelected.name);
Activity activity = getActivity();
activity.startActivity(intent);
} else {
mDetailViewFragment.update(itemSelected);
}
}
Fragment life cycle handling
Just like Android Activity, fragments implement the lifecycle callbacks and take proper actions during the start, pause, resume, stop, and destroy states of an application. The lifecycle management for a fragment is similar to that of an Activity.
Tips
Besides the regular Activity life cycle callbacks, such as onCreate, onStart, onResume, onPause, onStop, and onDestroy, fragments have a few extra lifecycle callbacks:
onAttach() – Called when the fragment has been associated with the activity
onCreateView() – Called to create the view hierarchy associated with the fragment
onActivityCreated() – Called when the activity’s onCreate() has returned
onDestroyView() – Called when the view hierarchy associated with the fragment is being removed
onDetach() – Called when the fragment is being disassociated from the activity
The following shows the effect of an activity life cycle on fragment life cycle callbacks.
Figure 10 Mapping of application lifecycle to fragment lifecycle callbacks
Similar to Activity, fragments may need to save and restore application states during device configuration changes, such as a change in device orientation, or an unexpected Destroyed activity to a Paused activity. Saving application states will be handled in the onSaveInstanceState () callback, which is called before the Activity is destroyed, and restoring application state can be handled in either the onCreate (), onCreateView (), or onActivityCreated () callback. The following code snippet shows how the restaurant app saves the index of the selected grid item in onSaveInstanceState () and restores it in onCreate ().
public void onCreate (Bundle savedInstanceState) {
super.onCreate(savedInstanceState);
if (savedInstanceState != null) {
String selectedIndex = savedInstanceState.getString("selectedIndex");
if(selectedIndex != null) {
mSelectedPosition = Integer.parseInt(selectedIndex);
}
}
mImageAdapter = new ImageAdapter(getActivity());
}
public void onSaveInstanceState (Bundle outState) {
if (mSelectedPosition != -1) {
outState.putString("selectedIndex", Integer.valueOf(mSelectedPosition).toString());
}
}
Tips
There may be times that you don’t want your fragments to be recreated during configuration change (device orientation change), perhaps due to the complexity of the application state data. Calling setRetainInstance (true) on the container class of fragments can prevent fragment from being recreated during configuration change.
Android Resource System, graphics and text, screen resolution and density
What about text and graphics presentation on screen? A font size chosen for a phone device may be too small for a tablet with a large screen. A graphic icon may look just right on a tablet, but appear too big on a phone with a smaller screen. And, what about preventing an image from being stretched on devices with different screen resolutions?
In this section, we will discuss a few techniques to make sure your text and graphics resources look well on screen with different resolutions and densities.
Images and screen pixel density
Screen pixel density plays an important role in how graphics is presented on the screen. A same image will show up bigger on a screen with low pixel density, simply because the size of one pixel is larger on a low density device. Vice versa, the same image will show up smaller on a screen with high pixel density. When you design your UI, you want to preserve the same look of the graphics as much as possible across devices with different screen pixel densities.
In most cases, this can be handled by using a pixel-independent unit, such as "dp" and "wrap_content" in specifying the dimension and layout of the graphics icon in the resource system. With a pixel-independent unit, Android will adjust the graphics based on the pixel density of the screen. The following sample demonstrates the use of "dp" and "wrap_content" in showing the image of food items in a detailed view.
<ImageView
    android:id="@+id/dish_image"
    android:layout_width="fill_parent"
    android:layout_height="wrap_content"
    android:layout_below="@+id/cart_area"
    android:minWidth="600dp"
    android:minHeight="400dp"
android:scaleType="centerCrop"/>
Sometimes this is not sufficient. For example, a small image could look pixelated on a screen due to the image scaling. In this case, you should provide alternative images in the res/drawable area to avoid the problem. Images with different sizes can be provided in res/drawable-<xxxxxx> folders, in which xxxxxx is the generalized density category. The following chart provides a reference to interpret the generalized density in actual screen density.
Figure 11 Different drawable areas with graphics resources for devices with different display sizes
Figure 12 Mapping of generalized screen density to actual dpi value
Size of text and screen sizes
To enhance the readability of the text, sometimes it is necessary to adjust the font size based on the size of the display. For example, in the sample restaurant app, I use a smaller font size for the name and price of the food on the grid menu for a device with less than 600 pixels in screen width (like a phone). I created a text "style" with different font sizes for screens with larger and smaller displays. The style files are stored in res/values-sw<N>dp with respect to the screen size.
Figure 13 Different style files for screen with different sizes
The following style file specifies the font size of the text used in the grid menu item.
<!—text style for screen with dp smaller than 600 à
 <style name="GridItemText">
        <item name="android:textColor">@color/grid_item_unselected_text</item>
        <item name="android:textStyle">italic</item>
        <item name="android:textSize">14sp</item>
    </style>

<!—text style for screen with dp larger than 600 à
<style name="GridItemText">
        <item name="android:textColor">@color/grid_item_unselected_text</item>
        <item name="android:textStyle">italic</item>
        <item name="android:textSize">20sp</item>
    </style>
The layout file for the grid item reference to the text style as defined above (view_grid_item.xml).
<TextView
            android:id="@+id/grid_price"
            android:layout_width="wrap_content"
            android:layout_height="wrap_content"
            android:paddingLeft="5dp"
            android:paddingRight="5dp"
            android:paddingTop="15dp"
            android:paddingBottom="15dp"
            android:layout_gravity="right"
 style="@style/GridItemText"/>
Conclusion
Android UI is one of the most interesting areas in Android programming. There are many things to consider when designing and programming Android UI. This document discusses four essential concepts that help you to achieve the goal of building a Dynamic UI:
- Use of the latest recommended UI elements, such as the action bar, tab, and swipe view for screen navigation.
- Programming practices to handle dynamic application data and how they are used with the action bar, tab, and swipe views.
- Using Android fragments to implement multi-pane and master-detail view layouts for devices with different screen sizes
- Using the Android resource system to improve the look of graphics and text on a screen with different resolutions and pixel densities
As Android continues evolving. A good practice is to embrace the latest UI techniques and to keep your knowledge up to date with the latest UI concepts. Having these techniques in mind will help you with your dynamic UI design for the many Android devices to come.
References
- Action bar creation: https://developer.android.com/training/basics/actionbar/index.html
- Action bar styling: https://developer.android.com/training/basics/actionbar/styling.html
- Multi-pane layouts: https://developer.android.com/design/patterns/multi-pane-layouts.html
- Fragment programming guide: https://developer.android.com/guide/components/fragments.html
- Multiple screen design: https://developer.android.com/guide/practices/screens_support.html
- Android SDK reference: https://developer.android.com/reference/packages.html
Related Articles and References
The products described in this document may contain design defects or errors known as errata which may cause the product to deviate from published specifications. Current characterized errata are available on request.
Contact your local Intel sales office or your distributor to obtain the latest specifications and before placing your product order.
Copies of documents which have an order number and are referenced in this document, or other Intel literature, may be obtained by calling 1-800-548-4725, or go to:
http://www.intel.com/design/literature.htm
Software and workloads used in performance tests may have been optimized for performance only on Intel microprocessors. Performance tests, such as SYSmark* and
MobileMark*, are measured using specific computer systems, components, software, operations, and functions. Any change to any of those factors may cause the results to vary.
You should consult other information and performance tests to assist you in fully evaluating your contemplated purchases, including the performance of that product when combined with other products.
**This sample source code is released under the Intel Sample Source Code License Agreement
To learn more about Intel tools for the Android developer, visit Intel® Developer Zone for Android.
Intel is inside more and more Android devices, and we have tools and resources to make your app development faster and easier.


 General
  News
News  Suggestion
  Question
  Bug
Bug  Answer
  Joke
Joke  Praise
  Rant
Rant  Admin
Admin 


