Introduction
The interest in integrating desktop applications with social networks such as Facebook is growing day after day. That's because the ability of developing a software that is not just enclosed among a group of people, but can be shared exponentially among millions of users within days is remarkable.
This article shall demonstrate how to take Facebook applications to another level beyond web applications, but to desktop applications.
It's interesting to mention that due to implementing this integration into one of my applications, on the first day of UNOFFICIAL publishing - just informing around 5 friends about it - 75 people were registered into the application database!! This is mainly because of the wall publishing thing which I consider free publicity.
To use this project, three things must be available:
- The Facebook Developer Toolkit : http://facebooktoolkit.codeplex.com/
- A .dll file called shdocvw.dll used to control Internet Explorer: http://www.dll-files.com/dllindex/dll-files.shtml?shdocvw
- A Facebook application whose application key shall be used within the project. One could get one by simply going to http://www.facebook.com/#!/developers/ and creating an application.
It is also assumed that the reader is oriented with basic Facebook features.
Using the Code
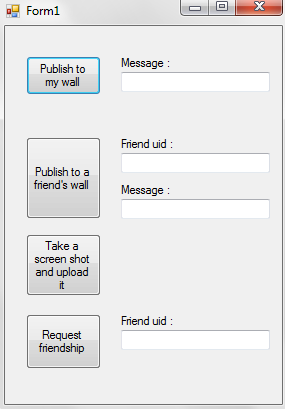
The project consists mainly of two classes, the Form1 class and is the main class, and ScreenShotFormatter class and is just called by Form1 when a screen shot is required using the corresponding button.
This article is mainly concerned with the main Facebook features that are:
- Current user wall publishing
- Current user's friends wall publishing
- Photo upload
- Album creation
- Friendship request
- Automatic photo tagging
Each of the above functionalities is represented using its own function within the code with a corresponding GUI interface.
To begin using Facebook APIs, one should start a FacebookService giving it the application API (refer to Background section). Also, according to the application, some user permissions may be needed to be acquired. To get a list of permissions, you can go to http://developers.facebook.com/docs/authentication/permissions.
fbService.ApplicationKey = "";
List<Enums.ExtendedPermissions> perms = new List<Enums.ExtendedPermissions>
{
Enums.ExtendedPermissions.none
};
fbService.ConnectToFacebook(perms);
Important note: Some permissions are not yet listed in the current SDK, so I sometimes need to add them in the Enums.ExtendedPermissions class and re-compile the source.
After a successful initialization of the FacebookService, running the application now shall result in the following dialog that is used to start a session between a user and Facebook servers.

Now for the fun stuff. I used the Facebook APIs asynchronously due to the latency that may be noticed due to network issues. It goes like that...
For publishing, the main function used here is Stream.PublishAsync. All I have done is write a neat interface to use this function along with the required callback (a function that is called when the asynchronous result is received successfully).
public void PublishToAFriendWall()
{
try
{
attachment att = new attachment
{
name = "",
href = "",
caption = "",
media = new List<attachment_media>()
};
attachment_media_image attMEd = new attachment_media_image
{
src = "",
href = ""
};
att.media.Add(attMEd);
action_link a = new action_link
{
text = "What's this",
href = ""
};
IList<action_link> tempA = new List<action_link> { a };
fbService.Stream.PublishAsync(friendWallTextBox.Text, att,
tempA, uidTextBox.Text, 0, PublishAsyncCompleted, null);
}
catch (Exception)
{
}
}
private static void PublishAsyncCompleted(string result, Object state,
FacebookExeption e)
{
}
For the other functionalities, the Facebook APIs used are:
Photos.CreateAlbumAsync for creating albums asynchronously Photos.UploadAsync for uploading photos asynchronously Photos.AddTag for tagging photos - And for the adding issue, I used the Internet Explorer DLL file (refer to Background section) to pop up a controlled Internet Explorer window showing the page http://www.facebook.com/addfriend.php?id= appended to it the uid of the user to add as a friend.
Mentioning on this article how exactly to use the above APIs is a bit frustrating (240 lines of code!!), so please refer to the attached project. It shows how exactly to use each and every API with the required objects and callbacks.
My Experience
Through my experience, I noticed some things that must be considered:
- You need to give the
FacebookService a valid API key obtained from the application created on Facebook. - When publishing, make sure the
- attachment,attachment_media_image and
action_link objects are given a name and reference. Or else you can just "NULL" them and it will be fine. - Using the synchronous Facebook APIs is DANGEROUS...the application just hangs!!
- When auto tagging a photo, mind the following. Facebook doesn't work in pixels, meaning that if you pass to the API say 550px and 480px, nobody would be tagged. That is mainly because Facebook deals in percentage of the screen, so what you need to do is multiply the value by 100 and divide by the full width/height of the screen (or whatever area you're considering).
- You also need to know that if the passed uid to the
Photos.AddTag API is of a non-friend, then tagging would fail. - MUST MUST MUST ask for the suitable user permissions as mentioned at the beginning of the previous section or else nothing would work. And again, refer to http://developers.facebook.com/docs/authentication/permissions for all available permissions, and again, if a permission is not listed within
Enums.ExtendedPermissions, you will have to enter it yourself in the source code of the Facebook SDK, recompile and use the new .dll file.
If you have done all this and still have issues, please contact me.
Points of Interest
As a Facebook Developer Toolkit user, I must admit how excited I was to be able to use nearly all Facebook features within a desktop application. The main features are demonstrated throughout this article, however, many more are waiting to be tried... go on.
I graduated Computer Engineering - Cairo University in 2010 and currently I'm a software development engineer at Mentor Graphics Egypt.


 General
  News
News  Suggestion
  Question
  Bug
Bug  Answer
  Joke
Joke  Praise
  Rant
Rant  Admin
Admin 


