Introduction
I am sure you have heard about functions, but what about functoids? Fuctoids or BizTalk functoids are, in a way, small reusable functions that you build just like functions. These are like operations that you need to perform specific tasks on data. BizTalk comes with a good collection of readymade functoids.
In this Scenario i like to Explain about the usage of the Looping Function and how it can be used in Biztalk Map with a small Example .
Scneario
For this example i am building a Interface that takesthe store details as input and send the Order Details .The Order Details are stored as a Repeting Record and using the Looping Functiod we will generate as number of order's as in the Store Details
A Bird's Eye View of the Steps
For this Example i am building two schemas and a map to demonstarte the Looping Function functionality.
*Create Biztalk Project
*Create Schemas and Maps in that Project
*Signing the DLL with a key
*Deploy and GAC the DLL
*Testing
Geeting Down to the Business..
Step1:Creating Biztalk Project
->Go to Start-All Programs-Microsoft Visual Studio 2005 - Microsoft Visual Studio 2005 .Its opens the Visual Studio 2005 Environment
-> Go to File and select New Project.It opens a window in that select Biztalk Project and Empty Biztalk Project ,give name of the project as LoopingFunctiods and clik ok.It will open a Biztalk Project.
Step2:Creating Schemas and maps in the project
You need to create Schemas and Maps for the Project.I had created the schemas as shown below.
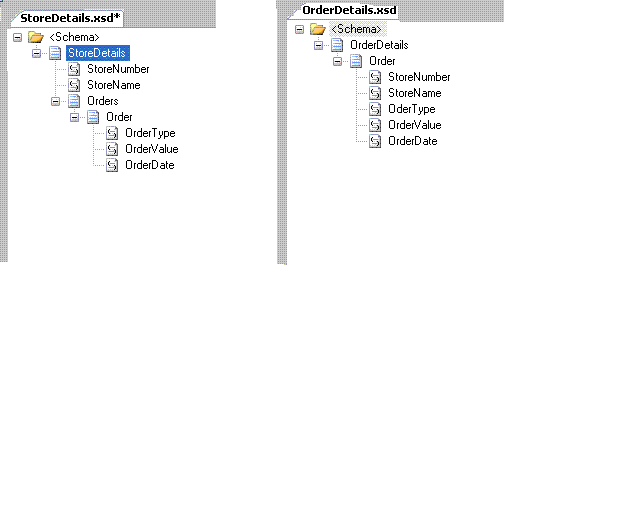
Ihad also created the Map with name as StoreDetails_MAP_OrderDetails.btm.It is as shown below

Step3:Signing the DLL with a key
Using the Visual Studio command prompt generate a Key Pair .It can be done usin the instruction " sn -k <keyname>.snk" and once the strong key(KeyPair) is generated ,reference that in the
Assembly Key File in the Project Properties(give the whole path where it is stored)
Step4:compile and Deploy the Project
From the project properties in the solution explorer window,deploy the project.Check in the GAC to see if the DLL is deployed.
Step 5: Testing
You can drop the input file in a Receive file folder"INPUT" and see the outpu in the send Folder "OUTPUT".Input File is as Below
Output File is as below
Using Code
Code Download contains one Project by name LoopingFunctiods and a Folder with name Installers which you can directly import the MSI File .If you want to Import the Bindings there is Binding File also .It will import all the Receive Folder Details and Send Folder Details to the Interface.It also has a sample File of the interface .
Conatct
If you are not able to load this project or any doubts you can mail me at graginireddy_mca2000@yahoo.co.in or to gr.raginireddy@gamil.com.


 General
  News
News  Suggestion
  Question
  Bug
Bug  Answer
  Joke
Joke  Praise
  Rant
Rant  Admin
Admin 


