Introduction
First of all, I must say that this article is about a fictive system for a fictive company,to explain the need of a cross-use of Remoting, COM+, and Oracle database. The following text will be about this cross-use, start imagining.
Software developing teams that are working with many and large projects are hard to delegate and to steer up. There might also be teams that work with testing to make sure that the software is ready for releasing. For this reason, we use several tools.
To make it easier to handle the outcome from projects of teams that have been working on, we would need a system to store them in. This system should keep track of versions that have been made and the ones that have been tested, with a description of the actions taken by the teams.
This article is all about a system that will handle those problems with the cross use of an Oracle database to store the information and .NET Remoting and COM+ in C# to make the communication between the client application and this database. The article will use .NET and COM+ in a way that will be simple to understand, and show which part is suitable for a specific task.
This article will describe:
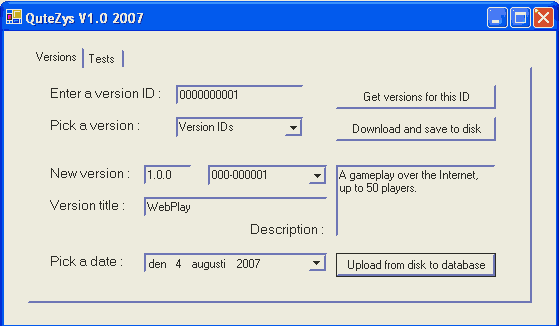
This is a screenshot of the client application. Here you can read, load, save, and create a test, upload a Zip version, or a Zip filled with test information. This information might be documents and scanned papers; the version zip file will contain the source code and the EXE files.
The company
This imaginary company develops software for customers and they also test it to discover bugs. There are several employees who are either a developers or testers. Some can also be both at the same time. The teams can be either a developer team or a test team. There can also be teams where only one employee is working. The software versions are created by a team are stored on CDs. The plan for this company is to use an application to archive all versions and tests in a database in the local area network; all versions should be put in a Zip-file instead of CDs as they do today. These Zip-files should be stored in the database as binary streams to make them available in the same place, and a backup on a regular basis will be done by the database administrator. A developer should be able to store versions and a tester to retrieve them, while the developer and tester should both be able to both retrieve and store test results.
Back to top?
The database model

An employee can have zero or more contracts written and a contract can belong to an employee and display which type he or she is, meaning that an employee can be a developer and/or a tester. Thus, he can belong to a test team and at the same time be a developer in a team that develops software. A contract can be written for an employee who belongs to a team and a team can have several contracts because it can belong to more than one employee in a team. A team of developers can have zero or more team tasks and a team task can only belong to one team. A team task can belong to only one project and a project can have one or more team tasks. A project can have zero or more versions of the same software while a version could only have been created in one project. A team of testers could then have zero or more tests and one test can only belong to one team. A test is done for only one version and a version can be exposed to several tests.
Back to top?
The class diagram
Back to top?
Using the code
This application creates a COM+ component which will be the transaction object for storing a version Zip-file in the database, and through this component, we are going to set some accounts to users who will be allowed to use it. This data will be the versions that are created by teams that are developing it, so it will be the developers who will have access to it. The database is an Oracle database V 9.1 with seven entities, and the client application will communicate with the database over the TCP protocol. We will use TCP in this case because the system will run inside a LAN, but it would still be easy to change to HTTP and port 80 will make it possible to have full access over the Internet because we will not get trapped over a firewall like we probably would with TCP. When a tester is working on an application, he/she will only be able to retrieve files and store test results but never upload a file version. The storing of a test will be done by another transaction object that is not a COM+ object because everyone will have access to store test results; the developer might have a small project to be tested by himself. This system only takes care of the versioning and testing; there's another system for handling employees, contracts, team tasks, teams, and projects. We are only going to explain the system for adding and retrieving a version, and the same for test results, but the database is complete to add in more parts to make it complete if you'd like.
Back to top?
And then there are the SQL scripts to create the database. Here I'm going to explain every table and all of their keys bit by bit. We will start with..
CREATE TABLE EMPLOYEE(EID CHAR(10) PRIMARY KEY,
NAME VARCHAR(25) NOT NULL, EDATE DATE NOT NULL);
The table Employee will store a tester or a developer because this is what the system is all about. EID is the employee number for the unique worker, which therefore is a PRIMARY KEY.
CREATE TABLE CONTRACT(CID CHAR(10) NOT NULL, TID CHAR(2) NOT NULL,
EID CHAR(10) NOT NULL, TYPE VARCHAR(20) NOT NULL, CDATE DATE NOT NULL);
An employee will have a contract written between him/her and the company which explains this person's tasks (the company which he/she is working for). The CID is the ID of the contract stored on paper in another archive. Type is what kind of contract it is, and can be either a developer contract or a tester one.
CREATE TABLE TEAM(TID CHAR(2) PRIMARY KEY, NAME VARCHAR(20) NOT NULL,
TDATE DATE NOT NULL);
This table is created when a new team is needed, with the name of the team and the creation date.
CREATE TABLE TEAMTASK(TASKID CHAR(10) NOT NULL, TID CHAR(2) NOT NULL,
PROID CHAR(10) NOT NULL, TASK VARCHAR(25) NOT NULL, STARTDATE DATE,
ENDDATE DATE);
A new team task is created when a project needs another task to reach its goal.
CREATE TABLE PROJECTT(PROID CHAR(10) PRIMARY KEY,
TITLE VARCHAR(20) NOT NULL, STARTDATE DATE, ENDDATE DATE);
And here we have a project and will be related to a team task.
CREATE TABLE VERSION(VID CHAR(10) NOT NULL, VER VARCHAR(10) NOT NULL,
PROID CHAR(10) NOT NULL, TITLE VARCHAR(25) NOT NULL, DESCR VARCHAR(80),
ZIPFILE BLOB, ZIPEX BLOB, VDATE DATE NOT NULL);
A new version of the software will end here with a version ID and a version number like 1.0. ZIPFILE is the file which the developer will store and will be retrieved by the test team. If more space is needed than 4 GB, which is the maximum space of a BLOB, there is a ZIPEX to store up to 4GB more information, but this part will not be used in the application; it's just there for future changes. Which means that we will have to add the value null to this one. And yes, it's never good to store null values in a database, but it will do for now. VDATE is the date this version was uploaded.
CREATE TABLE TEST(TESTID CHAR(10) NOT NULL, VID CHAR(10) NOT NULL,
VER VARCHAR(10) NOT NULL, TID CHAR(2) NOT NULL,
COMMENTS VARCHAR(80), INFOZIP BLOB, STARTDATE DATE, ENDDATE DATE);
When the test team has finished a test, it will end up in this table. They may have some important information to store in the database like scans and documents of a version test in the INFOZIP BLOB.
ALTER TABLE CONTRACT ADD CONSTRAINTS PK_CID_CONTRACT
PRIMARY KEY(CID);
Now it is time for the keys to be created. Here we create the primary key on CID for the contract.
ALTER TABLE TEAMTASK ADD CONSTRAINTS PK_TASKID_TEAMTASK
PRIMARY KEY(TASKID);

ALTER TABLE VERSION ADD CONSTRAINTS PK_VID_VER_VERSION
PRIMARY KEY(VID,VER);
We have something to pay attention to here. This is a combined primary key which we need to be able to have the same version number for different VIDs but still make the version number unique for the same VID so that we can't end up with several versions with the same version ID number.
ALTER TABLE TEST ADD CONSTRAINTS PK_TESTID_TEST
PRIMARY KEY(TESTID);
I guess it says it all.. I'll jump to comment on the foreign key instead.
ALTER TABLE CONTRACT ADD CONSTRAINTS FK_TID_TEAM_CONTRACT
FOREIGN KEY(TID) REFERENCES TEAM(TID);

ALTER TABLE CONTRACT ADD CONSTRAINTS FK_EID_EMPLOYEE_CONTRACT
FOREIGN KEY(EID) REFERENCES EMPLOYEE(EID);

ALTER TABLE TEAMTASK ADD CONSTRAINTS FK_TID_TEAM_TEAMTASK
FOREIGN KEY(TID) REFERENCES TEAM(TID);

ALTER TABLE TEAMTASK ADD CONSTRAINTS FK_PROID_PROJECTT_TEAMTASK
FOREIGN KEY(PROID) REFERENCES PROJECTT(PROID);

ALTER TABLE VERSION ADD CONSTRAINTS FK_PROID_PROJECTT_VERSION
FOREIGN KEY(PROID) REFERENCES PROJECTT(PROID);

ALTER TABLE TEST ADD CONSTRAINTS FK_VID_VER_VERSION_TEST
FOREIGN KEY(VID,VER) REFERENCES VERSION(VID,VER);
This is the second part to pay attention to. Here we are combining again by adding a foreign key to the table TEST to make it work with the combined primary key in the Version table on the VID and VER attributes.
ALTER TABLE TEST ADD CONSTRAINTS FK_TID_TEAM_TEST
FOREIGN KEY(TID) REFERENCES TEAM(TID);
We have no DELETE ON CASCADE in this script because we need to store history. That's it!
Back to top?
The connection string
First, we need to add an application configuration file to the server console application project and add the following lines to it:
<configuration>
 <appSettings>
  <add key="Oracle"
    value="Data Source=your_basename; User Id=your_username;
            Password=your_password;" />
 </appSettings>
</configuration>
This is good, because it will be easy to make changes to this string rather than to every single string nestled within the application. And in all of the objects that are using the connection string, you will have to add the following code:
private string con1 = System.Configuration.ConfigurationSettings.
AppSettings["Oracle"];
This will load the connection string by the key value "Oracle".
Back to top?
The OracleClient provider
To make it possible to communicate with the Oracle database, you will need the OracleClient provider which is included in the Oracle9i package. Add it to the project's references, and the following line to the code:
using System.Data.OracleClient;
Back to top?
The parameters
We are going to use parameters to build our SQL queries; it's more secure than a string concatenation to add values to a SQL string. It will not be possible to hack the database so easily when using parameters because we can't add commands into the SQL string to make the query ask for something else than it was meant to. In this system, it doesn't matter, but always use parameters! An example of what could happen if you do use hard coding in your SQL queries:
SELECT USERNAME FROM USER WHERE USERNAME = '"+userIDTextBox.Text+
       "' AND PASSWORD = '"+userPassTextBox.Text+"'
Pretend that we are using the above login SQL query. If this will return a value, the user is allowed to login. But what would happen if the user adds the following text in userPassTextBox.Text?
' OR PASSWORD IS NOT NULL
The query will then look like this..
SELECT USERNAME FROM USER WHERE USERNAME =
       'Whatever' AND PASSWORD = '' OR PASSWORD IS NOT NULL
It will return every value that has a PASSWORD value, and it will give this user the right to log in to the system!! This is why we always should use parameters and never display column names for the user.
Back to top?
Remoting to make it .NET
In the server console application "QuteZysServer", we are only using the main function and nothing else. As follows:
using System;
using System.Runtime.Serialization.Formatters;
using System.Runtime.Remoting;
using System.Runtime.Remoting.Channels;
using System.Runtime.Remoting.Channels.Tcp;
using System.Collections;
using QuteServer_Class;
using QuteValueInterface_Lib;
.. some other things ..
static void Main(string[] args)
{
try
{
BinaryServerFormatterSinkProvider srvFormatter =
new BinaryServerFormatterSinkProvider();
BinaryClientFormatterSinkProvider clntFormatter =
new BinaryClientFormatterSinkProvider();
srvFormatter.TypeFilterLevel = TypeFilterLevel.Full;
IDictionary props = new Hashtable();
props["port"] = 10014;
TcpChannel kanal = new TcpChannel(props, clntFormatter, srvFormatter);
ChannelServices.RegisterChannel(kanal);
RemotingConfiguration.RegisterWellKnownServiceType
(typeof(QuteServer_Class.Controller),
"MyURI1.tcp",WellKnownObjectMode.Singleton);
Console.WriteLine("Server started. Press Enter to end");
Console.ReadLine();
}
catch(Exception ex)
{
Console.WriteLine(ex.Message.ToString());
}
}
Here we start by using System.Runtime.Serialization.Formatters to use the client and server providers and then System.Runtime.Remoting, System.Runtime.Remoting.Channels, and System.Runtime.Remoting.Channels.Tcp to create the TCP channel, and a well known object by the name "MyURI1.tcp". When the server starts, it will listen over TCP on port 10014. Never use a TCP port lower than 2000 because there'll be some software listening on it already. Also, to be able to send objects from the server to the client, we must set TypeFilterLevel to Full.
Back to top?
The Controller
We will now take a look at the namespace QuteServer_Class which includes the Controller object that will pass on all communications between the client and the database.
using System;
using QuteValueInterface_Lib;
namespace QuteServer_Class
{
public class Controller : MarshalByRefObject, IController
{
public Controller()
{
Console.WriteLine("A controller object was created!");
}
public IReadVersion GetReadVersionObject()
{
Console.WriteLine("A version object was sent!");
return new ReadVersion();
}
public IHandleTest GetHandleTestObject()
{
Console.WriteLine("A handle test object was sent!");
return new HandleTest();
}
public void SaveVersion(QuteValueInterface_Lib.Version ver)
{
try
{
TransactionWorker trWork = new TransactionWorker();
trWork.SaveVersion(ver);
}
catch(Exception ex)
{
throw ex;
}
}
}
}
The Controller object will delegate transactions between the client and the database. If the client wants to read a version, he will be given an instance of the ReadVersion object by the Controller, and this will also be the case if the client wants to read or save tests to the database. But if the client wants to save a version to the database, the Controller will then create an instance of TransactionWorker which is a COM+ object to make the call from here to save the version data to the database. We are doing this to be able to set roles on the COM+ component to limit access to the developer only. TransactionWorker has the internal attribute on the constructor so that objects within the QuteServer_Class namespace will be the only ones allowed to create an instance.
Back to top?
COM+
The other interesting part of the namespace QuteServer_Class is the COM+ TransactionWorker object mentioned above which will be explained later. For now, take a look at the following code.
using System;
using System.Collections;
using QuteValueInterface_Lib;
using System.EnterpriseServices;
using System.Runtime.InteropServices;
using System.Data;
using System.Data.OracleClient;
namespace QuteServer_Class
{
[JustInTimeActivation(true),
ClassInterface(ClassInterfaceType.AutoDual),
ObjectPooling(true,1,5)]
public class TransactionWorker : ServicedComponent, ITransactionWorker
{
public TransactionWorker(){}
[AutoComplete]
public void SaveVersion(QuteValueInterface_Lib.Version ver)
{
string SQL = "INSERT INTO VERSION (VID, VER, PROID," +
"TITLE, DESCR, ZIPFILE, ZIPEX, VDATE) ";
SQL +="VALUES(:VID,:VER,:PROID,:TITLE,:DESCR,:ZIPFILE,:ZIPEX,:VDATE)";
OracleConnection con = new OracleConnection(con1);
try
{
con.Open();
OracleCommand cmd = new OracleCommand(SQL,con);
OracleParameter pamet;
pamet = cmd.CreateParameter();
pamet.OracleType = OracleType.Char;
pamet.Size = 10;
pamet.ParameterName = "VID";
pamet.Value = ver.VersionID;
pamet.Direction = ParameterDirection.Input;
cmd.Parameters.Add(pamet);
pamet = cmd.CreateParameter();
pamet.OracleType = OracleType.VarChar;
pamet.ParameterName = "VER";
pamet.Value = ver.VersionNR;
pamet.Direction = ParameterDirection.Input;
cmd.Parameters.Add(pamet);
pamet = cmd.CreateParameter();
pamet.OracleType = OracleType.Char;
pamet.Size = 10;
pamet.ParameterName = "PROID";
pamet.Value = ver.ProjectID;
pamet.Direction = ParameterDirection.Input;
cmd.Parameters.Add(pamet);
pamet = cmd.CreateParameter();
pamet.OracleType = OracleType.VarChar;
pamet.ParameterName = "TITLE";
pamet.Value = ver.Title;
pamet.Direction = ParameterDirection.Input;
cmd.Parameters.Add(pamet);
pamet = cmd.CreateParameter();
pamet.OracleType = OracleType.VarChar;
pamet.ParameterName = "DESCR";
pamet.Value = ver.Description;
pamet.Direction = ParameterDirection.Input;
cmd.Parameters.Add(pamet);
pamet = cmd.CreateParameter();
pamet.OracleType = OracleType.Blob;
pamet.ParameterName = "ZIPFILE";
pamet.Value =
(byte[])(ver.ZipFile == null ? OracleBinary.Null : ver.ZipFile);
cmd.Parameters.Add(pamet);
.. SOME OTHER PRAMETERS ..
cmd.ExecuteNonQuery();
con.Close();
}
catch(OracleException ex)
{
con.Close();
throw new Exception(ex.Message.ToString());
}
}
protected override bool CanBePooled()
{
return true;
}
}
}
We first set the class to JustInTimeActivation(true), and ClassInterface(ClassInterfaceType.AutoDual) and ObjectPooling(true,1,5). ClassInterface(ClassInterfaceType.AutoDual) is not recommended because of versioning limitations (MSDN 2003). JustInTimeActivation is set to true to prevent "Greedy Clients", which keep an object forever even if the client is using it just twice. In this case, it will be released from the pool when the function is done since we are using [AutoComplete] on the function. ObjectPooling is set to minimum 1 object in the pool and maximum 5 to be pushed into the pool at the same time. The class must inherit from ServicedComponent which is a must to make it a COM+ component. TransactionWorker only stores a version in the database and nothing else. As you can see, we are overriding CanBePooled and returning true, which is even; this a must to be safe swimming in the pool.
Back to top?
Strong name
We will have to make QuteServer_Class strong named to make it work as COM+ at the server side by adding the following rows to the AssemblyInfo.cs file..
...
using System.EnterpriseServices;
..
[assembly: ApplicationAccessControl(false)]
[assembly: ApplicationActivation(ActivationOption.Server)]
...
[assembly: AssemblyVersion("1.0.0.0")]
And we need a version number which in this case will be 1.0.0.0; otherwise.. we'll get different hashes and GUIDs every time we rebuild.
...

[assembly: AssemblyKeyFile("c:\\MinNyck1.snk")]
And we need this link to our key, which you create in the VS.NET Command prompt using the command "sn.exe -k c:\MinNyck1.snk".
Back to top?
The client
The client application is a Win32 Form with a couple of text fields:
using System;
using System.IO;
using System.Drawing;
using System.Collections;
using System.ComponentModel;
using System.Windows.Forms;
...
using QuteServer_Class;
using QuteValueInterface_Lib;
namespace QuteZysClient
{
public class Form1 : System.Windows.Forms.Form
{
private IController c;
QuteValueInterface_Lib.Version[] aR;
... SOME OTHER WIN WORK HERE ...
private void Form1_Load(object sender, System.EventArgs e)
{
c = (Controller)Activator.GetObject(typeof(QuteServer_Class.Controller),
"tcp://localhost:10014/MyURI1.tcp");
... SOME OTHER CODE ...
}
When the form loads, it creates a port for communication over the address tcp://localhost:10014/MyURI1.tcp, through port 10014 to our well-known object MyURI1.tcp. A proxy will be created when Activator.GetObject returns.
Back to top?
The Zip BLOB
private void SaveVersion(object sender, System.EventArgs e)
{
OpenFileDialog openFileDialog1 = new OpenFileDialog();
openFileDialog1.Multiselect = false;
openFileDialog1.Filter = "ZIP files (*.zip)|*.zip";
if(DialogResult.OK == openFileDialog1.ShowDialog())
{
FileStream fs = new FileStream(openFileDialog1.FileName.ToString(),
FileMode.Open, FileAccess.Read);
BinaryReader r = new BinaryReader(fs);
Byte[] te = r.ReadBytes((int)fs.Length);
fs.Close();
r.Close();
try
{
QuteValueInterface_Lib.Version ver =
new QuteValueInterface_Lib.Version();
ver.VersionID = versionID.Text;
ver.VersionNR = verNRSave.Text;
ver.ProjectID = projectID.Text;
ver.Title = title.Text;
ver.Description = description.Text;
ver.VersionDate = dateTimePicker1.Text;
ver.ZipFile = te==null ? null : te;
ver.ZipEx = null;
c.SaveVersion(ver);
MessageBox.Show("This version was saved to the base!");
}
catch(Exception ex)
{
MessageBox.Show(ex.Message.ToString());
}
}
}
}
}
}
This function saves a version to the database by opening an OpenFileDialog to let the user pick a Zip file containing the files for this version. It converts it into a byte array and fills a Version object with all the information needed from the user. The Version table in the database has a BLOB type where this byte array will be stored.
When a user wants to download a version from the database to look at it, it must be translated back into a Zip file. This is a very easy thing to do, as follows in this function..
private void SaveToLocalDisk(object sender, System.EventArgs e)
{
 if(versionNR.SelectedIndex>=0 &&
 aR[versionNR.SelectedIndex].ZipFile!=null)
 {
  SaveFileDialog saveFileDialog1 = new SaveFileDialog();
  saveFileDialog1.Filter = "ZIP files (*.zip)|*.zip";

  if(DialogResult.OK == saveFileDialog1.ShowDialog())
  {
   FileStream fs2 = new FileStream(saveFileDialog1.FileName.ToString()
   ,FileMode.Create, FileAccess.Write);
   BinaryWriter r2 = new BinaryWriter(fs2);

   r2.Write((byte[])aR[versionNR.SelectedIndex].ZipFile);

   fs2.Close();
   r2.Close();
  }
 }
}
The user will chose a filename to save it to, and it will be unboxed to a byte[] array and written to the chosen file. That's it! To see the complete thing, you'll have to download the source code.
Back to top?
Set user accounts for COM+
Don't forget to set a group of developer accounts to this component in the COM application, to limit the use of this component to developers only. To do this, right click on the component and choose "Properties", then click on "Safety" and check the force acquisition controlling for this component. Now you can set a couple of developer accounts in a group.
Back to top?
Points of interest
One more thing! You might want to change localhost to something more suitable for you. You will use this code at your own risk without any warranties. The application was developed on an XP Pro in Visual Studio 2003, .NET V1.1 environment.
Back to top?
History
- Version 1.0, uploaded 15 Aug 2007 - This takes care of the part for handling tests and software versions.
- Version *, changed 15 Oct 2007 - Made some changes to this article. Added better explanation.
Back to top?-
License
This software is provided 'as-is' without any express or implied warranty. In no event will the author(s) be held liable for any damages arising from the use of this software. Permission is granted to anyone to use this software for any purpose including commercial applications. If you use this software in a product, an acknowledgment in the product documentation would be appreciated but is not required.
Back to top?
Professional programmer, degree in Informatics and Applied Systems Science.


 General
  News
News  Suggestion
  Question
  Bug
Bug  Answer
  Joke
Joke  Praise
  Rant
Rant  Admin
Admin 


