Introduction
I received a ZuneHD the day after release. All of the Zunes are user programmable via the XNA framework. So in the “Because I Can” category, I decided to make a level program. After making the program, I found that some others wanted the source code and know how to get the XNA framework on their computers. I already had some text that I had written on programming the previous Zunes, so I’ve taken that text, added some information on the accelerometer and multi-touch panel to it, and the result is this document.
You can see a video of the level in action on YouTube here.
Prerequisites
To make use of this article, you should already have an understanding of .NET and C# foundational concepts. You should also have experience with Windows Forms programming. While the code presented here doesn’t make use of the Windows Forms namespace (it’s not supported on the Zune), some of the concepts that you may have encountered while developing Windows Forms applications (such as isolated storage) are used here.
Required Software and Hardware
To get started on programming for a Zune, there are a few things that you will need:
Hardware Variations
At the time of this writing, there are three Zune generations available. The first generation Zune (also known as the Zune 30) has a 5 way directional pad, a play button, and a back button. The second generation Zunes are available in a number of different capacities from 4 gigs to 120 gigs. The 80 and 120 gig models use hard drives while the others use flash memory. On these Zunes, the 4-way directional pad has been replaced by what I can best describe as being a dual-mode mouse pad. One can either slide a finger over the pad or press on it to use it as a 5-way directional pad. The differences in the directional pads aren’t major, but you should be aware of them when designing user interactions; you will need to account for both hardware variations. The latest addition to the Zune family has only three buttons (back, power, and a media control button). It lacks the directional pad, but has an accelerometer and multi-touch panel for input. The screen supports up to 4 simultaneous touches.
Rebooting the Zune
It’s going to happen eventually; you’ll write some code that gets the Zune stuck in an infinite loop and you have no way to exit your application. If you press and hold the back button for two seconds, the application will exit. If for some reason you are unable to exit, you can also reboot the Zune. Press and hold the back button while pressing up on the directional pad if your Zune has a touch pad, or hold down the power and back button if you have a ZuneHD. After a few seconds, the Zune will reboot.
Creating a New Zune Project
When you create a new XNA project in Visual Studio, you can target the XBox 360, the PC, or the Zune. For this article, we will only be concerned with the Zune project types, and will ignore the others. The Zune project types include “Zune Game (3.1)” and the “Zune Game Library (3.1)”. (While it’s clear that Microsoft intends for these project types to be used for games, keep in mind that you aren’t limited to using them for that purpose. If you can think of some other productivity tasks that you want your Zune to do that’s not a game, by all means go ahead and write it!) Think of the “Zune Game (3.1)” project type being like making an application, while the “Zune Game Library (3.1)” is like a DLL.

Go ahead and create a new project in Visual Studio for a Zune Game (3.1) project called “Hello World.” The project will contain a number of stub methods automatically. Don’t worry about what they do, we will examine that later. This program does nothing more than render a cornflower blue background (Microsoft’s favourite colour!). Connect your Zune to your computer and run the project. You’ll get an error.
No devices are available to deploy the project ‘HelloWorld’.
   Register a device using the XNA Game Studio Device Center.
If the Zune client software is running, close it. Only one program can sync to the Zune at a time, and if it is running, you’ll encounter failure in the following steps. You’ll find the “XNA Game Studio Device Center” under “Microsoft XNA Game Studio (3.1)” in the programs group. Start the program and select the option to “Add Device”. You’ll be asked whether you want to add a Zune or an XBox 360. Select “Zune”. Your Zune’s name will be displayed and you can select it. After you select “Finish”, go back to Visual Studio and try to run your project again. If this is your first time running an XNA game on your Zune, then the .NET Framework will deploy followed by your application. When the application runs, you’ll see the screen turn cornflower blue (which is all this program does). To exit the program, press down the back button.
Congratulations! You’ve compiled and run your first Zune application.
Taking the Application Apart
Our first program didn’t do much. We’ll add functionality to it, but before doing so, let’s take apart. Having an understanding of the structure of an XNA application will help in creating new applications. Microsoft.Xna.Framework.Game is the base class for an XNA application. You create your application by deriving from this class and then overriding its methods. The application class generated for us by Visual Studio overrides five methods for us:
Initialize – Contains the initialization logicLoadContent – Called directly after Initialize.Update – Contains your game’s logic.Draw – Contains the rendering code for your application.Unload – Releases any resources (usually content) before the application exits.
The Update and Draw methods are called cyclically until the application is terminating. A graphical representation of these method calls looks like the following:
The Draw/Update cycle will occur up to 60 times per second on the first generation Zune, and up to 30 times per second on the second generation Zune (for more information, see the Hardware Variation section).
Reading the Buttons
The XNA Framework was designed with the XBox controller in mind. The XBox controller (and XNA) are usable on both the XBox 360 and the PC. The buttons on the Zune are mapped to some of the XBox controller buttons so that you can interact with it in the same way that you would interact with an XBox controller.
The back button on the XBox 360 controller is mapped to the back button on the Zune. On the Zune HD, this is the button directly under the screen. On the other two Zune models, this is the button to the left of the directional pad. None of the other buttons are mapped to the ZuneHD. The A button on the XBox 360 controller is mapped to the Action button in the center of the directional pad. The B button is mapped to the Play button on the Zune. For the original Zune, the directional pad is mapped to be treated like the 4-way directional pad on the XBox 360 controller. On the second generation Zune, if the user presses down on the edges of the Zune pad, it is treated as a directional controller. But, if the user moves a finger over the surface of the Zune pad, it will be treated the same as the left joy stick.
Now that I’ve covered the button mappings, I’ll talk about how to actually read the controller. This information is true for the Zune, a PC with an XBox 360 controller, and of course, for XNA on the XBox 360. The main class used for interacting with the controller is the GamePad class. It’s a static class, and almost all of the methods require an enumerated variable of type PlayerIndex. The PlayerIndex enumeration has the values One, Two, Three, and Four. This number is used to identify which controller one wishes to interact with. For Zune only, PlayerIndex.One is valid.
GamePad
Like many of the XNA classes, the GamePad class has a method named GetCapabilities that gives you information on the capabilities of the controller. Had I not mentioned the button mappings above, the GamePadCapabilities object returned by this method would have informed you which button mappings were present. The GamePad's other method of interest is the GetState method. It will return the state of all of the buttons and directional inputs on the controller in a GamePadState object. The Buttons member of the GamePadState object has a group of ButtonState members whose value can be Pressed or Released (if a button is not present, then its state is always Released). The ThumbSticks member contains two Vector2 members named Left and Right. The Right member will never have anything of interest on the Zune, but the Left member will inform you of the position on the ZunePad that the user is touching.
The only button on the Zune that I use in the example program is the Back button for exiting the program.
Connecting your Zune to Visual Studio
You’ll need to designate your Zune as a device that XNA can target. Start by connecting your Zune to the computer. In order to deploy programs to your Zune, Visual Studio (or Visual Studio Express) will need to be able to communicate with the Zune through the XNA Game Studio Connector. The Zune software must be installed to ensure the proper drivers are present for the Zune. However, Visual Studio cannot communicate with the Zune if the Zune software is running on the PC. Make sure that it isn’t open. Start the XNA Game Studio Connector, and select the option to Add Device. You’ll be given an option to add an XBox 360 or a Zune. Select Zune and click Next.
If your Zune is connected to the computer, then it will be listed as a device you can target. Select it and click Next. Another screen will ask you if you would like to set this Zune to be the default Zune. You can safely leave this option with its default value, and click Next to complete the process. Repeat the same process for any other Zune you would like to add.
After you’ve completed the process for one or more Zunes, the XNA Game Studio Device Center will display all of your Zunes. Oddly enough, the ZuneHD is displayed with the same icon as the Zune80/120. The Zune30 and Zune4 display with the correct icons.
Displaying Text
Before version 3 of XNA Game Studio for Zune, if you wanted to draw text on the screen, you had to load a set of images of the letters and selectively draw sections from your font image to the screen. As of the 3.1 version, some of this process has been automated by the SpriteMap class. We are going to update our HelloWorld program so that it will display the time. To display the time, we first need to import a font into our application. Then, we must use that font to render text.
To import a font, do the following:
- Right-click on the “Content” area of the project and select “Add New Item”.
- Select
SpriteFont as the new item type, and enter MyFont.spritemap as the name. - An XML file opens. In the
<FontName> element of this file, replace the text with the name of the font you want to use. Optionally, change the settings for the font size and spacing. - In the
CharacterRegion area, ensure that the Start and End elements are set to the range of Unicode characters that are to be included in your SpriteFont.
Now, to use the font :
- Add a new member of type
SpriteFont as a member of the application. Name it MyFont. - In the
LoadContent method, type the following:
MyFont = Content.Load<SpriteFont>("Myfont");
- Replace the contents of the
Draw method with the following:
GraphicsDevice.Clear(Color.CornflowerBlue);
Vector2 TextPosition = new Vector2();
TextPosition.Y=100;
TextPosition.X=20;
spriteBatch.Begin();
spriteBatch.DrawString(MyFont, DateTime.Now.ToString(),TextPosition,Color.Red);
spriteBatch.End();
- Run the program.
When the program runs, it will display the current date and time up to the second. You can exit the program at any time by pressing the Back button.
A few words of warning: Fonts, like software, are intellectual property, and you may not be able to use certain fonts because of potential copyright infringement. Also note that fonts, like any other resource, take up space. Whenever possible, strictly limit the character range of fonts included only to those that your program will use.
Displaying Content
There are a number of different file formats that can be displayed using XNA on the Zune. I would suggest using PNG in most cases. Here is a non-exhaustive list of the image formats that you can use:
The current Zunes all have a resolution of 240x320 or 272x480. Keep that in mind when sizing resources. Since we are just getting started, I want to keep my operations with images simple. I want to take the program that I already have and load an image into the background. I’ll be using a Texture object to handle my image. Using any paint editor, create an image of size 240x320. Add the image to your project’s Content folder. The XNA Game Studio will automatically make it a content resource of type texture. I named my image “Background.png”. Once added to the project, the following code changes should be applied:
- Add a member of type
Texture to the application class. Name it MyTexture. - In the
LoadContent method, add the following:
MyTexture = Content.Load<Texture>("Background");
- In the
Draw() method, erase the call to Clear(). - Use the following as the rendering code in the method:
spriteBatch.Begin();
spriteBatch.Draw(MyTexture, imagePosition, Color.White);
spriteBatch.DrawString(MyFont, DateTime.Now.ToString(), TextPosition, Color.Red);
spriteBatch.End();
Now, when you run the program, you will see your background behind the time.
Conditional Compiling
It is possible to share the same source code between the Zune, XBox 360, and PC. However, there are aspects of XNA that are specific to each of these devices. Conditional compiling can be used to keep a single code base while not using features on platforms that don’t support them. For Zune projects, the ZUNE symbol is defined.
#if ZUNE
Limitations
Like programming for many other mobile devices, for the Zune, you must remember that you are not programming with the same resources that you would have when developing for a desktop. In an XNA program, you will be limited to 16 megabytes of RAM, and the screen size will be 272x480 on the ZuneHD, or 240x320 on the other Zunes. Also, the colour depth on the Zunes is 16-bit.
Since the Zune has no keyboard or mouse, if you try to query the states of either of these devices on the Zune, you will find that they always report that no keys are being pressed and the X and Y values for the mouse are always zero.
Interacting with the Accelerometer
Currently, ZuneHD is the only XNA platform that supports the accelerometer. If you are writing your code generically (so that it will run on a PC, XBox 360, and variations of the Zune), then you’ll want to be able to detect whether or not you are running on a device that has an accelerometer. You can get all the information that you want to know about the accelerometer from the appropriately named Accelerometer class. The Accelerometer class is static so you can immediately begin using it. The GetCapabilities method will let you know whether or not an accelerometer is present through the IsConnected member of the AccelerometerCapabilities instance that it returns. The AccelerometerCapabilities class also has three members (HasXAxis, HasYAxis, HasZAxis) that suggest at some point in the future there could exist devices that don’t detect accelerations along all three planes. I could see a steering wheel type interface being implemented in that manner. The limits of the device’s acceleration detection can be queried through the AccelerationResolution and the MaximumAcceleration and MinimumAcceleration values.
To read the state of the accelerometer, use the GetState method of the Accelerometer class. It returns an AccelerometerState object. The instance contains a Boolean property named IsConnected that lets you know whether or not an accelerometer is present, and a Vector3 instance that tells you the readings of the accelerometer along the X-axis, Y-axis, and Z-axis.
Interacting with the Touch Panel
The touch panel is a minor component of this program. If you press the icon of the back button on the screen, then it will exit. The touch panel is not used in any other way in this program. But using the touch panel is similar to using the game pad or the accelerometer. You have a static class with a GetCapabilities method (for detecting whether or not the hardware is available), and a GetState method for reading the actual state of the hardware. You may notice that I keep referring to the surface as a touch panel instead of a touch screen. In theory, the touch surface does not have to be on the screen. Think of a mouse pad or a pen tablet, both of which are touch surfaces of a type but are not on the screen. The term “Touch Panel” is more encompassing of other types of touch surfaces that could be added to XNA support in the future.
The static class is named TouchPanel. The TouchCapabilities object returned by its GetCapabilities method has a member named IsConnected to inform you whether or not a touch panel is available, and MaxTouchCount to inform you how many touches the panel can detect. The TouchPanel’s GetState method returns a TouchCollection object. The TouchCollection contains a list of TouchLocations that, among other things, contains the coordinates (as a Vector2) of the areas on the screen being touched. The touch panel on the ZuneHD can detect up to four touches, so this member will never have more than four members in it.
For the attached program, I only check to see if any of the couch points are intersecting the exit button. Touch is not used in any other way here.
Remaking the Bubble Level
Planning and Design
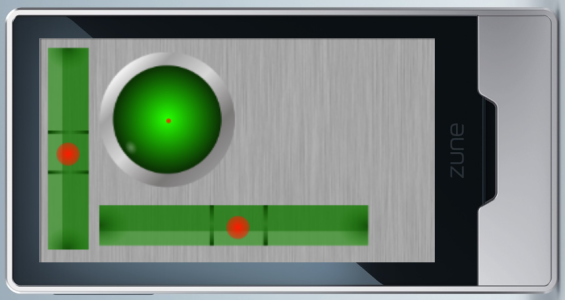
It seems that for any mobile device with an accelerometer out there, you can find a bubble level program. It’s the unofficial “Hello World” app of devices with accelerometer capabilities. So in sticking with tradition, I’ve written a bubble level program for my ZuneHD. The creation of the program started off on a sheet of graph paper. I marked off a rectangle that was to scale for the ZuneHD’s 272x480 screen, and then used it to decide how the visual elements would be laid out. I wanted to have a horizontal level, a vertical level, and a circular level. This is the layout that I came out with:
Now that I knew the desired layout, I could begin creating my graphical assets. Since the sketch was drawn to scale, I could use it to decide on the exact sizes for each one of my assets. Since I had only planned to invest no more than a couple of hours into this program, I wanted to put the graphics together quickly. But at the same time, I didn’t want them to look bad. So, I used Expressions Design to quickly put together the graphics I needed. I already had a brushed metal image saved from a personal project from years ago, so I reused it. The resulting image assets follow:
The graphics were added as content to the program. I also added a font to the content so that I could render text. With all of the needed assets present, the next step was to write the code. But before writing the code, some math needs to be understood.
How Does an Accelerometer Work?
An accelerometer measures the acceleration that a device experiences relative to freefall. In other words, it measures a device’s acceleration minus the force of gravity that the object is experiencing.
The Accelerometer class returns a Vector3 object that contains an X, Y, and Z component that can be used to describe the orientation of the device. For a stationary device, the vector described by these three numbers will have a length close to one. If you remember the Pythagorean theorem (which is usually written in the form of ), then you’ll also realize that this means that x*x+y*y+z*z will be equal to about 1. If I place the ZuneHD face-up on a level table, the accelerometer reading would be {X:0, Y:0, Z:-1}. If I place the unit face down, the accelerometer reading would be {X:0, Y:0, Z:1}. If I stand the Zune up with its left side on the floor and the right side on the ceiling, then the vector gets close to {X:-1, Y:0, Z:0}. If I have the ZuneHD flat on a table and begin to tilt it to the left or right, then then the reading along the Z-axis will begin to decrease in magnitude as the reading on the X-axis increases in magnitude. This may be difficult to visualize. So, I encourage you to run the program “AccelerometerTest” that is included with this article to get a feel for the accelerometer’s response to movement.
Zune laying on its side with the accelerometer reading on the screen.
The Math Behind the Program
So now that we have the accelerometer’s reading, we need to be able to change it to an angle. If you remember your trigonometry, then you may recall that the arctangent function can be used to get an angle from an X and a Y coordinate. But before we start going down this trail, we need to keep in mind that we have three coordinates, not two. Also, the arctangent function can’t distinguish between the angles of some positions. There is a second form of the arctangent function, usually labeled arctan2, that has the functionality that we need.
Vector3 accelReading = accelState.Acceleration;

tiltDirection = (float)Math.Atan2(accelReading.Y, accelReading.X);
tiltMagnitude = (float)Math.Sqrt(accelReading.X * accelReading.X +
                 accelReading.Y * accelReading.Y );
Now that I have the tilt direction and the magnitude, I need to be able to translate that into X and Y displacements for the bubble indicators. Easily done using sine and cosine. Math.Sin(tiltAngle) will convert my angle to a horizontal displacement between 1 and -1. -Math.Cos(tiltAngle) will convert the angle to a displacement between 1 and -1 also. I can take the results of these functions and scale them up to fit into the maximum displacement that I want to allow for the bubble indicators.
Rectangle horizontalBubbleRectangle =
  new Rectangle((int)(118 + 102 * tiltMagnitude * -
                 Math.Cos(tiltDirection)), 22, 36, 36);
Rectangle verticalBubbleRectangle =
  new Rectangle(22, (int)(80 + 140 + 124 * tiltMagnitude *
                Math.Sin(tiltDirection )), 36, 36);

Rectangle smallBubbleArea = new Rectangle(156 +
  (int)(48*tiltMagnitude * -Math.Cos(tiltDirection )), 156 +
  (int)(48 *tiltMagnitude* Math.Sin(tiltDirection )), 8, 8);
That is all the computation that is needed. Once that is done, all that is left is placing the objects on the screen.
spriteBatch.Begin();

spriteBatch.Draw(ProgramBackground, backgroundTextureArea, Color.White);
spriteBatch.Draw(HorizontalLevelTexture, horizontalLevelTextureArea, Color.White);
spriteBatch.Draw(VerticalLevelTexture, verticalLevelTextureArea, Color.White);
spriteBatch.Draw(RoundLevelTexture, roundLevelTextureArea, Color.White);

spriteBatch.Draw(BubbleTexture, horizontalBubbleRectangle, Color.White);
spriteBatch.Draw(BubbleTexture, verticalBubbleRectangle, Color.White);
spriteBatch.Draw(SmallBubbleTexture, smallBubbleArea, Color.White);
spriteBatch.Draw(BackArrowTexture, BackArrowPosition, Color.White);


spriteBatch.DrawString(MainFont, "J2i.net", siteAddressPosition, Color.Blue);

spriteBatch.End();
Defining the Game Icon
The one thing I skipped over is how to define an icon for the game. When you create the project, it adds a file named GameThumbnail.png to the project. Edit this file to change the icon.
Where to From Here
If you'd like to look into the XNA program further, then there are plenty of resources available online. But the two that I would highly suggest are the Zune Programming Reference and the XNA Creator's Club Forums.
History
- 25 September 2009 - Initial publishing.


 General
  News
News  Suggestion
  Question
  Bug
Bug  Answer
  Joke
Joke  Praise
  Rant
Rant  Admin
Admin 


