Introduction
This article introduces a method to download and use "XAP" packages on demand in Silverlight.
Background
To run a Silverlight application, browsers need to download the "XAP" packages generated by the Silverlight projects. When developing a Silverlight application, developers can put all the "User Controls" and other resources in a single "XAP" package. They can also choose to put these resources into separate "XAP" packages and let the browsers download them as needed. In many cases, putting the resources into a single "XAP" file should be the correct choice. But separating the resources into different "XAP" files can potentially provide some advantages in some other cases:
- The browsers can download only the Silverlight contents needed by the application in real time, which may potentially save the download time and improve the user experience.
- If some parts of the Silverlight application are changed, we can choose to redeploy only the "XAP" packages affected by the changes.
This article introduces a method to download and use "XAP" packages on demand in Silverlight with a Visual Studio example. The Visual Studio solution that comes with this article is developed in Visual Studio 2010 and Silverlight 4. This article assumes the readers having some basic experiences with Silverlight development. If you are new to Silverlight, Scott Guthrie's blog is the default place for you to get started.
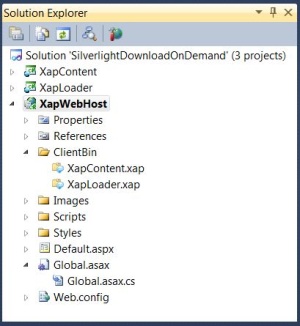
This example Visual Studio solution has three projects:
- "XapWebHost" is an ASP.NET web application to host the Silverlight application.
- "XapLoader" is a Silverlight project. It will generate a "XAP" file called "XapLoader.xap". The "XapLoader.xap" file will be hosted in the "XapWebHost" web application.
- "XapContent" is also a Silverlight project. It will generate a "XAP" file called "XapContent.xap". The "XapContent.xap" file is the "XAP" package to be downloaded on demand in this article.
After successful compilation, Visual Studio will put both "XapLoader.xap" and "XapContent.xap" into the "ClientBin" folder in the "XapWebHost" project. If you want to download the source code and run it in your own Visual Studio, you will need to have your development environment set up. You need to download and install "Silverlight 4 SDK" and "Silverlight 4".
Let us first take a look at the "XapWebHost" web project.
The host web application
As you can see from the picture, "XapWebHost" is a simple ASP.NET web application. The Silverlight "XAP" file "XapLoader.xap" is hosted in the "Default.aspx" file:
<%@ Page Language="C#" AutoEventWireup="true"
    EnableSessionState="False" EnableViewState="false"
    CodeBehind="Default.aspx.cs" Inherits="XapWebHost.Default" %>

<!DOCTYPE html PUBLIC "-//W3C//DTD XHTML 1.0 Transitional//EN"
    "http://www.w3.org/TR/xhtml1/DTD/xhtml1-transitional.dtd">

<html xmlns="http://www.w3.org/1999/xhtml" >
<head id="Head1" runat="server">
    <title>Silverlight Download on Demand Example</title>
    <link rel="SHORTCUT ICON" href="Images/rubik.ico" />
    <link href="Styles/SilverlightDefault.css"
               rel="stylesheet" type="text/css" />
    <script src="Scripts/Silverlight.js"
                 type="text/javascript"></script>
</head>
<body>
    <div id="silverlightControlHost">
        <object data="data:application/x-silverlight-2,"
            type="application/x-silverlight-2"
            width="100%" height="100%">
    <param name="source" value="ClientBin/XapLoader.xap"/>
    <param name="onError" value="onSilverlightError" />
    <param name="background" value="white" />
    <param name="minRuntimeVersion" value="4.0.50826.0" />
    <param name="autoUpgrade" value="true" />
    <a href="http://go.microsoft.com/fwlink/?LinkID=149156&v=4.0.50826.0"
            style="text-decoration:none">
      <img src="http://go.microsoft.com/fwlink/?LinkId=161376"
                alt="Get Microsoft Silverlight" style="border-style:none"/>
    </a>
     </object><iframe id="_sl_historyFrame"
            style="visibility:hidden;height:0px;width:0px;border:0px"></iframe></div>
</body>
</html>
In order to make sure the on-demand downloading process of the "XapContent.xap" file is always visible in the browser, caching is disabled by changing the "Global.asax.cs" file:
using System;
using System.Collections.Generic;
using System.Linq;
using System.Web;
using System.Web.Security;
using System.Web.SessionState;

namespace XapWebHost
{
    public class Global : System.Web.HttpApplication
    {
        protected void Application_Start(object sender, EventArgs e) { }
        protected void Session_Start(object sender, EventArgs e) { }
        protected void Application_AuthenticateRequest(object sender, EventArgs e) { }
        protected void Application_Error(object sender, EventArgs e) { }
        protected void Session_End(object sender, EventArgs e) { }
        protected void Application_End(object sender, EventArgs e) { }

        protected void Application_BeginRequest(object sender, EventArgs e)
        {
            HttpContext.Current.Response.Cache.SetCacheability(HttpCacheability.NoCache);
            HttpContext.Current.Response.Cache.SetNoStore();
        }
    }
}
The Silverlight application "XapLoader"

"XapLoader" is a very simple Silverlight application. This application implements only one "User Control" in "Splash.xaml":
<UserControl x:Class="XapLoader.Splash"
    xmlns="http://schemas.microsoft.com/winfx/2006/xaml/presentation"
    xmlns:x="http://schemas.microsoft.com/winfx/2006/xaml"
    xmlns:d="http://schemas.microsoft.com/expression/blend/2008"
    xmlns:mc="http://schemas.openxmlformats.org/markup-compatibility/2006"
    mc:Ignorable="d" Cursor="Wait">

    <Grid x:Name="LayoutRoot" Background="White">
        <Grid.RowDefinitions>
            <RowDefinition Height="*" />
            <RowDefinition Height="20" />
        </Grid.RowDefinitions>

        <Image Grid.Row="0" Source="Image/SmallTiger.jpg" />
        <Grid Grid.Row="1">
            <Rectangle x:Name="rectStandard" HorizontalAlignment="Stretch"
                       Fill="Beige" />
            <Rectangle x:Name="rectProgress" HorizontalAlignment="Left"
                       Width="0" Fill="LightBlue" />
            <TextBlock x:Name="txtProgress" HorizontalAlignment="Center" />
        </Grid>
    </Grid>
</UserControl>
This "User Control" has an "Image", which will be displayed in the web browser. Because this "User Control" is responsible for downloading the "XapContent.xap" file, it also implements a progress bar to show the downloading status with the following UI components:
- A "
Rectangle" named "rectStandard" is used as the background of the progress bar. - A "
Rectangle" named "rectProgress" is used to show the downloading progress graphically. - A "
TextBlock" named "txtProgress" is used to show the downloading percentage in text.
The code-behind file of "Splash.xaml" is the following:
using System;
using System.Net;
using System.IO;
using System.Windows;
using System.Windows.Controls;
using System.Reflection;
using System.Windows.Resources;

namespace XapLoader
{
    public partial class Splash : UserControl
    {
        private int downloadProgress;
        public Splash()
        {
            InitializeComponent();
            this.Loaded += new RoutedEventHandler(Splash_Loaded);
            this.SizeChanged += new SizeChangedEventHandler((Object sender,
                    SizeChangedEventArgs e)
                => { UpdateProgressBar(); });
        }

        private void Splash_Loaded(object sender, RoutedEventArgs e)
        {
            string contentUri = Application.Current.Host.Source
                .AbsoluteUri.Replace("XapLoader", "XapContent");

            WebClient wc = new WebClient();
            wc.OpenReadCompleted
                += new OpenReadCompletedEventHandler(wc_OpenReadCompleted);
            wc.DownloadProgressChanged
                += new DownloadProgressChangedEventHandler(wc_DownloadProgressChanged);
            wc.OpenReadAsync(new Uri(contentUri));
        }

        private void wc_OpenReadCompleted(Object sender, OpenReadCompletedEventArgs e)
        {
            Assembly assembly = LoadAssemblyFromXap("XapContent.dll", e.Result);
            object loadedContent = assembly.CreateInstance("XapContent.Main");

            App app = (App)Application.Current;
            app.ApplicationVisualRoot.Children.Clear();
            app.ApplicationVisualRoot.Children.Add((UserControl)loadedContent);
        }

        private void wc_DownloadProgressChanged(Object sender,
            DownloadProgressChangedEventArgs e)
        {
            downloadProgress = e.ProgressPercentage;
            UpdateProgressBar();
        }

        private void UpdateProgressBar()
        {
            rectProgress.Width = rectStandard.ActualWidth * downloadProgress / 100;
            txtProgress.Text = "Loading ... " +
                               downloadProgress.ToString() + "%";
        }

        private Assembly LoadAssemblyFromXap(string relativeUri,
            Stream xapPackageStream)
        {
            StreamResourceInfo xapPackageSri
                = new StreamResourceInfo(xapPackageStream, null);
            StreamResourceInfo assemblySri
                = Application.GetResourceStream(xapPackageSri,
                new Uri(relativeUri, UriKind.Relative));
            AssemblyPart assemblyPart = new AssemblyPart();

            return assemblyPart.Load(assemblySri.Stream);
        }

    }
}
In the "Loaded" event of this "User Control", a "WebClient" object is initiated. Two event handlers are associated with this object:
- The "
OpenReadCompleted" event is fired when the "WebClient" finishes downloading the required contents. We can then process the downloaded contents in the event handler. - The "
DownloadProgressChanged" event is fired to report the downloading progress. The progress bar is adjusted in the event handler to inform the users of the downloading status.
The downloading starts when the "OpenReadAsync" method of the "WebClient" object is called. This method requires an "Uri" input. In this case, the "Uri" is the pointer to the "XapContent.xap" package. After the download finishes, the "LoadAssemblyFromXap" method is used to retrieve the correct assembly from the "XapContent.xap" package. I borrowed this method from this place, and it works fine in my example. The "CreateInstance" method is then used to create an instance of the "XapContent.Main" "User Control". This user control is then made visible to the UI. The "User Control" "XapContent.Main" is implemented in the "XapContent" project, which we will be talking about in detail soon.
"Splash.xaml" is added to the application's "RootVisual" at the Silverlight application's "Startup" event:
private void Application_Startup(object sender, StartupEventArgs e)
{
        ApplicationVisualRoot = new Grid();
        ApplicationVisualRoot.Children.Add(new Splash());
        this.RootVisual = ApplicationVisualRoot;
}
The "XapContent" project
The "XapContent" project creates the "XapContent.xap" package for the application to download. For this purpose, the "XapContent.xap" file should be large enough so the downloading progress is slow enough to be visible. I added two pictures "BigLion.jpg" and "BigTiger.jpg" to this project. The combined size of these two pictures is about 3 MB. I initially wanted to simply add these two pictures in a "User Control", but I then decided to spice it up a little bit by adding some animation effect. The "User Control" "Main.xaml" will have both pictures added, but only one will be visible. Clicking on the picture, it will slowly flip to the other side. I learned this flip animation method from this link. What I did in this article is simply wrap the code into an easy to use class "FlipAnimator". This class is implemented in the "Utilities" folder:
using System;
using System.Windows;
using System.Windows.Controls;
using System.Windows.Media;
using System.Windows.Media.Animation;
namespace XapContent.Utilities
{
public class FlipAnimator
{
private bool isFrontSide = true;
private Storyboard ThisStoryBoard = new Storyboard();
private TimeSpan TimeSpanLastFrame = new TimeSpan();
private Panel Container;
private UIElement FrontControl;
private UIElement BackControl;
public int AnimationSpeed { get; set; }
public FlipAnimator(Panel Container,
UIElement FrontControl, UIElement BackControl)
{
this.Container = Container;
this.FrontControl = FrontControl;
this.BackControl = BackControl;
this.AnimationSpeed = 4;
TransformGroup transforms = new TransformGroup();
ScaleTransform scale = new ScaleTransform();
Container.RenderTransformOrigin = new Point(0.5, 0.5);
transforms.Children.Add(scale);
this.Container.RenderTransform = transforms;
AnimateFlip(ThisStoryBoard, scale, out TimeSpanLastFrame);
this.Container.Resources.Add("Animation", ThisStoryBoard);
ThisStoryBoard.Completed
+= new EventHandler(ThisStoryBoard_Completed);
}
public void Toggle()
{
if (isFrontSide) { GoBack(); } else { GoFront(); }
}
public void GoFront()
{
if (isFrontSide) return;
BackControl.Visibility = Visibility.Visible;
FrontControl.Visibility = Visibility.Visible;
ThisStoryBoard.Pause(); ThisStoryBoard.AutoReverse = true;
ThisStoryBoard.Seek(TimeSpanLastFrame); ThisStoryBoard.Resume();
isFrontSide = true;
}
public void GoBack()
{
if (!isFrontSide) return;
BackControl.Visibility = Visibility.Visible;
FrontControl.Visibility = Visibility.Visible;
ThisStoryBoard.Pause(); ThisStoryBoard.AutoReverse = false;
ThisStoryBoard.Begin(); isFrontSide = false;
}
private void ThisStoryBoard_Completed(object sender, EventArgs e)
{
if (isFrontSide) { BackControl.Visibility = Visibility.Collapsed; }
else { FrontControl.Visibility = Visibility.Collapsed; }
}
private static KeySpline DefineKeySpline(double X1,
double Y1, double X2, double Y2)
{
KeySpline ksStart = new KeySpline();
ksStart.ControlPoint1 = new Point(X1, Y1);
ksStart.ControlPoint2 = new Point(X2, Y2);
return ksStart;
}
private TimeSpan AnimateFlip(Storyboard sb,
ScaleTransform scale, out TimeSpan tsLastFrame)
{
double speed = (double)AnimationSpeed;
double flipRotation = 0;
double flipped = 2;
tsLastFrame = new TimeSpan();
TimeSpan tsSideFlipped = new TimeSpan();
int frames = 1;
DoubleAnimationUsingKeyFrames daX = new DoubleAnimationUsingKeyFrames();
tsLastFrame = new TimeSpan();
while (flipRotation != flipped * 180)
{
flipRotation += speed;
double flipRadian = flipRotation * (Math.PI / 180);
double size = Math.Cos(flipRadian);
double scalar = (1 / (1 / size));
DiscreteDoubleKeyFrame ddkfX = new DiscreteDoubleKeyFrame();
ddkfX.Value = (size * scalar);
tsLastFrame = TimeSpan.FromMilliseconds(frames * 28);
flipped = (size < 0) ? +1 : +0;
if (flipped == 1 && tsSideFlipped.Ticks == 0)
{
tsSideFlipped = tsLastFrame;
}
ddkfX.KeyTime = KeyTime.FromTimeSpan(tsLastFrame);
daX.KeyFrames.Add(ddkfX);
flipRotation %= 360;
frames++;
}
Storyboard.SetTarget(daX, scale);
Storyboard.SetTargetProperty(daX, new PropertyPath("(ScaleX)"));
sb.Children.Add(daX);
VisualizeSide(sb, tsSideFlipped, 0,
TimeSpan.FromMilliseconds((tsSideFlipped.Milliseconds + 100)),
BackControl.Opacity, this.BackControl);
VisualizeSide(sb, TimeSpan.FromMilliseconds((tsSideFlipped.Milliseconds - 100)),
FrontControl.Opacity, tsSideFlipped, 0, this.FrontControl);
BackControl.Opacity = 0;
return tsLastFrame;
}
private void VisualizeSide(Storyboard sb, TimeSpan tsStart,
double opacityStart, TimeSpan tsEnd, double opacityEnd,
UIElement side)
{
DoubleAnimationUsingKeyFrames daOpacity =
new DoubleAnimationUsingKeyFrames();
SplineDoubleKeyFrame sdkfStart = new SplineDoubleKeyFrame();
sdkfStart.Value = opacityStart;
sdkfStart.KeyTime = tsStart;
sdkfStart.KeySpline = DefineKeySpline(0, 0, 1, 1);
daOpacity.KeyFrames.Add(sdkfStart);
SplineDoubleKeyFrame sdkfEnd = new SplineDoubleKeyFrame();
sdkfEnd.Value = opacityEnd;
sdkfEnd.KeyTime = tsEnd;
sdkfEnd.KeySpline = DefineKeySpline(0, 0, 1, 1);
daOpacity.KeyFrames.Add(sdkfEnd);
Storyboard.SetTarget(daOpacity, side);
Storyboard.SetTargetProperty(daOpacity,
new PropertyPath("(UIElement.Opacity)"));
sb.Children.Add(daOpacity);
}
}
}
If you want to know how the flip animation is achieved, you can refer to this link. Although the "FlipAnimator" class looks complex, it is very easy to use, which you can see from "Main.xaml":
<UserControl x:Class="XapContent.Main"
    xmlns="http://schemas.microsoft.com/winfx/2006/xaml/presentation"
    xmlns:x="http://schemas.microsoft.com/winfx/2006/xaml"
    xmlns:d="http://schemas.microsoft.com/expression/blend/2008"
    xmlns:mc="http://schemas.openxmlformats.org/markup-compatibility/2006"
    mc:Ignorable="d">

    <Grid x:Name="LayoutRoot" Margin="10, 10, 10, 10">
        <Grid.RowDefinitions>
            <RowDefinition Height="30" />
            <RowDefinition Height="*" />
        </Grid.RowDefinitions>

        <Grid Background="Black" Opacity="0.95" Grid.RowSpan="2" />

        <TextBlock Grid.Row="0" HorizontalAlignment="Center"
                   VerticalAlignment="Center" FontFamily="Verdana"
                   FontWeight="Bold" Foreground="White">
            Click on the image to flip the content
        </TextBlock>

        <Grid Grid.Row="1" x:Name="flipContainer" Margin="20, 0, 20, 20">
            <Grid x:Name="TigerSide"
                  VerticalAlignment="Stretch" HorizontalAlignment="Center">
                <Image Source="Image/BigLion.jpg" Cursor="Hand"
                       MouseLeftButtonUp="Image_MouseLeftButtonUp" />
            </Grid>
            <Grid x:Name="LionSide"
                  VerticalAlignment="Stretch"
                  HorizontalAlignment="Center">
                <Image Source="Image/BigTiger.jpg" Cursor="Hand"
                       MouseLeftButtonUp="Image_MouseLeftButtonUp" />
            </Grid>
        </Grid>
    </Grid>
</UserControl>
In this "XAML" file, I added a "Grid" named "flipContainer". Inside this "Grid", I added two "Grids" TigerSide and LionSide. I also inserted a picture in each of the "Grids". This is all that will be needed to use the class "FlipAnimator". The code-behind file of this "XAML" file is the following:
using System;
using System.Collections.Generic;
using System.Linq;
using System.Net;
using System.Windows;
using System.Windows.Controls;
using System.Windows.Documents;
using System.Windows.Input;
using System.Windows.Media;
using System.Windows.Media.Animation;
using System.Windows.Shapes;
using XapContent.Utilities;

namespace XapContent
{
    public partial class Main : UserControl
    {
        private FlipAnimator animator;

        public Main()
        {
            InitializeComponent();
            this.Loaded += new RoutedEventHandler(Main_Loaded);
        }

        private void Main_Loaded(object sender, RoutedEventArgs e)
        {
            animator = new FlipAnimator(flipContainer, LionSide, TigerSide);
        }

        private void Image_MouseLeftButtonUp(object sender, MouseButtonEventArgs e)
        {
            animator.Toggle();
        }
    }
}
In the "Loaded" event, the "FlipAnimator" is initiated by passing the references to the "Grids" "flipContainer", "LionSide", and "TigerSide" to the constructor. In the "MouseLeftButtonUp" events of "Images", the "Toggle" method of the "FlipAnimator" is called to flip the images.
We have now completed the implementation of the three projects. After compilation, the "XapLoader.xap" file is about 62 KB, and the "XapContent.xap" file is about 3 MB.
Run the application
Set the "XapWebHost" project as the "StartUp" project and the "Default.aspx" file as the "Start" page. We can debug run the application. When the Silverlight application starts, it will display "Splash.xaml" and starts to download the "XapContent.xap" package. The progress bar at the bottom shows the download status:
Once the download finishes, the "Main.xaml" "User Control" implemented in the "XapContent" project is shown in the browser:
Click on the tiger, and the "FlipAnimator" starts the animation and flips the content to show the lion:
You can then click the lion to flip the image back to the tiger. Depending on the speed of your computer, the download speed can be very fast that the downloading process is almost invisible. But if you take a look at the network traffic captured by "Firebug", you can easily tell that the "XapContent.xap" package is indeed downloaded on demand.
Points of interest
- This article introduced a method to download "XAP" packages on demand in Silverlight applications. In this article, I only showed you how to download and use a "User Control". In fact, any resource can be downloaded with the "
WebClient" similar to what I have done in this article. - As mentioned earlier, putting all the resources in a single "XAP" package can be a good choice in many cases. But separating the resources in different "XAP" packages can be proven useful in some other cases, particularly when the "XAP" packages become large and the network is slow. It is a design decision that you will need to make.
- The "
FlipAnimator" introduced in this article is borrowed from here. I just wrapped it into a class and it turns out to be very easy to use. If you are interested to learn the details, you can take a look at this link directly. In this article, I only showed flipping images. But if you take a look at the constructor of the "FlipAnimator", you may notice that the input parameters "FrontControl" and "BackControl" are of "UIElement" type. This means that you can flip almost any Silverlight UI element. - In the development environment, the download of "XapContent.xap" can be very fast if you have a fast computer, so the downloading process may not be visible. But if you take a look at what the "Firebug" captures, you should be convinced that the "XAP" file is indeed downloaded on demand.
- If you want to compile and run this example application in your own Visual Studio, you will need to set up the Silverlight 4 SDK and have Silverlight 4 installed on your computer. Since I finished setting up my environment so easily, I do not have any recommendations. But if you do encounter problems to set up your environment, you just need to be patient, and the problems should be resolved.
- I hope you like my postings, and I hope that this article can help you one way or the other.
History
This is the first revision of this article.
I have been working in the IT industry for some time. It is still exciting and I am still learning. I am a happy and honest person, and I want to be your friend.


 General
  News
News  Suggestion
  Question
  Bug
Bug  Answer
  Joke
Joke  Praise
  Rant
Rant  Admin
Admin 


