Initial requirements:<o:p>
- Reader is familiar with the usage Nunit and knows how to create Nunit tests or projects.
- Reader is familiar with the menus and links provided on the FinalBuilder tool.
- Reader is familiar with coding and creating projects and DLLs using C#.
Steps:
Create a Nunit project
- First create a project using Nunit that would contain the DLLs to be tested. Alternatively you could point to an existing C# project.
- To do this you may run the Nunit-Gui.exe which in turn opens Nunit-Gui application.
- In this example you may open the DLL mock-assembly.dll that is automatically installed at the time of installing Nunit. Normally this is stored in the path “C:\Program Files\NUnit 2.2\bin”
- Save the file as a Nunit test project (*.nunit) file type. Name it “mock-assembly.nunit” (“.nunit” is the file extension).
Running the test from FinalBuilder
- Create a new FinalBuilder project and name it as “FinalBuilderLesson.fbz3”.
- In the top of the FinalBuilder editor right click next to right of the action list “OnFailure” to open the pop up menu.
- In the pop up menu select “Add Action List”. Give the name of the action list as “Nunit Test”.
- From the left menu click on “Windows OS” to view the action items available in it (if not already visible).
- Double click on the “Execute Program” icon. This opens up the “Execute Program” action item properties box.
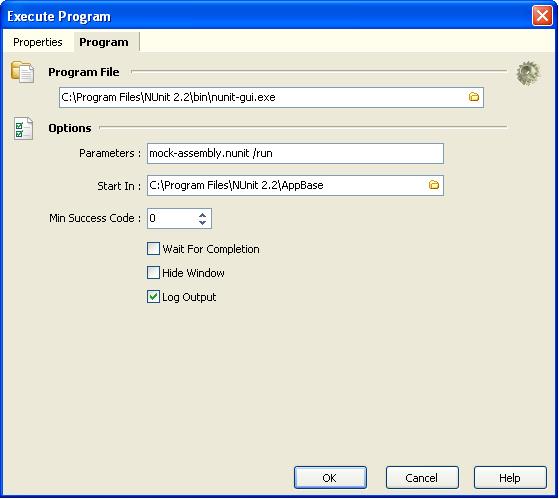
- Select the page “Program”.
- In the program file input box browse to the path where you saved the “mock-assembly.nunit” file.
- In the Options – Parameters input box type in “mock-assembly.nunit /run”
- In the Options – Start in input box type in “<the directory where the file is stored>”
- Uncheck the Options - Hide Window check box.
- Save the project.
- Now select the Execute Program action type and click Alt + F9

<o:p>End notes
To make this application is little bit robust I added the try, catch, finally and end action tags from the flow control in the left menu. To move the “Execute Program” action list inside the catch block use the menu items in the “Actions” top menu. In the try block I have put a “Windows Does Exist” action item. This item is the “Windows Exist” menu item in the “Windows OS” of the left menu list.


