Introduction
This is a simple article in which some rough ideas about UI that you might have thought about are presented.
In this article, we will see how to:
- Change the mouse cursor inside the form
- Change the appearance of the form by re-drawing it
- Change the appearance of the form using its
TransparencyKey property - Change the opacity of the form and its drawing size
- Move the form by dragging any part of it
Background
I was wondering how different shapes of Windows Forms can be designed and that's where I found the information to write this article.
Using the Code
Use the following part to change to mouse cursor. You need to pass the bitmap object to the ChangeCursor function. I would usually pass an embedded resource stream.
private void ChangeCursor(Bitmap b)
{
    Graphics g = Graphics.FromImage(b);
    IntPtr ptr = b.GetHicon();
    Cursor c = new Cursor(ptr);
    this.Cursor = c;
}
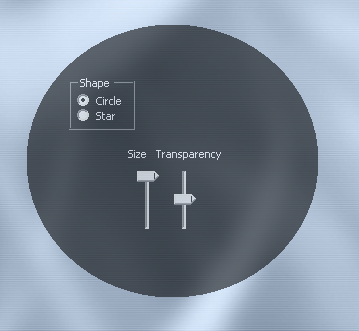
The following would first hide your default form borders, draw a simple graphic object and set it to the current form. A simple circle in this case.
this.FormBorderStyle = FormBorderStyle.None;
gP = new GraphicsPath();
gP.AddEllipse(0, 0, this.Width, this.Height);
this.Region = new Region(gP);
To change the ellipse size and re-apply it back to the form, we use the following:
float i = ((TrackBar)sender).Value;
gP = new GraphicsPath();
gP.AddEllipse(300-i,300-i,i-(300-i),i-(300-i));
this.Region = new Region(gP);
Opacity adjustments would simply take place by changing the Opacity property associated with the control.
this.Opacity = ((TrackBar)sender).Value / 100f;
Our Evening Star
To draw other shapes, you would usually use the other methods listed under the GraphicsPath object like the AddPolygon method which allows you to freely define the points of your random polygon "a good practice would have been drawing the star in this article, but it's almost 3 in the morning and I'm a bit lazy to do that".
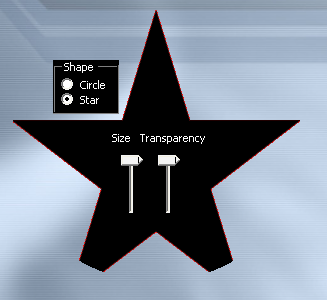
In this example, I had a simple star auto shape drawn in Microsoft Word, copied it to Adobe PhotoShop to set the outside part of the image to transparent. In the application, we do the following:
- Create a
PictureBox control - Give it an Image (Our little art piece from Microsoft Word)
- Add our
PictureBox to the form and dock it to fill the whole area - Set the
TransparancyKey to whatever and change the form BackColor accordingly:
if (((RadioButton)sender).Checked)
{
    PictureBox pb = new PictureBox();
    pb.Image = new Bitmap(Properties.Resources.pStar);
    this.Controls.Add(pb);
    pb.Dock = DockStyle.Fill;

    this.TransparencyKey = Color.Red;
    this.BackColor = Color.Red;
}
Last but not least, we have to give our form a different handle to allow us to move it. The little part proceeding the constructor in our example defines the following region to be used later in the associated mouse event:
#region To move form with mouse
public const int WM_NCLBUTTONDOWN = 0xA1;
public const int HT_CAPTION = 0x2;

[DllImportAttribute("user32.dll")]
public static extern int SendMessage(IntPtr hWnd,
                         int Msg, int wParam, int lParam);
[DllImportAttribute("user32.dll")]
public static extern bool ReleaseCapture();
#endregion
And in the MouseMove event, we say:
if (e.Button == MouseButtons.Left)
{
      ReleaseCapture();
      SendMessage(Handle, WM_NCLBUTTONDOWN, HT_CAPTION, 0);
}
Points of Interest
You may have noticed how the star shape is clipped from the bottom, this is because the path object is still applied to the form and the star location starts at the beginning of the ellipse but ends beyond its invisible part which makes us think about the combination of shapes we can create! Use your imagination!
You have to remark that a VDU with a poor or inappropriate hardware drivers would completely omit the transparency and the opacity effects to probably give you a solid black color.
Credit
Special thanks to FreewareFire for moving our form of which this code part is captured from the article:
History
- 13th April, 2009: Initial post


 General
  News
News  Suggestion
  Question
  Bug
Bug  Answer
  Joke
Joke  Praise
  Rant
Rant  Admin
Admin 


