Introduction
There are a number of public domain Multi-Select TreeView controls and a number of File Explorers as well, but most seem to be either very complex, older (.NET 2.0 or earlier), too slow for our needs, or are not multi-select.
We wanted something lightweight, flexible and relatively fast that we could populate on demand from any node in the File System.
Background
When I started to build this DLL, the Multi-Select feature seemed the most problematic so I looked at some of the other code online. Anything I found was tracking node selection manually in an IList, ArrayList (erg) or other data structure.
The code to do that can get a little hairy if one lets the user select/deselect away to their hearts content and I felt that there had to be a better way.
I thought about using the TreeNode Tag property to hold a custom object that would contain both the node's selected status as well as the appropriate 'Info' object (FileInfo, DirectoryInfo, DriveInfo) but in a moment of silliness I decided to first see whether the TreeNode Checked property would work even if the CheckBox display is turned off.
And what do you know, they do. They are merrily checking away in the background even if the TreeView isn't showing them. With that little revelation (to me at least) in hand, Multi-Select got much easier.
The rest of this article is focused on how we implemented the Multi-Select feature using the Checked property.
Note: The project also needed TreeView populate-on-demand code and not being one to reinvent the wheel, I derived mine from another CodeProject article by Chandana Subasinghe in October 2006 - http://www.codeproject.com/KB/cs/TreeViewFileExplorer.aspx). Yes, I could have used a DataSource but for this project, the lighter the better.
The Code
The guts of the MFT Multi-Select code is comprised mainly of two event handlers:
_AfterSelect fires whenever a node is clicked, after the Tree's SelectedNode property has been set. _AfterCheck fires after that, each time we programmatically check a node.
Let's look at _AfterSelect first:
In our code, the event handler decides what nodes to check by looking at the ModifierKeys the user has pressed (SHIFT, CTRL, or both).
We implemented to duplicate Windows Explorer right-pane functionality. The SHIFT and SHIFT-CTRL handling is the trickiest but not too bad since we are only firing 'Checked' events, not trying to track the selections (sans error trapping for clarity):
protected void MultiSelectFileTreeView_AfterSelect(object sender, TreeViewEventArgs e)
{
bool bBoth = ModifierKeys == (Keys.Shift | Keys.Control);
bool bControl = (ModifierKeys == Keys.Control);
bool bShift = (ModifierKeys == Keys.Shift);
if (!(bBoth || bControl || bShift))
{
ClearChecksRecursive(this.Nodes);
e.Node.Checked = true;
this.SelectedNode = e.Node;
return;
}
if (bControl)
{
e.Node.Checked = !e.Node.Checked;
this.SelectedNode = e.Node;
return;
}
if (bShift || bBoth)
{
if (bShift)
ClearChecksRecursive(this.Nodes);
TreeNode TopNode = new TreeNode();
TreeNode BottomNode = new TreeNode();
if (_prevNode.Level != SelectedNode.Level)
{
TopNode = SelectedNode.Parent.Nodes[0];
BottomNode = e.Node;
}
else
{
TopNode = (_prevNode.Index < SelectedNode.Index) ? _prevNode : SelectedNode;
BottomNode = (SelectedNode.Index > _prevNode.Index) ?
SelectedNode : _prevNode;
}
for (int x = TopNode.Index; x <= BottomNode.Index; x++)
{
TreeNode n = SelectedNode.Parent.Nodes[x];
n.Checked = true;
if (n.Tag.GetType() != typeof(FileInfo))
n.Collapse();
}
return;
}
}
Now that we are firing "Check" events, all we have to do is trap them and color the Node being checked/unchecked to reflect its status.
_AfterCheck
protected void MultiSelectFileTreeView_AfterCheck(object sender, TreeViewEventArgs e)
{
  e.Node.BackColor = (e.Node.Checked == true) ? SelectedBackColor : this.BackColor;
  e.Node.ForeColor = (e.Node.Checked == true) ? SelectedForeColor : this.ForeColor;
  if (e.Node.Checked)
  {
      Type nodeType = e.Node.Tag.GetType();
      if (nodeType == typeof(DirectoryInfo) || nodeType == typeof(DriveInfo))
          e.Node.Expand();
  }
}
Using the Code
The MFT class inherits directly from TreeView and all of the base TreeView members are accessible to your code.
Use the normal VS methodology of adding a DLL reference to your project and, if you like, of adding it to your VS tool box.
The ReadMe.txt file included in the download describes the MFT properties, which are minimal.
We were after lightweight, remember?
You can set the Node Selection colors and specify the image index numbers to be used but the parent form is responsible for supplying the ImageList just as you would with a normal TreeView.
As mentioned, the MFT provides for essentially the same node selection functionality as found in Windows Explorer - SHIFT-select, CTRL-select and SHIFT-CTRL-select functionality are provided.
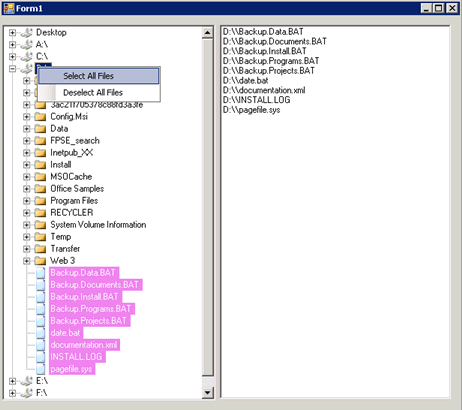
In addition, a right-click context-menu is provided on expandable nodes. The screen shot shows the Test WinForm app using the context menu to select the files in the root of D:\.
The Test application implements the MFT control in the left pane and subscribes to its After_Check event to populate a Listbox with selected files on the right using the event-handler code shown below. As always, the underlying handler (our MFT event) runs before the handler in the parent form.
Note: The MFT also provides a PopulateAtPath method so that a portion of the file system can be used where appropriate to the application.
Implementing the Control
Here is the code used to implement the control in the Test form. Pardon the lack of error trapping for easier reading.
public Form1()
{
InitializeComponent();
MultiSelectFileTreeView1.ImageList = imageList1;
MultiSelectFileTreeView1.AfterCheck +=
new TreeViewEventHandler(MultiSelectFileTreeView1_AfterCheck);
MultiSelectFileTreeView1.SelectedBackColor = Color.Violet;
if (!MultiSelectFileTreeView1.Populate())
{
MessageBox.Show(MultiSelectFileTreeView1.Message);
}
}
void MultiSelectFileTreeView1_AfterCheck(object sender, TreeViewEventArgs e)
{
if (e.Node.Tag!=null && e.Node.Tag.GetType() == typeof(FileInfo))
{
listBox1.BeginUpdate();
bool has = listBox1.Items.Contains(e.Node.FullPath);
if (e.Node.Checked && !has)
{
listBox1.Items.Add(e.Node.FullPath);
}
else if (!e.Node.Checked && has)
{
listBox1.Items.Remove(e.Node.FullPath);
}
listBox1.EndUpdate();
}
}
Points of Interest
One thing to notice is that the Node.Tag property contains the 'info' object for each node, gathered at the time the node is populated from the file system.
So, while the test app simply shows the FullPath in the listbox, the entire Info object is just as easily available to your code.
History
- 3rd April, 2010: Initial post
In '97 or so I started fiddling around with this new thing called the Internet. Mistake.
I blinked and found myself in 2000 ditching my Accounting designation and starting to write code for a living - mostly ASP Classic back then along with some C++ and a little assembler, PHP, Perl/CGI (ouch) and of course Javascript and most of the other web-side tools.
With v3.0 .Net finally became something I couldn't ignore and so here I am still coding - WinForm, ADO, SQL, .Net, and WPF shortly, no doubt to be followed by Silverlight and maybe some MVC.
"Teach me, learn or get out of the way."


 General
  News
News  Suggestion
  Question
  Bug
Bug  Answer
  Joke
Joke  Praise
  Rant
Rant  Admin
Admin 


