Introduction
This is an picture control that cycles through a list of images, using various transitioning effects, such as fading, dissolving, and sliding, to display them.
Using The Code
Properties
I have categorised all of the special properties for this control as "Effects".
bool Autostart
- If true, starts the transition effects as soon the control is loaded. A minimum delay of
DelayTime is executed before the first image in the list is shown.
ImageEntry DefaultBitmap
- An image to display prior to the transitions being commenced. This image will appear until the transitions start, as well as in the designer.
int DelayTime
- The time in milliseconds between each transition.
System.Drawing.ContentAlignment ImageAlignment
- Where to draw each image within the control.
System.Windows.Forms.Border3DStyle ImageBorder3DStyle
- If the
ImageBorderStyle is set to BorderSyle.Fixed3D, this property defines the style of 3D border drawn around the image
System.Windows.Forms.BorderStyle ImageBorderStyle
- Defines the type of border drawn around the image. This differs from the
BorderStyle property inherited from UserControl in that property will draw a border around the whole UserControl, while this property draws the border around any resized image being displayed
List<ImageEntry> Images
- Contains a list of the images that will be displayed in the control. See the section below on the
ImageEntry class for an explanation of how these objects are defined.
bool RandomOrder
- Defines if the list will be displayed sequentially (
False) or in random order (True).
TransitionEffects TransitionEffect
- Defines the effect to use when transitioning between images. Selecting
TransitionEffects.Random will select a random effect for each transition.
int TransitionFramesPerSecond
- The number of transitions that will be drawn per second.
int TransitionTime
- The time in milliseconds that it takes a transition to complete. The exception to this is
TransitionEffects.None, which displays the next image in the sequence immediately.
Methods
There are only two public methods for this control
void Start() - Starts the transitioning effects.void Stop() - Stops the transitioning effects.
Events
void TransitionStarted(object sender, EventArgs args) - Fired when transitioning starts on the control.void TransitionStopped(object sender, EventArgs args) - Fired when transitioning stops on the control.
Objects
class ImageEntry
Represents an image displayed in the control
Remarks
The base ImageEntry class is designed for an image either loaded at design time, or loaded from a file. The Image and Path properties define where the image is retrieved from. If a Path is entered, then the Image is not actually loaded into memory until the Image property is retrieved.
The SizeMode property of this object defines how the image is to be drawn (See the ImageDrawMode enumeration below).
The main reason I defined this object is the application I wrote the control for is able to retrieve images from either a database, or from a URL. For each of these cases, I subclass the ImageEntry object, initialising it with either the Database ID of the image, or the URL of the image online. Like the parent class, the image data itself is not downloaded until it is actually needed i.e. the Image property is accessed.
Enumerations
enum ImageDrawMode
Describes how the image in the ImageEntry object is drawn in the control. Possible values are:
- Copy - The image is drawn at its original size. If it overruns the bounds of the control, then it is simply clipped.
- Stretch - The image is resized to fit within the control. The aspect ratio is not necessarily maintained.
- Zoom - The image is resized to the largest size possible to fit within the control, while maintaining the aspect ratio.
enum TransitionEffects
Describes the type of effect used to transition from one image to the next
- None - This is the only effect that does not take the
TransitionTime to complete. It simple replaces one image with the next. - Fade - The image currently displayed increases its transparency, while the next image is drawn over the top of it increasing its opacity. The reason both images are altered at the same time is that doing so allows for transparent pixels in one or both images.
- Dissolve - The next image is transitioned over the exiting one by replacing all the pixels in a random order.
- ZoomIn - The next image overwrites the current one in decreasing circles, from the outer edges to the center.
- ZoomOut - The next image the current one in increasing circles from the center to the outer edges.
- SlideLeft - Both the next image and the current one slide to the left, the current image exiting from the left hand side, and the new image entering from the right.
- SlideRight - Both the next image and the current one slide to the right, the current image exiting from the right hand side, and the new image entering from the left.
- SlideUp - Both the next image and the current one slide upwards, the current image exiting from the top edge, and the new image entering from the bottom.
- SlideDown - Both the next image and the current one slide downwards, the current image exiting from the bottom edge, and the new image entering from the top.
How It Works
My first problem was that the images I was using were all different sizes. In order to perform the transitions, I needed to work with a canvas that was the same size. Therefore, before any transition starts, I draw the new image into a bitmap that is the same size as the ClientRectangle. As the drawn image may not be the same size as the image that is already there, this bitmap is created as System.Drawing.Imaging.PixelFormat.Format32bppArgb, and is initialized with a completely transparent background. I use the ImageEntry.SizeMode property to determine how the image is drawn into this new bitmap.
Bitmap newBmp = new Bitmap(clientRectangle.Width, clientRectangle.Height, System.Drawing.Imaging.PixelFormat.Format32bppArgb);
using (Graphics g = Graphics.FromImage(newBmp)) {
Point imgOrigin = Point.Empty;
Size bmpSize = clientRectangle.Size;
Rectangle targetRectangle;
g.SmoothingMode = System.Drawing.Drawing2D.SmoothingMode.AntiAlias;
g.TextRenderingHint = System.Drawing.Text.TextRenderingHint.AntiAlias;
g.PageUnit = GraphicsUnit.Pixel;
if (orig.Image != null) {
if (orig.SizeMode == ImageDrawMode.Zoom) {
double ratio = (double)bmpSize.Width / (double)orig.Image.Width;
double ratioh = (double)bmpSize.Height / (double)orig.Image.Height;
if (ratioh < ratio)
ratio = ratioh;
bmpSize = new Size((int)(ratio * orig.Image.Width), (int)(ratio * orig.Image.Height));
imgOrigin = LocateBitmap(clientRectangle.Size, bmpSize);
targetRectangle = new Rectangle(imgOrigin, bmpSize);
if (_borderStyle == System.Windows.Forms.BorderStyle.Fixed3D)
targetRectangle.Inflate(-SystemInformation.Border3DSize.Width, -SystemInformation.Border3DSize.Height);
else if (_borderStyle == System.Windows.Forms.BorderStyle.FixedSingle)
targetRectangle.Inflate(-1, -1);
g.DrawImage(orig.Image, targetRectangle, new Rectangle(0, 0, orig.Image.Width, orig.Image.Height), GraphicsUnit.Pixel);
}
else if (orig.SizeMode == ImageDrawMode.Copy) {
imgOrigin = LocateBitmap(clientRectangle.Size, orig.Image.Size);
targetRectangle = new Rectangle(imgOrigin, orig.Image.Size);
targetRectangle.Intersect(clientRectangle);
if (_borderStyle == System.Windows.Forms.BorderStyle.Fixed3D)
targetRectangle.Inflate(-SystemInformation.Border3DSize.Width, -SystemInformation.Border3DSize.Height);
else if (_borderStyle == System.Windows.Forms.BorderStyle.FixedSingle)
targetRectangle.Inflate(-1, -1);
g.DrawImageUnscaledAndClipped(orig.Image, targetRectangle);
}
else {
targetRectangle = clientRectangle;
if (_borderStyle == System.Windows.Forms.BorderStyle.Fixed3D)
targetRectangle.Inflate(-SystemInformation.Border3DSize.Width, -SystemInformation.Border3DSize.Height);
else if (_borderStyle == System.Windows.Forms.BorderStyle.FixedSingle)
targetRectangle.Inflate(-1, -1);
g.DrawImage(orig.Image, targetRectangle);
}
}
Note that space is left when drawing the image into the new bitmap to allow a border to be drawn around the resized image.
Once we have two images of exactly the same size and format, then transitioning between one and the other becomes a matter of determining how each of the images differ for each frame of the transition. The way I handled this was I set up n private abstract class called "Transition". Each of the effects have their own subclass of inherited from this base. The classes all have a constructor that take the two images (background and foreground), as well as the time required for the transition and the time between each frame of the transition. The constructor in each case will set up any private members required to keep track of the stage the transition is at.
Each transition class declares 6 main methods - Start, Stop, Step, Finish, Resize and Draw, as well as two events - Changed and Finished. The Changed event is fired whenever the transition changed - it basically invalidates the client area to force a redraw. The finished event is fired when all of the transitioning frames are completed. When this event is captured the Transition object is destroyed and a timer is started on the main thread to allow the background image to remain on the screen until the next transition is started (DelayTime milliseconds). While this delay is waiting to be triggered, a background thread is started to generate the next foreground image, and to create the next transition.
All of the Transition objects except the NoTransition create a System.Threading.Timer to process each frame of the transition. Because this is not running on the main window thread, care has to be taken so that (a) Any object that reside in the main window are not changed, and (b) the Events are marshaled back to the main thread before they are called. The first is easy - the transition just works on its own private members to generate each frame. The second is done in the base Transition class in the RaiseChanged and RaisedFinished methods. They both use the same pattern to ensure the event is fired on the same thread the handler was created on.
protected virtual void RaiseChanged() {
    if (Changed != null) {
        foreach (Delegate d in Changed.GetInvocationList()) {
            ISynchronizeInvoke s = d.Target as ISynchronizeInvoke;
            if (s != null && s.InvokeRequired)
                s.BeginInvoke(d, new object[] { this, EventArgs.Empty });
            else
                d.DynamicInvoke(this, EventArgs.Empty);
        }
    }
}
There are plenty of examples and articles around that talk about this marshaling technique, so I won't go into those details here. I have just included the code above to basically explain what I am doing.
The next couple of paragraphs give an overview of how I perform each of the transitions.
TransitionEffects.None
This is the simplest of the transitions, as there is actually no effect shown. When Start is called, the class immediately calls Finish. The new image replaces the old image in the Finished event, and the delay timer is restarted.
TransitionEffects.Fade
The fade effect works by drawing the background image with an increasing transparency factor, and then drawing the foreground image over the top of it with a decreasing transparency factor. The Start method creates two ColorMatrix objects - one to be applied to the foreground, and the other to the background. The foreground matrix is initialised with a transparency factor of 0, and the background with a factor of 0. Each Step method call then modifies these factors based on the fraction of the total transition that has currently been processed.
public override void Step() {
    lock (_sync) {
        _currentStep += _stepTime;
        _fade = Math.Min(1F, (float)_currentStep / (float)_transitionTime);
        _cmBg.Matrix33 = 1F - (_cmFg.Matrix33 = _fade);
    }
    base.Step();
}
The Draw method simply draws the background image with its calculated transparency, and then draws the foreground image over the top of it with its transparency factor.
public override void Draw(Graphics g) {
    lock (_sync) {
        if (_transitioning) {
            ImageAttributes attr = new ImageAttributes();
            if (_back != null) {
                attr.SetColorMatrix(_cmBg);
                g.DrawImage(_back, _clientRectangle, 0, 0, _clientRectangle.Width, _clientRectangle.Height, GraphicsUnit.Pixel, attr);
            }
            if (_front != null) {
                attr.SetColorMatrix(_cmFg);
                g.DrawImage(_front, _clientRectangle, 0, 0, _clientRectangle.Width, _clientRectangle.Height, GraphicsUnit.Pixel, attr);
            }
        }
        else if (_finished)
            g.DrawImage(_front, 0, 0);
        else
            g.DrawImage(_back, 0, 0);
    }
}
Note the synchronisation lock on each of the methods. This is because the Step method is called from the timer thread, while the Draw method is called from the main thread, and we don't want values being changed in the middle of drawing. This means that before drawing takes place, any updates for the current step are completed, or if drawing is occurring, the values are not updated until such time as the drawing is completed. All of the transitioning effects have the same locking mechanism.
The Resize method, called from the main thread's OnClientSizeChanged override, simply replaces the current foreground and background images with the resized ones. This method is also called if any of the properties affecting the appearance of the images (such as changing the borders or the image alignment), as the processing involved is the same as if the image size is changed. In fact, I probably should have named this method "AppearanceChanged" or something like that, to reflect what has happened.
TransitionEffects.Dissolve
The Dissolve effect replaces each pixel in the background image with the corresponding pixel in the foreground image, in a random order, until all pixels have been replaced. This is accomplished by preparing a list of all the offsets of the pixels in the images, shuffled using the Fisher-Yates Shuffle algorithm. This is done in the constructor.
_randomPixels = new List<int>(_imageSize);
for (int i = 0; i < _imageSize; ++i)
    _randomPixels.Add(i * 4);
for (int i = 0; i < _imageSize; ++i) {
    int j = Random.Next(_imageSize);
    if (i != j) {
        _randomPixels[i] ^= _randomPixels[j];
        _randomPixels[j] ^= _randomPixels[i];
        _randomPixels[i] ^= _randomPixels[j];
    }
}
The _imageSize member referred to is simply the image width multiplied by its height.
For the sake of speed during the drawing process, the DissolveTransition instance maintains a copy of the current state of the transition as a bitmap. The Step method then simply peels pixel offsets from the last offset in the list, replacing those pixels in the transition image with the foreground pixel. Also, for speed, the bits of the image are locked, and the pixel values are read and written directly from and to the bitmap data. As the format of all the bitmaps are 32bppARGB, reading and writing the pixels as Int32 works perfectly. This is a massive speed increase over using the GetPixel and SetPixel methods.
public override void Step() {
    lock (_sync) {
        _currentStep += _stepTime;
        int endPoint = Math.Min(_imageSize, (int)((long)_imageSize * _currentStep / _transitionTime));
        BitmapData src = _front.LockBits(_clientRectangle, ImageLockMode.ReadOnly, PixelFormat.Format32bppArgb);
        BitmapData target = _transition.LockBits(_clientRectangle, ImageLockMode.WriteOnly, PixelFormat.Format32bppArgb);
        for (int i = _pixelsDissolved; i < endPoint; ++i) {
            Marshal.WriteInt32(target.Scan0, _randomPixels[i], Marshal.ReadInt32(src.Scan0, _randomPixels[i]));
        }
        _transition.UnlockBits(target);
        _front.UnlockBits(src);
        _pixelsDissolved = endPoint;
    }
    base.Step();
}
Resizing the transition proved to be quite difficult. Not only did I have to recreate the random list of points, but I had to make it appear that so much of the transition had already been completed. And I had to do all this in as little time as possible. To accomplish this, if the size of the image had increased, I just increased the size of the random pixel list to the new size, and shuffled only the end of the list. If the size had decreased, I simply removed any pixel address that was greater than the new size.
int newSize = _clientRectangle.Width * _clientRectangle.Height;
if (newSize > _imageSize) {
    _randomPixels.Capacity = newSize;
    for (int i = _imageSize; i < newSize; ++i) {
        _randomPixels.Add(i * 4);
    }
    for (int i = _imageSize; i < newSize; ++i) {
        int j = Random.Next(_imageSize);
        if (i != j) {
            _randomPixels[i] ^= _randomPixels[j];
            _randomPixels[j] ^= _randomPixels[i];
            _randomPixels[i] ^= _randomPixels[j];
        }
    }
}
else if (newSize < _imageSize) {
    int maxPoint = (newSize - 1)* 4;
    _randomPixels.RemoveAll(i => i > maxPoint);
    _randomPixels.TrimExcess();
}
Calculating the relative location of the pixels that had already been processed proved quite complicated, as as such very time consuming. So instead, I just used the existing offsets into the new size, processed the pixels where they now stood. The number of pixels to process in this function is recalculated for the image of the new size based on the step it was currently up to. With all else that is happening on the screen when an image is resized, and the speed at which the frames are being processed, the eye just does not notice this irregularity in the transition.
TransitionEffects.Zoom...
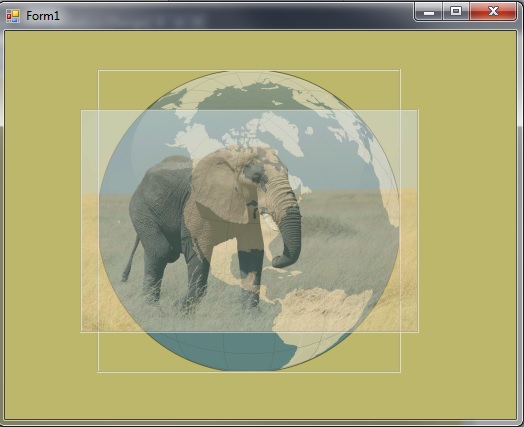
The ZoomIn and ZoomOut transitions both work the same way - its just the order in which they draw the images that are reversed. The technique is quite simple. I create a GraphicsPath object and add an ellipse to it. Then the clip region of the Graphics object being drawn on is set to that path, and the appropriate image is drawn using that clip region. I then set the clip region to be the ClientRectangle XOR'd with the existing (ellipse) clip region, and draw the other image. This draws the 2nd image everywhere except the original ellipse.
For the ZoomIn transition, the ellipse is originally drawn in a rectangle 20% bigger than the ClientRectangle, and each step reduces the size of that rectangle. The background image is drawn first, clipped to fit within the ellipse. The clip region is then XOR's as described above, and the foreground image is drawn in the remainder of the ClientRectangle.
For the ZoomOut transition, it all just works in reverse. The starting ellipse is just a small dot in the middle if the image, and each step increases the size of the ellipse up to 20% bigger than the client rectangle. The foreground image is drawn first in the ellipse, and then the background is drawn to fill the remainder of the client.
TransitionEffects.Slide...
The sliding effects are probably the simplest. The name of the effect indicates the direction the images are sliding to. The background images slides in the direction indicated until it moves completely off the screen, while the foreground images slides in after it.
The Step of the slide transitions simply calculates the distance the images have moved. The calculation of what is to be displayed is simple enough to be left until the actual drawing. It simply creates a rectangle using the calculated distance of the movement on the appropriate axis (X for left-right, Y for up-down), and draws the appropriate section of each image in the proper place.
Points of Interest
Inherited Properties
When testing the control, I was annoyed by all of the spurious properties and events appearing in the designer property grid. I started overloading each of these with the [Browsable(false)] attribute, but very quickly tired of that. So I did some research, following which I developed a method of removing those inherited properties included in this control. This pattern's concept is complex enough that I considered it deserved its own article - so I published it Remove Unwanted Properties and Events from UserControl[^].
Control Transparency
I have been looking for a solution to make the entire control transparent, so far to no avail. I have set the appropriate ControlStyle, I don't paint any background, and I set the base control's BackColor to Color.Transparent, and still all it does is seem to copy the background colour of the parent. Anything put behind this control is covered by it. So if anyone can take a look at this, and come up with an answer for me, it would be much appreciated.
Been programming for 40 years now, starting when I was 13 on DEC PDP 11 (back in the day of paper tape storage, and hex switch boot procedures). Got right into micro-computers from an early age, with machines like the Dick Smith Sorcerer and the CompuColor II. Started CP/M and MS-DOS programming in the mid 1980's. By the end of the '80's, I was just starting to get a good grip on OOP (Had Zortech C++ V1.0).
Got into ATL and COM programming early 2002. As a result, my gutter vocabulary has expanded, but it certainly keeps me off the streets.
Recently, I have had to stop working full time as a programmer due to permanent brain damage as a result of a tumour (I just can't keep up the pace required to meet KPI's). I still like to keep my hand in it, though, and will probably post more articles here as I discover various tricky things.


 General
  News
News  Suggestion
  Question
  Bug
Bug  Answer
  Joke
Joke  Praise
  Rant
Rant  Admin
Admin 


