Introduction
In my current job, I'll soon be working on a task where we're going to convert hundreds forms in an Oracle Forms application to a WinForms .Net application. There are a couple of "wizards" in the existing app, but when I went looking in the templates for a Wizard form, imagine my dismay when I didn't find one. Despite my best efforts, I also couldn't find anything that was a) lightweight, b) contained "enough" features, or c) worked all the time. There are a couple of articles here on CP, but none of them felt right for me. Since I'm still learning .Net, I figured this would be a good opportunity to create my own wizard code. Along the way, I learned a few new niggles about WinForms.
Code Formatting Disclaimer: In an attempt to keep the width of the <pre> blocks to something reasonable, I changed the formatting you see in this article and in some cases, removed several "this." qualifiers. The actual code in the source files will look different.
Usage Disclaimer: This code is designed to be used within the context of a non-resizable stand-alone Form environment.
The Concept
Essentially, this code doesn't establish any innovative methods or new ideas where your garden variety wizard form is concerned, there's no clever designer integration, and you still have to actually write a bit of code to "make it go". Here's a feature list:
- A graphic panel that allows you to provide some eye-candy via a (optional) gradient background, and support for an (optional) image (nothing new here)
- Specify text for a title and/or subtitle, as well as the ability to configure the font and color of the text (nothing new here)
- Support for multiple possible paths through the wizard (nothing new here)
- Efficient tracking of visited pages (nothing new here)
- Re-sizes the wizard form to accommodate the largest wizard page
Implementation is about as simple as I could make it, but there's at least one thing I did that I'd wished I could have done a different way. I'll point it out in the ensuing discussions regarding the base classes.
Techniques Use
The following techniques were utilized in order to implement this code:
- Inheritance (deriving
Form and UserControl classes) - Polymorphism (multiple wizard pages deriving from the same base class)
- Encapsulation (utilizing public, protected, and private data members and methods)
- Custom events
- In-designer detection
- Custom drawing and image display
- Programmatic form resizing
The WizardFormLib Assembly
Keeping things compartmentalized is always a good idea, so I put all of the base code into this assembly. It's comprised of a few support classes and the two primary classes, WizardFormBase, and WizardPage
The Page Chain
One of the aspects of a wizard is the desire to maintain some sort of list of pages that have been visited. This becomes even more important if the wizard presents multiple data-driven paths from the start page to the stop page. It's pretty obvious that you have to maintain a list of the pages, but it would be highly inefficient to maintain a list of ALL of the pages in the wizard when you 're not going to necessarily visit all of them. So, the WizardPageChain class is what I came up with to resolve the issues.
This is a fairly simple class, and simply manages the list of pages as they are visited. When a page is visited (when the user starts the wizard or clicks the Next button), it is added to the end of the list, and it is considered to be the "current page". If the user clicks the Back button, the page is removed from the end of the list, and the new last page in the list is considered the "current page". It's really nothing more than a fancy queue. The code is as follows (comments were omitted in the interest of brevity), and can be found in the file WizardFormLib.WizardPageChain.cs:
public class WizardPageChain
{
private List<object> m_pageChain = new List<object>();
private WizardFormBase m_parent = null;
public int Count
{
get { return m_pageChain.Count; }
}
public WizardPage CurrentPage
{
get
{
if (this.Count > 0)
{
return (WizardPage)this.m_pageChain[this.Count-1];
}
else
{
throw new Exception("No pages in page chain list.");
}
}
}
public WizardPageChain(WizardFormBase parent)
{
m_parent = parent;
this.m_pageChain.Clear();
}
public WizardPage GoBack()
{
if (this.Count > 1)
{
this.CurrentPage.Visible = false;
this.m_pageChain.RemoveAt(this.Count - 1);
}
else
{
throw new Exception("No pages in page chain list.");
}
WizardPage currentPage = this.CurrentPage;
currentPage.Visible = true;
return currentPage;
}
public WizardPage GoNext(WizardPage nextPage)
{
m_pageChain.Add(nextPage);
WizardPage currentPage = this.CurrentPage;
if (this.Count > 1)
{
((WizardPage)(m_pageChain[this.Count-2])).Visible = false;
}
currentPage.Visible = true;
return currentPage;
}
public WizardPage SaveData()
{
WizardPage invalidPage = null;
foreach (WizardPage page in m_pageChain)
{
if (!page.SaveData())
{
invalidPage = page;
break;
}
}
return invalidPage;
}
}
Events, Handlers, and Arguments
To facilitate page/form interaction, I implemented a few custom events. These elements aren't at all remarkable, and are only mentioned here in the interest of completeness. Their names should be reasonably descriptive of their reason for being.
public delegate void WizardPageActivateHandler(object sender, WizardPageActivateArgs e);
public delegate void WizardPageChangeHandler(object sender, WizardPageChangeArgs e);
public delegate void WizardPageCreatedHandler(object sender, WizardPageCreatedArgs e);

public class WizardPageActivateArgs : EventArgs
{
    private WizardPage     m_activePage = null;
    private WizardStepType m_stepType   = WizardStepType.None;

    public WizardPage ActivatedPage
    {
        get { return m_activePage; }
    }
    public WizardStepType StepType
    {
        get { return m_stepType; }
    }

    public WizardPageActivateArgs(WizardPage page, WizardStepType step)
    {
        m_activePage = page;
        m_stepType   = step;
    }
}

public class WizardPageChangeArgs : EventArgs
{
    private WizardPage     m_activePage = null;
    private WizardStepType m_stepType   = WizardStepType.None;

    public WizardStepType StepType
    {
        get { return m_stepType; }
    }
    public WizardPage ActivatedPage
    {
        get { return m_activePage; }
    }

    public WizardPageChangeArgs(WizardPage page, WizardStepType step)
    {
        m_activePage = page;
        m_stepType   = step;
    }
}

public class WizardPageCreatedArgs : EventArgs
{
    private Size m_size;

    public Size Size
    {
        get { return m_size; }
    }

    public WizardPageCreatedArgs(Size size)
    {
        m_size = size;
    }
}
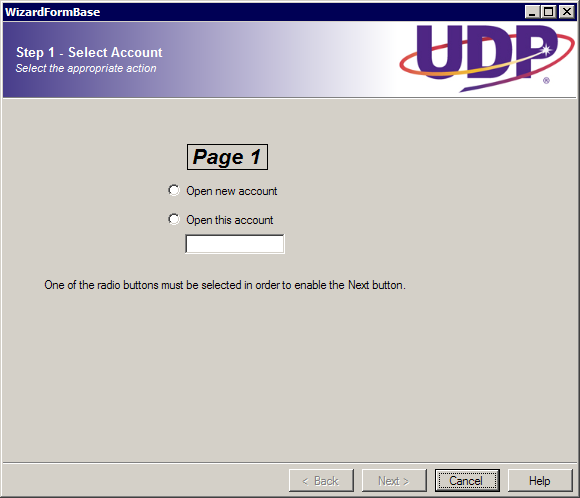
WizardFormBase - The Base Form Class

The form template (seen above) is just wide enough to contain the four buttons on the form. The reason is that the wizard pages will ultimately define the size of the form. As you can see, there are two Panel containers, two separators, and a pair Label controls, as well as the four required wizard buttons. The top panel is docked at the top of the form, and the top separator line is docked under the top panel. The pagePanel container and the lower separator line are anchored to the right, and bottom edges of the form, as are the buttons. The form itself is not re-sizable by the user, but since our form changes size so that it can conform to the largest axis of all of the combined pages, we need to set these anchors. Before we talk about the code itself, lets talk about the top panel container.
The top panel is where we put our eye candy. You have the option of using a solid background, or a gradient, along with an optional image that can be displayed in one of three positions - the left side, the right side, or the center. The position of the image dictates which edge the gradient starts on. Assuming white as the background color, and dark slate blue as the gradient color, here's the way the gradient will be painted.
Notice also that the title/subtitle text automatically positions itself depending on the position of the bitmap. In the event that you use a centered image, the title/subtitle text components aren't painted at all. Finally, the image itself is re-size to fit the height of the panel. In the event that the re-sized bitmap is too long to fit within the width of the form, it will simply be clipped at the edges of the form.
The actual code that comprises the WizardFormBase class is mostly comprised of properties, data members, and methods to show/hide and enable/disable the buttons. The largest single chunk of code deals exclusively with the painting of the top graphic panel and the title/subtitle text for a given wizard page. Those are the two methods we'll talk about first.
To draw the panel itself, we intercept the Paint event. The first thing we do is gather our components around us so they're within easy reach:
private void graphicPanelTop_Paint(object sender, PaintEventArgs e)
{
Graphics g = e.Graphics;
Bitmap image = null;
Rectangle imageRect = new Rectangle(0, 0, 0, 0);
Rectangle panelRect = new Rectangle(0, 0,
this.graphicPanelTop.Width,
this.graphicPanelTop.Height);
Rectangle gradientRect = new Rectangle(0, 0,
panelRect.Width,
panelRect.Height);
Brush gradientBrush = null;
int gradientDirection = 0;
bool needGradient = (this.GraphicPanelGradientColor !=
this.GraphicPanelBackgroundColor);
There is support in the enum for a left or right-positioned graphic panel, but I didn't really need it, so that's where support for that positioning ends. For the eternal tinkerers out there, it would require a completely new/additional method just for painting such a panel, so have at it if you're so inclined. All of this means that I need to put in a sanity check to make sure the programmer didn't use any of the side-oriented positioning for this version of the library. The breadth of the check includes translating the selected position to its appropriate top-oriented equivalent.
switch (this.GraphicPanelImagePosition)
{
case WizardImagePosition.Top :
this.GraphicPanelImagePosition = WizardImagePosition.Right;
break;
case WizardImagePosition.Bottom :
this.GraphicPanelImagePosition = WizardImagePosition.Center;
break;
case WizardImagePosition.Middle :
this.GraphicPanelImagePosition = WizardImagePosition.Left;
break;
}
Next we load the image from the resources, and calculating the image position.
try
{
if (this.GraphicPanelImageResource != "")
{
Assembly assembly = Assembly.GetEntryAssembly();
Stream stream = assembly.GetManifestResourceStream(this.GraphicPanelImageResource);
image = new Bitmap(Bitmap.FromStream(stream));
imageRect.Size = new Size(image.Width, image.Height);
if (imageRect.Size.Height != panelRect.Size.Height)
{
float resizePercent = (float)panelRect.Height / (float)imageRect.Height;
imageRect.Size = new Size((int)((float)imageRect.Width * resizePercent),
panelRect.Height);
}
switch (this.GraphicPanelImagePosition)
{
case WizardImagePosition.Right :
imageRect.Location = new Point(panelRect.Width - imageRect.Width, 0);
break;
case WizardImagePosition.Left :
imageRect.Location = new Point(0, 0);
break;
case WizardImagePosition.Center :
imageRect.Location = new Point((int)(((float)panelRect.Width -
(float)imageRect.Width) * 0.5), 0);
break;
}
}
Next, we calculate our gradient rectangle, and its position. One point to notice is that we start out assuming the gradient rectangle consumes the entire graphic panel. Whether it does or not is based on whether or not the programmer has specified that the image has a transparent background. If it doesn't, the gradient rectangle only consumes the space not intended for use by the image.
bool needOppositeGradient = false;
if (needGradient)
{
switch (this.GraphicPanelImagePosition)
{
case WizardImagePosition.Left :
if (!m_graphicPanelImageIsTransparent)
{
gradientRect.Location = new Point(imageRect.Width-1, 0);
gradientRect.Size = new Size(gradientRect.Width - imageRect.Width,
gradientRect.Height);
gradientDirection = 180;
}
break;
case WizardImagePosition.Right :
if (!m_graphicPanelImageIsTransparent)
{
gradientRect.Location = new Point(0, 0);
gradientRect.Size = new Size(gradientRect.Width - imageRect.Width,
gradientRect.Height);
gradientDirection = 0;
}
break;
case WizardImagePosition.Center :
{
needOppositeGradient = true;
gradientRect.Location = new Point(0, 0);
gradientRect.Size = new Size((int)(((float)gradientRect.Width -
(float)imageRect.Width) * 0.5),
gradientRect.Height);
gradientDirection = 0;
}
break;
}
gradientBrush = new LinearGradientBrush(gradientRect,
GraphicPanelGradientColor,
GraphicPanelBackgroundColor,
gradientDirection);
}
Finally we can start painting. We start with the gradient rectangle, and then lay on the image. This allows us to make a 1-pixel mistake without overwriting the image. (Oh c'mon - we all make mistakes every now and then.) We also need to be prepare to draw the opposite gradient rectangle in the even the image is centered in the panel.
g.Clear(this.GraphicPanelBackgroundColor);
if (needGradient && gradientBrush != null)
{
g.FillRectangle(gradientBrush, gradientRect);
if (needOppositeGradient)
{
gradientBrush.Dispose();
gradientDirection = (gradientDirection == 180) ? 0 : 180;
gradientRect.Location = new Point(gradientRect.Width +
imageRect.Width, 0);
gradientBrush = new LinearGradientBrush(gradientRect,
GraphicPanelGradientColor,
GraphicPanelBackgroundColor,
gradientDirection);
g.FillRectangle(gradientBrush, gradientRect);
}
gradientBrush.Dispose();
}
if (image != null)
{
g.DrawImage(image, imageRect);
image.Dispose();
}
}
catch (Exception ex)
{
throw ex;
}
}
That was a HUGE method. You may be wondering why we didn't paint the title/subtitle in that method. Well, that's because only the wizard pages know when the title/subtitle need to be changed, and when a new page is activated, they call the following method in order to facilitate this.
protected void PaintTitle(string title, string subtitle)
{
if (this.GraphicPanelImagePosition == WizardImagePosition.Center)
{
this.labelTitle.Visible = false;
this.labelSubtitle.Visible = false;
return;
}
else
{
this.labelTitle.Visible = true;
this.labelSubtitle.Visible = true;
}
this.labelTitle.AutoSize = true;
this.labelTitle.Text = m_pageChain.CurrentPage.Title;
this.labelTitle.Font = m_graphicPanelTitleFont;
this.labelTitle.ForeColor = m_graphicPanelTitleColor;
this.labelSubtitle.AutoSize = true;
this.labelSubtitle.Text = m_pageChain.CurrentPage.Subtitle;
this.labelSubtitle.Font = m_graphicPanelSubtitleFont;
this.labelSubtitle.ForeColor= m_graphicPanelSubtitleColor;
if (this.GraphicPanelImagePosition == WizardImagePosition.Left)
{
this.labelTitle.Location = new Point(this.graphicPanelTop.Width - 10 -
this.labelTitle.Size.Width,
this.labelTitle.Location.Y);
this.labelSubtitle.Location = new Point(this.graphicPanelTop.Width - 10 -
this.labelSubtitle.Size.Width,
this.labelSubtitle.Location.Y);
}
Rectangle panelRect = new Rectangle(0, 0,
this.graphicPanelTop.Width,
this.graphicPanelTop.Height);
try
{
using (Graphics g = Graphics.FromHwndInternal(this.Handle))
{
int textHeight = (this.labelTitle.Height + this.labelSubtitle.Height);
int y = (int)(((float)panelRect.Height - (float)textHeight) * 0.5f);
this.labelTitle.Location = new Point(this.labelTitle.Location.X, y);
y += this.labelTitle.Size.Height;
this.labelSubtitle.Location = new Point(this.labelSubtitle.Location.X,
this.labelSubtitle.Location.Y);
this.labelTitle.Invalidate();
this.labelSubtitle.Invalidate();
}
}
catch (Exception ex)
{
throw ex;
}
}
When a wizard page is created, it calls the PageCreated method. This method takes care of adding the page (remember, it's a UserControl) to the pagePanel's child controls list. While we're here, it also sets the hide/show state of all the buttons. This is a form-global setting, but it can be modfieid with the wizard pages if needed. The way I have it figured, when a button is physically hidden from view, it's probably going to be hidden for the life of the form. Finally, the method performs some sanity checks on the page that was created to make sure it's not appearing in the wrong order, and then saves the page as a start page or stop page, if applicable.
public void PageCreated(WizardPage page)
{
m_pageCount++;
pagePanel.Controls.Add(page);
if (ButtonBackHide)
{
page.ButtonStateBack &= ~WizardButtonState.Visible;
}
if (ButtonNextHide)
{
page.ButtonStateNext &= ~WizardButtonState.Visible;
}
if (ButtonCancelHide)
{
page.ButtonStateCancel &= ~WizardButtonState.Visible;
}
if (ButtonHelpHide)
{
page.ButtonStateHelp &= ~WizardButtonState.Visible;
}
switch (page.WizardPageType)
{
case WizardPageType.Start :
{
if (m_startPage != null)
{
throw new Exception("A start page has already been specified.");
}
if (m_stopPage != null)
{
throw new Exception("A start page cannot be specified after a stop page has been specified.");
}
if (this.PageCount > 0)
{
throw new Exception("A start page cannot be specified after other pages have been specified.");
}
m_startPage = page;
}
break;
case WizardPageType.Stop :
{
if (m_stopPage != null)
{
throw new Exception("A stop page has already been specified.");
}
if (m_startPage == null)
{
throw new Exception("A stop page cannot be specified until a start page has been specified.");
}
m_stopPage = page;
}
break;
case WizardPageType.Intermediate :
{
if (m_startPage == null)
{
throw new Exception("Intermediate pages cannot be specified until a start page has been specified.");
}
if (m_stopPage != null)
{
throw new Exception("Intermediate pages cannot be specified after a stop page has been specified.");
}
}
break;
}
}
Another method that's called during wizard page creation is DiscoverPagePanelSize. This method is responsible for tracking the largest necessary page size so that we can make the form large enough to display each page in its entirety.
public void DiscoverPagePanelSize(Size pageSize)
{
    if (pageSize.Width > m_desiredPagePanelSize.Width)
    {
        m_desiredPagePanelSize.Width = pageSize.Width;
    }
    if (pageSize.Height > m_desiredPagePanelSize.Height)
    {
        m_desiredPagePanelSize.Height = pageSize.Height;
    }
}
Finally, we get to the method that kicks everything off. After you've created your pages and configured the wizard form itself, you simply call StartWizard. This method performs some sanity checks to make sure we a) have wizard pages, b) at least one start page, and c) at least one stop page.
public void StartWizard()
{
if (m_pageCount == 0)
{
throw new Exception("There are no pages in the wizard.");
}
if (m_startPage == null)
{
throw new Exception("A start page has not been added to the wizard.");
}
if (m_stopPage == null)
{
throw new Exception("A stop page has not been added to the wizard.");
}
this.Width += (m_desiredPagePanelSize.Width - this.pagePanel.Size.Width);
this.Height += (m_desiredPagePanelSize.Height - this.pagePanel.Size.Height);
m_pageChain.GoNext(m_startPage);
UpdateButtonsState(m_startPage);
}
When the wizard is started, or a new page is activated, we have to update the graphic panel, the visibility and enabled state of the buttons on the wizard form, and the text on the Next button. The following method handles those chores. The button state is maintained as flags so that a single variable can be used to maintain the button's state.
public void UpdateWizardForm(WizardPage page)
{
PaintTitle(page.Title, page.Subtitle);
this.buttonBack.Visible = (page.ButtonStateBack & WizardButtonState.Visible)
== WizardButtonState.Visible;
this.buttonBack.Enabled = (page.ButtonStateBack & WizardButtonState.Enabled)
== WizardButtonState.Enabled;
this.buttonNext.Visible = (page.ButtonStateNext & WizardButtonState.Visible)
== WizardButtonState.Visible;
this.buttonNext.Enabled = (page.ButtonStateNext & WizardButtonState.Enabled)
== WizardButtonState.Enabled;
this.buttonCancel.Visible = (page.ButtonStateCancel & WizardButtonState.Visible)
== WizardButtonState.Visible;
this.buttonCancel.Enabled = (page.ButtonStateCancel & WizardButtonState.Enabled)
== WizardButtonState.Enabled;
this.buttonHelp.Visible = (page.ButtonStateHelp & WizardButtonState.Visible)
== WizardButtonState.Visible;
this.buttonHelp.Enabled = (page.ButtonStateHelp & WizardButtonState.Enabled)
== WizardButtonState.Enabled;
if (page.WizardPageType == WizardPageType.Stop)
{
this.buttonNext.Text = "Finish";
}
else
{
this.buttonNext.Text = "Next >";
}
}
When you get right down to it, the WizardFormBase class is comprised mostly of drawing code to support the graphic panel container, yet it hides a lot of the mechanics of wizard forms from the programmer. I'm not saying that the class allows you to create a wizard in less than three lines of code, but it's reasonably low-impact enough to help keep your mind on the derived wizard pages themselves. Speaking of the wizard pages, that's where we're going next.
WizardPage - The Base Page Class
First, there are three constructor overloads. The first one is the default constructor, and was retained to support the designer in our derived forms - it's not really intended to be used for real pages. The other two overloads provide support for specifying the parent wizard form, and the page type. Both of the "real" constructor overloads call the Init method. This method is responsible for some minor configuration (docking style, initial visibility, and page type), notifying the parent form of its existence, and adding a message handler for the WizardPageChangedEvent event.
private void Init(WizardFormBase parent, WizardPageType pageType)
{
InitializeComponent();
m_parentWizardForm = parent;
this.Visible = false;
this.Dock = DockStyle.Fill;
m_pageType = pageType;
if (WizardPageType == WizardPageType.Start)
{
ButtonStateBack &= ~WizardButtonState.Enabled;
}
m_parentWizardForm.PageCreated(this);
m_parentWizardForm.WizardPageChangeEvent += new WizardPageChangeHandler(parentForm_WizardPageChange);
}
The remaining methods are fairly minor as far as functionality goes. they're included with their associate comments so we can same time and a little space.
public void AddNextPage(WizardPage nextPage)
{
m_nextPages.Add(nextPage);
}
protected void Raise_WizardPageActivated(WizardPageActivateArgs e)
{
WizardPageActivated(this, e);
}
public virtual bool SaveData()
{
return true;
}
public virtual WizardPage GetNextPage()
{
if (m_nextPages.Count == 0)
{
throw new Exception("No pages have been specified as a \"next\" page.");
}
return m_nextPages[0];
}
void parentForm_WizardPageChange(object sender, WizardPageChangeArgs e)
{
}
private void WizardPage_VisibleChanged(object sender, EventArgs e)
{
if (!WizardUtility.IsDesignTime())
{
if (this.Visible)
{
WizardPageActivated(this, new WizardPageActivateArgs(this, m_stepType));
}
}
}
The Sample Application
The sample application is a simple affair that initially presents a form with a single button. Clicking that button will display the wizard form (the reason we're all here).
The WizardExample Form
Before beginning, make sure you've added the WizardFormLib project to your solution, and compiled the solution (don't forget to add a reference to the assembly in your application project). This will "prime the pump" as it were, and the IDE will be able to help us out a little.
To create a wizard form, you need to add a new item to the app. In the templates dialog, you want to select Inherited Form, as shown below:
After you click okay, you'll be prompted to select a base class. The WizardFormBase should be one of your selections. Select it, and click OK. At this point, the IDE will show you the new form. Just go ahead and close that window, and view the code for the new form class. Go ahead and add using WizardFormLib;, and change the base class to WizardFormBase.
Now, create some WizardPage-derived objects. This process is similar to creatingthe wizard form - add a new item to the application project, and select "Inherited UserControl" from the available templates. Don't worry about populating the pages with controls just yet because you need to add some code that will make the pages work. For each one, you need to add some overloaded constructors and an Init function, like so:
public WizardPage1(WizardFormBase parent) : base(parent)
{
InitPage();
}
public WizardPage1(WizardFormBase parent, WizardPageType pageType) : base(parent, pageType)
{
InitPage();
}
public void InitPage()
{
ButtonStateNext &= ~WizardButtonState.Enabled;
InitializeComponent();
base.Size = this.Size;
this.ParentWizardForm.DiscoverPagePanelSize(this.Size);
this.ParentWizardForm.EnableNextButton(false);
}
In our eaxmple app, the first page allows the user to take a different path through the wizard depending on which radio button is clicked. If you need the same functionality, you need to override the following function in your derived class:
public override WizardPage GetNextPage()
{
if (m_nextPages.Count != 2)
{
throw new Exception("Page 1 expects two \"next\" pages to be specified.");
}
if (this.radioButton1.Checked)
{
return m_nextPages[0];
}
else
{
return m_nextPages[1];
}
}
After you've created all of your wizard pages, go ahead and populate the pages with controls. (The pages in the sample app are understandably useless, having the primary purpose of simply providing pages that are of different size.) After you've populated your pages, return to your wizard form code so you can instantiate the pages and start the wizard. Go ahead and add an event handler for the Load event, and make it look something like this:
private void WizardExample_Load(object sender, EventArgs e)
{
this.GraphicPanelImagePosition = WizardImagePosition.Left;
this.GraphicPanelImageResource = "WizardDemo.udplogo.png";
this.GraphicPanelGradientColor = Color.DarkSlateBlue;
this.buttonBack.Click += new System.EventHandler(this.buttonBack_Click);
this.buttonNext.Click += new System.EventHandler(this.buttonNext_Click);
this.buttonCancel.Click += new System.EventHandler(this.buttonCancel_Click);
this.buttonHelp.Click += new System.EventHandler(this.buttonHelp_Click);
page1 = new WizardPage1(this, WizardPageType.Start);
page2a = new WizardPage2a(this);
page2b = new WizardPage2b(this);
page3 = new WizardPage3(this);
page4 = new WizardPage4(this, WizardPageType.Stop);
page1.WizardPageActivated += new WizardPageActivateHandler(WizardPageActivated);
page2a.WizardPageActivated += new WizardPageActivateHandler(WizardPageActivated);
page2b.WizardPageActivated += new WizardPageActivateHandler(WizardPageActivated);
page3.WizardPageActivated += new WizardPageActivateHandler(WizardPageActivated);
page4.WizardPageActivated += new WizardPageActivateHandler(WizardPageActivated);
page1.AddNextPage(page2a);
page1.AddNextPage(page2b);
page2a.AddNextPage(page3);
page2b.AddNextPage(page3);
page3.AddNextPage(page4);
StartWizard();
}
The last thing you have to do is to make the event handlers do something. The sample application doesn't actually have anything to do when WizardPageActivated event is raised (thanks Steven Nichiolas!), but I established a handler for future needs.
void WizardPageActivated(object sender, WizardPageActivateArgs e)
{
}
private void buttonBack_Click(object sender, EventArgs e)
{
WizardPage currentPage = m_pageChain.GoBack();
Raise_WizardPageChangeEvent(new WizardPageChangeArgs(currentPage, WizardStepType.Previous));
}
private void buttonNext_Click(object sender, EventArgs e)
{
if (m_pageChain.CurrentPage.WizardPageType == WizardPageType.Stop)
{
if (m_pageChain.SaveData() == null)
{
this.Close();
}
}
else
{
WizardPage currentPage = m_pageChain.GoNext(m_pageChain.CurrentPage.GetNextPage());
Raise_WizardPageChangeEvent(new WizardPageChangeArgs(currentPage, WizardStepType.Next));
}
}
private void buttonCancel_Click(object sender, EventArgs e)
{
this.Close();
}
private void buttonHelp_Click(object sender, EventArgs e)
{
MessageBox.Show("Not implemented yet.");
}
Niggles and Minutia
In the process of writing this code, I learned some valuable information about WinForms programming.
Designer Issues
When you are deriving from a Form or UserControl class, you have to be very careful about the code you put in your base classes. The reason is that it's very easy to freak the designer out. In my case, I added an event handler for the VisibleChanging event.
Right after I added that event handler, attempting to load one of the derived wizard pages in the designer resulted in a complete IDE crash. It has something to do with the this pointer not being set to the instance of an object. When I ran the code as an application, it was fine, but trying to load it in the designer in the IDE resulted in tragedy.
The solution is to determine whehther or not the code is running in the IDE, and if not, executing the offending code. I found several methods for accomplishing this, but the only thing that worked was the following code. I created a utility class so I could use the code in the future (if necessary).
using System.Diagnostics;
public static bool IsDesignTime()
{
return (Process.GetCurrentProcess().ProcessName.ToLower() == "devenv");
}
Inheritance Not
In order to make use of fairly generic functions without having to worry about types, I pass WizardPage objects around - a lot. It simply makes life easier. Generally speaking, this makes life easier on you, but in this case, the effect was exactly the opposite. In my case, everything was fine until I decided I wanted the form to automatically resize itself based on the largest combine dimensions of all of the wizard pages.
When you inherit from a Form or UserControl, and you refuse to use the derived class type as a reference, I've found that properties in the derived class do NOT overwrite the same properties in the base class. You actually have to transfer the desired properties to the base class so that things happen the way you expect (or, at least the way you'd expect in a C++ application). Of course, this discovery was the direct of result of my apparently unnatural desire to pass around the base class object. I discovered this while trying to dynamically resize the form, and if I was using the actual class type, this wouldn't have been a problem.
The Top Panel Bitmap (Section added on 12/15/2008)
The image used in the top graphic panel must be added as a resource, and must be configured as an EMBEDDED resource. If you don't do this, you'll get an exception and the top panel will contain nothing but a white background with a big red X painted through it.
Common Gotcha's (Section added on 12/15/2008)
If you fail to specify the correct assembly name when you initialize your wizard form, the library will not be able to locate your image resource.
private void WizardExample_Load(object sender, EventArgs e)
{
this.GraphicPanelImagePosition = WizardImagePosition.Left;
this.GraphicPanelImageResource = "WizardDemo.udplogo.png";
this.GraphicPanelGradientColor = Color.DarkSlateBlue;
Addendum (01/20/2009) - WizardFormStartedEvent Event
Some time after posting this article, I decided it might be nice if you could optionally center a given group of controls on the wizard page. I figured that the best way to apporoach this was to create a container control on the page, place your controls inside that container, and then simply center the container. Of course, "simply" never happens when you're on a schedule. Here's how I approached it.
Knowing that the form is automatically made large enough to contain the largest page, I knew that I had to wait until after all of the pages had been added, and then fire an event indicating that the form was ready to go. Fortunately, we already have the StartWizard() method, which is called immediately after addng the pages. All I had to do was create a suitable (empty) EventArgs class, and an event.
In EventArgs.cs:
public delegate void WizardFormStartedHandler(object sender, WizardFormStartedArgs e);

public class WizardFormStartedArgs : EventArgs
{
    public WizardFormStartedArgs()
    {
    }
}
In WizardFormBase.cs
namespace WizardFormLib
{
public partial class WizardFormBase : Form
{
public event WizardFormStartedHandler WizardFormStartedEvent;
public void Raise_WizardFormStartedEvent(WizardFormStartedArgs e)
{
WizardFormStartedEvent(this, e);
}
public void StartWizard()
{
Raise_WizardFormStartedEvent(new WizardFormStartedArgs());
}
}
}
Finally, in any wizard page that you wish to handle the event in, simply add a handler for it. I added a WizardPage5 object to the demo, and put a handler in it:
public partial class WizardPage5 : WizardFormLib.WizardPage
{
public void InitPage()
{
InitializeComponent();
base.Size = this.Size;
this.ParentWizardForm.DiscoverPagePanelSize(this.Size);
this.ParentWizardForm.WizardFormStartedEvent +=
new WizardFormStartedHandler(ParentWizardForm_WizardFormStartedEvent);
}
void ParentWizardForm_WizardFormStartedEvent(object sender, WizardFormStartedArgs e)
{
Size parentPanel = this.ParentWizardForm.PagePanelSize;
int x = (int)((parentPanel.Width - this.groupBox1.Width) * 0.5);
int y = (int)((parentPanel.Height - this.groupBox1.Height) * 0.5);
this.groupBox1.Location = new Point(x, y);
}
}
When the wizard page was designed it looked like this:
When the page is displayed, it looks like this:
If you're going to center controls on a wizard page (like I've done above), they must be enclosed by some kind of container control (a Panel, GroupBox, etc), and you must remember to set the Dock property to None for that container.
As a side note, some of you might be wondering how I can be sure that the centering code will always work. Don't forget - the form is resized to accomodate the largest wizard page that you add to it. Therefore, the centering code I've demonstrated above will always work.
In Closing
Like I said, this may not be the most innovative piece of work, but the point is that it *does* work. If you spot something that looks sideways, let me know and if I deem it within the context of the article, I'll update it at my earliest convenience.
Cautionary Note: It is virtually impossible to write an article for CodeProject when Top Gear is on television. :)
History
- 06/24/2010: Fixed a couple of phraseology issues.
- 02/17/2009: Added a "Start" button that allows the user to go all the way back to the first wizard page with one mouse click, fixed a bug that prevented the Help button from being displayed, and streamlined some of the code.
- 01/21/2009: Added functionality to allow the programmer to center a container control within the wizard page. See article addendum for more info.
- 01/17/2009: Implemented bug fix described by Liesbet. Many thanks!
- 12/18/2008: Implemented recommendation by Steven Nicholas regarding setting the state of the wizard form buttons (I did it a little different than he described, but the general idea is the same). Thanks Steven!.
- 12/15/2008: Fixed a couple of spelling errors and descriptive text errors.
- 12/14/2008: Original article posted.
I've been paid as a programmer since 1982 with experience in Pascal, and C++ (both self-taught), and began writing Windows programs in 1991 using Visual C++ and MFC. In the 2nd half of 2007, I started writing C# Windows Forms and ASP.Net applications, and have since done WPF, Silverlight, WCF, web services, and Windows services.
My weakest point is that my moments of clarity are too brief to hold a meaningful conversation that requires more than 30 seconds to complete. Thankfully, grunts of agreement are all that is required to conduct most discussions without committing to any particular belief system.


 General
  News
News  Suggestion
  Question
  Bug
Bug  Answer
  Joke
Joke  Praise
  Rant
Rant  Admin
Admin 


 . I think I sometimes just make things difficult for myself...