Introduction
InteractiveToolTip is an extension to the balloon-style WinForms ToolTip which supports the use of a caller-supplied Control to render its contents and provide user-interaction.

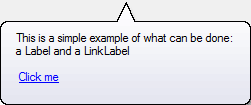
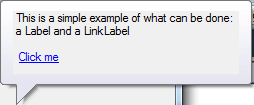
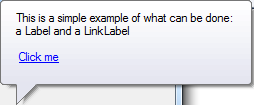
An example InteractiveToolTip. The icon, text and link-label are all separate WinForms Controls.
A few months ago I was working on a code-analysis tool for a project. The tool had the ability to detect a wide range of issues with the code under analysis, and as many of these problems could be corrected automatically I started looking at a suitable user-interface for presenting the information to the user and allowing them to choose whether to apply the automated fixes. After trying a few ideas out, I hit on the idea of using a balloon-style tooltip which could be displayed adjacent to the piece of code with a problem. This took care of the presentation, but of course you can't put controls into WinForms tooltips... I hit Google thinking that I couldn't possibly be the only person out there with this problem. I wasn't, but I also couldn't find any solutions, just a lot of people asking how to do it. Undeterred, I started to research how tooltips work.
My immediate requirement was to be able to display some text in the balloon (the problem description) and optionally one or more LinkLabels (for the user to apply fixes for the problem), but it seemed that the best solution would be to allow any arbitrary Control to be placed in the tooltip, as this would give me complete control over its appearance (one other limitation of the balloon-style tooltip is that it doesn't support OwnerDraw, so I would find it hard to format the text the way I wanted).
This article presents my solution and the techniques I used to achieve it.
Using the code
With the code added to your project (or the supplied DLL added as a reference), InteractiveToolTip should show up in the Forms Designer toolbox, from where it can be added to your Form in the same way as a regular ToolTip. It provides a Show() / Hide() API, but does not currently support SetToolTip().
To display an InteractiveToolTip for a Control call one of the Show() methods, passing the Control to be used as the tooltip's content and the UI window (typically a Control) with which the tooltip is to be associated:
public void Show(Control content, IWin32Window window);
public void Show(Control content, IWin32Window window, StemPosition stemPosition);
public void Show(Control content, IWin32Window window, Point location);
public void Show(Control content, IWin32Window window, int x, int y);
public void Show(Control content, IWin32Window window, Point location, StemPosition stemPosition, int duration);
public void Show(Control content, IWin32Window window, int x, int y, StemPosition stemPosition, int duration);
To remove the tooltip, call its
Hide() method. An instance of
InteractiveToolTip can only display one tooltip at a time; calling
Show() whilst one is already open will close that one before opening the new one.
The tooltip's location relative to the origin of
window may be specified by passing either
location or
x and
y; this controls where the tip of the ballon's stem will appear. The position of the stem on the balloon may be specified by passing one of the
InteractiveToolTip.StemPosition values:
TopLeft,
TopCentre,
TopRight,
BottomLeft,
BottomCentre,
BottomRight. Note that if the specified location or position would result in the balloon appearing off-screen then they may be adjusted when the balloon is shown.
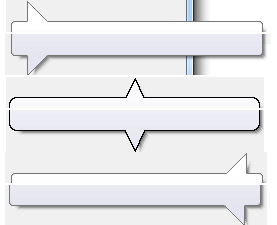
Balloon-stem positions.
If the duration parameter is non-zero then the balloon will be removed automatically after the specfied time (in milliseconds) has elapsed; otherwise it will remain on-screen until explicitly closed by a call to Show() or Hide(), or the InteractiveToolTip is disposed.
Two events are provided: ToolTipShown and ToolTipHidden. Each uses an InteractiveToolTipEventArgs as its event-data; this contains a reference to the window of the current tooltip. Finally, InteractiveToolTip provides the UseAnimation and UseFading properties, which are analgous to those on ToolTip.
ToolTip Content
The content of an InteractiveToolTip can be any subclass of System.Windows.Forms.Control. After passing it to Show(), the caller may not modify or dispose of the Control until it has been released again by either calling Show() with a different content Control, or by calling Hide(). When Show() is called, InteractiveToolTip will add the supplied Control to a private container Control, so it may not already have a Parent.
The caller is free to handle any events coming from the Control; InteractiveToolTip takes no interest in these. It is recommended that the Control's BackColor be set to System.Drawing.Color.Transparent in order for the tooltip's background to show through.
How it works
There were a number of problems to solve: tooltips aren't themselves Controls, so you can't just add your own to them; they do their own sizing and layout, so you can't specify dimensions; balloon-style tooltips don't allow you to specify where you want the stem to appear; and of course some of the more interesting and useful APIs aren't exposed in the .NET libraries yet.
The Win32 APIs are used to manage the tooltip window. First, create its Handle:
CreateParams createParams = new CreateParams();
createParams.ClassName = Win32.TOOLTIPS_CLASS;
createParams.Style = Win32.TTS_ALWAYSTIP | Win32.TTS_BALLOON;
CreateHandle(createParams);
Now we work out its dimensions. We have a
Control that we want to display, so we need to set the tooltip window to be large enough to accomodate both the
Control and the balloon's own borders and stem. This is a little awkward, since the tooltip does not allow us to set its size in pixels. We can, however, fake it by setting the tooltip's content to be a string of whitespace which when rendered will have approximately the same size as the
Control, and we generate such a string like this:
private string GetSizingText(Control content)
{
StringBuilder sb = new StringBuilder();
Graphics graphics = Graphics.FromHwnd(Handle);
Font font = Font.FromHfont((IntPtr)Win32.SendMessage(Handle, Win32.WM_GETFONT, 0, 0));
font = new Font(font.FontFamily, 1.0f);
Win32.SendMessage(Handle, Win32.WM_SETFONT, (int)font.ToHfont(), 1);
Size size = TextRenderer.MeasureText(" ", font);
int rows = (content.Height + size.Height - 1) / size.Height;
for (int n = 0; n < rows; n++)
{
sb.Append("\r\n");
}
size = TextRenderer.MeasureText(sb.ToString(), font);
int width = content.Width + size.Height - content.Height;
while (size.Width < width)
{
sb.Append(" ");
size = TextRenderer.MeasureText(sb.ToString(), font);
}
return sb.ToString();
}
This string can then be passed to the tooltip when we create it a little later. The next thing we want to do is determine where the balloon's stem is going:
string contentSpacing = GetSizingText(content);
Rectangle toolTipBounds = CalculateToolTipLocation(contentSpacing, Window, x, y, stemPosition);
Screen currentScreen = Screen.FromHandle(Window.Handle);
Rectangle screenBounds = currentScreen.WorkingArea;
stemPosition = AdjustStemPosition(stemPosition, ref toolTipBounds, ref screenBounds);
toolTipBounds = CalculateToolTipLocation(contentSpacing, Window, x, y, stemPosition);
toolTipBounds.X = Math.Max(0, toolTipBounds.X);
toolTipBounds.Y = Math.Max(0, toolTipBounds.Y);
AdjustStemPosition() takes the value passed by the caller,
stemPosition and checks that this is actually possible - if it would result in the tooltip being positioned partly or entirely off the visible screen area, the value may be changed and the tooltip repositioned.
CalculateToolTipLocation() works out the coordinates of the top-left corner of the balloon ready for display, based on the caller-supplied position (which is relative to the associated
Window) and the final stem-position.
We can now create the tooltip window and start setting it up:
Win32.TOOLINFO ti = new Win32.TOOLINFO();
ti.cbSize = Marshal.SizeOf(ti);
ti.uFlags = Win32.TTF_IDISHWND | Win32.TTF_TRACK | Win32.TTF_TRANSPARENT;
ti.uId = window.Handle;
ti.hwnd = window.Handle;
ti.lpszText = contentSpacing;
if (StemPosition.BottomCentre == stemPosition || StemPosition.TopCentre == stemPosition)
ti.uFlags |= Win32.TTF_CENTERTIP;
if (0 == Win32.SendMessage(Handle, Win32.TTM_ADDTOOL, 0, ref ti))
throw new Exception();
Win32.SendMessage(Handle, Win32.TTM_SETMAXTIPWIDTH, 0, SystemInformation.MaxWindowTrackSize.Width);
Now, this isn't quite enough to get the result we're after: the tooltip API only allows us to specify that the stem should be centered or not-centered. It doesn't let us specify left, right, top or bottom. So how do we do it? We cheat! Handily, Windows also does some repositioning and reformatting of the tooltip to prevent it from going off the visible screen, and even more handily it only does these calculations when the tooltip is first shown - if you reposition the tooltip whilst it is visible, its layout remains unchanged.
The default behaviour is for the stem to appear at the top-left corner of the balloon:

Setting TTF_CENTERTIP moves it to top-centre:
But if you place the tooltip too close to the bottom edge of the screen then Windows helpfully moves the stem to the bottom edge of the balloon:
Similarly if you place it too close to the right edge of the screen then the stem moves to the right edge of the balloon:
So by setting a suitable initial position for the tooltip we can force Windows into putting the stem where we want it:
int initialX = screenBounds.X;
int initialY = screenBounds.Y;
if (StemPosition.TopLeft == stemPosition || StemPosition.BottomLeft == stemPosition)
initialX += StemInset;
else if (StemPosition.TopCentre == stemPosition || StemPosition.BottomCentre == stemPosition)
initialX += screenBounds.Width / 2;
else
initialX += screenBounds.Width - StemInset;
if (StemPosition.BottomLeft == stemPosition || StemPosition.BottomCentre == stemPosition || StemPosition.BottomRight == stemPosition)
initialY += screenBounds.Height;
Win32.SendMessage(Handle, Win32.TTM_TRACKPOSITION, 0, (initialY << 16) | initialX);
Finally, we show the tooltip...
Win32.SendMessage(Handle, Win32.TTM_TRACKACTIVATE, 1, ref _toolInfo);
...and move it to where the caller wants it:
Win32.SetWindowPos(Handle, Win32.HWND_TOPMOST, toolTipBounds.X, toolTipBounds.Y, 0, 0, Win32.SWP_NOACTIVATE | Win32.SWP_NOSIZE | Win32.SWP_NOOWNERZORDER);
So far so good. We now have a balloon tooltip with position, layout and dimensions of our choosing. But we still don't have any content. The simplest way to attach our
Control is this:
Win32.SetParent(Control.Handle, Handle);
Handle is the
HWND of the tooltip window. This does work, but it's not really satisfactory - for one thing, the transparent
BackColor of the
Control doesn't work and the
Control is grey:
This happens because BackColor is an ambient property and the Control doesn't have a 'real' Parent yet. So we need to insert another Control between the content Control and the tooltip Window. InteractiveToolTip provides this in the form of a private class:
private class ContentPanel : UserControl
{
    private IntPtr _toolTipHwnd;

    public ContentPanel(IntPtr toolTipHWnd)
    {
        _toolTipHwnd = toolTipHWnd;
        Win32.SetParent(Handle, toolTipHWnd);
    }
}
It attaches itself by calling
Win32.SetParent() as before, and the content
Control is added to it in the usual way. Of course, this just means that the content
Control will pick up the
BackColor from the
ContentPanel...which is still grey, so we're no better off yet. There's also another problem: by adding the
Control to the tooltip
Window, we're trashing the tooltip's own background:

So ContentPanel implements a paint method:
protected override void OnPaintBackground(PaintEventArgs e)
{
Win32.SendMessage(_toolTipHwnd, Win32.WM_PRINTCLIENT, (int)e.Graphics.GetHdc(), 0);
}
This simply calls the tooltip window and has it paint itself into the
ContentPanel. Voila - we have a fully-rendered balloon tooltip background - and because it's being rendered in the context of a
Control, ambient properties work with it and the content
Control gets its transparent background:
And finally...
So there we have it. It was an interesting problem to solve, and hopefully I've managed to do it without breaking any rules or relying on undocumented behaviour. It's only been tested on Windows 7 to date, although I can't see any reason why it shouldn't work on at least Windows 8, Vista or XP. The DLL requires .NET 2.0 or better.
If you find it useful, please let me know!
History
- 1.0 2013-01-17 Initial release
I've been playing with computers and writing software for around 25 years now, 15 of them in a professional capacity. I've worked in assembly language, C, Java, C++, Pascal and C#, and on systems ranging from embedded microcontrollers to distributed database systems, mobile phones to 3D CAD. I do it because I like to solve problems, but mainly I do it because it's fun!


 General
  News
News  Suggestion
  Question
  Bug
Bug  Answer
  Joke
Joke  Praise
  Rant
Rant  Admin
Admin 


