Table of content
- Introduction
- Background
- Using the code
- MVC Project structure
- Model
- View
- Controller
- JQuery
- Creating your first MVC application
- List/index page
- Details page
- Edit page
- Create page
- Delete functionality
- Search
- Validation
- Conclusion
Introduction
In this article you can find a simplest way to create your first ASP.NET MVC application. This is a tutorial for absolute beginners to ASP.NET MVC. Only prerequisite for following this tutorial is that you know how to use Visual Studio, and to understand HTML and C# syntax. Also, I will show you briefly how you can use some JQuery plug-ins so it would be helpful if you if you know some JQuery syntax. If you are not familiar with JQuery it is not a problem you can just skip that parts because they are optional enhancements.
Background
What is MVC (Model-View-Controller)? MVC is a simple architecture where all components are separated into three classes:
- Model - classes that contain data that will be shown to the user.
- View - components that will display model to the user.
- Controller - components that will handle any interaction with user.
In the web framework, user will enter some URL to the ASP.NET MVC application, and controller, model, and view will handle this request and return HTML back to the user. Interaction between browser and server that has model, view and controller components is shown in the following figure:
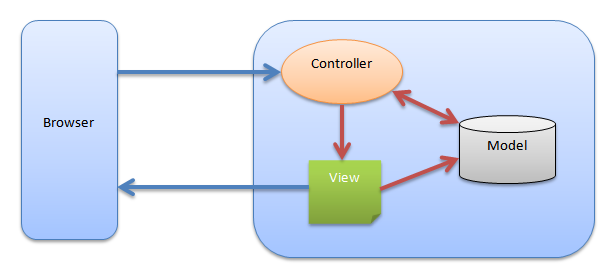
This simple scenario of processing MVC request is described in the following steps:
- User enters in the browser some URL that is sent to the server e.g. http://localhost/Product/List.
- User request is analyzed by the framework in order to determine what controller should be called.
- Controller takes the parameters that user has sent, calls model to fetch some data, and load model object that should be displayed.
- Controller pass model object to the view.
- View gets data from the model, puts them into the HTML template, and sends response back to the user browser.
- Browser shows HTML that is received from the server.
In this example I will show how you can create a simple application that allows you list and manage user details using ASP.NET MVC.
Using the code
To start with this code you will need to have Visual Studio or at least Web Developer. If you do not have it, you can install it from the ASP.NET MVC site. There you can find all necessary prerequisites for installing MVC framework.
When you instal Web Developer, creating MVC application is easy. Just go to File/New Project, select ASP.NET MVC Web Application and wizard will walk you through the setup process.

Here you should put a name of your project and determine where it will be placed. You can use default settings if you want. In the following sections will be explained structure and elements of the created MVC project.
MVC Project structure
When you create your MVC web application it will be organized in the following folders:
- Model containing your model classes
- Controller where are placed classes named as <CONTROLLER-NAME>Controller. These classes contains action method that will be called when Http request is sent.
- Views - in this folder are placed template files that will be used to generate HTML as a response. Views are partitioned in the subfolders. Each controller has its own subfolder named the same way as controller where controller's views are placed.
- CSS files and images will be placed in the Content folder
- JavaScript files will be placed in the Scripts folders
Example of that kind of structure is shown in the following figure:
In this figure you can see all components described above. We have two controllers User and School and their views in the /Views/School and /Views/User folders. Views that are placed in the /Views/Shared folder are shared among all controllers and views. Note that views have a .cshtml file extension. This means that they are using so called Razor syntax for view templates (this syntax is used in this tutorial).
Model
Model can be any class that defines data structure that will be shown to the user. It can be plain C# class, Entity Framework model generated from database, even a DataSet (although it is not recommended to use it in MVC). In this example I will use a plain list of objects as a simulation of data repository. Examples in this article will display a table of users from the list, show/edit details of one user object from the list, and enable you to add/delete users from the list. Model class used in the application is shown in the following listing:
public partial class User
{
    public int UserID { get; set; }
    public string Name { get; set; }
    public string Address { get; set; }
    public string Town { get; set; }
    public string County { get; set; }
    public string Country { get; set; }
    public string Email { get; set; }
    public DateTime DoB { get; set; }
    public bool IsActive { get; set; }
    public string UserName { get; set; }
    public string Password { get; set; }
    public int Rating { get; set; }
}
In this example will not be used some persistent data storage (e.g. database). I will put User object in the plain list and application will use to shown user data. Example of that kind of "repository" is shown in the following example:
public class UserRepository
{
        public static List<User> Users = new List<User>();
}
Although I will not explain any advanced data access technique, I will use some simple LINQ queries to find user data from the list. In the following listing is shown LINQ queries that find users:
var user = userList.First(x => x.UserID == id);
var bestUsers = userList.Where(x => x.Rating > 8);
The first line of code finds the first object in the user list that has property UserID equal to id variable (i.e. finds an user by id). The second line finds all user with rating greater than 8.
The form parameter => expression is inline function(lambda expression) that is used to define criterion for finding users from the list. It is just shorter version for the inline function that would look like:
function(parameter){ return expression; } You can find more information about LINQ queries in the Using LINQ Queries article.
View
View is a plain file that defines a template that will be used to show model data. In the simplest scenario you can imagine view as a plain HTML code where are placed positions where you will inject model properties. Example of that kind of view is shown in the following listing:
<fieldset>
    <legend>User</legend>
    <div class="display-label">Name</div>
    <div class="display-field">@Model.Name</div>
    <div class="display-label">Address</div>
    <div class="display-field">@Model.Address</div>
</fieldset>
In this view is defined HTML structure that will be shown to the user, and the places where the model data will be placed. In the example will be injected model Name and Address properties into the HTML code. Syntax @Model.<<PropertyName>> defines place where model property will be placed in the view.
How to add a new View? In the folder structure above, you can see Views folder and subfolders called User, School, Shared etc. Just right-click on the folder where you want to put the view, go to Add New View, and following dialog will be shown to you:
Here you can enter name of the view (usually it is same as a name of the controller action), type of model object that will be shown. Also, you can add an empty view and start coding it, or you can select some of the predefined templates for list, details, edit, create, or delete.
You can imagine views as a separate pages that will be shown to the user. However, there are few other types of views(described below).
Layout page
When you are creating set of pages, probably you will need to use the same elements on many pages. As an example, all pages will have a same menu, same CSS/JavaScript files included etc. In ASP.NET MVC you do not need to copy the same elements on each page. You can use so-called layout page where a general layout of entire MVC application will be defined and used on each view page. Example of Layout page that will be used in this project is shown in the following listing:
<!DOCTYPE html>
<html>
<head>
    <meta charset="utf-8" />
    <title>This is a title of the page</title>
    <link href="/Content/Site.css" rel="stylesheet" type="text/css" />
    <script src="/Scripts/jquery-1.5.1.min.js" type="text/javascript"></script>
    <script src="/Scripts/modernizr-1.7.min.js" type="text/javascript"></script>
    @RenderSection("PageScripts",false)
</head>

<body>
    @RenderBody()
</body>
</html>
As you can see in the Layout page I have included all necessary CSS/JavaScript files that will be used across all pages. Also, I have defined two custom placeholders where each view will put specific content. These two placeholders are:
- Section PageScripts - where each page will be able to put some JavaScript or CSS files that will be required only on that page.
- RenderBody statement that defines where content of the particular view will be injected in the general layout.
Partial views
Another way to organize and reuse your view code is to put elements that are used on several views into the separate files. These are not standalone views that are shown to the user - these are only partial views that are included on the other main view pages.
Partial views are same HTML templates as regular views. Example of one partial view that shows current date is shown in the following listing:
_CurrentDateView.cshtml
<div class="now">Current date is @DateTime.Now.ToString()</div>
Whenever you need to include this partial view, you can just call it by name as it is shown in the following example:
@Html.Partial("_CurrentDateView")
In the place of the call, entire content of the view will be included.You can put this statement in standard views, layout pages, and even in the other partial views.
Controller
Controller is a hart of processing logic in the MVC model. When URL is sent to the internet application in the format /<<Controller>>/<<Action>>/<<Parameter>> (e.g. /User/Details/1) it will be parsed and class that is called <<Controller>>Controlle<code>r (e.g. UserController) will be found, method <<Action>> that in that controller will be called (e.g. method Details in the above URL) and parameter will be passed to that method.
Controller will perform all necessary processing - it will find a model and pass it to the view.
Controller can have any public method with arbitrary parameters that will be passed. As an example, in the following listing is shown controller called ExampleController with one method ControllerAction that receives three parameters - id, name, and flag.
public ExampleController{
        public ActionResult ControllerAction(int id, string name, bool flag)
        {
            var model = GetModel(id, name, flag);
            return View(model);
        }
}
You can call this controller's action using the following URL:
/Example/ControllerAction?id=17&name=test&flag=true
This is default mapping between URL routes and controller/actions where first word in the URL represents a controller name, and the second one is action method name. However, you can modify it and add your own routing mapping rules. You can see more details about the custom routing in the creating custom routes article.
Controller will automatically map parameters from the request to the method arguments by name. This is useful if you have a form with many parameters that can be automatically read from the request and user in the action method body.
How you can add a new controller? It is similar to the adding new views - go to Controller folder, right-click, and add a new controller. Following dialog will be shown:
Here you can enter name of the controller - note that it must be in the format <<Name>>Controller. Also, you can choose one of the predefined templates - empty controller, controller with list, details, edit, create, and delete actions, and controller that is already connected to database via Entity framework. In this example I have started with an empty controller. Once you create an empty controller you can add action methods in the following format:
public MyController{
        [Get]
        public ActionResult MyAction()
        {
            return View();
        }
}
Action method should return view that will display HTML in the browser (ActionResult type in the example above). By default if you add MyAction method in the MyController class it will be called when /My/MyAction URL is sent. You can change this behavior, but it will not be described in this beginner level article. Also you might notice [Get] attribute that is placed before method. This attribute tells action that it should react only on GET Http protocol. As an alternative, I could set [Post] instead of [Get] or I could leave it blank so action would be opened on both GET and POST protocols.
Also, you have noticed that the last statement in the action is return View(). If an action MyAction is placed in the MyController, this statement will find MyAction.cshtml view in the My folder in the views section. This is default rule for returning views in action methods.If you do not want to use this default view you can choose what view should be returned by specifying view name e.g.
return View(name);
Note that you have easy way to go to view, or to add view for some particular action. Just right click on the action and you will see context menu that will enable you to a add view for this action. Add View action will open the same "Add View" dialog as in the previous section. If view with the same name as an action already exists, "Go to view" will open view page.
JQuery
Although it is not direct part of the MVC, JQuery is very useful JavaScript library that can enable you to enhance your user interface. First useful thing you will be able to do is to easily find HTML elements in the HTML. Some of the simplest queries are shown in the following table:
| JQuery selector | Description |
| $("table") | Find all table nodes in the HTML |
| $("#Name") | Find element in the HTML with id Name |
| $(".required") | Find all elements in the HTML that have CSS class "required" |
| $("table a.delete") | In any table, find all A tags that have CSS class "delete" |
| $("table tr:odd") | Find all odd rows in the table |
Once you find elements with JQuery selectors, you can hide them, change their color, attributes (classes, values, inner text), add some event handlers to them (click, double click), etc.
Also, JQuery contains a set of useful plugins that enable you to enhance your UI elements. Some examples are shown in the following table:
| Plugin | Description |
| $("input.calendar").datepicker() | Add date picker(calendar) dialog on each input element that has CSS class "calendar" |
| $("form").validate() | Add JavaScript validation on the form |
| $("table").dataTable() | Add JavaScript sorting, pagination and filtering in the table |
You can fine more details and tutorials about the JQuery on the JQuery documentation site. This is optional, but very easy and useful to add in the MVC application. Note that when you create MVC application, JQuery will be automatically included in the project. However, plugins are not part of core JQuery that is included in the MVC project so you will need to find them and put them in your project manually.
How can you use this JavaScript code? First you will need to include JQuery libraru from the JQuery download page. In your MVC project you will probably find this library included in scripts folder so you can just add a reference to this script in the layout page. Then you wil be able to use these library - one example is shown in the following listing:
<script src="/Scripts/jquery-1.7.1.min.js" type="text/javascript"></script>
    <script type="text/javascript">
        $(document).ready(function () {
            $("table").fadeOut("slow");
        }
    </script>
In this example I have included JQuery version 1.7.1. and added fade out effect on the table element. Note that this statement is placed in the document ready wrapper. Using this wrapper, any JavaScript code within it will be called when entire document is loaded and reayd to be processed. This is common practice in the JQuery programming. Here I have added JQuery code as an inline script, but you can put it into the separate file.
Creating your first MVC application
In this section I will show how you can create a simple MVC application that list, edit, create and delete users.
List/Index page
On the list page will be displayed a table with a list of users in the repository. Page will be opened when /User/Index URL is called. Therefore, we would need to create Index method and place it in the UserController class. Example of Index method is shown in the following listing:
        public ActionResult Index()
        {
            var model = UserRepository.Users;
            return View(model);
        }
This method is fairly simple. It takes a list of users from the repository and pass it to the view. List view takes this list and display a table as it is shown in the following listing:
<table class="display">
    <thead>
    <tr>
        <th>
            Name
        </th>
        <th>
            Address
        </th>
        <th>
            Town
        </th>
        <th>
            County
        </th>
        <th>
            Rating
        </th>
        <th></th>
    </tr>
    </thead>
    <tbody>

@foreach (var item in Model) {
    <tr>
        <td>
            @item.Name
        </td>
        <td>
            @item.Address
        </td>
        <td>
            @item.Town
        </td>
        <td>
            @item.County
        </td>
        <td>
            @item.Rating
        </td>
        <td>
            <a href="/User/Details/@item.UserID">Details</a> |
            <a href="/User/Edit/@item.UserID">Edit</a> |
            <a href="/User/Delete/@item.UserID" class="delete">Delete</a>
        </td>
    </tr>
}
</tbody>
</table>
As you can see, this list view has taken a collection of user objects and output them as HTML table in the for each loop. Note that you do not need to create HTML wrapper with head and body tags. These are defined in the layout page, and this part of HTML code is just injected in the middle of the page (RenderBody statement in the layout page above). Example of the list page is shown on the following figure:
Applying JQuery DataTables plugin
The table you have saw is just a plain table without any functionality. However you can easily enhance this table with JQuery JavaScript library to add some advanced features such as sorting, pagination, filtering etc.
In the layout page you have saw that I have put PageScripts placeholder that allow each view to put some custom JavaScript or CSS. In this example only on the list page, I will add some JavaScript that will enhance this table. Example of this additional script is shown in the following listing:
@section PageScripts{
    <link href="/Content/dataTable/demo_table.css" rel="stylesheet" type="text/css" />
    <script src="/Scripts/jquery.dataTables.1.8.2.js" type="text/javascript"></script>
    <script type="text/javascript">
        $(document).ready(function () {
            $("table").dataTable();
        }
    </script>
}
This script has included JQuery DataTables CSS and JavaScript files, and applied datatables function on the HTML table. As an result, you will convert this plain table to feature-rich table shown on the following figure:
I will not explain how this JQuery plugin can be used in more details, but if you are interested in, you can take a look at the Enhancing HTML tables using the jQuery DataTables plug-in article.
Details page
On the details page will be shown information of some particular user by id. Request that is sent to the server-side is in the following format:
/User/Details/123
In this request, you can see that UserController will be called, and that Details method with parameter 123 will be executed. 123 is an id of the record that will be shown.
Details method will take the id of the user, find this user in the model repository and pass it to the view:
public ActionResult Details(int id)
{
    var model = UserRepository.Users.First(user => user.UserID == id);
    return View(model);
}
View is also simple - it receives User model object and inject user properties into the view. Part of view is shown in the following listing:
@model JQueryMVC.Models.User

<h2>User Details</h2>
<fieldset>
    <legend>User</legend>
    <div class="display-label">Name</div>
    <div class="display-field">
        @Model.Name
    </div>
    <div class="display-label">Address</div>
    <div class="display-field">
        @Model.Address
    </div>
    <div class="display-label">Town</div>
    <div class="display-field">
        @Model.Town
    </div>
    <div class="display-label">County</div>
    <div class="display-field">
        @Model.County
    </div>
</fieldset>
You can notice that most of the page is a plain HTML - we have only placed model properties in some parts of HTML code. As an result, the following user details page will be shown:
Note that in the listing above I have placed just a part of the view. You can find complete listing in the attached source code.
Edit page
Edit page is very similar to the details page. Controller will receive the same parameter (id), find object with that id, and pass it to the view.
public ActionResult Edit(int id)
{
    var model = UserRepository.Users.First(user => user.UserID == id);
    return View(model);
}
The view is similar to the details view except that instead of the DIV element for displaying plain labels, here we are using HTML input element. In the following listing is shown part of the edit view:
<form method="post" action="/User/Edit/@Model.UserID">

    @Html.ValidationSummary(true)
    <fieldset>
        <legend>User</legend>
        <input type="hidden" name="UserID" id="UserID" value="@Model.UserID" />
        <div class="editor-label">
            <label for="Name">Name</label>
        </div>
        <div class="editor-field">
            <input type="text" name="Name" id="Name" value="@Model.Name" />
            @Html.ValidationMessageFor(model => model.Name)
        </div>

        <div class="editor-label">
            <label for="Email">Email</label>
        </div>
        <div class="editor-field">
            <input type="text" name="Email" id="Email" value="@Model.Email" />
            @Html.ValidationMessageFor(model => model.Email)
        </div>
        <div class="editor-label">
            <label for="DoB">Date of birth</label>
        </div>
        <div class="editor-field">
            <input type="text" name="DoB" id="DoB" value="@Model.DoB" class="calendar"/>
            @Html.ValidationMessageFor(model => model.DoB)
        </div>
        <div class="editor-label">
            <label for="IsActive">Is Active</label>
        </div>
        <div class="editor-field">
            <input type="checkbox" name="IsActive" id="IsActive" value="@Model.IsActive" />
            @Html.ValidationMessageFor(model => model.IsActive)
        </div>
        <div class="editor-label">
            <label for="UserName">User name</label>
        </div>
        <div class="editor-field">
            <input type="text" name="UserName" id="UserName" value="@Model.UserName" />
            @Html.ValidationMessageFor(model => model.UserName)
        </div>
        <div class="editor-label">
            <label for="Password">Password</label>
        </div>
        <div class="editor-field">
            <input type="password" name="Password" id="Password" value="@Model.Password" />
            @Html.ValidationMessageFor(model => model.Password)
        </div>
        <p>
            <input type="submit" value="Save" />
        </p>
    </fieldset>
</form>
There are also few validation element placed after inputs - these will be described later. Look of the edit page is shown in the following figure:
We have saw the action that read user from the list and pass it to the view, but we would also need an action that will handle update requests that is sent when someone updates user data. Action that handles POST request is shown in the following listing:
[HttpPost]
public ActionResult Edit(int id, FormCollection collection)
{
    var model = UserRepository.Users.First(user => user.UserID == id);
    try
    {
        UpdateModel(model);
        return RedirectToAction("Index");
    }
    catch
    {
        return View(model);
    }
}
This action takes the id of the user that is currently been edited, and user parameters that are entered in the HTML form via form collection. Then, it finds user by id and updates it. If everything is fine Index view will be shown, otherwise if some error occurs the same view will be shown again.
Adding JQuery Datepicker
In this example, date of birth (DoB property) is entered as a plain text. Instead of the plain text input, I will attach JQuery datepicker to this field, so user can select date from the calendar popup. In order to integrate JQuery datepicker I will put the following custom script in the edit view:
 @section PageScripts{
    <link href="/Content/themes/base/jquery.ui.all.css" rel="stylesheet" type="text/css" />
    <script src="/Scripts/jquery-ui-1.8.11.js" type="text/javascript"></script>
    <script type="text/javascript">
        $(document).ready(function () {
            $("input#DoB").datepicker();
        });
    </script>
}
This custom script will include all necessary JavaScripts and CSS files(JQuery UI), and put Datepicker on the input element with an id DoB. As an result the following calendar will be opened each time date of birth is edited:
This is another example how you can with few lines of code enhance your user interface.
Create functionality
When new users should be created, a blank form similar to the edit form should be shown. Url of the create form will be:
/User/Create
As this form do not contains any data, Create action of controller is very simple:
public ActionResult Create()
{
return View();
}
This action does nothing useful - when /User/Create page is called it just returns empty view. Part of the view of the create page is shown in the following listing:
<form action="/User/Create" method="post">
    @Html.ValidationSummary(true)
    <fieldset>
        <legend>User</legend>
        <div class="editor-label">
            @Html.LabelFor(model => model.Name)
        </div>
        <div class="editor-field">
            @Html.EditorFor(model => model.Name)
            @Html.ValidationMessageFor(model => model.Name)
        </div>

        <div class="editor-label">
            @Html.LabelFor(model => model.IsActive)
        </div>
        <div class="editor-field">
            @Html.EditorFor(model => model.IsActive)
            @Html.ValidationMessageFor(model => model.IsActive)
        </div>

        <div class="editor-label">
            @Html.LabelFor(model => model.Password)
        </div>
        <div class="editor-field">
            @Html.EditorFor(model => model.Password)
            @Html.ValidationMessageFor(model => model.Password)
        </div>
        <p>
            <input type="submit" value="Create" />
        </p>
    </fieldset>
</form>
This is a simple form that that contains INPUT fields where can be entered user information. Note that in this case we might use plain HTML input elements as in the edit example; however, in this case I have used MVC LabelFor and EditorFor functions. As an result the following form will be shown:
There is no difference between the plain HTML and MVC helper functions - both ways will generate standard HTML inputs. If you use plain HTML, it would be easier to modify HTML code, but if you use editor it will automatically generate text inputs or check boxes, depending on the type of the property (string, bool, etc). Also, one advantage of EditorFor function is that it can handle situations where model is null (in the plain HTML mode you will need to add come conditions to check are there any data that can be displayed). However in the practice, I believe that you will use both ways depending on the particular needs.
As in the edit example, we would need another action that handles request that will be sent when information in the form are posted to the server. This action is shown in the following listing:
[HttpPost]
public ActionResult Create(FormCollection collection)
{
try
{
var user = new User();
UpdateModel(user);
UserRepository.Users.Add(user);
return RedirectToAction("Index");
}
catch
{
return View();
}
}
This action is similar to the action that updates user data in the previous section. However, in this case, instead of finding user by id a new user object will be created, updated with posted form parameters, and added to the list. If everything is fine, index will be shown, otherwise create view will be shown again.
Delete functionality
Standard delete page can be created the same way as the other pages. You can create Delete view that will show confirmation page to the user, deletes user from the model and then returns back to the list.
However, in this case I will show how you can create AJAXified functionality that deletes user data.
I will not create separate delete view - I will modify list view that is already created where we have already placed delete link in each table row. In the list view, I will attach JQuery Ajax call that deletes data on the server-side and removes the row from the table. Request that is sent to the server-side is in the following format:
/User/Delete/123
In this request you can see that UserController will be called, and that Delete method with parameter 123 will be executed. 123 is an id of the record that will be deleted.
First I would need to attach JQuery event handler to the delete link that is placed in the table. This code is shown in the following listing:
$("table a.delete").click(function (event) {
    event.preventDefault();
    var link = this;
    if (confirm("Are you sure that you want to delete this user?")) {
        $.ajax({
            type: "POST",
            url: link.href,
            success: function (data) {
                $(link).parents("tr").remove();
            },
            error: function (data) {
                alert("This user cannot be deleted");
            }
        });
    }
}
);
In this code sample, I have attached function on the link that are placed in the table, which have "delete" class. This function will be called when delete link is clicked. First thing you will need to do is to prevent default event action because you will replace it with the custom Ajax call. Then, the event handler asks user to confirm that he want to delete the current row. If he confirms it, this function takes the href attribute of the link and creates the Ajax call to the server side page. If the delete request succeed, row will be removed from the table, otherwise error message will be shown.
On the server-side we would need Delete action that will be called when Ajax request is sent in the error handler.
Controller action that handles delete request is shown in the following listing:
public void Delete(int id)
{
    var model = UserRepository.Users.First(user => user.UserID == id);
    UserRepository.Users.Remove(model);
}
This action takes id from the request, finds an object from the repository by id, and removes it from the list. In the real code you would create some DELETE SQL code, or delete object from the Entity Framework model.
Search
The last functionality that will be shown here is user search. This will not be separate page - I will create one partial view that can be placed on any page. The partial view is shown in the following listing:
_SearchUsers.cshtml
 <form method="post" action="/User/Search">
    <fieldset>
        <legend>Search for users</legend>
        <div class="editor-label">
            <label for="active">Is Active</label>
        </div>
        <div class="editor-field">
            Yes<input type="radio" name="active" id="active" value="true" />
            No<input type="radio" name="active" id="active" value="false" checked="checked" />
        </div>

        <div class="editor-label">
            <label for="rating">Minimal Rating</label>
        </div>
                <div class="editor-field">
            <input type="text" name="rating" id="rating" value="0" />
        </div>
        <input type="submit" value="Search" />
    </fieldset>
 </form>
As you can see I have just created one form with active radio button and minimal rating text field. You can put it on any view using the @Html.Partial("_SearchUsers") statement. Whenever you put this statement, MVC will inject the following form in the view:
When search button is pressed, parameters in the form are sent to the /User/Search URL, therefore we would need a controller that will accept form data and perform search for users. Search action is shown in the following listing:
public ActionResult Search(bool? active, int? rating)
{
var model = UserRepository.Users.Where(user => user.IsActive == active && user.Rating > rating);
return View("Index", model);
}
First you can see in the method signature method arguments that match the form elements by name. When form is sent, form parameters will be placed in these arguments. This action finds all users where IsActive flag is equal to the value selected in the form, and Rating is greater than a value entered in the form input.
Note that in this case I have not created a view for showing search results. In standard case, I would need to create Search view that will receive users that matches search condition and displays them in some kind of table. However, as I already have that kind of view (Index) I will use this one.
Result of this query (model) is passed to the view called Index. Index view do not care what controller has call it - it will just show model that is provided. As a result, you will see users filtered by search criterion on the index page. You can see that I have used a View("Index", model) call instead of View(model), in order to prevent controller action to match view by action name.
Validation
One of the most important thing that should be added in the application is validation. As an example, you need to put some validation rules that check is the user name entered, is date of birth a valid date, is rating in the range from 0 to 10 etc. If some validation rules are not satisfied, error messages similar to the ones on the following figure will be shown:
In the view page, you have already saw that I have placed ValidationFor elements. Example of the validation placeholder that will show an error message when error occurs in the DoB property is shown in the following listing:
         <div class="editor-label">
            <label for="DoB">Date of birth</label>
        </div>
        <div class="editor-field">
            <input type="text" name="DoB" id="DoB" value="@Model.DoB"/>
            @Html.ValidationMessageFor(model => model.DoB)
        </div>
This code is used to show validation message, but you will need to implement some rules that will check are the validations satisfied. In this article I will show you three ways to implement validation rules:
- Using the Data annotations in the model.
- Using annotations in the model meta data class.
- Using explicit rules.
You can find more details about the validation in the
ASP.NET MVC3 Validation Basics article.
Using Data Annotations
The simplest way to implement validation is to put annotation attributes in the model class. As an example, I will put
[Required] attribute in the
Name property of the user.
public partial class User
{
    public int UserID { get; set; }
    [Required]
    public string Name { get; set; }
    public string Address { get; set; }
    public string Town { get; set; }
    public string County { get; set; }
    public string Country { get; set; }
    public string Email { get; set; }
    public DateTime DoB { get; set; }
    public bool IsActive { get; set; }
    public string UserName { get; set; }
    public string Password { get; set; }
    public int Rating { get; set; }
}
If user do not populate name of the user,
UpdateModel will throw an exception, and required field message will be shown in the view.
Using MetaData class
Sometime, you are not able to modify a model class, especially if it is automatically generated. In that case you can create MetaData class for the model class, where you will place validation rules. Example is shown in the following listing:
[MetadataType(typeof(UserMetadata))]
public partial class User
{
    public class UserMetadata
    {
        [StringLength(50), Required]
        public object Name { get; set; }
        [StringLength(5)]
        public object Email { get; set; }
        [Range(0, 10)]
        public object Rating { get; set; }
    }
}
In this case, in the model class is defined that
UserMetaData will be meta data class of the
User class, where validation rules will be placed. In the metadata class you can put properties named the same way as properties of the model and put annotations there. This is useful way to implement validation even if you can modify your original model classes but you do not want to mix validation rules and properties. The only prerequisite is that model class is defined as partial so we can put second part of the class in the separate file.
Custom validation
Third option is to put a custom validation rules directly in the controller code. Example of explicit setting of error messages in the controller is shown in the following listing:
ModelState.AddModelError("Country", "This is useless message attached to the 'Country' input");
Method
AddModelError takes the id of the input element where error label should be shown, and the text of the error message. This code is placed in the action method of the controller and it puts a new error that will be associated to the Country input.
Conclusion
In this article I have shown you a basics of ASP.NET MVC3. Following these instructions and using the attached code, you will be able to create a simple MVC web application and extend it.
Note that MVC is much more - you can find lot of additional functionalities and customizations such as integration with Entity Framework, using areas, define custom routing, applying filters etc. You might take a look at the ASP.NET MVC site for more details about these features. Also, here I have used Razor syntax for views however you might explore other alternative view syntax such as standard ASP.NET, Spark, or NHaml. There are lot of possibilities you can explore and I hope that this will be good starting point for you.
Graduated from Faculty of Electrical Engineering, Department of Computer Techniques and Informatics, University of Belgrade, Serbia.
Currently working in Microsoft as Program Manager on SQL Server product.
Member of JQuery community - created few popular plugins (four popular JQuery DataTables add-ins and loadJSON template engine).
Interests: Web and databases, Software engineering process(estimation and standardization), mobile and business intelligence platforms.


