The above download contains:
- Ribbon source code: RibbonSource0.4
- Demo: RibbonDemo0.4
- Sample: RibbonSample (Part 2) - Sample project explained in this article [Part 2]
- Sample: RibbonMdiSample (Part 4) - Sample project explained in this article [Part 4]
- Edited DLL: (edited) DLL - Modified DLL as described in [Part 4])
Content
Part 1: Background
The ribbon that is going to be used in this article is an open source project created by Jose Menendez Poo and
SpiderMaster ( http://ribbon.codeplex.com/). The ribbon creator has posted an article explaining what this ribbon
is all about at here: A Professional Ribbon You Will Use (Now with orb!). However, that article doesn't describe how to use it in your project. Therefore, this article will show how to use it.
Original development platform: .NET Framework 2.0. Can be used in .NET Framework 3.5, 4.0 and 4.5.
Obtain Ribbon for .NET Framework 3.5 4.0 and 4.5.
(Updated: 22 Apr 2012)
To obtain the DLL for .NET Framework 3.5, 4.0, 4.5, you can either convert the original source project of this ribbon from .NET Framework 2.0 to 4.0, or create a blank class project of .NET Framework 4.0.
If you choose to create a blank class, add all .cs files from the source code of
System.Forms.Ribbon into your class, and add additional reference
for:
System.DesignSystem.Drawing-
System.Windows.Forms
Then, you have to modify GlobalHook.cs (refer [Part 4, Step 2]). Find
private void InstallHook().
Add a return statement at the beginning of the method so nothing is done.
Next, please note that in your new WinForms project, after the first build, the target framework will initially switch to .NET Framework 4.0 Client Profile.
You have to manually switch it back to .NET Framework 4.0. This is because Client Profile does not support
System.Design
which is required by the Ribbon to run internally.
Besides that, you can even add all the cs files of the ribbon source code directly into your project. Just create a folder under your project's Solution Explorer and all the cs (source code) files into the folder. With this method, you won't have to do any recompile of the DLL.
Part 2: How to Use
this Ribbon Control
Updated: Note for Visual Studio 2012 You have to modify some of the source code before using it in Visual Studio 2012. Open the source code, find this file > GlobalHook.cs. Open GlobalHook.cs and find this method:
private void InstallHook()
{
if (Handle != 0) throw new Exception("Hook is already installed");
...
...
} Replace the whole method with this:
private void InstallHook()
{
    return;
}
You should be able to compile it regardless of target framework of 2.0, 3.5, 4.0 or 4.5. This might not be the best patch, but this is what I currently know that work.
|
- Download the Ribbon source code and obtain System.Windows.Forms.Ribbon.dll.
- Create a blank WinForms project.

- There are several ways to add the ribbon into the form. Below introduce 3 common ways:
- 1st Way: Using code to add the ribbon
- 2nd Way: Add as Toolbox item
- 3rd Way: Add the source file into your project
1st Way: Using code to add the ribbon
Add a Reference to System.Windows.Forms.Ribbon.dll in your project.
Right click on Reference in Solution Explorer, choose Add.
Locate System.Windows.Forms.Ribbon.dll.
Open the designer of Main Form. In this example, Form1.Designer.cs.
This is the initial code for Form1.Designer.cs:
namespace WindowsFormsApplication1
{
partial class Form1
{
private System.ComponentModel.IContainer components = null;
protected override void Dispose(bool disposing)
{
if (disposing && (components != null))
{
components.Dispose();
}
base.Dispose(disposing);
}
#region Windows Form Designer generated code
private void InitializeComponent()
{
this.components = new System.ComponentModel.Container();
this.AutoScaleMode = System.Windows.Forms.AutoScaleMode.Font;
this.Text = "Form1";
}
#endregion
}
}
Add three lines of code into Form1.Designer.cs.
private System.Windows.Forms.Ribbon ribbon1;
this.ribbon1 = new System.Windows.Forms.Ribbon();
this.Controls.Add(this.ribbon1);
Save and close Form1.Designer.cs.
Double click and open Form1.cs, and now the Ribbon control is added into the main form.
2nd Way: Add as toolbox item and drag/drop
This is a simpler way to add the ribbon into a form. Simply create a new tab
in the Toolbox.
Drag and drop the DLL into the new tab. Click on any area of Toolbox. Right click > Add Tab.
Give the new tab a name.
Drag the DLL into the new tab area.
Drag the Ribbon into the form. That is it.
And this will automatically add a reference to System.Windows.Forms.Ribbon for you.
3rd Way: Add the source file into your project
Create a folder in the solution explorer of your project and add all the source cs file of the ribbon.
Build your project.
Then drag & drop the ribbon control from toolbox explorer into the form.
The benefit of adding the ribbon this way is you won't have another separate assembly (DLL) to deliver with your application. The source of the ribbon is embed directly into your project.
Okay, lets continue....
4. Click on the Ribbon and click Add Tab.
5. Click on the newly added RibbonTab, then click Add Panel.
6. Click on the newly added RibbonPanel, go to Properties.
You will see a set of available controls that can be added to the RibbonPanel.
Well, some of you might not able to see the extra command links of "Add Button", "Add ButtonList", "Add ItemGroup"... etc at the Properties Explorer.
Well, what you need to do is right click at the Properties Explorer and Tick/Check the [Commands].
7. Try to add some buttons into the RibbonPanel.
8. Click on the RibbonButtons, go to Properties.
9. Let's try to change the image and the label text of the button.
10. This is how your ribbon looks like now.
11. Now, create the click event for the buttons. Click on RibbonButton, go to Properties, modify the
Name of the button.
12. Open the code for Form1.cs.
This is what we have initially:
using System;
using System.Collections.Generic;
using System.ComponentModel;
using System.Data;
using System.Drawing;
using System.Text;
using System.Windows.Forms;

namespace WindowsFormsApplication1
{
    public partial class Form1 : Form
    {
        public Form1()
        {
            InitializeComponent();
        }
    }
}
13. Add the Button's Clicked event for the RibbonButton.
public Form1()
{
InitializeComponent();
cmdNew.Click += new EventHandler(cmdNew_Click);
cmdSave.Click += new EventHandler(cmdSave_Click);
}
void cmdNew_Click(object sender, EventArgs e)
{
MessageBox.Show("Button \"New\" Clicked.");
}
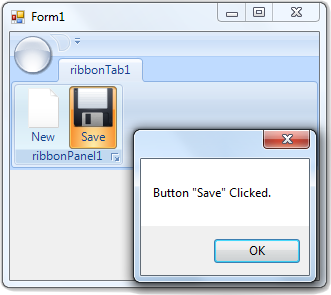
void cmdSave_Click(object sender, EventArgs e)
{
MessageBox.Show("Button \"Save\" Clicked.");
}
14. Press F5 to run the application. Done.
15. You might want to inherit your Main Form into a RibbonForm to have extra features. Such as:
Note: Inherit the Main Form to RibbonForm will have some compatibility problems with some of
the System.Windows.Forms controls.
16. In the code for Form1.cs, change this line:
public partial class Form1 : Form
to this line:
public partial class Form1 : RibbonForm
A sample project (RibbonSample.zip) that is used to explain this article is downloadable at top.
Part 3: Caution While Using With Visual Studio 2010
Always save and close straight away after you have finished designing the GUI editing of Main Form (the form that contains the ribbon control).
Don't Run (press F5) the application while the Main Form is open in Visual Studio 2010. Or else, you might experience that the ribbon control has disappeared. You will end up redesigning/redrawing the ribbon and reconnecting all the events that
are associated with the ribbon.
Part 4: Using
this Ribbon with an MDI Enabled WinForm
The following guide will show how to apply this ribbon with an MDI (Multi Document Interface) enabled WinForm.
Simple Walkthrough
I'll briefly explain what are we going to do here.
The original System.Windows.Forms.Ribbon.dll obtained from the source code is not fully compatible with System.Windows.Forms's
MDI client. You'll experience a delay while closing forms within the MDI client area.
Therefore, we have to make some modifications on the DLL so that it will enable us to use the
Ribbon with MDI fluently.
The sample project described in this article can be downloaded at the top. You may download it,
and view the code to have a better understanding of the workflow of implementing MDI with this ribbon control.
This guide will also show you how to eliminate the control box (highlighted in the below picture) when a MDI child form is
maximized within the
MDI client control of the main form. This will help make the appearance of the application look less weird.
Start
- Start off by modifying the original System.Windows.Forms.Ribbon.dll.
- Download the source code of the ribbon. Open GlobalHook.cs.
- Find
private void InstallHook(). Add a return statement at the
beginning of the method so nothing is done.
- Build the solution and obtain the newly edited System.Windows.Forms.Ribbon.dll. We'll use this to build our next MDI WinForm. Or, you can simply download
it (which I've modified) at the top of this page.
Add this edited System.Windows.Forms.Ribbon.dll as reference and start building the application.
- Let's first create a Ribbon application with the edited System.Windows.Forms.Ribbon.dll like this. Don't inherit the MainForm (the form that contains
the
ribbon control) with
RibbonForm. Inheritance of RibbonForm is not compatible with
the MDI client control.
- Create the
Click event for the ribbon buttons.
public partial class MainForm : Form
{
    public MainForm()
    {
        InitializeComponent();

        cmdCloseForm.Click += new EventHandler(cmdCloseForm_Click);
        cmdForm1.Click += new EventHandler(cmdForm1_Click);
        cmdForm2.Click += new EventHandler(cmdForm2_Click);
        cmdWelcome.Click += new EventHandler(cmdWelcome_Click);
    }

    void cmdWelcome_Click(object sender, EventArgs e)
    {

    }

    void cmdForm2_Click(object sender, EventArgs e)
    {

    }

    void cmdForm1_Click(object sender, EventArgs e)
    {

    }

    void cmdCloseForm_Click(object sender, EventArgs e)
    {

    }
}
- Next, set the
MainForm's properties of IsMdiContainer to
True.
- Create a few forms that needs to be opened in
MainForm's MDI. You can name
them anything, of course, but we take these as examples:
- Form1.cs
- Form2.cs
- WelcomeForm.cs
and the codes we use to open the forms in MDI might look like this:
void cmdForm1_Click(object sender, EventArgs e)
{
    Form1 f1 = new Form1();
    f1.MdiParent = this;
    f1.ControlBox = false;
    f1.MaximizeBox = false;
    f1.MinimizeBox = false;
    f1.WindowState = FormWindowState.Maximized;
    f1.Show();
}
- These forms run normally, but you will notice there is an annoying Control Box appearing at the top of
the Ribbon Bar control.
- To get rid of the Control Box, we need to rearrange these codes in the correct sequence.
f1.ControlBox = false;
f1.FormBorderStyle = System.Windows.Forms.FormBorderStyle.None
f1.MaximizeBox = false;
f1.MinimizeBox = false;
f1.WindowState = FormWindowState.Maximized;
- First, we create another form named MdiChildForm.cs. Open the designer
for
MdiChildForm.
- Add the below code to MdiChildForm.Designer.cs at the right sequence:
this.WindowState = System.Windows.Forms.FormWindowState.Normal;
this.ControlBox = false;
this.FormBorderStyle = System.Windows.Forms.FormBorderStyle.None;
this.MaximizeBox = false;
this.MinimizeBox = false;
In the Load event of MdiChildForm, add this:
public partial class MdiChildForm : Form
{
    public MdiChildForm()
    {
        InitializeComponent();
        this.Load += new System.EventHandler(this.MdiChildForm_Load);
    }

    private void MdiChildForm_Load(object sender, EventArgs e)
    {
        this.ControlBox = false;
        this.WindowState = FormWindowState.Maximized;
        this.BringToFront();
    }
}
- Save and close MdiChildForm.cs and MdiChildForm.Designer.cs.
- Modify all forms (forms that will be loading in MainForm.cs's MDI) to inherit
MdiChildForm. Form1.cs
Change this:
public partial class Form1 : Form
to this:
public partial class Form1 : MdiChildForm
Form2.cs
Change this:
public partial class Form2: Form
to this:
public partial class Form2: MdiChildForm
WelcomForm.cs
Change this:
public partial class WelcomForm: Form
to this:
public partial class WelcomForm: MdiChildForm
- Open forms and load it into the MDI client of
MainForm.
void cmdForm1_Click(object sender, EventArgs e)
{
    Form1 f1 = new Form1();
    f1.MdiParent = this;
    f1.Show();
}
- Done. A sample project (RibbonMdiSample.zip) that
is used in this article can be downloaded at the top.
Part 5: Alternative Ribbon
You may also want to have a look at:
Part 6: How to Make a New Theme, Skin for this Ribbon Programmatically
Default Theme
Example color theme of RibbonProfesionalRendererColorTableBlack.cs (ready made by ribbon author).
Another custom theme
- Open the source code. In Solution Explorer, there is a file/class named RibbonProfesionalRendererColorTable.cs.
This class defines all the colors of each component in the ribbon.
There is a class named RibbonProfesionalRendererColorTableBlack.cs. This is an example of a customized theme. (Shown above, picture 2.)
- To make your own color theme, create another class and inherit RibbonProfesionalRendererColorTable.cs.
- Change all the color objects into your desired colors.
A sample is available inside the source code file.
- Example: (the first five colors have been filled for your reference).
In this example, we'll name the new theme MyCoolThemeSkin.
using System;
using System.Collections.Generic;
using System.Text;
using System.Drawing;

namespace System.Windows.Forms
{
    public class MyCoolThemeSkin
        : RibbonProfesionalRendererColorTable
    {
        public RibbonProfesionalRendererColorTableBlack()
        {
            #region Fields

            OrbDropDownDarkBorder = Color.Yellow;
            OrbDropDownLightBorder = Color.FromKnownColor(KnownColor.WindowFrame);
            OrbDropDownBack = Color.FromName("Red");
            OrbDropDownNorthA = FromHex("#C2FF3D");
            OrbDropDownNorthB = Color.FromArgb(201, 100, 150);
            OrbDropDownNorthC =
            OrbDropDownNorthD =
            OrbDropDownSouthC =
            OrbDropDownSouthD =
            OrbDropDownContentbg =
            OrbDropDownContentbglight =
            OrbDropDownSeparatorlight =
            OrbDropDownSeparatordark =

            Caption1 =
            Caption2 =
            Caption3 =
            Caption4 =
            Caption5 =
            Caption6 =
            Caption7 =

            QuickAccessBorderDark =
            QuickAccessBorderLight =
            QuickAccessUpper =
            QuickAccessLower =

            OrbOptionBorder =
            OrbOptionBackground =
            OrbOptionShine =

            Arrow =
            ArrowLight =
            ArrowDisabled =
            Text =

            RibbonBackground =
            TabBorder =
            TabNorth =
            TabSouth =
            TabGlow =
            TabText =
            TabActiveText =
            TabContentNorth =
            TabContentSouth =
            TabSelectedGlow =
            PanelDarkBorder =
            PanelLightBorder =
            PanelTextBackground =
            PanelTextBackgroundSelected =
            PanelText =
            PanelBackgroundSelected =
            PanelOverflowBackground =
            PanelOverflowBackgroundPressed =
            PanelOverflowBackgroundSelectedNorth =
            PanelOverflowBackgroundSelectedSouth =

            ButtonBgOut =
            ButtonBgCenter =
            ButtonBorderOut =
            ButtonBorderIn =
            ButtonGlossyNorth =
            ButtonGlossySouth =

            ButtonDisabledBgOut =
            ButtonDisabledBgCenter =
            ButtonDisabledBorderOut =
            ButtonDisabledBorderIn =
            ButtonDisabledGlossyNorth =
            ButtonDisabledGlossySouth =

            ButtonSelectedBgOut =
            ButtonSelectedBgCenter =
            ButtonSelectedBorderOut =
            ButtonSelectedBorderIn =
            ButtonSelectedGlossyNorth =
            ButtonSelectedGlossySouth =

            ButtonPressedBgOut =
            ButtonPressedBgCenter =
            ButtonPressedBorderOut =
            ButtonPressedBorderIn =
            ButtonPressedGlossyNorth =
            ButtonPressedGlossySouth =

            ButtonCheckedBgOut =
            ButtonCheckedBgCenter =
            ButtonCheckedBorderOut =
            ButtonCheckedBorderIn =
            ButtonCheckedGlossyNorth =
            ButtonCheckedGlossySouth =

            ItemGroupOuterBorder =
            ItemGroupInnerBorder =
            ItemGroupSeparatorLight =
            ItemGroupSeparatorDark =
            ItemGroupBgNorth =
            ItemGroupBgSouth =
            ItemGroupBgGlossy =

            ButtonListBorder =
            ButtonListBg =
            ButtonListBgSelected =

            DropDownBg =
            DropDownImageBg =
            DropDownImageSeparator =
            DropDownBorder =
            DropDownGripNorth =
            DropDownGripSouth =
            DropDownGripBorder =
            DropDownGripDark =
            DropDownGripLight =

            SeparatorLight =
            SeparatorDark =
            SeparatorBg =
            SeparatorLine =

            TextBoxUnselectedBg =
            TextBoxBorder =

            #endregion
        }
    }
}
- Then, in the
Load event of MainForm.cs, add this line:
namespace RibbonDemo
{
    public partial class MainForm : RibbonForm
    {
        public MainForm()
        {
            InitializeComponent();
            this.Load +=new EventHandler(MainForm_Load);
        }

        private void MainForm_Load(object sender, EventArgs e)
        {
            (ribbon1.Renderer as RibbonProfessionalRenderer).ColorTable =
                new MyCoolThemeSkin();
        }
    }
}
Article Change Log:
31 Dec 2012
- Part 2: Guide added for using the ribbon in Visual Studio 2012
27 Apr 2012
- Content added: Part 6: How to Make a New Theme, Skin for this Ribbon Programmatically
15 Apr 2012
- Content added: Part 1: Background - Emphasize that Ribbon applicable on .NET Framework 3.5
and 4.0
14 Apr 2012
- Content added: Part 2: Step 3 - Added second method to add Ribbon into Form
12 Apr 2012
- Content added: Part 4: Using this Ribbon with MDI Enabled WinForm
11 Apr 2012
Programming is an art.


