Drupal is powerful and popular web CMS, with many useful features and hundreds of different modules that can extend core functionality. Android is powerful, popular and very
fast growing mobile platform. It's leading smartphone and tablets platform. In this article i'll show you how to integrate Drupal with Android powered mobile devices,
to authorize on site and to perform some actions. If you are interested in development mobile applications, that can backup or store files to a website, upload photos,
make posts, administer site, or perform other remote actions - this article is for you. Here you can find guidelines and principles description of how mobile
and web integration can be made. Example in this article will be a practical task: post pages and upload photos from Android device to Drupal website.
In the example, I show how to use it with Drupal 6, but all is also applicable to Drupal 7 (only minor modifications of Drupal module are required).
This article show how to integrate Drupal with Android OS. If you need another platform, it can be useful for you too, as it describes principles and issues of communication.
How it will be done
Our task is to perform actions on Drupal website, and we need a method to communicate with it. We will use XML-RPC protocol for communication between Android and Drupal.
It's lightweight remote procedure call protocol, and you don't need any additional knowledge, as with SOAP. Also, it's not require interface definitions, as with SOAP.
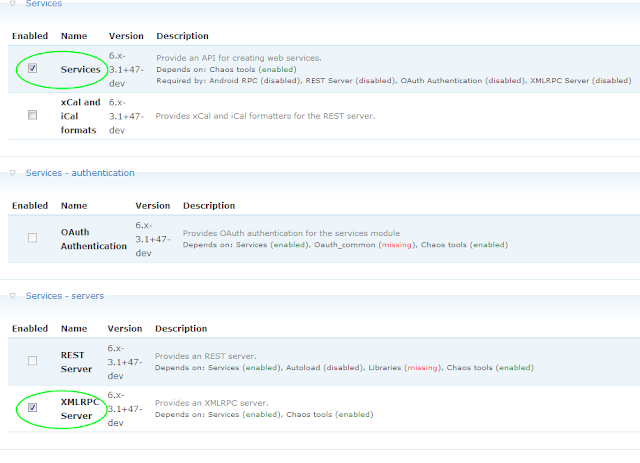
To use it, we need services module (http://drupal.org/project/services).
1. Services module
This module allows to create services within Drupal modules. A service exposes a set of methods, that can be called remotely by third party applications. Each method has defined name, parameters and return type. In our case they will
be called from Android-powered mobile device.
Services module supports many communication protocols. REST, XMLRPC, JSON, JSON-RPC, SOAP, AMF are supported.
In this example we will use XMLRPC.
2. Configuring services module
Services module is not included in Drupal core. So, you need to download it from http://drupal.org/project/services.
Unpack it into your Drupal website modules subdirectory (sites/all/modules), and enable it in modules administration page.
If all is fine, you will see it in modules admin page.
Next, you need to define the service endpoint. Open the services admin page of your site, and add "android" endpoint:

Then click "Add" link:
And then, enter endpoint's parameters: machine-readable name, server type and endpoint path. Session authentication must be checked. If it's unchecked, all rpc calls will
be executed as anonymous user. Example is shown below:
Next, open resources tab. And select resouces, that will be available through this endpoint.
Resources are nodes, comments, files, users, etc. You need to enable user login and logout, and node create and delete. You can enable more resouces.
For example: to allow users registration from mobile, to add/remove comments and etc. But, it's good practice to allow only that's really needed.
(For example, if you use captcha for users registration to block bots, enabling user.register method through services will allow them to avoid captcha).
Now, services module is configured.
3. Drupal module
The purpose of our module is to get uploads from Android devices and attach them to pages.
We call our module "photoupload". Create subdirectory photoupload in sites/all/modules directory
of Drupal. Now we create photoupload.info. Set up mandatory fields:
name = Photo upload
description = Module that manages photo uploads from Android devices

core = 6.x
version = "6.x-1.0"
project = "photoupload"
Now, create module file photoupload.module. Begin with php opening tag.
<?php
First, our module will define "upload photos" permission. Only users with this permission are allowed to upload photos.
function photoupload_perm()
{
      return array('upload photos');
}
Next, we need to define menu item for uploads. Call it "photoupload". Menu item is needed to handle urls, so it will be hidden (callback).
Upload is made through form, so define page callback to be drupal_get_form, page arguments as array containing name of function to create form.
Access arguments is array containing permission, required for access to menu item. In this case, it will an array with "upload photos" element.
<pre class="prettyprint lang-php">function photoupload_upload_file($form_state)
{
    // prepare the file upload form
    // set multipart/form-data encoding type
    $form = array('#attributes' => array('enctype' => 'multipart/form-data'));

    // image file selector
    $form['image'] = array(
        '#type' => 'file',
        '#title' => 'Upload photo',
        '#description' => t('Pick a image file to upload')
    );

    // page node identifier. The page to image be attached
    $form['nid'] = array(
        '#type' => 'textfield',
        '#title' => 'Page nid',
    );

    $form['#token'] = FALSE;

    // submit button
    $form['submit'] = array('#type' => 'submit', '#value' => 'Upload');
    return $form;
}
Now, we create form for upload. It will contain image file and page node identifier elements.
function photoupload_upload_file($form_state)
{
$form = array('#attributes' => array('enctype' => 'multipart/form-data'));
$form['image'] = array(
'#type' => 'file',
'#title' => 'Upload photo',
'#description' => t('Pick a image file to upload')
);
$form['nid'] = array(
'#type' => 'textfield',
'#title' => 'Page nid',
);
$form['#token'] = FALSE;
$form['submit'] = array('#type' => 'submit', '#value' => 'Upload');
return $form;
}
Create form submission handler.
function photoupload_upload_file_submit($form, &$form_state)
{
$dir = file_directory_path();
if (!isset($_FILES) || empty($_FILES) || $_FILES['files']['size']['image'] == 0) {
drupal_set_message("Your file doesn't appear to be here.");
return ;
}
$name = $_FILES['files']['name']['image'];
$size = $_FILES['files']['size']['image'];
$type = $_FILES['files']['type']['image'];
$nid = $form_state['values']['nid'];
$file = file_save_upload('image', array() , $dir);
if ($file) {
$filename = $dir."/".$file->filename;
$import = _photoupload_attach_photo($filename, $nid);
drupal_set_message($import);
}
else {
drupal_set_message("Something went wrong saving your file.");
}
}
Add function to attach photo to page.
function _photoupload_attach_photo($file, $nid)
{
global $user;
$node = node_load($nid);
$name = basename($file);
$file_obj = new stdClass();
$file_obj->filename = $name;
$file_obj->filepath = $file;
$file_obj->filemime = file_get_mimetype($name);
$file_obj->filesize = $stats['size'];
$file_obj->filesource = $file;
$file_obj->status = FILE_STATUS_TEMPORARY;
$file_obj->timestamp = time();
$file_obj->list = 1;
$file_obj->new = true;
drupal_write_record('files', $file_obj);
file_set_status($file_obj, 1);
$node->files[$file_obj->fid] = $file_obj;
node_save($node);
return "OK";
}
And PHP closing tag.
?>
We finished with Drupal's module code.
Now, you need enable it in modules administration page.
It's all done with Drupal part. In the next part of article I'll describe how to implement Android application.
My name is Andrey Moskvichev.
I'm a software developer with more than 14 years of programming experience.
I specialize in networking, Unix systems (Linux, FreeBSD), mobile programming, computer graphics, software architecture, reverse engineering, data processing systems, AI, computer vision.
I'm interested in all new cutting edge technologies.


