Introduction
Catharsis is a powerful RAD (Rapid Application Development) tool which is built around a solid architecture using ASP.NET MVC and nHibernate. Best practice Design Patterns and separation of concerns between layers were key factors in the design of the Catharsis framework.
Using Guidance, the framework offers RAD functionality on a robust enterprise level architecture by automatically generating most of the code you need for your web application entities. Filling in a few simple dialog screens is all that is required in many cases.
This article explains how you can quickly build an application to create, read, update, and delete entities (CRUD). The Catharsis Guidance automatically generates the multi-tier architecture and adds a skeleton infrastructure of classes and interfaces which will work without much additional coding. The article builds on the previous one in this series which examined the Catharsis example project. In this article, we will add a new entity to that example project which is available to download. This information will allow you to quickly create your own CRUD application.
In addition to creating simple entities, this article will also explain how to use the framework to code references between entities, for example, where one entity is used as an entity-type in another entity. Finally, we will look at how to add business rules to your application.
If you have a database and want to quickly create a robust enterprise level web application to access that database, Catharsis offers the best way to achieve this.
Unlike many frameworks, Catharsis was written using public and protected methods which makes it completely extensible. The programmer can take control of their own application and override methods when they want to add new functionality when they need to. This is not necessary when creating a lot of applications on Catharsis, but for enterprise level applications, it is nice to know that the option is available if needed.
Before reading this article, please read the Catharsis installation guide. This is Catharsis Tutorial 01 in the list available here: http://www.codeproject.com/script/Articles/MemberArticles.aspx?amid=4013680.
A powerful example solution based on the Catharsis framework is available for download. The example solution is called Firm.SmartControls, and can be downloaded here: http://catharsis.codeplex.com/Release/ProjectReleases.aspx?ReleaseId=28510.
The second article in this series looks into the example solution and explains how it is set up. Read this before continuing (Catharsis Tutorial 02): catharsis_tutorial_02.aspx.
A good way to lean more about Catharsis is to install the demo solution and follow the step by step guide in this article to add a new entity to that solution.
The solution contains entities called Agent and AgentContract, we will add an additional one called Client.
Automatically creating a web infrastructure
The database create script for the Firm.SmartControls solution actually contains two tables which are not yet mapped so we will use one of these as an example of how to add a new entity.
"Client" will be our new entity. (We will add it to the Insurance namespace.)
Before we can add the new entity using Guidance, we need to enable the Guidance package. Click on Tools -> Guidance Package Manager.

Click Enable/Disable Packages on the dialog that appears, select ProjectBase.Guidance, and click OK.
Close the next two dialogs that appear as we do not need them now.
Note that if you want to add a complete web infrastructure, the best place to add it is via the Entity (or Web project). It is also possible to add it in the Data Layer, but this would exclude the GUI elements which we will require in this instance. The folder into which the new entity is added will become part of the namespace for that new entity. If you want the entity to be in a new namespace, you should create a folder in the entity project and add it there; alternatively, you can add it to an existing folder as we will do in this case because we want our new entity to be in the Insurance namespace.
Right click on the folder and select "(Re) Create COMPLETE WEB infrastructure" from the menu. "(Re)" signifies that if the entity already exists in the folder, the files will be overwritten with new empty skeleton classes. This offers a way to undo code or correct mistakes. "COMPLETE WEB" means that skeleton class-files will be added to every project (even unit tests). If you select "(Re) Create Project - (Entity, Business, Common, Tests)", no files in the Models, Controllers, and Web projects will be added (or changed). This is for cases where no GUI elements are required.
The namespace of the new entity should be Firm.SmartControls.Entity.Insurance.Client so we click on the Insurance folder as shown to generate the web infrastructure via Guidance.
Here is the main dialog which we need to fill. Giving as much information here as possible will reduce the amount of work that we need to do later.
Type the name of the new entity in the dialog. You can now add up to three additional properties.
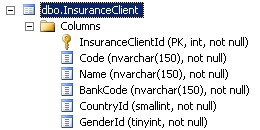
In SQL Server 2005, we saw the columns of the InsuranceClient table so we can add the first three: Code, Name, and BankCode. Guidance will automatically generate checks to ensure that Code is unique (this can be deleted if it is not required). Adding properties here reduces the amount of work that we will have to do later; however, we can only add value types, for example, a string property "name"; we cannot add Entity types, for example, a foreign key which references another table such as Country.
The namespace is provided because it is determined by where you add the entity in the solution.
The entity type in this case should be 'Persistent'. That will create the skeleton for the business object which has no ancestors for the business type (it is derived directly from the Persistent object). Other types allow reusing previously implemented functionality.
The second and third options are for CodeLists, you can choose "simple" or "separate entity". First, we need to be clear on what a CodeList is. CodeList entities are often used to populate comboboxes, for allowing the user to select one option from a collection of predefined options. All of the countries in the EU could be represented in this way, the genders Male and Female is another good example. Another general property of CodeList entities is that the data is static. It will not be necessary to add or delete objects of this type. Gender, for example, will never need more than "Male" and "Female". The base classes give CodeList entities a code and a name, so for Gender, the name could be Male and the code could be M. These are simple entities because no additional information is required. Therefore, using the option for a simple CodeList is suitable for something like Gender or Country. If you need a simple entity like Gender, you can use the ICodeList option. In that case, you do not have to implement anything, your new ICodeList property will work immediately without any additional coding.
The framework also gives the option to create a CodeList but allows for the entity to be extended with additional information. Currency, for example, could have an object with the Name "Dollar" and the Code "USD", but we might also want to add a column for subunit and give it a value of "cents" or "c". If we need to extend the basic functionality of a CodeList, a "separate entity" can be used. In this case, a column in the database table should hold a value for the subunit.
The Tracked entity type is the same as a Persistent type but additional code is provided which allows an "Audit Trail" to be maintained for the entity. If you need to track when an entity is changed, who changed it, and what state it is in, this is the best option.
Click Finish, and after some time, all of the files will be automatically generated and a pop-up will appear to tell you what you should do next:
So we follow these instructions and open the Str.Controller.cs file and add the highlighted line:
Now we open the menu.config file:
The highlighted code should be added:
It is added at the same level as Agent, so it will appear as a sibling of this node in the navigation tree.
Attempting to use this new entry in the navigation menu will cause an error of course because the database table has not yet been mapped via nHibernate:
Mapping the database table to the entity
The table that we are mapping looks like this:
Open the nHibernate file which was automatically generated for this entity: Firm.SmartControls.Data.Insurance.Client.hbm.xml.
The data which you supplied during the creation of the entity is already added:
='1.0'='utf-8'
<hibernate-mapping xmlns='urn:nhibernate-mapping-2.2'
namespace='Firm.SmartControls.Entity.Insurance'
assembly='Firm.SmartControls.Entity'>
<class name='Client' table='Client' lazy='true' >
<id name='ID' column='ClientId' >
<generator class='native'></generator>
</id>
<property not-null='true' name='Code' />
<property not-null='true' name='Name' />
<property not-null='true' name='BankCode' />
</class>
</hibernate-mapping>
The following sections need to be changed: the table name is InsuranceClient, not Client. The ID column is InsuranceClientId, not ClientId. CountryId and GenderId are CodeLists and will require many-to-one mappings.
Here is the completed version:
='1.0'='utf-8'
<hibernate-mapping xmlns='urn:nhibernate-mapping-2.2'
namespace='Firm.SmartControls.Entity.Insurance'
assembly='Firm.SmartControls.Entity'>
<class name='Client' table='InsuranceClient' lazy='true' >
<id name='ID' column='InsuranceClientId' >
<generator class='native'></generator>
</id>
<property not-null='true' name='Code' />
<property not-null='true' name='Name' />
<property not-null='true' name='BankCode' />
<many-to-one name='Country' column='CountryId' lazy='false' ></many-to-one>
<many-to-one name='Gender' column='GenderId' lazy='false' ></many-to-one>
</class>
</hibernate-mapping>
We can see a reference to Firm.SmartControls.Entity.Insurance in the file above so this will need to be changed to reflect the changes we made in the mapping file.
The DAO (Data Access Object) will also need to be changed, but before we do that, we will add the properties to the Entity file which were not automatically generated by Guidance.
Open the Client entity file:
Three properties exist: Code, Name, and BankCode. We will now add Gender and Country. These are CodeList objects so we need to add a using directive for Firm.SmartControls.Entity.CodeLists in order for the Gender and Country datatypes to be recognized. The code we should add is in bold.
using System;
using System.Collections.Generic;
using System.Linq;
using ProjectBase.Core;
using ProjectBase.Core.PersistentObjects;
using ProjectBase.Core.Collections;
using Firm.SmartControls.Entity.CodeLists;
namespace Firm.SmartControls.Entity.Insurance
{
[Serializable]
public class Client : Persistent
{
public virtual string Code { get; set; }
public virtual string Name { get; set; }
public virtual string BankCode { get; set; }
public virtual Gender Gender { get; set; }
public virtual Country Country { get; set; }
Now we add these additional fields to the DAO (Firm.SmartControls.Data.Insurance.ClientDao). The newly added Gender and Country should be available in intellisense when we add the two new entries, this is obviously because they are now properties of the Client entity.
Running the application with the new entity
Now we have made the necessary changes to the nHibernate file, the Entity, and the DAO so the "Client" menu item will work.
Of course, there are no Clients in the database yet, so we will need to add these. The next step is to extend the functionality behind the "New" button to allow us to add new Clients.
Add New
If we click the "New" button now, we will see that the properties which we specified during the Guidance setup (Code, Name, and BankCode) are automatically added.
Now we will add the Gender and Country properties.
Open the ClientDetailsWC.ascx file (the abbreviation WC is for "Web Control").
This file shows the HTML markup used to create the page shown above.
We will reduce the size of the two columns (Identification and Description) and add a third column for CodeLists and will add CodeLists for Gender and Country.
Each row in the HTML contains a number of fieldsets. There is currently one fieldset for Identification and one for Description. We will reduce the percentage width of these two to 32% so we will have enough room in the row for three fieldsets.
<div class='newRow mh50'>
    <fieldset class='newDetail w32p'>
w32p represents a CSS class for width. We can examine these CSS classes in the following file:
The CSS style .w32p { width: 32%; } will be used in our case.
Now we can add a third fieldset for the two CodeLists, the code is shown here:
<fieldset class='newDetail w32p'>
      <legend><%= GetLocalized(Str.Business.CodeLists.CodeList)%></legend>
      <div class='fieldset'>

        <div class='inputWC inputWC60 w100p'>
          <div class='label'><%= GetLocalized(Str.Controllers.Country)%></div>
          <div class='input'><% Country.SetEntityAsDataSource(Model.Item.Country); %>
            <smart:AsyncComboBoxWC ID='Country' runat='server'
                   TargetController='Country' /> </div>
        </div>

        <div class='inputWC inputWC60 w100p'>
          <div class='label'><%= GetLocalized(Str.Controllers.Gender)%></div>
          <div class='input'><% Gender.SetEntityAsDataSource(Model.Item.Gender); %>
            <smart:AsyncComboBoxWC ID='Gender' runat='server'
                   TargetController='Gender' /> </div>
        </div>
    </div>
</fieldset>
This code uses the Model to access the item (the entity) and its properties. Now we can see that two new dropdown lists have been added and populated with the data that we require.
Attempting to actually add a new Client will fail:
This is because when we click the Add button, the Controller will try to add the entity but it cannot do so because it cannot yet handle the entity-type properties.
We need to look at the Controller for the new entity which has been automatically generated at the following location:
Here are many regions which are available for us to add code to, most of these are empty in a newly created Controller file.
It may be useful to know that holding down the CTRL key and typing mo will expand all the regions, likewise CTRL ml will collapse all the regions.
- Members: This is used to hold local variables which are used in this class.
- OnList: This region contains overridden methods which we can use to extend the functionality for creating a list of entities to display in the "List" view in the application and also to export that list to an Excel spreadsheet.
- OnAfter: This region contains some overridden methods which are used to perform tasks after certain events have taken place.
OnAfterBindModel and OnAfterBindSearch are implemented in the default Controller. These two are used to take care of entity-type properties so we will use these to add Country and Gender. - OnBefore: Like the region above, we can override several methods from the base classes in this section. It is possible to see a list of the available methods by typing "override OnBefore" and then intellisense will show us the available methods.
- Actions: This region could be used to override methods relating to Actions, but if we do not need this, we can simply delete the region. It is important to realise that a lot of the automatically generated code might not be needed for your particular needs and therefore can be deleted. It is easier to delete unneeded code than to write missing code.
- ClearSearch: This is used to remove parameters from a search object after it has been used.
- Properties: This region has a method which returns the name of the current Controller, which will of course be
ClientController in our case. It is also used to load entities which we may need if they are entity types in our entity. This will be the case in our example because we will have two entity types. These objects use the "lazy load" approach, this means that they are only created when they are needed, which improves efficiency in the application.
We will now make the required changes to allow us to save a new Client.
We need to add two methods to the OnAfter region to handle the entity types:
protected override bool OnAfterBindModel()
{
var success = base.OnAfterBindModel();
int id = 0;
if (Request.Form.AllKeys.Contains(Str.Controllers.Country)
&& int.TryParse(Request.Form[Str.Controllers.Country], out id))
{
Model.Item.Country = CountryFacade.GetById(id);
}
if (Request.Form.AllKeys.Contains(Str.Controllers.Gender)
&& int.TryParse(Request.Form[Str.Controllers.Gender], out id))
{
Model.Item.Gender = GenderFacade.GetById(id);
}
return success;
}
protected override bool OnAfterBindSearch()
{
var success = base.OnAfterBindSearch();
int id;
if (Request.Form.AllKeys.Contains(Str.Controllers.Country))
{
Model.SearchParam.Example.Country = null;
if (int.TryParse(Request.Form[Str.Controllers.Country], out id))
{
Model.SearchParam.Example.Country = CountryFacade.GetById(id);
}
}
if (Request.Form.AllKeys.Contains(Str.Controllers.Gender))
{
Model.SearchParam.Example.Gender = null;
if (int.TryParse(Request.Form[Str.Controllers.Gender], out id))
{
Model.SearchParam.Example.Gender = GenderFacade.GetById(id);
}
}
return success;
}
As you can see from the code, some checks are performed to make sure that a value for Country was provided on the form (in the ASCX control) and also to ensure that the supplied value is an integer. Then we call CountryFacade to find the Country which has the ID which was sent from the form and the Country object is returned and added to the Client object.
We also need to add some properties in the Properties region:
public override string ControllerName { get { return Str.Controllers.Client; } }
public virtual ICountryFacade CountryFacade
{
protected get
{
if (_countryFacade.IsNull())
{
_countryFacade = FacadeFactory.CreateFacade<ICountryFacade>(Model.Messages);
}
return _countryFacade;
}
set
{
Check.Require(value.Is(), " ICountryFacade cannot be null");
_countryFacade = value;
}
}
public virtual IGenderFacade GenderFacade
{
protected get
{
if (_genderFacade.IsNull())
{
_genderFacade = FacadeFactory.CreateFacade<IGenderFacade>(Model.Messages);
}
return _genderFacade;
}
set
{
Check.Require(value.Is(), " IGenderFacade cannot be null");
_genderFacade = value;
}
}
This provides a façade for the two entity types which will be used in the OnAfter methods above.
The methods above require two local members and these are added in the members region as shown here:
#region members
IGenderFacade _genderFacade;
ICountryFacade _countryFacade;
#endregion members
Now we have added all the required code to allow us to add a new Client.
The newly added Client above can be seen in the list view when we click on the Client menu item:
Note that Gender and Country do not appear in the list. The properties of the Client entity which do appear are the ones which we provided to the Guidance dialogs when we were creating the web infrastructure. As mentioned above, the OnList region in the control should be expanded to handle this.
List
In this section, we will add to the OnList method in the ClientController to show the Gender and Country of the listed Client entities.
Here is the code which controls what appears in the list:
protected override void OnListToDisplay()
{
    Model.ListModel.ItemsToDisplay = Facade.GetBySearch(Model.SearchParam)
        .Select(i => new ItemToDisplay()
        {
            ID = i.ID,
            Description = i.ToDisplay(),
            Items = new List<IHeaderDescription>
            {
              new HeaderDescription { HeaderName = "Code", Value = i.Code},
              new HeaderDescription { HeaderName = "Name" , Value = i.Name },
              new HeaderDescription { HeaderName = "BankCode" , Value = i.BankCode },
              new HeaderDescription { HeaderName = Str.Common.ID ,
                                      Value = i.ID.ToDisplay(), Align = Align.right },
            }
        } as IItemToDisplay);
}
We will add another line to display the Country code:
new HeaderDescription { HeaderName = Str.Controllers.Country,
  Value = i.Country.Code, SortByObject=Str.Controllers.Country,
  SortByProperty=Str.Common.Code},
Column sorting attributes are also provided in this line. You can choose to display Country.Code such as "IR", or Country.Display such as "IR (Ireland)".
The second entity-type property, Gender, is added in a similar way.
It is important to note when working with the Catharsis framework, it will often be necessary to rebuild the entire application in order to see changes in the web browser when the application is running in Debug mode. This is because of the separation of concerns between the layers of the Catharsis framework. When you make some changes in the code (as in the ClientController in this case) and press F5 or click the Debug button, only the files (DLLs) which Visual Studio thinks need to be updated will be updated, because there is no references existing between the Controller and the web project. This will be explained in more detail later, but remember that if you expect to see changes, rebuild the entire solution before you test your changes.
Edit
No additional coding is required to make the entities editable.
When looking at an entity in the Detail view, click the Edit button and the text boxes become editable, change the property that needs to be updated, and click Update to save the entity.
Search
The search function is accessible by clicking the Search button.
The default search created by Guidance handles the properties that we provide while setting up the Guidance for the new entity.
The HTML and CSS can be adjusted to suit your needs.
The use of ID, Code, Name and Bank Code for searching is obvious. The number of rows displayed on the search page can be defined on the search page. It is also possible to display the search results in a new window.
We will now add the code required to search for entity type properties like Country and Gender. First, we will add the elements to the ASCX control. A fieldset containing the comboboxes for the two properties will be added:
<fieldset class='newDetail w30p'>
      <legend><%= GetLocalized(Str.Business.CodeLists.CodeList)%></legend>
      <div class='fieldset'>

        <div class='inputWC inputWC60 w100p'>
          <div class='label'><%= GetLocalized(Str.Controllers.Country)%></div>
          <div class='input'><% Country.SetEntityAsDataSource(
                                   Model.SearchParam.Example.Country); %>
            <smart:AsyncComboBoxWC ID='Country' runat='server'
              TargetController='Country' ComboBoxShowEmpty='true' /> </div>
        </div>
        <div class='inputWC inputWC60 w100p'>
          <div class='label'><%= GetLocalized(Str.Controllers.Gender)%></div>
          <div class='input'><% Gender.SetEntityAsDataSource(
                  Model.SearchParam.Example.Gender).SetComboBoxName(
                  Str.Controllers.Gender) ; %>
            <smart:AsyncComboBoxWC ID='Gender' runat='server'
              TargetController='Gender' ComboBoxShowEmpty='true' /> </div>
        </div>
    </div>
</fieldset>
This will create the GUI elements that we need and they will be populated with the expected lists.
This is enough to allow the system to search through Country and Gender.
It is also possible to expand the search functionality to search by Country name for example, this will be described in a later section.
Business rules
Most applications will need some business rules to be employed when manipulating entities. For example, if we have a Client who has "Germany" as Country, it is not a good idea to allow the system to delete the Country Germany from the available Countries. This would result in a situation whereby an entity uses an entity which no longer exists in the system. This is similar to foreign key data integrity at database level. We do not rely on the database to take care of this, it is more efficient to handle such situations in the code, so we will see how this is done now.
Business rules are applied on the business façade which can be found at the location shown here:
To enforce a business rule to disallow a Country to be deleted if it is used by a Client, we need to get the CountryFacade to ask the ClientFacade if any Clients use the country which we wish to delete.
This involves four steps.
- The "
CheckDelete" method in CountryFacade must be overridden and a check should be performed before the deletion of a country is allowed to be processed. - The check in the overridden
CheckDelete method should call another method in ClientFacade to check if the Country is in use by a Client. - The
ClientFacade interface (IClientfacade) should be extended with a method "IsCountryInUse". - The
IsCountryInUse method should be implemented in ClientFacade.
We begin by opening CountryFacade and adding the following code:
protected override bool CheckDelete(Country entity)
{
var result = base.CheckDelete(entity);
if (ClientFacade.IsCountryInUse(entity))
{
Messages.AddError(this, Str.Messages.Keys.CannotDeleteItem,
Str.Messages.Templates.CannotDelete1,
entity.ToDisplay());
result = false;
}
return result;
}
This method uses ClientFacade so we need to add a local member _clientFacade...
#region members
IClientFacade _clientFacade;
#endregion members
We also need a property for ClientFacade:
#region properties
public virtual IAgentFacade AgentFacade
{
protected get
{
if (_agentFacade.IsNull())
{
_agentFacade = FacadeFactory.CreateFacade<IAgentFacade>(Messages);
}
return _agentFacade;
}
set
{
Check.Require(value.Is(), " IAgentFacade cannot be null");
_agentFacade = value;
}
}
#endregion properties
The CheckDelete method above calls the method IsCountryInUse and will determine whether the Country can be deleted based on the results of that call.
IsCountryInUse must be added to IClientFacade:
bool IsCountryInUse(Country entity);
Note that it is also necessary to add a using directive so the interface has access to the CodeList namespace because it needs access to the Country object:
using Firm.SmartControls.Entity.CodeLists;
The above using directive also needs to be added to the ClientFacade.
Now we implement the IsCountryInUse method in ClientFacade.
#region IClientFacade
public virtual bool IsCountryInUse(Country entity)
{
var item = Dao.GetBySearch(new ClientSearch()
{
MaxRowsPerPage = 1,
Example = new Client()
{
Country = entity
}
}).FirstOrDefault();
if (item.Is())
{
Messages.AddWarning(this, Str.Messages.Keys.ItemInUse,
Str.Messages.Templates.ItemIsUsedForEntity3,
entity.ToDisplay(), item.ToDisplay(), Str.Controllers.Country);
return true;
}
return false;
}
#endregion IClientFacade
Now we can test our code. Run the application and click on Clients to see the list of current clients.
We can see that Ireland is in use as a country, so now open the CodeLists branch of the navigation tree and click on Country. We can use the red X next to the country Ireland to attempt to delete it. The deletion will fail because of the business rule which we have added. Note that the error messages can be formatted differently if you wish.
Business rules can also be used to control what is allowed during the addition or upgrading on an entity.
Summary
You should now have understood how to add new entities to the example solution, link them with other entities (CodeLists), and add some basic business rules. Using this information and the guidelines in the first document in this series, you should now be able to create a new database in SQL Server and rapidly develop a CRUD web application using the Catharsis framework.
In future tutorials in this series, we will look at troubleshooting some problems that users of the Catharsis framework have experienced. We will look more deeply into how to use Catharsis and will produce more example applications.
This member has not yet provided a Biography. Assume it's interesting and varied, and probably something to do with programming.


