Motivation
As an automation developer, you may find yourself required to automate products which are not designed for automation (no external interface).
For example, an old product which operates by pressing some buttons or switches.
In these cases, the solution must be physical (you need to replace the button press or switch key with something else.
A simple and cheap solution can be achieved by using Arduino controller.
In this post, I will show you how you can easily develop your own relay switch box and control it externally using your PC Com port.
What is Needed
- Arduino controller (I use Arduino mega 2560) - 15$ on eBay
- 8-Channel Relay Module for Arduino - 10$ on eBay
- 40 wire 2$ on eBay
- Arduino SDK - http://Arduino.cc/
Short Hardware Explanation
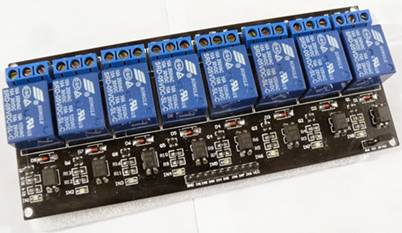
The Relay Module
The module has 8 relays, it needs to be fed by 5V from the Arduino mega board in order to operate.
It has 8 pins for controlling each relay separately, when applying logical “0” on each one of the relay ports the corresponding relay opens.
Arduino Mega 2560
A microcontroller board based on the ATmega2560, it has 54 digital input/output pins, 16 analog inputs, 4 UARTs (hardware serial ports), a USB connection, a power jack and a reset button. It contains everything needed to support the microcontroller, simply connect it to a computer with a USB cable.

Wiring the Setup
- VCC 5V from Arduino to VCC pin of the relay shield.
- GND from Arduino to GND pin of the relay shield.
- 8 wires from the Arduino board to the relay shield as follows:
- Pin 52 from the Arduino to pin 1 on the relay shield
- Pin 50 from the Arduino to pin 2 on the relay shield
- Pin 48 from the Arduino to pin 3 on the relay shield
- Pin 46 from the Arduino to pin 4 on the relay shield
- Pin 44 from the Arduino to pin 5 on the relay shield
- Pin 42 from the Arduino to pin 6 on the relay shield
- Pin 40 from the Arduino to pin 7 on the relay shield
- Pin 38 from the Arduino to pin 8 on the relay shield.
Using the Code
Let’s define two simple commands:
- Open relay should be +x where x is the port number.
- Closing relay should be -x where x is the port number.
First, we define the relay port numbers as connected on the wire:
#define RELAY1  52
#define RELAY2  50
#define RELAY3  48
#define RELAY4  46
#define RELAY5  44
#define RELAY6  42
#define RELAY7  40
#define RELAY8  38
Then, we initialize the port as outputs:
pinMode(RELAY1, OUTPUT);
pinMode(RELAY2, OUTPUT);
pinMode(RELAY3, OUTPUT);
pinMode(RELAY4, OUTPUT);
pinMode(RELAY5, OUTPUT);
pinMode(RELAY6, OUTPUT);
pinMode(RELAY7, OUTPUT);
pinMode(RELAY8, OUTPUT);
We need to assign logical “1” to the pins in order for all relay to be in off state:
digitalWrite(RELAY1,HIGH);
digitalWrite(RELAY2,HIGH);
digitalWrite(RELAY3,HIGH);
digitalWrite(RELAY4,HIGH);
digitalWrite(RELAY5,HIGH);
digitalWrite(RELAY6,HIGH);
digitalWrite(RELAY7,HIGH);
digitalWrite(RELAY8,HIGH);
We set the serial port for 19200 baud and wait for connection:
while (!Serial);
Serial.begin(19200);
On the loop method, we read full row from the serial port and detect if it is open or close command, for example:
sending  "-1" will cause relay 01 to close
sending  "+1" will cause relay 01 to open
For each command, we detect the status by detecting the first character of the command (+ or -) and the second character for the specific relay number. then we call “SetStatus” with the extracted parameters.
void loop()
{
String command;
char charBuf[5];
if(Serial.available() > 0)
{
command = Serial.readStringUntil('\r');
command.toCharArray(charBuf, 5);
}
else
return;
if (charBuf[0]=='+') SetStatus(true, charBuf[1]);
else if (charBuf[0]=='-') SetStatus(false, charBuf[1]);
}
The SetStatus method gets two parameters:
- Boolean on – the first command character (+ or -) , open or close
char relayNumber – the relay port to open or close
The complete code is as follows:
#define RELAY1 52
#define RELAY2 50
#define RELAY3 48
#define RELAY4 46
#define RELAY5 44
#define RELAY6 42
#define RELAY7 40
#define RELAY8 38
void setup()
{
pinMode(RELAY1, OUTPUT);
pinMode(RELAY2, OUTPUT);
pinMode(RELAY3, OUTPUT);
pinMode(RELAY4, OUTPUT);
pinMode(RELAY5, OUTPUT);
pinMode(RELAY6, OUTPUT);
pinMode(RELAY7, OUTPUT);
pinMode(RELAY8, OUTPUT);
digitalWrite(RELAY1,HIGH);
digitalWrite(RELAY2,HIGH);
digitalWrite(RELAY3,HIGH);
digitalWrite(RELAY4,HIGH);
digitalWrite(RELAY5,HIGH);
digitalWrite(RELAY6,HIGH);
digitalWrite(RELAY7,HIGH);
digitalWrite(RELAY8,HIGH);
while (!Serial);
Serial.begin(19200);
}
void loop()
{
String command;
char charBuf[5];
if(Serial.available() > 0)
{
command = Serial.readStringUntil('\r');
command.toCharArray(charBuf, 5);
}
else
return;
if (charBuf[0]=='+') SetStatus(true, charBuf[1]);
else if (charBuf[0]=='-') SetStatus(false, charBuf[1]);
}
void SetStatus(boolean on,char relayNumber)
{
int relayState =0; if (on)
relayState =1;
switch (relayNumber) {
case '1':
digitalWrite(RELAY1,relayState);
break;
case '2':
digitalWrite(RELAY2,relayState);
break;
case '3':
digitalWrite(RELAY3,relayState);
break;
case '4':
digitalWrite(RELAY4,relayState);
break;
case '5':
digitalWrite(RELAY5,relayState);
break;
case '6':
digitalWrite(RELAY6,relayState);
break;
case '7':
digitalWrite(RELAY7,relayState);
break;
case '8':
digitalWrite(RELAY8,relayState);
break;
}
}
Testing the Code
- Connect the Arduino board to your PC
- Open a new project using the Arduino SDK and paste the code.
- Make sure to select the correct COM Port.
- Select the Arduino Mega Board 2560 from the board type.
- Download the code to the Arduino Mega Board.
- Open the serial monitor on the Arduino SDK.
- Select the proper baud rate (19200).
- Write "+1" or "-1" for opening/closing relay 1,
- Press the send button.
That's it, you now have an automation solution operating on RS232.
This member has not yet provided a Biography. Assume it's interesting and varied, and probably something to do with programming.


 General
  News
News  Suggestion
  Question
  Bug
Bug  Answer
  Joke
Joke  Praise
  Rant
Rant  Admin
Admin 


