
MediaTek LinkIt™ Smart 7688 Duo Review – The Making of a Refrigerator Monitor
0/5 (0 vote)
LinkIt Smart 7688 Duo - a good board for anyone needing to develop quick IoT prototypes that also wish to continue into the manufacturing and delivery phases of their new product.
Overview
The MediaTek LinkIt ™ Smart 7688 Duo board provides a ton of power in a small package. The LinkIt Smart 7688 Duo is powered by the OpenWrt Linux distribution and a 580 MHz MIPS processor and is augmented with an ATMega32U4 Arduino supported microcontroller. With on-board WiFi support, this device truly provides everything needed to quickly prototype IoT devices and applications all on one small and affordable board.
MediaTek Labs also provides a free cloud service called the Cloud Sandbox where data can be sent from your prototype device and stored. This saves a lot of time as you do not need to setup and host your own servers in the cloud to ensure your prototype is functioning properly. This cloud service also has a feature that allows you to define data triggers and actions, so that you can receive alerts when data falls within specific ranges. Additionally, the Cloud Sandbox also provides ways for you to send data from the cloud to your device through the web console, so you can implement things like turning a lamp on and off through a relay connected to your device. The Cloud Sandbox certainly gives you a plethora of functionality that you can leverage to get your prototype up and running quickly.
Speaking of getting prototypes up and running quickly, MediaTek also provides support to bring your ideas to fruition. MediaTek has an established network of trusted partners with whom they can connect you to in order to get your IoT device manufactured and into the hands of consumers through their Partner Connect program.
A Refrigerator Monitor
In order to familiarize myself with this board. I’ve chosen a project where I could leverage both the Arduino and Linux functionality of this fantastic little board. The project is a refrigerator monitor. This will allow me to visualize just how many times, and for how long the fridge door is open on a given day. I would also like an email notification when the door has opened, so that I can take a look at the graphs in the Cloud Sandbox to see just how long the door was open. I kept the implementation of this solution quite simple. I will be placing a light sensor (photo resistor) into the refrigerator and post the light data to the Cloud Sandbox every 1.5 seconds. This project will also solve any mysteries surrounding if the refrigerator light actually does turn off when you shut the door ;)
Getting Started
Getting started with this board is quite simple. Full guidance is available on the MediaTek Labs website that walks you through joining the board to WiFi, updating firmware, adding the board to the Arduino IDE, and running your first program. The sample program demonstrates how by using the Serial console, that the Arduino sketch running on the board can communicate with a Python application running on Linux to blink an on-board LED.
Establishing Communication between Arduino and Node.js (running on Linux)
One of the largest attractions of this board is that it supports both Arduino and Linux. This means you have the choice to develop on one or the other platform. Ideally, you can leverage the strengths of both platforms.
Arduino has amassed a large collection of free libraries that interface with thousands of sensors and breakout boards and shields. This makes Arduino an ideal choice when it comes to working directly with hardware.
Linux excels with server-side solutions. On Linux, you can host web servers, MQTT brokers, data storage, and more. You can also choose to write your applications using any of the supported languages, including C, Python and Node.js. In this article, the focus will be on Node.js.
At the core, the ability to leverage both platforms comes down to learning how to communicate between them. You could setup a web server on the Linux system and communicate through http, but the more efficient solution would be through serial communication.
To demonstrate how to communicate serially between Arduino and Node.js (running on Linux), we will create a simple counter application that counts to 10. When one chip receives a number, it increments the value and sends it back to the other chip. If the counter value exceeds 10, the counting starts over.
Let’s begin with the Node.js side. Use a shell program such as Putty to terminal into the Linux side of the duo board. Once there, create a new folder, and navigate to it by executing the following:
mkdir communication

cd communication
Now we can initialize a Node application. To do so, execute the following:
npm init

Answer each of the prompts (it is ok to leave some answers blank or press Enter to accept the default value that is displayed in parentheses). This will create the package.json file that contains properties describing the application and will also track module dependencies.

Now we are ready to create our Node.js application. Using your favorite text editor, create an index.js file and replace the listing with the following:
// this module is already installed
// on the LinkIt Smart 7688 Duo
var SerialPort = require("serialport").SerialPort;

// Open serial communication to the Arduino
var serialPort = new SerialPort("/dev/ttyS0", {
	baudrate: 57600
});

// when light data is received from the Arduino
// send it to the MediaTek Labs Cloud Sandbox
serialPort.on('data', function(data) {
	//receive counter number from Arduino and increment
	data = Number(data);
  	console.log('Arduino sent: '+ data);
  	var newData = data + 1;
  	if(newData > 10){
  		newData = 0;
  	}

  	//convert to string and send new count back to Arduino
  	newData = newData +'';
  	console.log('Sending back: '+ newData);
  	serialPort.write(newData);
});
Start the Node.js application by executing the following:
node .
Next we will move to the Arduino IDE. Ensure that it is properly setup to communicate with the LinkIt Duo board. Create a new sketch, and replace the code with the following:
void setup() {
  // open serial connection to USB Serial
  //port(connected to your computer)
  Serial.begin(115200);

  // open internal serial connection to
  //MT7688 Linux SOC
  Serial1.begin(57600);

  //initiate counting conversation, start at 0
  Serial1.print(0);

}
void loop() {

  // read from MT7688
  if(Serial1.available()) {
    String received = Serial1.readString();
    Serial.println("Received: "+ received);

    //increment counter
    int val = received.toInt();
    val += 1;
    if(val > 10) {
      val = 0;
    }

    //send back incremented value
    Serial.println("Sending: "+ String(val));
    Serial1.print(val);
    delay(1500); //delay 1.5 seconds for user to read the conversation :)
  }
}
Upload the sketch to the board and watch the Node.js application talk with the Arduino sketch through serial communication!

Now that we’ve established how to communicate back and forth between the Arduino and Linux SOC, we are ready to continue with the Refrigerator project.
Hardware Setup
For this project, you will need the following:
- LinkIt Smart 7688 Duo
- 2 breadboards (1 for the LinkIt board, one to go into the fridge with the photocell)
- 1 photocell (light sensor)
- 1 10K Ohm Resistor (can go smaller, but I wanted higher light readings to ensure accuracy when detecting if the fridge door is open)
- Hook up wire
- An adapter to power the LinkIt Smart 7688 Duo board
Fritzing Diagram
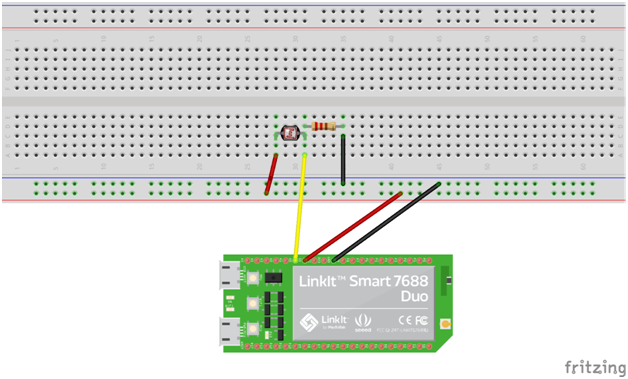
Wiring Details are as follows:
- LinkIt 5v to Power rail
- LinkIt GND to GND rail
- GND rail to one end of the resistor
- Other end of the resistor to one end of the photocell
- LinkIt A0 (Analog pin 0) to the same line as the resistor/photocell in the previous bullet
- Other end of the photocell to Power rail
Setting up Cloud Sandbox
The first thing you will need to do is to log in to the MediaTek Labs Cloud Sandbox. I recommend creating a MediaTek Labs account (if you don’t already have one) as there is single sign-on between the sites.
Cloud Sandbox is structured around the building blocks required to implement a prototype application. These building blocks consist of a Prototype, which is the project itself. The Prototype can consist of any number of test devices. The test device in our case is the LinkIt Smart 7688 duo board. In order for data to be communicated between a test device and the Prototype project, a data channel will need to be created.

Our cloud Prototype will end up looking like the following image. In the next few sections we will build out our Prototype in the MediaTek Labs Cloud Sandbox.

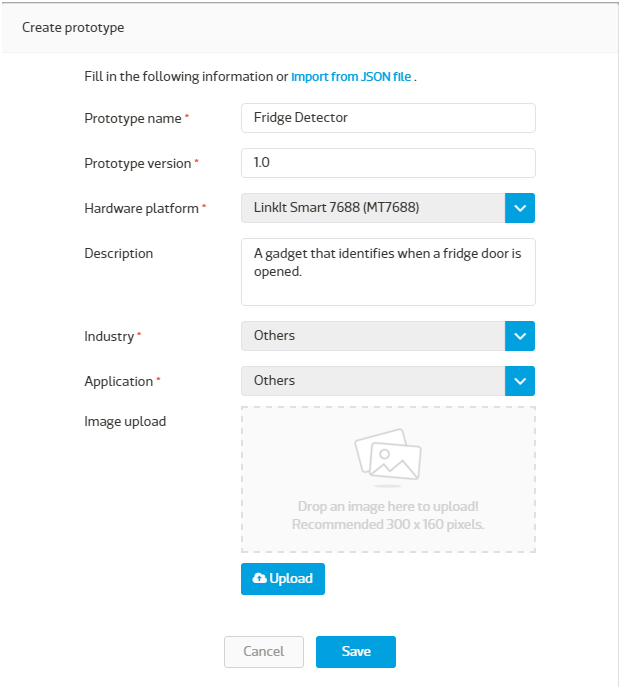
Creating a Cloud Prototype
The first artifact that will need to be created is a registry for your prototype. In the Development section of the console, create a new prototype, I created mine as follows:
Defining a Data Channel
The next artifact required is a data channel. In the prototype record, near the bottom of the form, click to add a data channel.

Select the Display template, this is the template used for sending data up to the cloud from your device in order to visualize it online.

Finally define your channel as follows:

Creating a Device in the Cloud
We now need to create a device so that data sent up can be matched up with the physical device sending the data. Click on Create Test Device from your Prototype Detail page.

Finally define your device as follows:

The device you just create will be given a Device Id and Device key. Obtain these values from the details page of the Test device, as you’ll need them for the source code coming up soon!

Defining the Email Trigger
The last thing that we need to do to setup our project in the cloud is to define the email trigger. In the prototype detail page, select the Trigger & Actions tab, then select "Add trigger & Action"

Define the trigger as follows:


Now the trigger will display in the list:

Source Code
Load the following source code to your device. Use the Arduino IDE to load the sketch, and a program such as WinSCP to move the Node.js files to the LinkIt Smart 7688 Duo.
Arduino Sketch – fridgeMonitor.ino
int lightSensorPin = 0; //A0

void setup() {
  Serial.begin(9600); //Arduino IDE console, when running tethered to the computer
  Serial1.begin(57600); // open internal serial connection to MT7688
  pinMode(lightSensorPin, INPUT);
}

void loop() {
  int val = analogRead(lightSensorPin);    // read the input pin
  Serial.println(val);
  Serial1.print(val); //send to MT7688 (node app)
  delay(1500); //delay 1.5 seconds
}
app.js – Node.js main application file
// npm install mcjs
var mcs = require('mcsjs');
// this module is already installed
// on the LinkIt Smart 7688 Duo
var SerialPort = require("serialport").SerialPort;

var dataChannel = "[YOUR DATA CHANNEL NAME HERE]";

// define the communication channel to the
// MediaTek Cloud Sandbox
var deviceCommChannel = mcs.register({
	deviceId: '[YOUR DEVICE ID HERE]',
	deviceKey: '[YOUR DEVICE KEY HERE]',
	host: 'api.mediatek.com'
});

// Open serial communication to the Arduino
var serialPort = new SerialPort("/dev/ttyS0", {
	baudrate: 57600
});

// when light data is received from the Arduino
// send it to the MediaTek Labs Cloud Sandbox
serialPort.on('data', function(data) {
	deviceCommChannel.emit(dataChannel, '', data);
  	console.log('data sent: '+ data);
});
package.json – Node.js project description and dependencies file
{
  "name": "fridgemonitorjs",
  "version": "1.0.0",
  "description": "identifies when the fridge door is opened",
  "main": "server.js",
  "scripts": {
    "test": "echo \"Error: no test specified\" && exit 1"
  },
  "author": "Carey Payette",
  "license": "ISC",
  "dependencies": {
    "mcsjs": "0.0.4"
  }
}
Running the Project
The first thing you will need to do is place your sensor in the refrigerator. I used two separate breadboards because I didn’t want to have my board in the fridge, and also didn’t want to run a thick power cable into the fridge.

Only thin wires were needed to run into the fridge to the second breadboard holding the sensor.

The second breadboard was placed in the fridge, ready to detect the light change when the door is opened.

Power up the board, and then terminal into the Linux system, and create a folder to hold the Node.js application.
mkdir fridgeMonitor
Copy app.js and package.json to that folder. We will then need to install the dependencies for the application. In the package.json file, you can see that the mcsjs package is a dependency. This package contains an API used to communicate with the MediaTek Labs Cloud Sandbox. To install this dependency, within the project folder, execute the following:
npm install
Finally, to run the application execute:
node app.js
Now you can start watching the data coming in (yes, I ran to the fridge to open the door!):

If you return to the Cloud Sandbox and pull up the Test Device detail, you will see a tile being updated with the latest reading as well as the ability to display a history graph of the data points registered.


I checked my email associated with my MediaTek Labs user account, and saw multiple emails sent from the email trigger:

In Conclusion
I found the LinkIt Smart 7688 Duo to be a very capable board. I ran into some issues initially in trying to setup the Wi-Fi connectivity but was able to get beyond this roadblock quickly (so if http://mylinkit.local doesn’t work for you, use the IP address instead http://192.168.100.1 when connecting to the board’s hotspot). Due to its low price-point, and the Cloud Sandbox, it is an attractive option for inventors to implement their IoT prototypes. Furthermore, the support that MediaTek can offer through the Partner Connect program will help ensure that future IoT products are developed thoroughly, accurately and reliably. I definitely recommend this board to anyone needing to develop quick IoT prototypes that also wish to continue into the manufacturing and delivery phases of their new product.