Introduction
This sample demonstrates how to use docker-compose to host multi container application with the ASP.NET Core MVC, WebAPI and MongoDB.
Prerequisites
You will need to have prior knowledge of ASP.NET Core MVC, Docker and MongoDB.
The sample project requires the following tools to be installed on Windows platform:
- Visual Studio 2015 or 2017
- .NET Core 1.1 SDK
- Docker Community Edition or higher
- Configure Docker to use Linux Containers to support
Docker Compose?
Compose is a tool for defining and running multi-container Docker applications. With Compose, you use a YAML file to configure your application’s services. Then, with a single command, you create and start all the services from your configuration.
Using Compose is basically a three-step process:
- Define your app’s environment with a
Dockerfile so it can be reproduced anywhere - Define the services that make up your app in docker-compose.yml so they can be run together in an isolated environment
- Lastly, run
docker-compose up and Compose will start and run your entire app
A docker-compose.yml looks like this:
version: '2'
services:
   MobileCart:
    image: mobilecart/dockerdemo
    container_name: "mobilecart"
    ports:
     - "8080:80"
    volumes:
     - C:\DockerLogs\MobileCart:/app/Logs

   CustomerRestAPI:
    image: customerserviceapi/dockerdemo
    container_name: "customerrestapi"
    ports:
     - "13402:80"
    volumes:
     - C:\DockerLogs\MobileCart:/app/Logs

   InventoryRestAPI:
    image: inventoryserviceapi/dockerdemo
    container_name: "inventoryrestapi"
    ports:
     - "13477:80"
    volumes:
     - C:\DockerLogs\InventoryService:/app/Logs
Sample Project Overview
The sample project code is designed to mock the order processing of ecommerce application. The project consists of 6 applications:
- Mobile Cart: It is a user-facing event-driven application, where the user places the order. It is developed using ASP.NET Core MVC Application.
The below RESTFul Services take the request from the Mobile Cart application and return the appropriate response.
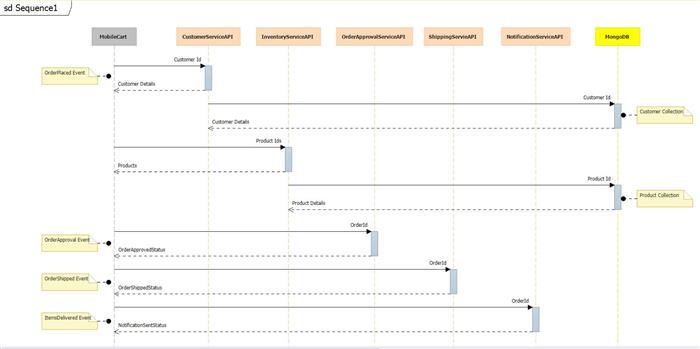
- Inventory Service: Accepts the product Id and returns the product info fetched from the products collection in MongoDB datasource
- Customer Service: Accepts the customer Id and returns the customer info fetched from the customer collection in MongoDB datasource
- Order Approval Service: Validates the order and returns the order approved status
- Shipping Service: Accepts the
orderId and returns the shipping status of the Items - Notification Service: Accepts the
orderId and sends the notification once the items are delivered
Please refer to the sequence diagram below to understand the flow of request in the sample project.
Sequence Diagram of the Sample Application
Running the Sample
Running the sample requires:
- Downloading and Installing the .NET Core 1.1 SDK and Docker Community Edition
- Downloading the sample application
- Publishing each project to its respective "/bin/Release/PublishOutput" folder
- Setting up the shared drives and proxy in docker client
- Building container images and
- Finally starting the multi-container application using docker-compose
Firstly, install the .NET Core 1.1 SDK and Docker Community Edition.
Next, download and unzip the sample application into C:/ or D:/ drive of your choice.
Create a folder for logs, e.g., C:\DockerLogs\MobileCart.
Setup the share drive on docker client: Goto docker client-> Shared Drives -> Select drive -> Click Apply -> If prompted for credentials -> Enter the credentials -> Click Ok
If Proxy setup is required: Goto docker client -> Proxies -> Select Manual proxy configuration ->. Enter the proxy details [<username>:<password>@<proxy>:<port>]-> Click Apply .
Building Container Images
Before running the multi container application, first custom container images have to be built for the applications in the sample.
Open Powershell and type the following commands:
// cd C:\MobileCart\MobileCart
// docker build -t mobilecart/dockerdemo .
Note: [docker build] command uses the Dockerfile in the project folder to build the image.
Repeat the same steps to build the images for CustomerServiceAPI, InventoryServiceAPI, rderApprovalServiceAPI, ShippingService API and NotificationServiceAPI Projects.
And to download the mongodb image from docker hub, type:
// docker pull mongo
To check whether all the images are available, type:
// docker images
This should list all the images.

Run the Multi-container Application Using docker-compose
Finally, to run the multi container application, enter the command:
// cd C:\MobileCart\MobileCart
// docker-compose up
Note: [docker-compose] command uses the docker-compose.yml file in the mobilecart project folder to bring all the services up and running.
The above command will bring all the containers up and running.
Now, browse http://localhost:8080/Home/Index to run the sample application.


 General
  News
News  Suggestion
  Question
  Bug
Bug  Answer
  Joke
Joke  Praise
  Rant
Rant  Admin
Admin 


