
Resizable, Moveable & Customizable Borderless Form
4.00/5 (9 votes)
An article on customizable user forms
 |
 |
Introduction
This code will allow you to use a fully customizable form in your Windows application.
This custom form features:
- Disabled controlbox & default borders
- Fully resizable in all directions
- Fully moveable with the mouse
- Transparency/Opacity
- Custom thickness & custom colors on all sides & corners of the form
- Max & Min size of the form
Background
It seems like many people, including myself, are in need of a way to disable the default border and caption from a form, but still be able to dynamically resize, move and customize them. I couldn't find any easy way to accomplish this, so I wrote my own solution to this problem.
Using the Code
Using the code is pretty straightforward. It is all based on a standard Windows form with the original controlbox and borders disabled.
The customization that we will do to the form is also based on the original form's different events that will initialize the desired behavior of the form
We start by creating a standard Windows form that we will set to lose its default borders and it's controlbox.
FormBorderStyle = FormBorderStyle.None;
As we disable the form's original borders, the default form has basically become useless.
We must now create our own custom borders and the belonging behaviors when hovering, clicking and dragging. First of all, we must set up the boundaries for the form, so that we have references to all the sides, corners and the middle area.
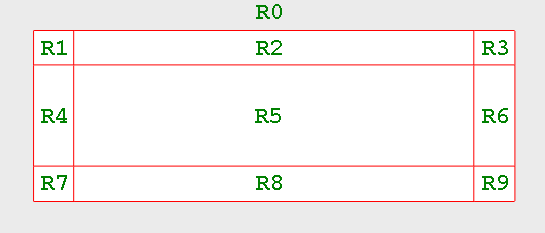
We will start by dividing the original form in 9 + 1 "virtual rectangles" as illustrated in the picture below, each of these rectangles will represent the following:
R0= The complete form area (clientrectangle)R1= Upper left cornerR2= Upper borderR3= Upper right cornerR4= Left borderR5= Center area of the formR6= Right borderR7= Bottom left cornerR8= Bottom borderR9= Bottom right corner
We will then tie different "sub-events" to each and every one of these rectangles to control our custom form's behavior. The thickness of our custom border will be defined by the variable VIRTUALBORDER
The Paint Event
Our custom form will be initialized every time the forms paint event is triggered. This code below will be assigned to the forms paint event. When the form is painted, we will create the R0 - R9 rectangles.
R1 = new Rectangle(new Point(ClientRectangle.X, ClientRectangle.Y),
    new Size(VIRTUALBORDER, VIRTUALBORDER));
R2 = new Rectangle(new Point(ClientRectangle.X + R1.Width, ClientRectangle.Y),
    new Size(ClientRectangle.Width - (R1.Width * 2), R1.Height));
R3 = new Rectangle(new Point(ClientRectangle.X + R1.Width + R2.Width,
    ClientRectangle.Y), new Size(VIRTUALBORDER, VIRTUALBORDER));

R4 = new Rectangle(new Point(ClientRectangle.X, ClientRectangle.Y + R1.Height),
     new Size(R1.Width, ClientRectangle.Height - (R1.Width * 2)));
R5 = new Rectangle(new Point(ClientRectangle.X + R4.Width,
     ClientRectangle.Y + R1.Height), new Size(R2.Width, R4.Height));
R6 = new Rectangle(new Point(ClientRectangle.X + R4.Width + R5.Width,
     ClientRectangle.Y + R1.Height), new Size(R3.Width, R4.Height));

R7 = new Rectangle(new Point(ClientRectangle.X,
     ClientRectangle.Y + R1.Height + R4.Height), new Size(VIRTUALBORDER, VIRTUALBORDER));
R8 = new Rectangle(new Point(ClientRectangle.X + R7.Width,
     ClientRectangle.Y + R1.Height + R4.Height),
     new Size(ClientRectangle.Width - (R7.Width * 2), R7.Height));
R9 = new Rectangle(new Point(ClientRectangle.X + R7.Width + R8.Width,
     ClientRectangle.Y + R1.Height + R4.Height), new Size(VIRTUALBORDER, VIRTUALBORDER));
If we would like to set colors to our custom borders, this can also be done in the paint event, like this:
if (SHOWVIRTUALBORDERS)
{
Graphics GFX = e.Graphics;


// Center Color
GFX.FillRectangle(Brushes.White, R5);

// Corner Colors
GFX.FillRectangle(Brushes.Gold, R1);
GFX.FillRectangle(Brushes.Gold, R3);
GFX.FillRectangle(Brushes.Gold, R7);
GFX.FillRectangle(Brushes.Gold, R9);


// Side Colors
GFX.FillRectangle(Brushes.Red, R2);
GFX.FillRectangle(Brushes.Red, R8);
GFX.FillRectangle(Brushes.Red, R4);
GFX.FillRectangle(Brushes.Red, R6);
}
The MouseMove Event
The MouseMove Event will have two different functions for our form, depending if the form has captured the mouse, i.e. the mouse button is pressed or not. If the Mousebutton is pressed when hovering the form, we assume that this is an indication that the user would like to move or resize the form. In this case, we will check where on our form the resizing is done and redraw the form accordingly...
RESIZEDESTINATION = PointToScreen(new Point(e.X, e.Y));
R0 = Bounds;

// If the form has captured the mouse...
if (Capture)
{

if (ISMOVING == true)
{
ISREZISING = false;
// ISMOVING is true if the R5 rectangle is pressed. Allow the form to be
// moved around the screen.
Location = new Point(MousePosition.X - MOUSEPOS.X, MousePosition.Y - MOUSEPOS.Y);
}

if (ISREZISING == true)
{
ISMOVING = false;

if (ISRESIZINGTOPLEFT)
{
Bounds = new Rectangle(R0.X + RESIZEDESTINATION.X - RESIZESTART.X, R0.Y +
    RESIZEDESTINATION.Y - RESIZESTART.Y, R0.Width - RESIZEDESTINATION.X +
    RESIZESTART.X, R0.Height - RESIZEDESTINATION.Y + RESIZESTART.Y);
}

if (ISRESIZINGTOP)
{
Bounds = new Rectangle(R0.X, R0.Y + RESIZEDESTINATION.Y - RESIZESTART.Y,
    R0.Width, R0.Height - RESIZEDESTINATION.Y + RESIZESTART.Y);
}

if (ISRESIZINGTOPRIGHT)
{
Bounds = new Rectangle(R0.X, R0.Y + RESIZEDESTINATION.Y - RESIZESTART.Y,
    R0.Width + RESIZEDESTINATION.X - RESIZESTART.X,
    R0.Height - RESIZEDESTINATION.Y + RESIZESTART.Y);
}

if (ISRESIZINGLEFT)
{
Bounds = new Rectangle(R0.X + RESIZEDESTINATION.X - RESIZESTART.X, R0.Y,
    R0.Width - RESIZEDESTINATION.X + RESIZESTART.X, R0.Height);
}

if (ISRESIZINGRIGHT)
{
Bounds = new Rectangle(R0.X, R0.Y, R0.Width + RESIZEDESTINATION.X - RESIZESTART.X,
    R0.Height);
}

if (ISRESIZINGBOTTOMLEFT)
{
Bounds = new Rectangle(R0.X + RESIZEDESTINATION.X - RESIZESTART.X, R0.Y,
    R0.Width - RESIZEDESTINATION.X + RESIZESTART.X, R0.Height +
    RESIZEDESTINATION.Y - RESIZESTART.Y);
}

if (ISRESIZINGBOTTOM)
{
Bounds = new Rectangle(R0.X, R0.Y, R0.Width, R0.Height +
    RESIZEDESTINATION.Y - RESIZESTART.Y);
}

if (ISRESIZINGBOTTOMRIGHT)
{
Bounds = new Rectangle(R0.X, R0.Y, R0.Width + RESIZEDESTINATION.X - RESIZESTART.X,
    R0.Height + RESIZEDESTINATION.Y - RESIZESTART.Y);
}

RESIZESTART = RESIZEDESTINATION;
Invalidate();
}
}
[The MouseMove Event continued] ...
When the mouse is just hovering the form, we want the cursor to change depending on where at the form it is hovering. i.e. If the mouse is hovering over one of the corners, it should change its cursor so that the user knows that the form can be resized at this location. The following code will be triggered if the mouse is hovering the form and it is not captured:
else
{
MOUSEPOS = new Point(e.X, e.Y);

// Changes Cursor depending where the mousepointer is located at the form...
if (R1.Contains(MOUSEPOS))
{
Cursor = Cursors.SizeNWSE;
}
if (R2.Contains(MOUSEPOS))
{
Cursor = Cursors.SizeNS;
}
if (R3.Contains(MOUSEPOS))
{
Cursor = Cursors.SizeNESW;
}
if (R4.Contains(MOUSEPOS))
{
Cursor = Cursors.SizeWE;
}
if (R5.Contains(MOUSEPOS))
{
Cursor = Cursors.Default;
}
if (R6.Contains(MOUSEPOS))
{
Cursor = Cursors.SizeWE;
}
if (R7.Contains(MOUSEPOS))
{
Cursor = Cursors.SizeNESW;
}
if (R8.Contains(MOUSEPOS))
{
Cursor = Cursors.SizeNS;
}
if (R9.Contains(MOUSEPOS))
{
Cursor = Cursors.SizeNWSE;
}

}
The MouseDown Event
When the MouseDown event is triggered, we will check which Rectangle that contains the mouse cursor and set the corresponding variables and Boolean's. We will also record the position of the mouse cursor as a reference point for our resize or move "events".
switch (e.Button)
{
case MouseButtons.Left:

if (R1.Contains(MOUSEPOS))
{
ISREZISING = true;
ISRESIZINGTOPLEFT = true;
RESIZESTART = PointToScreen(new Point(e.X, e.Y));
}

if (R2.Contains(MOUSEPOS))
{
ISREZISING = true;
ISRESIZINGTOP = true;
RESIZESTART = PointToScreen(new Point(e.X, e.Y));
}

if (R3.Contains(MOUSEPOS))
{
ISREZISING = true;
ISRESIZINGTOPRIGHT = true;
RESIZESTART = PointToScreen(new Point(e.X, e.Y));
}

if (R4.Contains(MOUSEPOS))
{
ISREZISING = true;
ISRESIZINGLEFT = true;
RESIZESTART = PointToScreen(new Point(e.X, e.Y));
}

if (R5.Contains(MOUSEPOS))
{
// If the center area of the form is pressed (R5), then we should be able
// to move the form.
ISMOVING = true;
ISREZISING = false;
MOUSEPOS = new Point(e.X, e.Y);
Cursor = Cursors.SizeAll;
}

if (R6.Contains(MOUSEPOS))
{
ISREZISING = true;
ISRESIZINGRIGHT = true;
RESIZESTART = PointToScreen(new Point(e.X, e.Y));
}

if (R7.Contains(MOUSEPOS))
{
ISREZISING = true;
ISRESIZINGBOTTOMLEFT = true;
RESIZESTART = PointToScreen(new Point(e.X, e.Y));
}

if (R8.Contains(MOUSEPOS))
{
ISREZISING = true;
ISRESIZINGBOTTOM = true;
RESIZESTART = PointToScreen(new Point(e.X, e.Y));
}

if (R9.Contains(MOUSEPOS))
{
ISREZISING = true;
ISRESIZINGBOTTOMRIGHT = true;
RESIZESTART = PointToScreen(new Point(e.X, e.Y));
}

break;
}
}
Points of Interest
I have used this approach in some of my projects. If you want to see an example that uses this approach, please check out the knas ScreenParts application.
History
This is the first version of this article.