
Custom Serialization - Part 2
3.86/5 (10 votes)
Custom Serialization in .NET
Introduction
In the previous article, I discussed about how .NET does serialization and converts the objects to XML and vice versa in a Web service scenario. In this article, I will discuss more about .NET serialization classes and how to use them.
Custom Serialization & Deserialization
Custom serialization is the process in which we determine how the object should be converted into a stream of bytes. .NET offers different ways of custom serialization.
Using Attributes
Attributes are applied at the class level and mark that the class instance can be serialized. The properties, public fields of the class get serialized based on two attributes. They are:
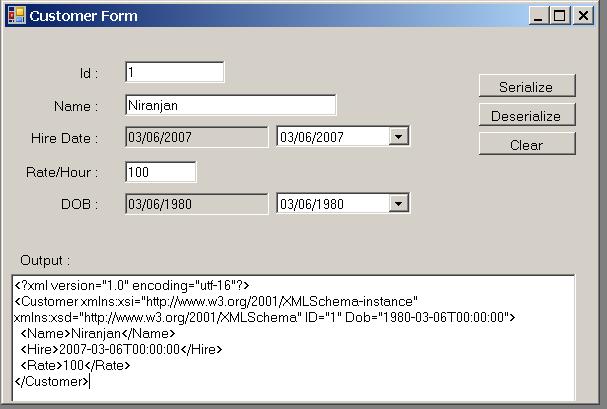
[XmlAttribute]: Means thepublicfield or property will be serialized as an attribute in the XML node[XmlElement]: Means that thepublicfield or property will be serialized as an element in the XML node
If you don't need a field to be serialized, you can mark it as [NonSerialized]. The following code snippet shows the Customer class as Serializable with public fields as attributes and elements:
[Serializable]
    public class Customer
    {
        [XmlAttribute("ID")]
        public string Id;

        [XmlElement("Name")]
        public string Name;

        [XmlElement("Hire")]
        public DateTime HireDate;

        [XmlElement("Rate")]
        public decimal RatePerHour;

        [XmlAttribute("Dob")]
        public DateTime Dob;

        public Customer()
        {
        }
    }
Once you define the entity class, you can serialize and deserialize the instances using XmlSerializer class found in the System.Xml.Serialization namespace. The following code snippet serializes the Customer instance, converts it into string and displays the result in a text box. Refer to frmCustomer in the sample application.
XmlSerializer serializer = new XmlSerializer(typeof(Customer));
StringWriter writer = new StringWriter();
serializer.Serialize(writer, customer);
textBoxResult.Text = writer.ToString();
Deserialization is the reverse process, and the code snippet is given below:
StringReader reader = new StringReader(textBoxResult.Text);
XmlSerializer serializer = new XmlSerializer(typeof(Customer));
Customer customer = (Customer) serializer.Deserialize(reader);
Pros and Cons
This approach has the following advantages:
- Flexibility of specifying whether a property should be serialized or not
- Serialize as attribute or element
- Controlled using attribute
This approach has the following pitfalls:
- We cannot control the format at runtime
- Change in format needs code change and hence needs code recompile, redeploy
Using IXmlSerializable Interface
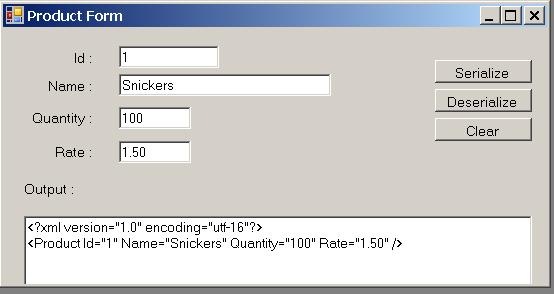
The second technique of custom serialization & deserialization is by implementing the IXmlSerializable interface. The Product class implements the IXmlSerializable. ReadXml() method will be called during the deserialization process and WriteXml() method will be called while serializing the object.
The entity class doesn't need any attribute at the class level or at the property/field level. The runtime would automatically consider all the public properties and fields during the serialization & deserialization process.
In the WriteXml() method, we can decide how we want to serialize the properties. When you write the properties using the XmlWriter, the XML document will be formed with properties. The following code snippet writes the properties as attributes.
public void WriteXml(XmlWriter writer)
{
    writer.WriteAttributeString("Id", Id);
    writer.WriteAttributeString("Name", Name);
    writer.WriteAttributeString("Quantity", Quantity.ToString());
    writer.WriteAttributeString("Rate", Rate.ToString());
}
In the ReadXml() method, you perform the operation of reading from the XmlReader in the same order in which you created the XML document.
public void ReadXml(XmlReader reader)
{
    Id = reader.GetAttribute("Id");
    Name = reader.GetAttribute("Name");
    Quantity = int.Parse(reader.GetAttribute("Quantity"));
    Rate = decimal.Parse(reader.GetAttribute("Rate")) ;
}
Pros and Cons
This approach has the following advantages:
- Serialize in XML format, serialize as attribute or element. Good for interoperability
- Better flexibility and control over serialization and deserialization. We can include some custom logic and decide whether to serialize/deserialize a property or not
This approach has the following pitfalls:
- Every entity needs the
ReadXml()andWriteXml()implementation. In a system with more entities, it will take considerable amount of time to implementReadXml()andWriteXml()logic in all entities.
Using ISerializable Interface
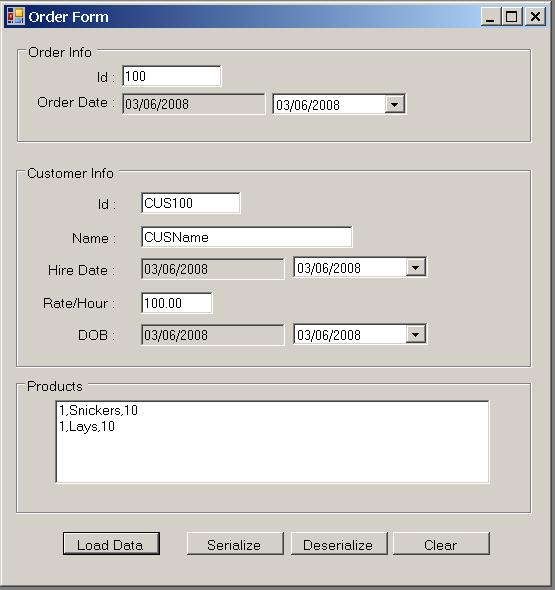
Custom serialization can also be achieved by implementing ISerializable interface on the class. When the object instance is serialized, the runtime will invoke the GetObjectData() method. In this method, you need to add the properties and values that need to be serialized. When you deserialize the object, a special overloaded constructor is required in which you would get the values and fill in your properties. The data will be serialized using Binary formatter, hence the performance would be better compared to other methods, but the objects are not interoperable.
This works very similar to the IXmlSerializable interface, but the difference is that you would be dealing with SerializationInfo instance instead of XmlReader and XmlWriter classes.
Serializing using ISerializable interface:
public void GetObjectData(SerializationInfo info, StreamingContext context)
{
    info.AddValue("Id", _id);
    info.AddValue("OrderDate", _orderDate);
    info.AddValue("Customer", customer);
    info.AddValue("Products", products);
}
Deserializing using ISerializable interface:
public Order(SerializationInfo info, StreamingContext context)
{
    _id = info.GetString("Id");
    _orderDate = info.GetDateTime("OrderDate");
    customer = (Customer)info.GetValue("Customer", typeof(Customer));
    products = (Product[])info.GetValue("Products", typeof(Product[]));
}
The Order class has an object graph. It contains a customer instance, and an array of Product instances.
The code that invokes the serialization process is as follows:
MemoryStream memoryStream = new MemoryStream();
StreamWriter writer = new StreamWriter(memoryStream);
BinaryFormatter formatter = new BinaryFormatter();
formatter.Serialize(memoryStream, order);
ASCIIEncoding encoding = new ASCIIEncoding();
byte[] bytes = memoryStream.ToArray();
The code that invokes the deserialization process is as follows:
MemoryStream memoryStream = new MemoryStream(bytes);
BinaryFormatter formatter = new BinaryFormatter();
Order order = (Order) formatter.Deserialize(memoryStream);
Pros and Cons
This approach has the following advantages:
- Serialize in binary format, obtain maximum performance
- Better flexibility and control over serialization and deserialization process. We can include some custom logic and decide whether to serialize/deserialize a property or not
This approach has the following pitfalls:
- Every entity needs
GetObjectData()and specialized constructor implementation. In a system with more entities, it will take considerable amount of time to implement these methods in all classes.
About the Code
The application has three forms:
CustomerProductOrder
Each form illustrates a different technique. The form would serialize the instance and show the serialized data in the text box in which the deserialize function would form the instance and fill the controls. You can change the value of the serialized data and see the deserialization process pick the changed data and fill the controls. The Order form does serialization and deserialization in binary format, which would not be shown in the form.
The Customer Form works with the Customer class. This form illustrates the attribute based serialization.
The Product Form works with the Product class. This form illustrates serialization using the IXmlSerializable interface.
The Order Form works with the Order class which internally contains Customer and Product[]. This form illustrates serialization using ISerializable interface & binary formatting.
Conclusion
.NET Framework provides many options for performing custom serialization and deserialization of class instances. Based on various factors like flexibility, interoperability, code maintainability, effort involved, we can choose the appropriate technique.
In the next article, I shall discuss how we can completely implement a serialization engine from scratch, with interoperability and flexibility as key requirements.
Happy reading! Happy coding!
History
- 6th March, 2008: Initial post