
Insert iCal Events into SharePoint 2010 Calendar
This article describes how to insert iCal events into your SharePoint 2010 calendar and use it as a calendar overlay.

Introduction
This article describes how to read an iCalendar file and insert the calendar events into a SharePoint 2010 calendar. It will also outline how we can show these new events as a calendar overlay to an existing SharePoint 2010 calendar so as to display it in another color and add additional view filters to these events.
Background
I am maintaining a departmental SharePoint 2010 team site which has a shared calendar object that the personnel in the departments rely on to update their out of office statuses and other departmental activities. As such, we thought it will be a good idea to also show public holidays on the calendar so staff can use it as a standard reference point to plan their work activities.
Public holidays are usually published in an iCalendar file on a government website. iCalendar, also known as RFC 2445, is a standard textual file format with the extension ".ics". It is a widely used format for exchanging and publishing calendaring and scheduling information, and it is used and supported by many calendaring products such as Google Calendar, Lotus Notes, Microsoft Outlook, etc.
Since the iCalendar files are in a standard format, there are multiple libraries available that can be used to extract the contents in the file. We will be using the Open Source DDay.iCal library to interact with the calendaring information in the iCalendar files and SharePoint 2010 Web Services to insert calendar events into the team site shared calendar.
SharePoint Calendar Setup
To keep the public holidays as a separate SharePoint calendar so that we can overlay the new calendar onto the existing departmental calendar, we would first have to create the new calendar. In your SharePoint site, create a new calendar under the List category. In this example, I have named the new calendar "Public Holidays".

Referencing SharePoint 2010 Web Services
After our new calendar is set up in the SharePoint site, we will need to switch back to Visual Studio 2010 to add a reference to the Web Services that are located in the SharePoint site. Create a new "Windows Console Application" project in Visual Studio 2010. Add the references to the DDay.iCal library to your solution, namely the antlr.runtime.dll and DDay.iCal.dll files. Next, we need to add a Web Service reference to our SharePoint site. Right click on "Service Reference" in your Visual Studio solution and select "Add Service Reference".

As SharePoint 2010 is utilizing .NET 2.0 style Web Services, we will need to create Web Service references instead of service references. In the "Add Service Reference" window, click on "Advanced". A "Service Reference Settings" dialog box should pop up. Click on "Add Web Reference" to add a .NET 2.0 Web Service reference to the solution.

At the Add Web Reference screen, type in the URL of your SharePoint site which contains the calendar, followed by the service path to the Lists.asmx Web Service. In this example, our site is named "caltest". Give a name to your Web Service reference. In this example, we have named it "WService". Click "Add Reference" to add this Web Service reference to our solution.

Using the Code
First, we need to include the DDay.iCal namespace into our code. Add the following using statement at the top of the Program.cs file:
using DDay.iCal;
Second, since we will be using CAML queries to create SharePoint 2010 calendaring entries, we will need to manipulate XML elements. We can do this easily by including the .NET System XML libraries. Include this statement following the DDay.iCal library inclusion.
using System.Xml;
To load calendar entries from the iCal files that you have downloaded, you just need to call the static LoadFromFile method. Note that you can also load from
other sources such as WebDAV or database. To load the entries from your local hard drive however, you just need the statement below.
IICalendarCollection calendars = iCalendar.LoadFromFile(@"D:\holidays.ics");
To iterate the events that are contained in the iCal file that you have just read, you need to define a start date and end date in the GetOccurance method
before you use a foreach loop to extract each individual event or occurrence. In the example below, we specify the current year.
foreach (Occurrence currentOccurance in calendars.GetOccurrences(
   new DateTime(DateTime.Today.Year, 1, 1),
   new DateTime(DateTime.Today.Year, 12, 31)))
{
    DateTime occurrenceTime =
      currentOccurance.Period.StartTime.Local;
    IRecurringComponent rc =
      currentOccurance.Source as IRecurringComponent;
    if (rc != null)
    {
        string holidayName = rc.Summary;
        DateTime holidayDate = occurrenceTime;
    }
}
To insert SharePoint 2010 calendar entries, we need to construct CAML queries and send it to the Lists.asmx Web Service. The Lists.asmx Web Service has various methods to allow you to manipulate lists in SharePoint. Calendars in SharePoint 2010 are implemented as lists, the only difference is that the list entries are rendered in a calendar view rather than a standard list view. Also, you will need to format your date string in a specific format for SharePoint 2010 to recognize it. The following example shows how to format your date as well as the various fields that you need to pass in to create the calendar entries.
string startDateString = String.Format("{0}T{1}Z",
  holidayDate.ToString("yyyy-MM-dd"), holidayDate.ToString("HH:mm:ss"));
string endDateString = String.Format("{0}T{1}Z",
  holidayDate.ToString("yyyy-MM-dd"), holidayDate.ToString("HH:mm:ss"));

XmlDocument doc = new XmlDocument();
XmlElement batch_element = doc.CreateElement("Batch");
string item = "<Method ID=\"1\" Cmd=\"New\">";
item = item + "<Field Name=\"Location\"></Field>";
item = item + "<Field Name=\"EventDate\">" + startDateString + "</Field>";
item = item + "<Field Name=\"EndDate\">" + endDateString + "</Field>";
item = item + "<Field Name=\"Description\">" + holidayName + "</Field>";
item = item + "<Field Name=\"Title\">" + holidayName + "</Field>";
item = item + "<Field Name=\"fAllDayEvent\">1</Field>";
item = item + "<Method>";
batch_element.InnerXml = item;
list.UpdateListItems("Public Holidays", batch_element);
Combined Final Code
Combining the code snippets above, we have something like the example below:
using System;
using System.Collections.Generic;
using System.Linq;
using System.Text;
using DDay.iCal;
using System.Xml;

namespace ImportICalendar
{
    class Program
    {

        public Program()
        {
            IICalendarCollection calendars =
                iCalendar.LoadFromFile(@"D:\holidays.ics");

            try
            {
                WService.Lists list = new WService.Lists();
                list.Url = "http://spsvr/sites/caltest/_vti_bin/Lists.asmx";

                list.Credentials = new System.Net.NetworkCredential(
                   "adminuser", "adminpassword", "testdomain");


                foreach (Occurrence currentOccurance in calendars.GetOccurrences(
                         new DateTime(DateTime.Today.Year, 1, 1),
                         new DateTime(DateTime.Today.Year, 12, 31)))
                {
                    DateTime occurrenceTime =
                      currentOccurance.Period.StartTime.Local;
                    IRecurringComponent rc =
                      currentOccurance.Source as IRecurringComponent;
                    if (rc != null)
                    {
                        string holidayName = rc.Summary;
                        DateTime holidayDate = occurrenceTime;

                        string startDateString = String.Format("{0}T{1}Z",
                          holidayDate.ToString("yyyy-MM-dd"),
                          holidayDate.ToString("HH:mm:ss"));
                        string endDateString = String.Format("{0}T{1}Z",
                          holidayDate.ToString("yyyy-MM-dd"),
                          holidayDate.ToString("HH:mm:ss"));

                        XmlDocument doc = new XmlDocument();
                        XmlElement batch_element = doc.CreateElement("Batch");
                        string item = "<Method ID=\"1\" Cmd=\"New\">";
                        item = item + "<Field Name=\"Location\"></Field>";
                        item = item + "<Field Name=\"EventDate\">" +
                               startDateString + "</Field>";
                        item = item + "<Field Name=\"EndDate\">" + endDateString + "</Field>";
                        item = item + "<Field Name=\"Description\">" + holidayName + "</Field>";
                        item = item + "<Field Name=\"Title\">" + holidayName + "</Field>";
                        item = item + "<Field Name=\"fAllDayEvent\">1</Field>";
                        item = item + "</Method>";
                        batch_element.InnerXml = item;
                        list.UpdateListItems("Public Holidays", batch_element);
                    }
                }
            }
            catch(Exception e){
                Console.WriteLine("Error occurred : " + e.ToString());
            }
        }

        static void Main(string[] args)
        {
            new Program();
        }
    }
}
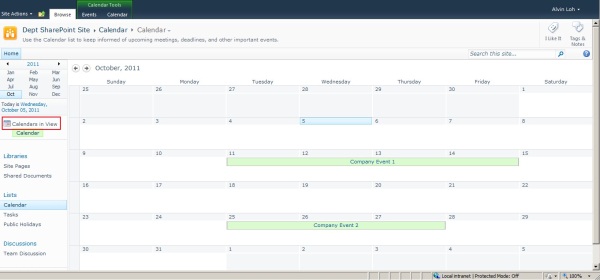
After running the code above, the entries in the iCal file should be inserted into the "Public Holidays" calendar. When we refresh the calendar in our SharePoint site, we should see the entries being inserted and displayed on the calendar.

Adding Additional SharePoint Calendar Overlay
Now, coming to the final part of this article, we want to overlay the "Public Holiday" calendar on top of our existing department SharePoint calendar. First, go back to the main calendar and click on "Calendars in View".
In the Calendar overlay screen, give a name to the overlay. In this example, we have named our overlay "Public Holiday Overlay". You will need to fill in the URL of your SharePoint site and click on the Resolve button to get SharePoint to retrieve all the calendars that are available for the particular SharePoint site. Select the calendar which you want to use as an overlay and click on the OK button.
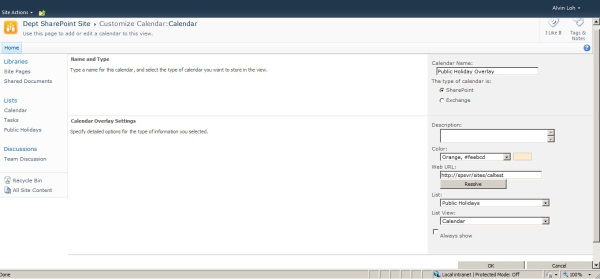
You will be returned to the Additional Calendar screen. Here you can choose which particular calendars will be visible in view. Click OK to overlay the "Public Holiday" calendar onto your existing SharePoint 2010 calendar and you're done! Congratulations!

History
- 7 Oct. 2011 - Posted.