
Home-Made XP Panel
Create your own neat expandable Windows XP Panel
 |
 |
|
Without Gradients (v1.0)
|
With Gradients (v1.1)
|
Introduction
I will be showing you how you can make that fancy Windows-XP dropdown panel in just a few steps, without using any DLL files, and without worrying about licenses! The panel is fully customizable, since the control is fully coded in VB.NET and no external resources are needed.
Background
I designed this panel because I wanted the Windows XP panel, but I didn't want any 3rd party stuff in my project. So I played with some buttons and panels and it got me a neat result. I decided to post the code for the panel because I thought that there weren't so many coded controls, and I did feel the need for it.
Using the Code
To start, create a new Windows Project named XPPanel.
Table of Contents
- Adding the panels
- Setting the variables
- Defining the colors used in the panel
- Adding the buttons
- Adding the LinkLabels
- Adding the
ImageList(optional) - Coding the expand- and collapse commands
- Finishing Off
Please note: Only one collapsible panel will be created in the next steps. Repeat these steps to add multiple panels. Of course the names of the panels will then be different.
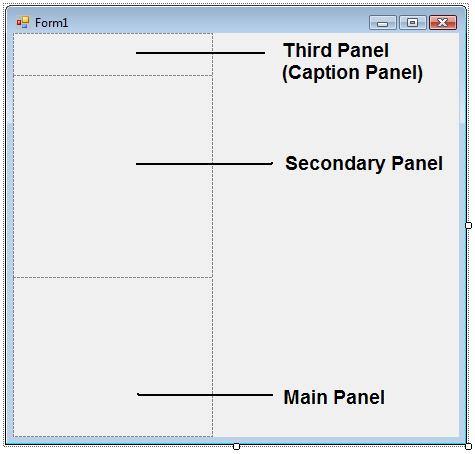
Adding the Panels
To start, we are going to add three panels to the form. The first will be added to the main form, in my case Form1. Set the dock property to Left. Second, add another panel inside the first panel with docking set to Top. We now have two panels, one at the main form, and one inside the main (first) panel. Now, how cool is that? :') After this, add another panel inside the second panel with docking also set to Top. We now have the following:
Setting the Variables
Now it’s time to ready some code. In the code of Form1, add the following lines of code (at the top of the page):
Dim Expanded As Boolean = True
Dim PanelHeight As Decimal
The Boolean Expanded is there to check whether the panel is in an expanded state or not. The decimal PanelHeight contains the height of the panel, needed when expanding the panel again. In the Load event of Form1, add the following code:
PanelHeight = Panel2.Height
You might wonder why I am doing this. It is necessary to do this because if we would not, editing the panel in the designer would give some weird results. In other words: Just add it! Haha.
Defining the Colors Used in the Panel
Now you have to choose if you want the old layout (Version 1, Example image 1) or the new layout (Version 1.1, Example image 2). If you choose the old layout, proceed to Plain Colors. If you like the gradients, proceed to Gradients.
Plain Colors
Now it’s time to brighten the panel up a bit. In this step, we'll give the panel some nice colors, which of course can be changed later on or immediately, to something you like more. Please note that the second and third panels are only given a color. As background color for Panel2, I used (RGB) 239; 243; 255 and for Panel3 (Caption Panel), I used (RGB) 32; 88; 200. Now we would also like some nice outline color, but unfortunately, this isn't supported yet. But fear not, for every problem there is a solution. (Is there?) In the Paint event of the Secondary Panel (Panel2), add the following code:
Dim BorderRectangle as New Rectangle(0,0,Panel2.Width – 1, Panel2.Height – 1)
e.Graphics.DrawRectangle(New Pen(Color.FromArgb(32,88,200),1), BorderRectangle)
e.Dispose()
We subtract 1 of the width and height, because if we don’t the line will not be drawn properly. The background for this isn't really important. This will draw a neat little border with a blue color.
Gradients
If you ask me, a plain background looks kind of boring. That's why I decided to add support for gradients. Please note that the second and third panels are only given a color. In the Paint Event of the Caption Panel (Third Panel), add the following code: Note: Make sure the gradient is drawn before the border is drawn, if not the gradient will be drawn on top of the border, which makes the border invisible.
Dim FirstGradientColor As Color = Color.SteelBlue
Dim SecondGradientColor As Color = Color.LightSteelBlue
Dim Grad As New System.Drawing.Drawing2D.LinearGradientBrush_
	(New Rectangle(0, 0, Panel3.Width, Panel3.Height), _
	FirstGradientColor, SecondGradientColor, _
	Drawing2D.LinearGradientMode.Vertical, False)
e.Graphics.FillRectangle(Grad, New Rectangle(1, 0, Panel3.Width - 1, Panel3.Height - 1))
Dim BorderRect As New Rectangle(0, 0, Panel3.Width - 1, Panel3.Height - 1)
e.Graphics.DrawRectangle(New Pen(Color.SteelBlue, 1), BorderRect)
This will draw a blue gradient and a blue border as in the second example image. If you're curious why I subtract 1 of the width and height, see above (Plain Colors). As background color for the Secondary Panel (Panel2), I've chosen Lavender. Of course you can change the colors chosen in this step to something you like more. Unleash your creative spirit! :)
Adding the Buttons
Now it’s time to add the expand and collapse button. Add a button wherever you like in the third (Caption) panel. I gave the button a nice little image which I will explain later. Also, I set the Flat Style property of the button to Flat, for later on. Give the button the same background color as the background color you gave to the Caption Panel (Third Panel).
Adding the LinkLabels
Now we'd also want the panel to actually have some function, like a menu. You could add whatever fits in your project. In my example, I used linklabels with some nice icons that come with Visual Studio.
Adding the ImageList (Optional)
You can also add an ImageList to Form1 (Main Form) for the state image of the Expand button. Create some up and down arrows, or simply fetch them from the internet. Add them to the ImageList.
Coding the Expand- and Collapse Commands
Now comes the somewhat hard part. The panel still can't expand and collapse as the XP panel and that function will be added in the next step. In the code of the Expand / Collapse button (Button1), add the following:
If Expanded = True Then
    Expanded = False
    ''Collapse the panel by changing its height to the height of the
    ''Caption Panel (Panel3)
    Panel2.Height = Panel3.Height
    ''Optional (index of the ImageList depends on the way you have added the images)
    Button1.Image = ImageList1.Images(0)
Else
    Expanded = True
    ''Expand the panel by changing its height to the original height.
    Panel2.Height = PanelHeight
    ''Optional
    Button1.Image = ImageList1.Images(1)
End If
Good job! The panel is now able to expand and collapse.
Finishing Off
The panel is almost done now. You can add some labels and images to fancy it up. I put an image in the left corner of the Caption Panel (Panel3) and a label with the title in the middle. You can also add a MouseOver effect to the button. In the MouseEnter event of the button, add the following:
Button5.FlatAppearance.BorderColor = Color.Blue
In the MouseLeave event of the button, add the following:
Button5.FlatAppearance.BorderColor = Color.FromArgb(32, 88, 200)
It’s obvious that the color.FromArgb can be replaced by the background color that you've chosen. When you picked a gradient background, I suggest to set the buttons border color to Transparent. Now you're done and you have made your own Windows XP Expandable Panel without any Third Party Software!
History
-
23rd April 2009
- Added support for Gradient Panels (Version 1.1)
-
5th April 2009
- Posted version 1.0
This is my first article! Please rate and comment, and if you come across any bugs (those nasty creeps), feel free to post it and I'll try to fix it. :)