
Creating CheckAll UncheckAll Gridview Webpart with Paging, Sorting Functionalities in Sharepoint 2007 in a Step by Step Manner
4.82/5 (9 votes)
An article about Creating CheckAll UncheckAll Gridview webpart with Paging, Sorting functionalities in Sharepoint 2007 in step by step manner
Introduction
This article helps:
- To know how to provide sorting, paging, Check All and Uncheck All functionality for a
gridviewin SharePoint - To read a SharePoint custom list and bind it to ASP.NET
Gridviewcontrol - To know how to call a User control in a SharePoint web part
- To understand how to deploy the web part
- To know how to debug the web part
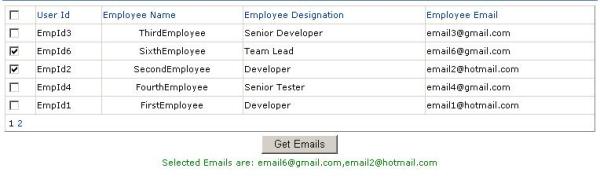
This is what we are going to achieve at the end of this article:
User Control in SharePoint
In webparts in general all the controls are created at run time. But when this task becomes too tedious then write user controls in ASP.NET and use them in SharePoint webparts.
How to Use the Code
Unzip the provided sample code GridView control. The solution contains two projects. The first project is for creating an ASP.NET Gridview usercontrol along with a test webpage. The second project is for creating a SharePoint Webpart using the above Gridview usercontrol.
Creating a Custom List in SharePoint
In the sample code, a custom list by name “EmployeeList“ was created in SharePoint site (http://[systemnumber]:[portnumber]) for populating the gridview.
Steps to Create SharePoint Custom List
- In the SharePoint site, i.e. (http://[systemnumber]:[portnumber]) click Site Actions >> Create.
- From the Create page, click the Custom List link under the Custom Lists category.
- From the New page, enter a title “
EmployeeList” and then click the Create button. - Then from the newly created list’s page, click the Create Column link under the Settings menu.
- From the Create Column page, enter the name of the column and type, e.g.
SingleLineofText. - Repeat steps 4 and 5 for all the columns [
Title,EmployeeName,EmployeeDesignation,EmployeeEmail].
Once all the columns have been created, click on New Item link under the list’s New menu to add an item to the list. And enter some records for “EmployeeList”.
Create User Control
- Open Visual Studio IDE, Select File >> New>> Project, select “Visual C#” as language and under “Web” select “Web Application” template.
- Now the Solution file can be shown in the “Solution Explorer”
- Click on References and select “Add References” option.
- Select “Windows SharePoint Services” from the .NET tab, with this Microsoft.Sharepoint.dll is added in the References.
- Right click on project >> Add >> New Item >> select
WebUserControl. - Following functionalities are provided in the
Gridviewuser control:- Getting data from SharePoint List
- Creating the
Gridviewheader rows at run time - Pagination
- Sorting
CheckAll&UncheckAllcheckboxes- for getting the Ids of the selected rows, in the following sample Email Ids are taken.Place a
Gridviewcontrol from the toolbox in ascx page.
Write JavaScript for getting thecheckallandUncheckAllfunctionality in thegridviewcontrol.
Sample User Control ascx Code
Check the GridViewUsercontrol.ascx code for JavaScript.
<asp:GridView ID="gvMail" runat="server" AutoGenerateColumns="False"
	Width="752px" AllowPaging="True" AllowSorting="True" PageSize="5"
	OnPageIndexChanging="gvMail_PageIndexChanging" OnSorting="gvMail_Sorting"
	HorizontalAlign="Left" UseAccessibleHeader="false">
<Columns>
<asp:TemplateField HeaderText="All" ItemStyle-HorizontalAlign="Left">
<HeaderTemplate>
<asp:CheckBox ID="chkAll" runat="server" onclick="SelectOrUnselectAll(this,'chkRow')" />
</HeaderTemplate>
<ItemTemplate>
<asp:CheckBox ID="chkRow" runat="server" onclick="Check('chkRow')" />
</ItemTemplate>
</asp:TemplateField>
<asp:BoundField DataField="Title" HeaderText="User Id"
SortExpression="Title" ItemStyle-HorizontalAlign="Left"
/>
<asp:BoundField DataField="EmployeeName" HeaderText="Employee Name"
	SortExpression="EmployeeName" ItemStyle-HorizontalAlign="Center" />
<asp:BoundField DataField="EmployeeDesignation" HeaderText="Employee Designation"
SortExpression="EmployeeDesignation"
ItemStyle-HorizontalAlign="Left" />
<asp:BoundField DataField="EmployeeEmail" HeaderText="Employee Email"
	SortExpression="EmployeeEmail"
ItemStyle-HorizontalAlign="Left" />
<asp:TemplateField SortExpression="EmployeeEmail"
Visible="false">
<HeaderTemplate>
Employee Email
</HeaderTemplate>
<ItemTemplate>
<asp:Label ID="lblEmail" Text='<%# Bind("EmployeeEmail") %>' runat="server" />
</ItemTemplate>
</asp:TemplateField>
</Columns>
</asp:GridView>
(a) Sample Code for Getting Data from SharePoint List
In the below code “EmployeeList” is the SharePoint Custom list name and http://[systemnumber]:[portnumber] is the site where webpart gets deployed.
Hold the data in a session.
protected void GetData()
{
    SPSecurity.RunWithElevatedPrivileges(delegate()
    {
        using (SPSite site = new SPSite("http://systemno:portnumber"))
        {
            using (SPWeb web = site.OpenWeb())
            {
                SPList list = web.Lists["EmployeeList"];
                SPListItemCollection itemColl;
                SPQuery query = new SPQuery();

                itemColl = list.GetItems(query);

                string employeeId = string.Empty;
                string employeeName = string.Empty;
                string employeeDesignation = string.Empty;
                string employeeEmail = string.Empty;

                if (itemColl.Count > 0)
                {
                    for (int icount = 0; icount < itemColl.Count; icount++)
                    {
                        SPListItem listItem = itemColl[icount];
                        if (listItem["Title"] != null)
                        {
                            employeeId = listItem["Title"].ToString();
                        }
                        if (listItem["EmployeeName"] != null)
                        {
                            employeeName = listItem["EmployeeName"].ToString();
                        }
                        if (listItem["EmployeeDesignation"] != null)
                        {
                            employeeDesignation =
				listItem["EmployeeDesignation"].ToString();
                        }
                        if (listItem["EmployeeEmail"] != null)
                        {
                            employeeEmail = listItem["EmployeeEmail"].ToString();
                        }
                        AddDataToTable(employeeId, employeeName,
				employeeDesignation, employeeEmail,
				(DataTable)Session[GridValues]);
                    }
                }
            }
        }
    });
}
(b) Sample Code for Sorting
Hold the sort expression, i.e. column names and sort direction ascending or descending in viewstate variables.
DataTable dtSort = ((DataTable)Session[GridValues]);
string lastExpression = string.Empty;
if (ViewState["SortExpression"] != null)
lastExpression = ViewState["SortExpression"].ToString();

string lastDirection = "asc";
if (ViewState["SortDirection"] != null)
lastDirection = ViewState["SortDirection"].ToString();

string newDirection = "asc";
if (e.SortExpression == lastExpression)
newDirection = (lastDirection == "asc") ? "desc" : "asc";

ViewState["SortExpression"] = e.SortExpression;
ViewState["SortDirection"] = newDirection;

DataView dvSort = new DataView(dtSort);
dvSort.Sort = e.SortExpression + " " + newDirection;
gvMail.DataSource = dvSort;
gvMail.DataBind();
(c) Sample Code for Pagination
Take care of sorting during pagination. So read the SortExpression i.e. column name and sort direction from the viewstate.
this.gvMail.PageIndex = e.NewPageIndex;
DataTable dtPagination = ((DataTable)Session[GridValues]);
DataView dvPagination = new DataView(dtPagination);

if (ViewState["SortExpression"] != null && ViewState["SortDirection"] != null)

dvPagination.Sort = ViewState["SortExpression"] + " " + ViewState["SortDirection"];

gvMail.DataSource = dvPagination;

gvMail.DataBind();
(d) Sample Code for Selecting the Emails
Loop through all the checkboxes and using FindControl method, find the selected checkboxes and as per the requirement like sending mails to those or deleting records implement it.
foreach (GridViewRow i in gvMail.Rows)
{
    CheckBox chkRowItem = (CheckBox)i.FindControl("chkRow");
    if (chkRowItem.Checked)
    {
        emailIds += ((Label)i.FindControl("lblEmail")).Text.ToString() + ",";
    }
}
Testing the User Control
For testing the user control functionality before adding it to a web part, add a web form to the project and call the user control in the web page so that the user control can be tested. Find the attached source code to check the functionality of user control in web page.
In the ascx page for Gridview this property “UseAccessibleHeader=false” is required for proper alignment of header checkbox with other checkboxes.
Adding the User Control in a Web Part
- Add new project to the same solution, select Visual C# as language and Windows >>Class Library
- Add “System.Web” as reference in the References of the project.
- Add a class file.
- Call user control in the class file for making it as webpart.
Sample Code for Calling User Control in the Class Library
GridViewUserControl.ascx is the name of the user control that was created in earlier steps.
WebUserControl = (UserControl)Page.LoadControl
(@"/_controltemplates/GridViewUserControl.ascx");

if (WebUserControl == null)
{
    this.Page.Response.Write("usercontrol null");
}

else
{
    this.Controls.Add(WebUserControl);
}
- Build the solution.
Deploying the Web Part
- Copy the user control file (*.ascx) in the path- “SharePoint Installation Drive\Program Files\Common Files\Microsoft Shared\Web Server Extensions\12\TEMPLATE\CONTROLTEMPLATE/usercontrolfilename.ascx”
- Copy the DLL of the user control in the path-"SharePoint Installation Drive\Inetpub\wwwroot\wss\VirtualDirectories\[Site Port No.]\bin\”
- Create Strong name key.
- Right click on the web part project, go to “properties”
- Select “signing” tab from left side
- Check the “Sign the assembly” checkbox
- Select “New” from the below drop down. ”Create Strong Name Key” Window opens.
- Uncheck the “Protect my Keyfile with a password”, enter name in the “Key File Name” textbox, then click “ok”.
Check the below screen for reference:

- Drag and drop the web part DLL in GAC (Type “assembly” in Start -> Run to open the Assembly folder directly).
-
Add Safe Control tag in the web.config file of this path- SharePoint Installation Drive\Inetpub\wwwroot\wss\VirtualDirectories\[Site Port No.]\web.config
<SafeControl Assembly="[Web
part Assembly Name], Version=1.0.0.0, Culture=neutral,
	PublicKeyToken=[PublicKeyTokenValue]"
Namespace="[Web Part Namespace Name]"

TypeName="*" Safe="True"
AllowRemoteDesigner="True"/>
Note
Get the Public Key Token value in two ways:
- From the Assembly folder, right click on the DLL (or deployed assembly) and go to properties and copy the Public Key Token value.
- Use Lutz Reflector. Helps in getting more information about .NET assemblies. Download from here.

- Do iisreset.
Adding the Web part in the Web Part Gallery
- Navigate to the site URL – http://[Site Port No.]
- Go to Site Actions>> Site Settings>>Galleries>>Webparts>>Web Part Gallery
- Click on “New” button of “Web parts Gallery” page. ”Web Part Gallery: New Web Parts” page gets opened, Select the deployed web part from the list below and click on “Populate Gallery” button
- If web part already exists, check the “Overwrite if file already exists”
checkboxand click on “Populate Gallery” button
Using the Web Part in the Site Home Page
- Navigate to the Site Home Page
- Go to Site Actions>>Edit Page
- Click on “Add a Web Part” and the opened window contains the list of all web parts
- Under Miscellaneous section, select the previously deployed web part and then click on “Add” button.
- Click Exit Edit mode
Now the Gridview webpart is displayed with Paging, sorting and CheckAll and UnCheckAll options are displayed.
Debugging the Web Part
- Start>> Run>> Type cmd
- Type “cd\” in the command prompt window, then type IISAPP.vbs and press enter type IISAPP.vbs is used to get the Process ID of SharePoint site.
(Refer the below screen shot, in this case the process ID is 2784.)

- In Visual Studio go to Debug>> Attach to Process >> and check for the Process “w3wp.exe” and Process ID 2784.
- Select the process and click on “Attach” button.

- Add breakpoints in the application and debug the web part like any other .NET project.
History
- 7th April, 2009: Initial post