
Creation of a SPGridview Webpart having Pagination, Sorting, Filtering Functionalities in Sharepoint Site in Step by Step Manner
4.53/5 (10 votes)
Creation of a SPGridview Webpart having pagination, sorting, filtering functionalities in Sharepoint aite in step by step manner
Introduction
Sharepoint has a built-in gridview control, i.e. SPGridView control. It has built-in support for sorting, filtering functionalities when used with an ObjectDataSource, and the look and feel is similar if SPGridView control is used. This is the major reason behind SPGridView usage over ASP.NET GridView control.
Below are the functionalities provided with this sample:
- Creating
SPGridviewwebpart - Different models of Pagination
- Sorting
- Filtering
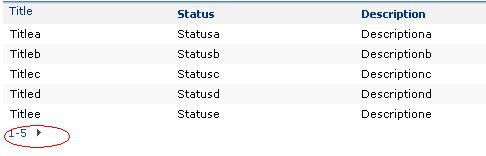
This is what we are going to achieve at the end of this article:
How to Use the Code
Unzip the provided sample code “SPGridViewWebpart”. The solution contains:
- SPGridViewWebpartClass.cs: The actual webpart that contains
SPGridviewwith paging, sorting and filtering functionalities - DataTableWrapper.cs:
ObjectDataSourcereturnsDataRow. To return aDatatableand for bindingSPGridviewwith this datatable, this class acts as a wrapper. - SmartPager.cs: A pagination model
- XofYPager.cs: A pagination model
Build the solution and deploy the DLL in GAC and add the webpart in Sharepoint site.
The steps involved are listed below.
A) Create Web Part
- Open Visual Studio IDE, Select File >> New>> Project, select “Visual C#” as language and under “Windows” select “Class Library” template.
- Right click on References and select “Add References” option.
- Select “Windows SharePoint Services” and “
System.Web” from the .NET tab and click Ok. - Add all the class files i.e. SPGridViewWebpartClass.cs, DataTableWrapper.cs, DataTableWrapper.cs and XofYPager.cs files to the project.
B) Creating Datatable in Runtime
Create a Datatable with columns Title, Status, Description and populate the datatable with data. Here populate the datatable with some sample datatable like TitleA, StatusA, DescriptionA, etc.
private DataRow CreateDataTable(string letter)
{
    DataRow dr;
    dr = sourceDataTable.NewRow();
    dr["Title"] = "Title" + letter;
    dr["Status"] = "Status" + letter;
    dr["Description"] = "Description" + letter;
    sourceDataTable.Rows.Add(dr);
    return dr;
}
C) Pagination
Enable the Pagination in gridview control. And define the page size as 5.
oGrid.PageSize = 5;
oGrid.AllowPaging = true;
Different Types of Showing Pagination
Use any one of the pagination models given below and comment the other models' code.
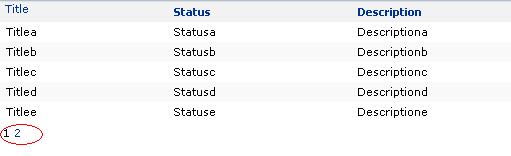
Default Pagination
Let's consider that a total of 50 records are present. Then it displays pagination in this way: 1 2 3 4 5 6 7 8 9 10.
 oGrid.PageIndexChanging += new
                   GridViewPageEventHandler(oGrid_PageIndexChanging);
 oGrid.PagerTemplate = null;

 void oGrid_PageIndexChanging(object sender,GridViewPageEventArgs e)
 {
     oGrid.PageIndex = e.NewPageIndex;
     oGrid.DataBind();
 }
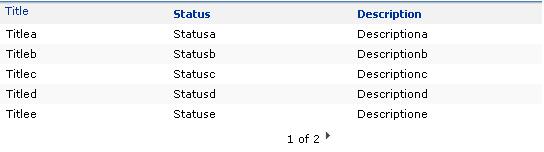
First Model of Pagination
This displays pagination in this way. For the first page, it displays 1 of 10 and for the second page it displays 1 of 10 and so on.
XofYPager xofy = new XofYPager("{0} of {1}", oGrid);
oGrid.PagerTemplate = xofy;
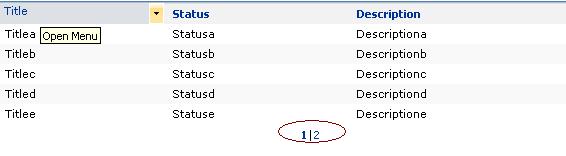
Second Model of Pagination
SmartPager smartpager = new SmartPager(1, oGrid);
oGrid.PagerTemplate = smartpager;
Third Model of Pagination
SPGridViewPager pager = new SPGridViewPager();
pager.ID = "mypager";
pager.GridViewId = "oGridId";
base.Controls.Add(pager);
D) Sorting Code
Enable the sorting in gridview control. Sorting is enabled on all the columns of the DataTable i.e. Title, Status and Description.
oGrid.AllowSorting = true;

BoundField colTitle = new BoundField();
colTitle.DataField = "Title";
colTitle.HeaderText = "Title";
colTitle.SortExpression = "Title";
this.oGrid.Columns.Add(colTitle);

BoundField colStatus = new BoundField();
colStatus.DataField = "Status";
colStatus.HeaderText = "Status";
colStatus.SortExpression = "Status";
this.oGrid.Columns.Add(colStatus);

BoundField colDescriptione = new BoundField();
colDescriptione.DataField = "Description";
colDescriptione.HeaderText = "Description";
colDescriptione.SortExpression = "Description";
this.oGrid.Columns.Add(colDescriptione);
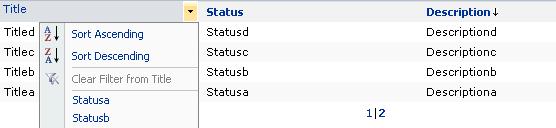
E) Filtering Code
Filtering is enabled on all the columns of the DataTable i.e. Title, Status and Description.
oGrid.AllowFiltering = true;

oGrid.FilterDataFields = "Title";
oGrid.FilteredDataSourcePropertyName = "FilterExpression";
oGrid.FilteredDataSourcePropertyFormat = "{1} like '{0}'";

oGrid.FilterDataFields = "Status";
oGrid.FilteredDataSourcePropertyName = "FilterExpression";
oGrid.FilteredDataSourcePropertyFormat = "{1} like '{0}'";

oGrid.FilterDataFields = "Description";
oGrid.FilteredDataSourcePropertyName = "FilterExpression";
oGrid.FilteredDataSourcePropertyFormat = "{1} like '{0}'";
F) Deploying the Web Part
- Create Strong name key.
- Right click on the web part project, go to “properties”
- Select “signing” tab from left side
- Check the “Sign the assembly” checkbox
- Select “New” from the below drop down.”Create Strong Name Key” Window opens.
- Uncheck the “Protect my Keyfile with a password”, enter name in the “Key File Name” textbox, then click “ok”.
Check the below screen for reference:

- Build the solution.
- Drag and drop the web part DLL in GAC (Type “assembly” in Start -> Run to open the Assembly folder directly).
- Add Safe Control tag in the web.config file of this path- SharePoint Installation Drive\Inetpub\wwwroot\wss\VirtualDirectories\[Site Port No.]\web.config.
<SafeControl Assembly="[Web part Assembly Name], Version=1.0.0.0,
	Culture=neutral, PublicKeyToken=[PublicKeyTokenValue]"
	Namespace="[Web Part Namespace Name]" TypeName="*"
	Safe="True" AllowRemoteDesigner="True"/>
Note: Get the Public Key Token value in two ways:
- From the Assembly folder, right click on the DLL (or deployed assembly) and go to properties and copy the Public Key Token value.
- Use Lutz Reflector.
- Do iisreset.
G) Adding the Web Part in the Web Part Gallery
- Navigate to the site URL – http://[Site Port No.]
- Go to Site Actions>> Site Settings>>Galleries>>Webparts>>Web Part Gallery
- Click on “New” button of “Web parts Gallery” page. ”Web Part Gallery: New Web Parts” page gets opened, select the deployed web part from the list below and click on “Populate Gallery” button
- If web part already exists, check the “Overwrite if file already exists” checkbox and click on “Populate Gallery” button
H) Using the Web Part in the Site Home Page
- Navigate to the Site Home Page
- Go to Site Actions>>Edit Page
- Click on “Add a Web Part” and the opened window contains the list of all web parts
- Under Miscellaneous section, select the previously deployed web part and then click on “Add” button.
- Click Exit Edit mode
Now the SPGridView web part is displayed with paging, sorting and filtering functionalities. It has the same look and feel of a Sharepoint site. That is the advantage of using SPGridView control instead of ASP.NET GridView control.
I) Debugging the Web Part
Refer to my article:
History
- 13th April, 2009: Initial version