
Code InfoBox Visual Studio Extension (VSX) 2010
4.97/5 (39 votes)
A WPF Infowindow placed on the right hand corner of the Code Canvas which informs you about the code statistics

Table of Contents
- Introduction
- Background
- Initial Requirement
- Types of Templates Installed
- Info Window Extension
- Steps to Create Extension
- Install / Uninstall an Extension
- Publishing your Extension
- Points of Interest
- References
- History
Introduction
Ever since I started working with .NET, the best tool that I have been using at times is Visual Studio. Visual Studio coming from VB6 or before has always been the primary tool for development. Visual Studio is used not only by developers like me but also by people who are students, working professionals to write small applications, people using it as editors to read, those learning programming, etc. To all those aspects, Visual Studio works perfectly. Gradually Visual Studio is getting richer and richer. The current version of Visual Studio that is released till now is Visual Studio 2010 Beta 2 [^]. So it's quite a long evolution of this tool. In the meanwhile, there are few languages that have evolved, which introduced to Visual Studio like F# etc., whereas a few have become obsolete like J#. But still Visual Studio is our most important development tool until now.
Visual Studio can now be easily extended by writing simple code. Visual Studio 2010 Beta 2 [^] comes with Extension pack (Visual Studio SDK [^]) which you can easily download for free and write great extensions for Visual Studio. After you install the SDK, you will find quite a number of Visual Studio Templates. Each template bears its own way of writing extension.
In this article, I am going to discuss about how I have created a simple extension for Visual Studio 2010 which will give you the information about the code that you are writing.
Background
It was always in my mind to try writing an extension for this wonderful tool, but I never got a chance to write. Even though, in earlier versions of Visual Studio, I had to write and learn lots of things like adding Interop to the project, invoking API related methods correctly and at correct time etc., I never managed time to learn and write one. But now, everything got easier with Visual Studio 2010. I just need to write a couple of lines of code to make a cool extension for Visual Studio 2010.
Initial Requirement
Here are the few things that are needed to work with the project:
- As this is an extension to Visual Studio 2010, you will of course need Visual Studio IDE. You can find that from here [^].
- Visual Studio 2010 Beta 2 SDK [^] for custom templates while writing Visual Studio Extension ( VSX ).
That's all you need to start.
Types of Templates Installed
After you install Visual Studio SDK, the few net templates that you get. 
- Editor ViewPortAdornment: This template will produce an editor adornment for your code. I will be using this template for my Extension.
- VSIX Project: This is an empty template for
VSIXpackage. - Editor Margin: This creates a margin pane on the bottom of the editor.
- Editor Classifier: It creates an
Editor Classifierfor Visual Studio. - Editor Text Adornment: This places an
editor adornmentproject which you might use to draw into the editor. - Windows Forms Toolbox Control: Helps to create a toolbox control for Visual Studio
- WPF Toolbox Control: WPF based Toolbox control
You can use any one of the applications to build your custom Visual Studio extension.
Note: It is always better to avoid VSIX project Template as you may need to manually edit source manifest file for this Beta Release. Though it is easy to fix those, other templates automatically do this for you.
Info Window Extension
Before I start discussing how I have created the extension, let us clear what the extension is all about. The extension will actually create an information box to the right hand corner of the code window (where you write your code). The info banner shows the statistics of your source code. It basically shows:
- Total Number of Lines in the File
- Total Number of Characters in the File
- Number of Namespaces
- Number of Fields
- Number of Interfaces
- Number of Classes
- Number of Methods
- Number of Properties
- Number of Comments
- Total Size of the File in Bytes, KB, MB, etc.
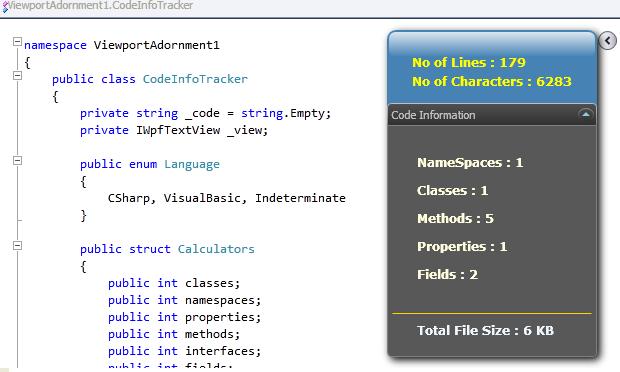
The info window updates itself instantly while you type your code, so you will see the updates shown in the infowindow instantly while writing your code.
Other than that, the info window is basically designed using Expander panels. It groups itself into two sections, each of which can be expanded and collapsed according to your need. Thus when it is not needed, you can just collapse it and see the entire work area. The figure below shows how you can Expand /Collapse the control.
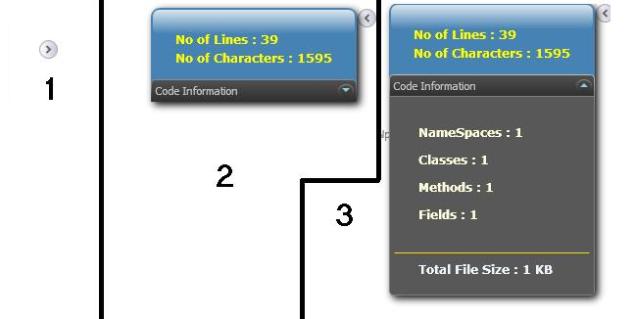
The control has specifically 3 states. The first one is a small expandable button. as shown in the 1st section of the image. Just clicking on it will open up the right side of the panel to show the basic file statistics. The Expandable panel can again be expanded to see all other statistics defined in the lower section panel.
The control, other than showing the content will also remain on the right most corner of the Viewport, and also move itself relative to your code while you scroll down the page. Moreover, the control will also update itself dynamically while you write the code in the editor.
Steps to Create Extension
The extension actually comprises of one WPF user control which I place into the viewport. It also contains 2 classes, one to parse the code to get the info regarding the code, and another to handle the custom editor events and add the WPF control to the viewport when page loads. Let's do one by one.
Initial Setup
I have started by creating a project being Viewport Adornment Project template selected from Extensibility section. This will create a project with one SourceManifest file and two classes. One is Adornment itself, which is used to place the adornment and another is AdornmentFactory class. We will look into both of them later in this article.
Building the User Control
Right click on the project and add a new WPF user control. I have used a user control to simplify this. The user control actually contains one Expander which is made ExpandDirection = Left, which wraps around few TextBlock elements and another Expander which is made ExpandDirection = Down. The code looks like below (I removed unnecessary design elements from it to make it simpler) :
  <Expander ExpandDirection="Left" Style="{DynamicResource ExpanderStyle1}"
           x:Name="expMain" >
  <StackPanel>
                <TextBlock x:Name="txtNoLines"
                           Text="No of Lines : {0}"
                           Margin="25 25 25 0"
                           FontSize="12"
                           FontFamily="Verdana"
                           FontWeight="Bold"
                           Foreground="Yellow"></TextBlock>
                <TextBlock x:Name="txtNoCharacters"
                           Text="No of Characters : {0}"
                           Margin="25 5 25 15"
                           FontSize="12"
                           FontFamily="Verdana"
                           FontWeight="Bold"
                           Foreground="Yellow"></TextBlock>
                <Expander x:Name="expCodeInfo" ExpandDirection="Down"
                                     Header="Code Information">
                    <StackPanel>
                        <TextBlock x:Name="txtClassInfo"
                                   Margin="25 25 25 0"
                                   FontSize="12"
                                   FontFamily="Verdana"
                                   FontWeight="Bold"
                                   Foreground="LightYellow"/>
                        <Line
                              Margin="0,4"
                              SnapsToDevicePixels="True"
                              Stroke="Gold"
                              Stretch="Fill"
                              X1="0" X2="1"
                              />
                        <TextBlock x:Name="txtFileSize"
                                   Margin="25 5 25 15"
                                   FontSize="12"
                                   FontFamily="Verdana"
                                   FontWeight="Bold"
                                   Foreground="AliceBlue"/>
                    </StackPanel>
                </Expander>
            </StackPanel>
         </Expander>
Thus you can see that the code looks very simple, with two Expanders, one for the Basic statistics and another for Enhanced statistics. I have used StackPanel to fix the layout of the TextBlocks.
Now if you look at the code behind, it is also as simple as this. I have actually created one class which parses the source files for me. I just added one extra constructor to the user control to make the work flexible.
private CodeInfoTracker _cinfo;
private CodeInfoTracker.Calculators _calculator;
public ucInfoBox(CodeInfoTracker cinfo)
            : this()
{
        this._cinfo = cinfo;
}
 public void UpdateInfo(CodeInfoTracker info)
 {
            _calculator = info.PerFormCalculate();
            this.txtNoLines.Text = string.Format("No of Lines : {0}",
                                    _calculator.no_of_lines);
            this.txtNoCharacters.Text = string.Format("No of Characters : {0}",
                                                       _calculator.no_of_characters);
            this.txtFileSize.Text = string.Format("Total File Size : {0}",
                                                       _calculator.totalfilesize);

            StringBuilder builder = new StringBuilder();
            if (this._calculator.interfaces != 0)
                builder.AppendFormat("Interfaces : {0}\n\r",
                                          this._calculator.interfaces);
            if (this._calculator.namespaces != 0)
                builder.AppendFormat("NameSpaces : {0}\n\r",
                                            this._calculator.namespaces);
            if (this._calculator.classes != 0)
                builder.AppendFormat("Classes : {0}\n\r",
                                            this._calculator.classes);
            if (this._calculator.methods != 0)
                builder.AppendFormat("Methods : {0}\n\r", this._calculator.methods);
            if (this._calculator.properties != 0)
                builder.AppendFormat("Properties : {0}\n\r",
                                               this._calculator.properties);
            if (this._calculator.fields != 0)
                builder.AppendFormat("Fields : {0}\n\r", this._calculator.fields);
            if (this._calculator.comments != 0)
                builder.AppendFormat("Comments : {0}\n\r", this._calculator.comments);

            if (builder.Length > 0)
            {
                this.txtClassInfo.Visibility = System.Windows.Visibility.Visible;
                this.txtClassInfo.Text = builder.ToString();
            }
            else
            {
                this.txtClassInfo.Text = "";
                this.txtClassInfo.Visibility = System.Windows.Visibility.Hidden;
       }
  }
I used a Structure Calculators which is placed inside my custom class, which has few integer properties to hold all the information after parsing the source. info.PerFormCalculate(); gives the Parsed result. I have used all that information here and updated the UIElements.
Building the Class to Get Information
The class is also very straight forward, even though there are complexities in code. Moreover, I would also like to address that I am very thankful to CS Parser [^] which helped me to parse source code automatically. For VB and others, I have done this manually.
The class actually receives an object of IWpfTextView which represents the Visual Studio text editor. The actual implementation of IWpfTextView is WpfTextView is actually received by the class during actual execution. I got the source code from WPFTextView.TextSnapshot.GetText().
Before I actually invoke the parse, I just have to detect what language the code is written in. Initially I thought of detecting this myself, but thanks to God, I found this already in WPFTextView object (though it is hidden very much inside the object hierarchy).
public enum Language
{
        CSharp, VisualBasic, Indeterminate
}
internal Language DetectLanguage
{
            get
            {
                string langtype =
		this._view.FormattedLineSource.TextAndAdornmentSequencer.
		SourceBuffer.ContentType.DisplayName;
                if(langtype.Equals("CSHARP",
			StringComparison.InvariantCultureIgnoreCase))
                    return Language.CSharp;
                else if(langtype.Equals("BASIC",
                              StringComparison.InvariantCultureIgnoreCase))
                    return Language.VisualBasic;
                else
                    return Language.Indeterminate;
            }
}
Thus DetectLanguage gives me the language appropriately using FormattedLineSource.TextAndAdornmentSequencer. of
SourceBuffer.ContentType.DisplayNameWPFTextView object, OMG. Later I created a new method PerFormCalculate which will actually parse the code and give me an object of the structure Calculation. I intentionally did not put the code here.
Creating the Adornment Factory Class
Finally coming back to the extension, I needed to create a Factory class of Adornment(InfoBoxAdornmentFactory). The class is inherited from IWpfTextViewCreationListener which allows me to Listen to the WPF Editor Creation event.
[Export(typeof(IWpfTextViewCreationListener))]
[ContentType("text")]
[TextViewRole(PredefinedTextViewRoles.Document)]
internal sealed class InfoBoxAdornmentFactory : IWpfTextViewCreationListener
{
        [Export(typeof(AdornmentLayerDefinition))]
        [Name("AlwaysVisibleInfoBox")]
        [Order(After = PredefinedAdornmentLayers.Selection)]
        [TextViewRole(PredefinedTextViewRoles.Interactive)]
        public AdornmentLayerDefinition editorAdornmentLayer = null;
        public void TextViewCreated(IWpfTextView textView)
        {
            new AlwaysVisibleInfoBox(textView);
        }
 }
Thus you can see that I have used a number of Attributes to the class like ContentType which defines that I am going to handle only those Editor calls which are in Text format, TextViewRole defines the type of textview that will handled by this class, etc.
Inside the class, I have created one object of AdornmentLayerDefination. As you might wonder why this is required at all when I am not using it, this is just to configure with the attributes. The Order attribute specifies that the InfoBox will be listened to after every selection of layer, Name of the Editor extension, etc. The constructor just invokes my Adornment class from the factory.
Creating the Adornment Class
The Adornment class is created to call / handle appropriate methods when the actual execution takes place. You may notice that I can easily do the whole thing in my Factory class, but I have created this class to separate the code with the Factory Elements.
The adornment class actually creates an object of the WPF User control, and sets it to the viewport Canvas. Inside the constructor, I handled IWpfTextView.LayoutChanged event, which is eventually called whenever the layout or any code is modified. Thus we can easily get the callback while we edit the document through this event. I have also handled WPFTextView.ViewportHeightChanged, WPFTextView.ViewportWidthChanged to get the callback when the browser editor size is changed, so that we can reposition the usercontrol accordingly.
public AlwaysVisibleInfoBox(IWpfTextView view)
{
          _view.LayoutChanged += this.OnLayoutChanged;
          this.GetLayer();
}
private void GetLayer()
 {
            _adornmentLayer = this._view.GetAdornmentLayer("AlwaysVisibleInfoBox");
            _view.ViewportHeightChanged += delegate { this.onSizeChange(); };
            _view.ViewportWidthChanged += delegate { this.onSizeChange(); };
}
 private void OnLayoutChanged(object sender, TextViewLayoutChangedEventArgs e)
{
            this._info = new CodeInfoTracker(_view);
            this.infobox.UpdateInfo(this._info);
 }
 public void onSizeChange()
 {

            _adornmentLayer.RemoveAllAdornments();
            Canvas.SetLeft(infobox, _view.ViewportRight - 255);
            Canvas.SetTop(infobox, _view.ViewportTop + 10);

          _adornmentLayer.AddAdornment(AdornmentPositioningBehavior.ViewportRelative,
          null, null,
          infobox, null);
}
Thus the constructor just calls the GetLayer which gets the Layer object that we place in the ViewPortSizeChage events like ViewportHeightChanged and ViewportWidthChanged. On every layout change I have updated the user control, in order to reflect the update clearly.
Therefore we successfully build our extension. You can run it using F5, and it will open up the Experimental instance of Visual Studio.
Install / Uninstall an Extension
Installing and deinstalling an extension is very easy now. When you compile the project, it produces an VSIX file. You can just double click on the file, it will install automatically to Visual Studio.
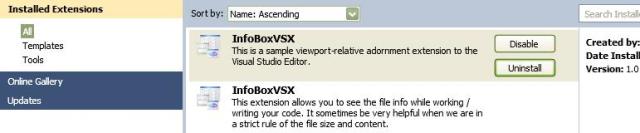
To uninstall the file, you open Visual Studio, Go to Tools - > Extension Manager, and select Uninstall to uninstall the extension.
Publishing your Extension
It is always cool to publish your extension to Visual Studio Gallery. Just you need to upload the VSIX file to www.visualstudiogallery.com. I have already uploaded my extension here [^].
Note: Before publishing your extension, don't forget to change the Manifest file. You just need to double click on the manifest file to get the Cool Interface.
Points of Interest
VSIX files are just a ZIP archive created using PackagePart classes of WindowsBase. If you open any VSIX file, you will see the DLL that comprises the extension, the manifest file and the [ContentType] file, which is the primary unit of Office zip version.
References
There are very few references that I can find regarding this. The few that I found are:
Visual Studio Gallery Link
I have already contributed this VSX to Visual Studio Gallery: InfoBoxVSX
History
- Initial version (V1.0) : 29 January 2010 I know there is lot to go with this extension, but I hope you will like the extension.
- 2nd version (V1.1) : 01 February 2010
- A small bug fix and support for VB code included