
CM_ConfigBuilder 1.2g: Visual Studio 6/Visual Studio 2005/Visual Studio 2008 Code Generator for Application Settings Graphic Management
4.94/5 (113 votes)
CM_ConfigBuilder generates and compiles the required files to manage your application's settings/preferences and to store/retrieve them in XML format.
- Download binaries (version 1.2g) - 2.19 MB
- Download source code (version 1.2g) - 2.55 MB
- Download samples - 30.94 KB
- Download sample1 binaries - 204.7 KB

Latest Update
| CM_Configbuilder Version 1.2G | |
| 1. | Fixed issue on Visual C++ 6.0 Project Generator |
| 2. | Fixed issue on Visual C++ 6.0 Test Project Template |
Introduction
About two years ago, I began to be bored every time my customers asked me, "Can you make this parameter configurable?" Every time I make a parameter configurable, I need to write code to perform the following actions: save the parameter to a file, retrieve the parameter from a file, set up some graphic control to allow the user to change its value (such as text box or some other input control), and validate values set by the user. So, I decided to create a tool that could make all these operations for me.
The first step was to create a tool to describe the structure of the parameters I wanted in my application. The second step was to add the capability to describe how the user could edit the data. The third step was to build a library containing all the needed code. All these wishes led me to write CM_ConfigBuilder. CM_ConfigBuilder generates all the code needed to manage my data structure and to make it persistent in an XML file. The GUI generated by CM_ConfigBuilder shows a tree view containing all the classes of the hierarchy:


Here follows a brief tutorial that shows how to create a simple configuration.
Step 1: Create Some Class Members
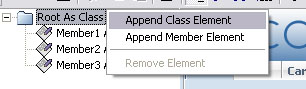
Let's create a simple configuration made of a root class with three attributes. To add members to the class, right click on the tree view and select the item you want to add. In this example, we will add three members:
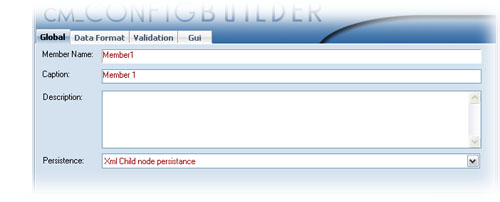
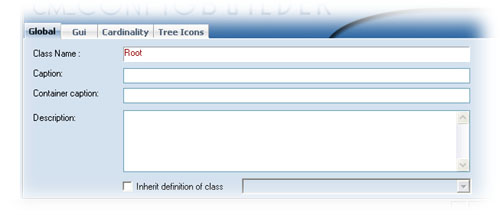
By selecting a member (in the tree view), we will see a set of tabs in the right pane. The first tab ("global") contains the name of the member, its caption (used in the GUI), and the "persistence mode":
The persistence mode can be set to the following values:
- "no persistence": the generator will create the members, but they will not be saved to (or loaded from) a file.
- "XML child node persistence": the generator will create methods to save the member as an XML node child of the container class.
- "XML attribute": the attribute will be stored as a class node attribute.
- "#text node": the attribute will be stored as a text node inside the parent's tags. Only one member can persist as #text node.
Step 2: Set Members' Data Type
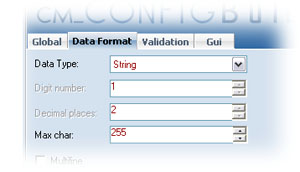
CM_ConfigBuilder allows definition of members' data types: string, long, Boolean, double, date, time. By default, the data type of members is set to "string" (the C++ generator uses a CString derived class called cmString):
Step 3: Set Members' Validation
Member validation currently supports a "Static Enum" and "Custom Validation."
| Static Enum | |||||||||||||||||||||

When we select a "Static Enum" validation, CM_ConfigBuilder generates:
Fields with "Static Enum" validation will be edited by ComboBox controls. The column "Default Values" can be used to specify which default value will be displayed for uninitialized fields. The button "Clear Default" will clear the entire column: the generator will set the initial field value at 0. So, we can set up a member variable long, string or double and validate it as an enum value. Let's have an example: We need to declare a class member representing a sampling rate (let's call it
Cm_ConfigBuilder generates the following code: typedef enum enSampleRate
{
enSampleRate_Low = 1,
enSampleRate_Medium = 5,
enSampleRate_High = 10
}
enSampleRate;
void SetSampleRate(enSampleRate newValue);
enSampleRate GetSampleRate() const;
double GetSampleRate_Value() const;
// this methods returns 10.55 when sampleRate is enSampleRate_Low
In this way, it is easy to make comparisons ( |
|||||||||||||||||||||
| Custom Validation | |||||||||||||||||||||
|
CM_ConfigBuilder can generate an interface. This interface contains a validation function for each member using Custom Validation. Every class member can have one for each class of the project. The Validation process has been associated with a set of possible results:

If you enable Custom Validation for a class member, you will get the following function: //
// VB Sample
//
Implements ItestRootValidator
Private Sub ItestRootValidator_MEMBERNAME_OnLostFocus(_
parent As CLASS, value As DATATYPE)
' if you implement this interface you could change value
' call SetMemberValidationStatus (enum memberId, validationStatus)
' to indicate the icon to display
parent.SetMemberValidationStatus enAttributeId_MEMBERNAME, _
enValidationResult_Error
' call SetMemberValidationMsg (enum memberId, _
' displayDefaultMsg as Boolean, Msg As String) to indicate the
' message to display
' if you set displayDefaultMsg to True the message set in
' figure above will be shown, if you set displayDefaultMsg to
' False you can provide the message to be displayed
parent.SetMemberValidationStatus enAttributeId_MEMBERNAME, _
False, "The value you entered is wrong"
End Sub
The following image shows a possible use of Custom Member Validation:  |
Step 4: Set Members' "GUI Mode"
Another thing to do is set the "GUI mode." We can decide if a member is visible or hidden.
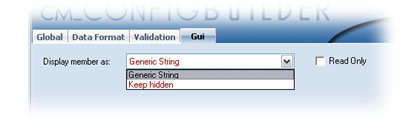
For each class member, CM_ConfiguBuilder will generate a Get/Set couple of methods. If the member is set to visible and the generator is configured to generate the GUI needed to edit the configuration, the member will be shown and will be editable if the check box "Read only" is not checked.
Step 5: Configure the Root Class
To configure a single class, we have to click on the corresponding node in the tree view. The first tab ("global") contains general information about the class: its name, its caption (shown in the treeview of the generated GUI) and its container caption. The container caption is used when the cardinality of the class is Array or Map (see sample 1 in CM_ConfigBuilder_samples.zip).
Step 6: Define GUI Mode
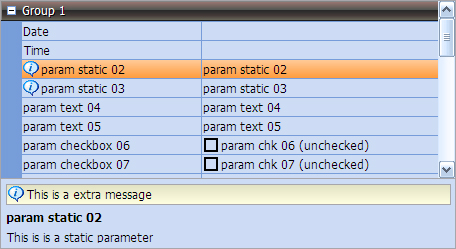
The tab "GUI" allows us to define how we want to see the attributes. Currently, only "Category list" and "Grid" are supported. CategoryList allows the class attributes to be grouped, as shown below. The configuration panel has two tabs: the first is a preview of the generated panel, while the second tab allows editing of the panel structure.


Grid style allows arrays of classes to be shown in a single table, where each row represents a single class instance. Currently, CM_ConfigBuilder provides the following customizations:
- Button bar generation (it is possible to generate a toolbar with buttons for add/remove rows)
- Optional column with row number (zero or one aligned)
- GUI style (currently, only classic and test1 styles are provided)
- Info area display

Starting from version 1.2c, "category list" (implemented by component cmOptionList) and "grid" (implemented by component cmTable) have a new style (soon customizable).
Sample of cmOptionList (style1):
Sample of cmTable (style1):

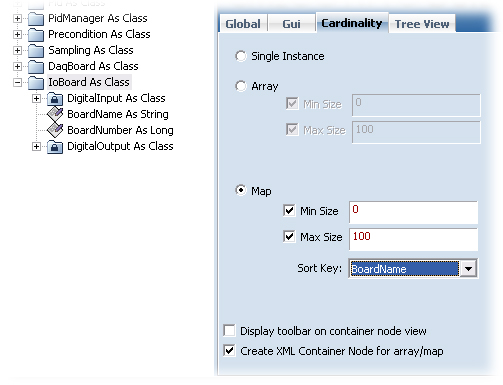
Step 7: Define Cardinality
The tab "Cardinality" allows us to say, "This class is not a single instance." We can decide if we want to create a class array or a class map. These settings are shown in sample 1 (see sample 1 in CM_ConfigBuilder_samples.zip). P.S. this version does not support min/max size of array or map.
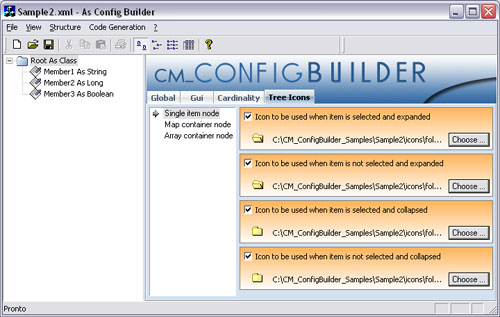
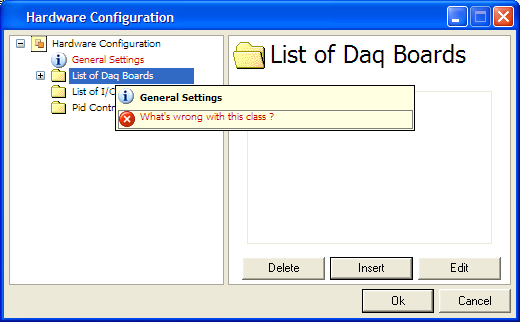
Step 8: Define Tree Icons
The tab "Tree Icons" allows us to specify which icons will be shown in the tree view. For classes not "single instance" (see Cardinality), it is possible to specify which icons will be shown on the container node.
Step 9: Class Validation
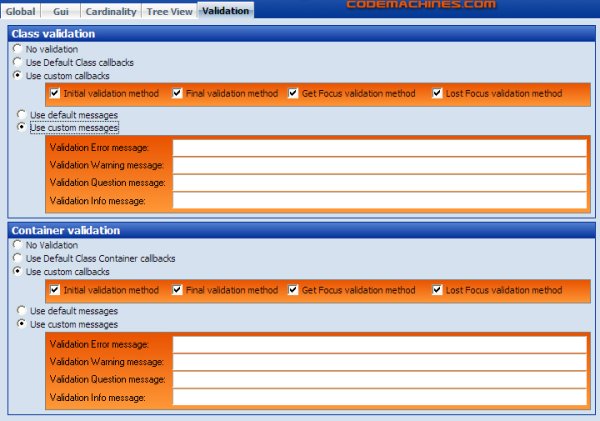
If you need to implement your specific validation procedure for a class, you'll need to set up the panel shown above. For each class, you can select which kind of validation you want:
- No Validation: no validation interface will be generated for this class.
- Use Default Class Callbacks: CM_ConfigBuilder generates a validation interface with the callbacks configured for the default class (Menu: Code Generation->Default Class).
- Use Custom Callbacks: you can enable the callbacks you want.
- Initial validation method: this method (if enabled) will be called when you call the
SetDatamethod onMainDialog. This allows you to perform a first validation. - Final validation method: this method (if enabled) will be called when the user presses the OK button. This allows you to perform a final check of all the values entered by the user.
GetFocusvalidation method: this method (if enabled) will be called each time the class is about to be shown.LostFocusvalidation method: this method (if enabled) will be called each time the class is about to be hidden (and a new class is displayed).
- Initial validation method: this method (if enabled) will be called when you call the
You can also decide if you want to display the default messages (defined in the Default Class settings) or if you want to provide class-specific messages. For classes with cardinality Map or Array, you can have a Container Class Validation Interface. You can configure it as you would configure the Class Validation Interface and have some more methods:
OnBeforeItemAdd: called when the user is trying to add a new item to the classContainer(Array or Map)OnBeforeItemDelete: called when the user is trying to delete an item from the class Container (Array or Map)
Each class has two additional methods:
SetClassValidationStatus: allows you to indicate the validation icon shown in the tree view node tool tip associated with the class. If you selectenValidationResult_Error, the tree view item text will be painted in red.SetClassValidationMsg: allows you to indicate the validation message shown in the tree view node tool tip associated with the class.
Step 10: Customize Main Dialog
CM_ConfigBuilder allows you to customize the dialog called "Main Dialog":


Step 11: Setup Options for MFC DLL
After the Custom Data Structure has been defined, we can reach the options via selecting the menu "Code Generation >> Options..." By checking "Enable C++ code generation," we are able to set up the C++ library generation:
- Class prefix: this prefix is used to create the names of the classes. For the class "Root," two corresponding files CfgSample_Root.h/cpp will be created. The use of the "class prefix" field allows us to use different configurations (with different prefixes) in the same project. The class prefix will be used as the name of the library:
CfgSample_D.lib library for debug version CfgSample_D.dll library for debug version CfgSample_DU.lib library for Unicode debug version CfgSample_DU.dll library for Unicode debug version CfgSample_R.lib library for release version CfgSample_R.dll library for release version CfgSample_RU.lib library for Unicode release version CfgSample_RU.dll library for Unicode release version - Generation path: this field specifies where the generator will create all directories and files.
- DLL file name prefix: this field specifies the name prefix of the generated library (DLL). The final name will have the following format: <name>_<configuration>.dll (configuration is _D for Debug, _DU for DebugUnicode, _R for Release, _RU for ReleaseUnicode)
- Visual Studio Version: allows you to specify which version of visual studio will be used to generate the library project
- After build, copy... : this field specifies where the DLL will be copied after the build step (for example, we can set our application's home directory).
- Generate Test project: if this check box is checked, the generator will create a simple (very simple) project to test the generated library.
- Generate GUI: when this check box is checked, the generator generates a GUI to edit the classes. We can also avoid resources overlapping by setting the resources offset.
- Delete previously generated files: this feature is not yet supported.
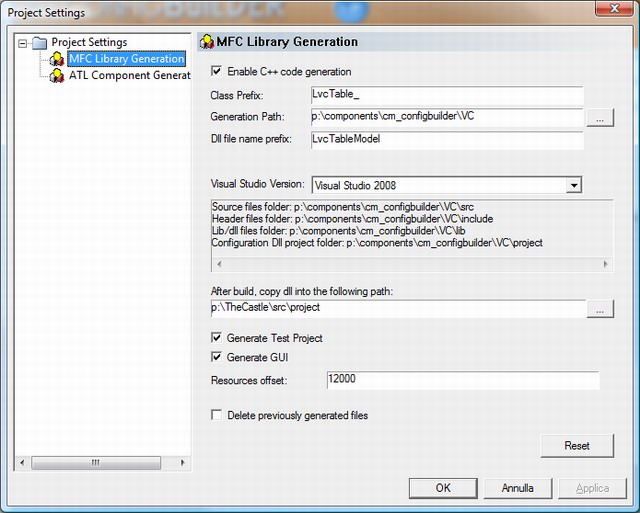
Note on Visual Studio 2005: If you need to use these libraries with Visual Studio 2005, you just have to open the generated project (*.dsw) with Visual Studio 2005 and compile it.
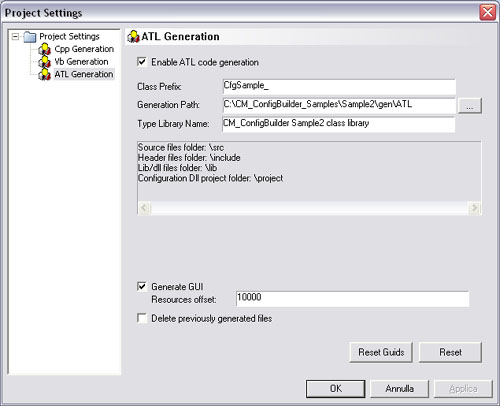
Step 12: Setup Options for ATL DLL
ATL generation allows Visual Basic users to access the class hierarchy. By checking the "enable ATL code generation," we are able to set up the ActiveX ATL library generation:
- Class prefix: see C++ library generation.
- Generation path: specifies where the generator will create all directories and files.
- After build, copy... : this field specifies where the DLL will be copied after the build step (for example, we can set our application's home directory).
- Generate Test project: if this check box is checked, the generator will create a simple (very simple) project to test the generated library.
- Generate GUI: when this check box is checked, the generator generates a GUI to edit the classes. We can also avoid resources overlapping by setting the resources offset.
- Delete previously generated files: this feature is not yet supported.
- Reset GUIDs: this button will reset all GUIDs associated with classes. If you don't press this button, all the classes will maintain the same GUIDs, which will avoid having to recompile applications using the library.
- Note: the generated ATL project supports the following configurations: Debug, Release Min Size, Release Min Dependency, Unicode Debug, Unicode Release Min Size, Unicode Release Min Dependency.
Step 13: ...And Finally... Code Generation!!!
Choosing menu "Code generation >> Go," we get the generator dialog. Pressing the button "Generate," we finally get what we want! For C++ and ATL generators, we can define some post-build steps:
- Compile Library: if checked, Visual C++ is launched automatically with compilation of the library; debug or release depends on the check boxes "debug" or "release" (release Min Dependencies for ATL library).
- Open project with MSDEV: this option will launch Visual C++ and open the library project. You will compile by pressing F7! This option is useful if there are errors during compilation. I would prefer 0 errors and 0 warnings. ;)
- Do nothing: no action is performed. This option is useful if Visual C++ has been already open.

Step 14: What's Happened?
After generation and compilation are done, we should see the following directory structure:
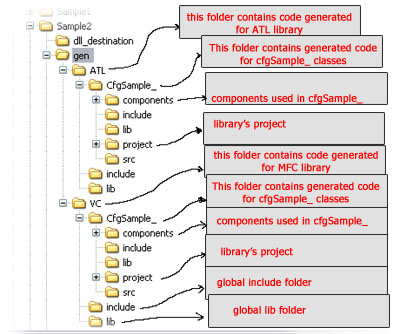
The structure shows a "global include folder" that contains all of the include files needed to integrate the library into our applications. Obviously, include files are not needed for ATL components. The structure shows a "global lib folder" that contains all the *.lib and *.dll files generated by the build process.
Step 15: Integrating the Library with Your MFC Application
To integrate the generated library into our applications, we need to follow these steps:
- In the menu "project >> settings >> C/C++ >> preprocessor," add the path to the "global include folder."
- In the menu "project >> settings >> link >> input >> object/library modules," add cfgSample_D.lib (for debug version).
- In the menu "project >> settings >> link >> input >> additional library path," add the path to the global library folder.
- In the "file view" of your project, add the headers of the generated classes to see them with Intellisense support. Simply add all CfgSample_*.h and xmlserializable.h.
The following code shows how to use the classes:
//
// C++ sample
//
Cfg_Root root;
Cfg_CfgManagerDlg dlg;
UINT ret;

ret = root.LoadFromXmlFile("mySettings.xml");
if (!ret)
{
    // file not found: set defaults
    //
    root.SetMember1("default value");
    root.SetMember2(10000);
    root.SetMember3(true);
}
dlg.SetData(root);
ret = dlg.DoModal(); // display modal dialog
if (ret == IDOK) {
   root = dlg.GetData();
   root.SaveToXmlFile("mySettings.xml");
}

// embedded dialog sample
//
BOOL CMyDialog::OnInitDialog()
{
    CDialog::OnInitDialog();

    Cfg_Root root;
    Cfg_CfgManagerDlg dlg;
    UINT ret;

    ret = root.LoadFromXmlFile("mySettings.xml");

    dlg_.CreateAndEmbed(this, CRect(0, 0, 100, 100));
    // dlg_ should be declared as class member
    dlg_.SetData(root);
}
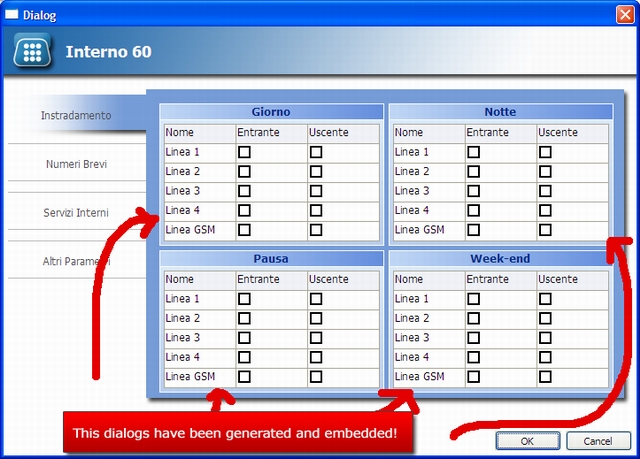
From version 1.2b, every single class dialog can be embedded in your application. Every dialog (generated for classes and their container) has a method: CreateAndEmbed. To embed a dialog in your dialogs, you have just to:
- Declare a member variable for the dialog you want to embed.
- Declare a member variable for the class or the container you want to be editable in your form.
- In your
OnInitDialoghandler, call theCreateAndEmbedmethod and pass to the embedded dialog the variable you want to edit using the methodSetData. - When done (for example, in your
OnOK()event handler), callStoreDataon the embedded dialog.
//
// C++ sample (how to embed a single class)
//

// header file
//

    Cfg_SampleClassDlg dlg_;
    Cfg_SampleClass data_;

// implementation file
//
BOOL CMyClass::OnInitDialog()
{
    CDialog::OnInitDialog();

    dlg_.CreateAndEmbed(this, CRect(0, 0, 200, 200));
    dlg_.SetData(&data_);
}

void CMyClass::OnOK()
{
    dlg_.StoreData();    // this updates data_

    data_.SaveToXmlFile(...) // if you need to store data_
}
You can get something like this (sorry... it's in Italian):
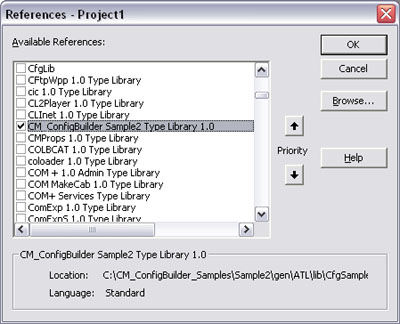
Step 16: Integrating the Library with My Visual Basic 6.0 Application
To integrate the ActiveX component with Visual Basic, you have just to select the menu "Project >> References ..." and choose library "CM_ConfigBuilder Sample2 Type Library 1.0":
The following code shows how to use the classes from VB:
' vb sample
'
Dim dlg As New CFGSAMPLE_Lib.MainDialog
Dim cfg As New CFGSAMPLE_Lib.Root
Dim ret As Boolean

ret = cfg.Load("mySettings.xml")
If Not ret Then
    cfg.Member1 = "default value"
    cfg.Member2 = 10000
    cfg.Member3 = True
End If

ret = dlg.Display(cfg)
If ret Then
    cfg.Save "mySettings.xml"
End If
Credits
Many resources used to create CM_ConfigBuilder came from CodeProject. I'd like to thank:
- All the people involved with the
MFCGridcomponent. - .dan.g. for
CEnTabControl. - Sven Wiegand for MSXML C++ wrapper classes.
- Alvaro Mendez for the
CAMSEditvalidating class. - Marc Richarme for flat splitter window.
- Sven Wiegand for
CTreePropSheet. - Kochise Kochise for
CPathSplit. - Paul J. Weiss for
CStringUtils. - Dana Holt for
CXSBrowseFolder. - FahadAsh for
CCoolButton. - Frank Luchs for
CVMBitmap.
History
- 2008.01.24 (version 1.2F)
- Added Visual Studio 2008 project generation
- 2007.11.28 (version 1.2E)
- bugfix: missing splitter cursor file for ATL project
- bugfix: "open project folder" for ATL project doesn't work
- bugfix: ATL project compile errors (due to new styles)
- ATL project update: uses new cmTableWnd
- bugfix: cmGlassButton doesn't work under vs2005
- bugfix: bug when loading icons under vs2005
- NEW: cm_Configbuilder project has been ported under vs2005
- NEW: cm_ConfigBuilder is now capable to generate vs2005 projects without the need of Visual Studio 6.0 installed
- 2007.10.30 (version 1.2d)
cmTreeCtrl: faster icon drawing- Grid dialogs: fixed redraw issue on dialog resize
- Category list and grid dialogs: added resizable
InfoArea - Category list and grid dialogs: added method
ShowInfoArea - Enhanced grid rendering preview
- New Category List rendering preview
- Fixed errors on single embedded dialogs in Test project
- container dialog: hidden "Append" button
- New button "open project folder" in generation panel. Since CM_ConfigBuilder isn't yet integrated with Visual Studio 2005, after code generation you can open the project folder and open it using VS 2005.
- 2007.10.10 (version 1.2.d BETA)
- Added a new graphic style for GUI component
cmOptionList. - Added a new graphic style for GUI component
cmTable. - Minor fixes.
- Added a new graphic style for GUI component
- 2007.09.30 (version 1.2c)
- Embedded Dialog for classes and containers (MFC library only).
- Time DataType and GUI Control (MFC library only).
- MFC library test project with single class dialog tester.
- Added default value for Static Enums validated fields.
- Other minor fixes.
- 2007.06.03 (version 1.2b)
- Embedded Dialog for classes and containers (MFC library only).
- Time DataType and GUI Control (MFC library only).
- MFC library test project with single class dialog tester.
- Default value for Static Enum validated fields.
- Minor fixes
- 2007.01.08 (version 1.2a BETA1)
- Embedded Dialog for MFC Library.
- Embedded ActiveX Component for ATL Library.
- Class validation callbacks.
- Member validation callbacks.
- Template Class.
- Template Member.
- Minor fixes.
- 2005.10.07 (version 1.1f)
- SmartHex field for long data members.
- FileName prefix for compiled DLLs in the options dialog.
- Compile time warning killed.
- Other minor fixes.
- 2005.07.24
- Flag for Hidden/Visible root node in the main dialog tree view.
- Customized look for main dialog tree view.
- 2005.06.25
- Drag & drop support has been added to the main tree view. It makes easier to modify the structure of your configuration.
- Icons embedding. The previous versions stored an absolute link to the icon file associated to the class tree view node of the generated dialog. From this version icons are stored inside the project (XML file).
- Improved "Static Enum" management (see section "Static Enum" in the article).
- Initial status (collapsed/expanded) for each treeview node of the generated configuration dialog.
- Editing of descriptions (multiline text) now supports "Enter" key.
- Category list dialogs have been made resizable to get a better editing.
- Other minor fixes.
- 2005.05.03 (version 1.1c)
- Added persistence "as CDATA" for class members.
- Other minor fixes.
- 2005.04.08 (version 1.1b)
- Added persistence "as #text node" for class members.
- Added possibility to avoid container XML node for classes with cardinality.
- 2005.03.29 (version 1.1a)
- Fixed some bugs on batch files generation.
- 2005.03.20 (version 1.1)
- Added full support for Unicode.
- Added member serialization as attribute.
- Removed dependency from xmlParser wrapper (this allows to open the VC++ 6.0 Project with Visual Studio .NET), other minor fixes.
- Note: the Unicode version of cm_configbuilder uses a new string class (
cmStringderived fromCString).
- 2004.05.25
- Removed memory leaks from ATL generated library.
- Added VC++ 7.0 library generation.
- Added possibility to keep the design order in Category List GUI mode.
- Added test project generation for ATL library test.
- Other minor fixes.
- 2004.04.13
- First release of CM_ConfigBuilder.
Contact
You can contact me by leaving a message in the discussion area below. For any problems, do not hesitate to send me your project and a brief description of the problem. I'll reply ASAP!