
Create/Read/Edit Advance Excel 2007/2010 Report in C#.Net using EPPlus
4.85/5 (46 votes)
Export Advance Excel 2007 Report
- Download Current Releaase Demo - 4.9 KB
- Download Current Release Source - 265.8 KB
- Download EPPlus_3.1.3.zip - 295.9 KB
- Download Previous Release Source - 314.7 KB
- Download Previous Release Demo - 8.5 KB
Contents
- Introduction
- Requirements
- Installation
- Reading a simple excel sheet that contains only text and numbers into DataTable
- Setting Excel Workbook properties
- Merge Excel Columns
- Setting Excel Cell background color
- Setting Excel Cell Border
- Setting Excel Formula
- Add Comments in Excel Cell
- Add Image in Excel Sheet
- Add Custom objects in Excel Sheet
- Create a New Excel Sheet from an Existing Excel Sheet or Template
- Adding 'R1C1' Formula in the Excel Cell
- Adding 'Named Range' in the Excel Sheet
- Adding Pie Chart in the Excel Sheet
- Declaration
- History
To do some Basic Works of Excel with EPPlus Library, See this.
Following 4 New Contents are added in this Release:
Introduction
Recently I was looking for an Advance tool through which I can generate complex Excel Reports. And after going through many tools I found EP Plus. For further details see this link. Through this tool we can easily create reports with charts, graphs and other drawing objects. I have planned to shared few samples with the community, so if any one is interested in using this library he will get a good kick start.
Requirements
- To compile the library, you need a C# 2010 Compiler or better, such as Visual Studio 2010 or Visual C# 2010 Express Edition.
- To run the library code you need to have the .NET 4.0 framework installed.
Installation
- Simply install the NuGet package.
Or you can download the library DLL from the above link. Then do the following:
- Add the following library into your peoject by adding reference to that library dll.
- After adding the reference you'll see the following scene in your 'Solution Explorer'
window of your Visual Studio:

- Then add these namespace into your C# file like this:
/* To work eith EPPlus library */
using OfficeOpenXml;
using OfficeOpenXml.Drawing;

/* For I/O purpose */
using System.IO;

/* For Diagnostics */
using System.Diagnostics;
Quick Start
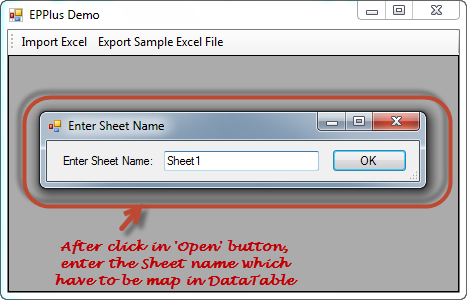
1. Reading From Excel Sheet into DataTable:
Reading a simple excel sheet containing text and number into DataTable.
private DataTable WorksheetToDataTable(ExcelWorksheet oSheet)
{
	int totalRows = oSheet.Dimension.End.Row;
	int totalCols = oSheet.Dimension.End.Column;
	DataTable dt = new DataTable(oSheet.Name);
	DataRow dr = null;
	for (int i = 1; i <= totalRows; i++)
	{
		if (i > 1) dr = dt.Rows.Add();
		for (int j = 1; j <= totalCols; j++)
		{
			if (i == 1)
				dt.Columns.Add(oSheet.Cells[i, j].Value.ToString());
			else
				dr[j - 1] = oSheet.Cells[i, j].Value.ToString();
		}
	}
	return dt;
}
How you do this in this project?
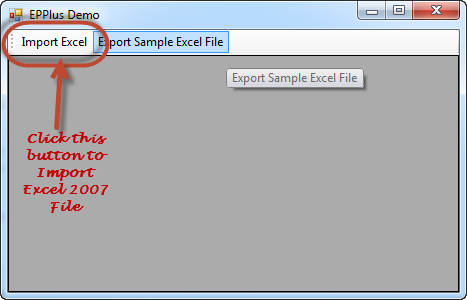

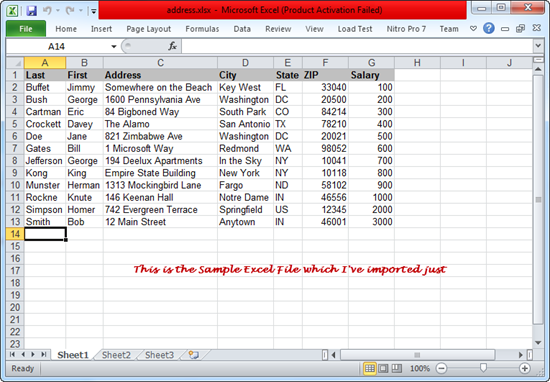
The Sample Excel file is the following:
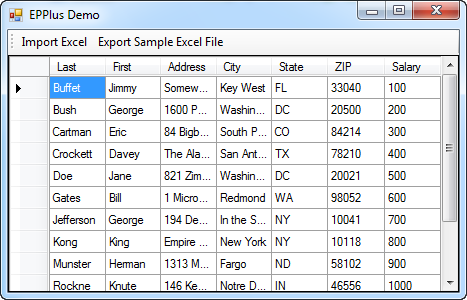
The Final Resule is below:
2. Setting Excel Workbook Properties:
The Useful properties which you can set are:
- Name of the Application by 'Application' property.
- Version of the Application by 'AppVersion' property.
- Name of the Author by 'Author' property.
- Category of the Workbook by 'Category' property.
- Comments in the Workbook by 'Comments' property.
- Name of the Company by 'Company' property.
- Last Modified Date of the Workbook by 'LastModifiedBy' property.
- Last Printed Date of the Workbook by 'LastPrinted' property.
- Keywords in Workbook if any by 'Keywords' property.
- Status of the Workbook by 'Status' property.
- Subject of the Workbook by 'Subject' property.
- Title of the Workbook by 'Title' property.
In the following way you can set the properties:
using (ExcelPackage excelPkg = new ExcelPackage())
{
	excelPkg.Workbook.Properties.Author = "Debopam Pal";
	excelPkg.Workbook.Properties.Title = "EPPlus Sample";
}
3. Merge Excel Columns:
Merge Excell Cells by providing the Row Index and Column Index of the Start Cell and the End Cell. The syntax is: Cell[fromRow, fromCol, toRow, toCol]. In the following way you can merge excel cells:
//Merge Excel Columns: Merging cells and create a center heading for our table
oSheet.Cells[1, 1].Value = "Sample DataTable Export";
oSheet.Cells[1, 1, 1, dt.Columns.Count].Merge = true;
4. Setting Excel Cell Background Color and Fill Style:
The following Fill Styles are available under OfficeOpenXml.Style.ExcelFillStyle:
- DarkDown
- DarkGrey
- DarkGrid
- DarkHorizontal
- DarkTrellis
- DarkUp
- DarkVertical
- Gray0625
- Gray125
- LightDown
- LightGrey
- LightHorizontal
- LightTrellis
- LightUp
- LightVertical
- MediumGrey
- None
- Solid
You can use any color from System.Drawing.Color as your Background
Color. In the following way you can set the Background Color along with Fill Style:
var cell = oSheet.Cells[rowIndex, colIndex];

//Setting the background color of header cells to Gray
var fill = cell.Style.Fill;
fill.PatternType = OfficeOpenXml.Style.ExcelFillStyle.Solid;
fill.BackgroundColor.SetColor(Color.Gray);
5. Setting Excel Cell Border:
The following Border styles are available under OfficeOpenXml.Style.ExcelBorderStyle:
- DashDot
- DashDotDot
- Dashed
- Dotted
- Double
- Hair
- Medium
- MediumDashDot
- MediumDashDotDot
- MediumDashed
- None
- Thick
- Thin
In the following way you can set the border style of a cell:
var cell = oSheet.Cells[rowIndex, colIndex];

//Setting top,left,right,bottom border of header cells
var border = cell.Style.Border;
border.Top.Style = border.Left.Style = border.Bottom.Style = border.Right.Style = OfficeOpenXml.Style.ExcelBorderStyle.Thin;
6. Setting Excel Formula:
var cell = oSheet.Cells[rowIndex, colIndex];

//Setting Sum Formula for each cell
// Usage: Sum(From_Addres:To_Address)
// e.g. - Sum(A3:A6) -> Sums the value of Column 'A' From Row 3 to Row 6
cell.Formula = "Sum(" + oSheet.Cells[3, colIndex].Address + ":" + oSheet.Cells[rowIndex - 1, colIndex].Address + ")";
7. Add Comments in Excel Cell:
///

/// Adding custom comment in specified cell of specified excel sheet
///
///
The ExcelWorksheet object
/// The row number of the cell where comment will put
/// The column number of the cell where comment will put
/// The comment text
/// The author name
private void AddComment(ExcelWorksheet oSheet, int rowIndex, int colIndex, string comment, string author)
{
	// Adding a comment to a Cell
	oSheet.Cells[rowIndex, colIndex].AddComment(comment, author);
}
8. Add Image in Excel Sheet:
///

/// Adding custom image in spcified cell of specified excel sheet
///
///
The ExcelWorksheet object
/// The row number of the cell where the image will put
/// The column number of the cell where the image will put
/// The path of the image file
private void AddImage(ExcelWorksheet oSheet, int rowIndex, int colIndex, string imagePath)
{
	Bitmap image = new Bitmap(imagePath);
	ExcelPicture excelImage = null;
	if (image != null)
	{
		excelImage = oSheet.Drawings.AddPicture("Debopam Pal", image);
		excelImage.From.Column = colIndex;
		excelImage.From.Row = rowIndex;
		excelImage.SetSize(100, 100);
		// 2x2 px space for better alignment
		excelImage.From.ColumnOff = Pixel2MTU(2);
		excelImage.From.RowOff = Pixel2MTU(2);
	}
}

public int Pixel2MTU(int pixels)
{
	int mtus = pixels * 9525;
	return mtus;
}
9. Add Custom objects in Excel Sheet:
The all shapes are available under enum eShapeStyle. In the following
way we can create object of the specified shape and inserting text inside it.
///

/// Adding custom shape or object in specifed cell of specified excel sheet
///
///
The ExcelWorksheet object
/// The row number of the cell where the object will put
/// The column number of the cell where the object will put
/// The style of the shape of the object
/// Text inside the object
private void AddCustomObject(ExcelWorksheet oSheet, int rowIndex, int colIndex, eShapeStyle shapeStyle, string text)
{
	ExcelShape excelShape = oSheet.Drawings.AddShape("Custom Object", shapeStyle);
	excelShape.From.Column = colIndex;
	excelShape.From.Row = rowIndex;
	excelShape.SetSize(100, 100);
	// 5x5 px space for better alignment
	excelShape.From.RowOff = Pixel2MTU(5);
	excelShape.From.ColumnOff = Pixel2MTU(5);
	// Adding text into the shape
	excelShape.RichText.Add(text);
}

public int Pixel2MTU(int pixels)
{
	int mtus = pixels * 9525;
	return mtus;
}
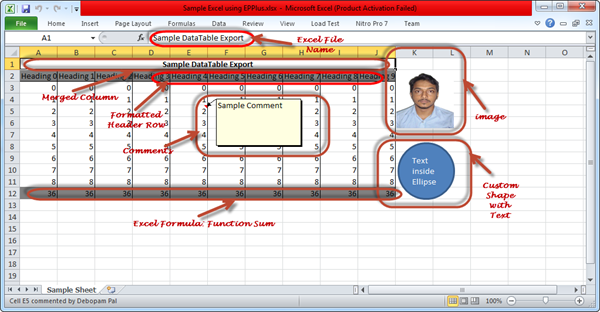
The Final Exported Excel file:
10. Create a New Excel Sheet from an Existing Excel Sheet or Template:
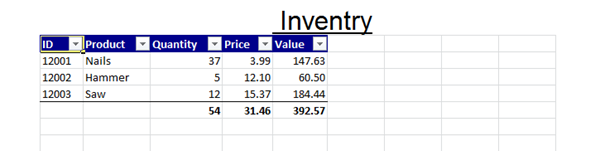
Now, we're going to take the Existing Excel Sheet what we've got from the extension of this article. The name of the existing excel sheet was 'Sample1.xlsx'. Now we are going to create 'Sample2.xlsx' by taking values from 'Sample1.xlsx' and adding some new values.
Here is 'Sample1.xlsx':
Now, see how you can do it:
// Taking existing file: 'Sample1.xlsx'. Here 'Sample1.xlsx' is treated as template file
FileInfo templateFile = new FileInfo(@"Sample1.xlsx");
// Making a new file 'Sample2.xlsx'
FileInfo newFile = new FileInfo(@"Sample2.xlsx");

// If there is any file having same name as 'Sample2.xlsx', then delete it first
if (newFile.Exists)
{
	newFile.Delete();
	newFile = new FileInfo(@"Sample2.xlsx");
}

using (ExcelPackage package = new ExcelPackage(newFile, templateFile))
{
	// Openning first Worksheet of the template file i.e. 'Sample1.xlsx'
	ExcelWorksheet worksheet = package.Workbook.Worksheets[1];
	// I'm adding 5th & 6th rows as 1st to 4th rows are already filled up with values in 'Sample1.xlsx'
	worksheet.InsertRow(5, 2);

	// Inserting values in the 5th row
	worksheet.Cells["A5"].Value = "12010";
	worksheet.Cells["B5"].Value = "Drill";
	worksheet.Cells["C5"].Value = 20;
	worksheet.Cells["D5"].Value = 8;

	// Inserting values in the 6th row
	worksheet.Cells["A6"].Value = "12011";
	worksheet.Cells["B6"].Value = "Crowbar";
	worksheet.Cells["C6"].Value = 7;
	worksheet.Cells["D6"].Value = 23.48;
}
11. Adding 'R1C1' Formula in the Excel Cell:
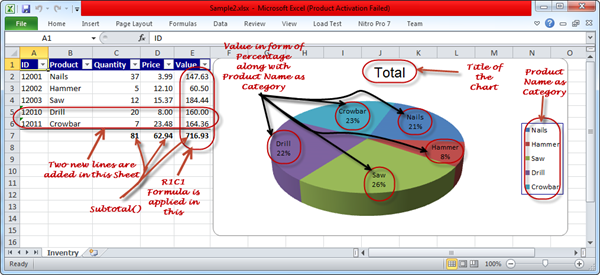
Now, we're going to add formula for 'Value' column i.e. 'E' as the values in column 'E' come from the product of 'Quantity' and 'Price' column, as you can see in the above picture of Sample1.xlsx. In the Extension of this Article, I've told how to add basic formula in this respect. So, I hope, you're now able to add basic formula:) Now, we're going to see how we add 'R1C1' formula. If you don't know what it is, just click here...I'm waiting for you here:) Lets see:
worksheet.Cells["E2:E6"].FormulaR1C1 = "RC[-2]*RC[-1]";
Just one line of code, its so simple:)
12. Adding 'Named Range' in the Excel Sheet:
You don't know 'Excel Named Range'? No problem, just read a few lines here. Like the following way we can add Named Range:
var name = worksheet.Names.Add("SubTotalName", worksheet.Cells["C7:E7"]);
By the following way we can add any formula to the Named Range:
name.Formula = "SUBTOTAL(9, C2:C6)";
13. Adding Pie Chart in the Excel Sheet:
Read about Excel Chart here.
Read about Pie Chart here.
EPPlus Library suport following type of chart below:
- Area
- Area3D
- AreaStacked
- AreaStacked100
- AreaStacked1003D
- AreaStacked3D
- BarClustered
- BarClustered3D
- BarOfPie
- BarStacked
- BarStacked100
- BarStacked1003D
- BarStacked3D
- Bubble
- Bubble3DEffect
- Column3D
- ColumnClustered
- ColumnClustered3D
- ColumnStacked
- ColumnStacked100
- ColumnStacked1003D
- ColumnStacked3D
- ConeBarClustered
- ConeBarStacked
- ConeBarStacked100
- ConeCol
- ConeColClustered
- ConeColStacked
- ConeColStacked100
- CylinderBarClustered
- CylinderBarStacked
- CylinderBarStacked100
- CylinderCol
- CylinderColClustered
- CylinderColStacked
- CylinderColStacked100
- Doughnut
- DoughnutExploded
- Line
- Line3D
- LineMarkers
- LineMarkersStacked
- LineMarkersStacked100
- LineStacked
- LineStacked100
- Pie
- Pie3D
- PieExploded
- PieExploded3D
- PieOfPie
- PyramidBarClustered
- PyramidBarStacked
- PyramidBarStacked100
- PyramidCol
- PyramidColClustered
- PyramidColStacked
- PyramidColStacked100
- Radar
- RadarFilled
- RadarMarkers
- StockHLC
- StockOHLC
- StockVHLC
- StockVOHLC
- Surface
- SurfaceTopView
- SurfaceTopViewWireframe
- SurfaceWireframe
- XYScatter
- XYScatterLines
- XYScatterLinesNoMarkers
- XYScatterSmooth
- XYScatterSmoothNoMarkers
First you need to add
OfficeOpenXml.Drawing.Chart namespace to work with Chart. Now see the code below:
// Adding namespace to work with Chart
using OfficeOpenXml.Drawing.Chart;

// Adding Pie Chart to the Worksheet and assigning it in a variable 'chart'
var chart = (worksheet.Drawings.AddChart("PieChart", OfficeOpenXml.Drawing.Chart.eChartType.Pie3D) as ExcelPieChart);
Setting title text of the chart:
chart.Title.Text = "Total";
Setting Chart Position: 5 pixel offset from 5th column of the 1st row:
chart.SetPosition(0, 0, 5, 5);
Setting width & height of the chart area:
chart.SetSize(600, 300);
In the Pie Chart value will come from 'Value' column and category name come from the 'Product' column, see how to do it:
ExcelAddress valueAddress = new ExcelAddress(2, 5, 6, 5);
var ser = (chart.Series.Add(valueAddress.Address, "B2:B6") as ExcelPieChartSerie);
Setting Chart Properties:
// To show the Product name within the Pie Chart along with value
chart.DataLabel.ShowCategory = true;
// To show the value in form of percentage
chart.DataLabel.ShowPercent = true;
Formmatting the style of the Chart:
chart.Legend.Border.LineStyle = eLineStyle.Solid;
chart.Legend.Border.Fill.Style = eFillStyle.SolidFill;
chart.Legend.Border.Fill.Color = Color.DarkBlue;
Finally Expoted Excel is here:
Declaration
Please Download the source code for detail. I hope you'll understand as the source
			code is documented. If any doubt, just post your comment below. Thank You.
History
- 11th Nov, 2013: First Release
- 13th Nov, 2013: Added the link to the Extension of this Article.
- 14th Nov, 2013: Extension Updates: Added the link of this article.
- 14th Nov, 2013: Added 4 contents:
- Next Release: I'll tell you how to lock excel cell, how to create Encrypting Excel File, Excel Pivot Table and many more.