
Setting up a Google Map with Information Window
4.88/5 (14 votes)
This article provides a step by step approach to set up a Google Map in our website and that is with an Information Window which can show business logo, address, phone numbers and/or a link to your contact form, etc.
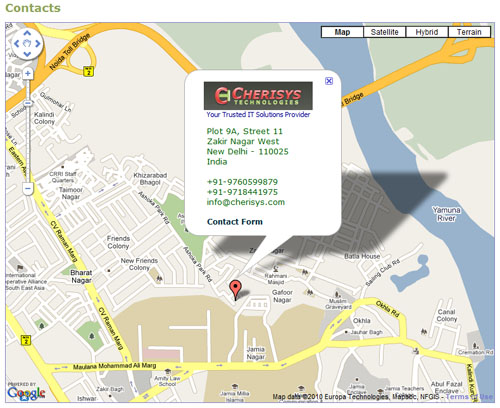
Table of Contents
- Introduction
- Google Account
- Google Maps API Key
- Latitude and Longitude
- Creating a Map
- Setting up a Marker Pointing your Location on the Map
- Creating Information Window
- Making Marker a Button to Show Information Window
- Adjusting Center Point of Canvas (Map)
- Points to Ponder
- Final Words
Introduction
This article provides a step by step approach to set up a Google Map in our website and that is with an Information Window which can show business logo, address, phone numbers and/or a link to your contact form, etc.
Google Account
If you have a Google Account, sign in to your account, otherwise sign up at http://www.google.com/accounts.
Google Maps API Key
To get a Google Maps API Key for your domain, browse for: http://code.google.com/apis/maps/signup.html. Read Terms & Conditions enter your website URL and click Generate API Key button; you’ll now get an API Key (approximate 100 characters long). Copy and paste it to a safe place.
Latitude and Longitude
To get the Latitude and Longitude values of the point where your business is located, browse for http://maps.google.com.
Enter some place of importance in your city, city name and country name (e.g. Railway Station, Saharanpur, India). You’ll see the area around your city or place which you’ve entered.
You can now move the map (up, down, left, or right) by moving your mouse with holding left mouse button. You can Zoom In or Zoom Out the map to get a better view of places around.
The purpose is to reach the point where you're located. When you are at that point, click right mouse button and choose 'What's here'. When you're done, you'll see a pair of numeric values in search text field. These are the values for Latitude and Longitude of your location.
Copy and paste these to a safe place. Don’t disconnect from the Internet or close this map, because we might need to come back to this map again in Step 9.
Creating a Map
To create a map on your webpage, first of all you have to decide the place and size of map you want to show on page. Suppose you want a map of size 600x500 (in pixels), put a container of it on your page, container is simply a division (<div>). Finally, write this code on your webpage where you want to show a map.
<div style="border: 1px dotted darkblue; width: 600px; height: 500px;"
	id="map_canvas"></div>
You can adjust the width, height, border or in one word ‘style’ of the container.
Before coming to the section of JavaScript code, I would like to discuss two cases with you:
Case 1: You are putting a Map on a normal HTML/ASPX page (which is not a Content page of a Master Page), has body tag of its own.
Case 2: You are putting a Map on a Content page of a Master page that has no body tag. We need to add one more trick for Google Map to work.
Now, if you’re with Case 1, simply put the code below in <head> section of your HTML/ASPX page and call initialize() function at onload event of body tag (e.g. the opening tag of the body element must look like this <body onload=”initialize()”>). The code to add in <head> section is given below:
<script type="text/javascript" language="javascript"
	src="http://maps.google.com/maps/api/js?sensor=false&key=FFFFFF"></script>
<script type="text/javascript" language="javascript">
    function initialize()
    {
	var cenLatlng = new google.maps.LatLng(000000,111111);
        var myOptions = {
                           zoom: 15,
                           center: cenLatlng,
                           mapTypeId: google.maps.MapTypeId.ROADMAP
                        }

        var map = new google.maps.Map(document.getElementById("map_canvas"),myOptions);
    }
</script>
If you’re with Case 2, put the code above in <asp:Content> section of your ASPX content page, add id and runat=”server” in the body tag of your Master page (e.g. the opening tag of the body element at Master page must look like this <body id=”mBody” runat="sever">. Now, come back to your ASPX content page, add these lines of code in OnLoad event handler of this page (Content Page).
HtmlGenericControl body = (HtmlGenericControl)Master.FindControl("mBody");
body.Attributes.Add("onload", "initialize()");
You can see above that there are 6Fs (FFFFFF) valued to key parameter of src attribute of first <script> statement. Replace these 6Fs with your API Key, which you have got in Step 3. IT’S IMPORTANT!!!
You can also see that there is a pair of six 0s and six 1s (000000,111111) assigned as the Latitude and Longitude of the center point of your map. You need to change these values with which you have got in Step 4. IT’S IMPORTANT!!!
Now, you have get a Map on your webpage (either a normal HTML/ASPX page of a ASPX Content Page) and notice that your location is pointed at the centre of Map.
Setting up a Marker Pointing your Location on the Map
To set up a Marker, you need to add some lines of code in the initialize() function mentioned above. So now the initialize() function will look like this:
function initialize()
{
    var cenLatlng = new google.maps.LatLng(000000,111111);
    var myOptions = {
                       zoom: 15,
                       center: cenLatlng,
                       mapTypeId: google.maps.MapTypeId.ROADMAP
                    }

    var map = new google.maps.Map(document.getElementById("map_canvas"),myOptions);

    // Start of newly added block of code
    var myLatlng = new google.maps.LatLng(000000,111111);
    var marker = new google.maps.Marker({
                                          position: myLatlng,
                                          map: map,
                                          title:"Cherisys Technologies"
                                       });
    // End of newly added block of code
}
You can see that there is a pair of six 0s and six 1s (000000,111111) assigned as the Latitude and Longitude of the marker position on your map. You need to change these values with the one you got in Step 4. This will add a Marker at the center of Map with title (tooltip) ‘Cherisys Technologies’, you can change this title value as required.
Creating Information Window
To set up a Marker, you need to add some lines of code in the initialize() function mentioned above. So now the initialize() function will look like this:
function initialize()
{
    var cenLatlng = new google.maps.LatLng(000000,111111);
    var myOptions = {
                       zoom: 15,
                       center: cenLatlng,
                       mapTypeId: google.maps.MapTypeId.ROADMAP
                    }

    var map = new google.maps.Map(document.getElementById("map_canvas"),myOptions);

    var myLatlng = new google.maps.LatLng(000000,111111);
    var marker = new google.maps.Marker({
                                          position: myLatlng,
                                          map: map,
                                          title:"Cherisys Technologies"
                                       });

    // Start of newly added code block
    var contentString = '<div id="content" style="margin-left:15px;
			margin-top:3px;overflow:hidden;">'+
                           '<div id="bodyContent">'+
                 	    	'<img src="images/logo.jpg" style="width:172px;height:45px;"
			alt="WebStreet.in"/>' +'<br>
			<font style="color:darkblue;font:11px
					tahoma;margin-left:5px;">
			Your Trusted IT Solutions Provider</font>'+
		      	'<br><br><div style="font:13px verdana;color:darkgreen;
			margin-left:5px;">Plot 9A, Street 11<br>Zakir Nagar West' +
			'<br>New Delhi - 110025<br>India<br><br>+91-9760599879<br>+
			91-9718441975<br>info@cherisys.com<br><br>'+
     		      	'<a href="ContactForm.aspx" style="color:#00303f;
			font:bold 12px verdana;" title="click to contact">
			Contact Form</a></div>' +
                           '</div>'+
                           '</div>';

    var infowindow = new google.maps.InfoWindow({
                                                  content: contentString,
                                                  width:192,
                                                  height:100
                                               });

    infowindow.open(map,marker);
    // End of newly added code block
}
In the newly added code block, there is a variable naming ‘contentString’, this represents HTML code of your information window. See that there are two divisions with ids ‘content’ and ‘bodyContent’ respectively. You can change the style of any division by adding a style attribute and inner HTML of second division. You can place your logo, address, phone numbers, or a link to some page (usually contact form) of your website. But in any case, don’t change id values of any division.
Now I created a new instance of information window describing the attributes (content, width, and height) of this window. Also you can add an attribute for maximum width (maxWidth) by giving it a value as required.
An information window has now been set up, it is needed to open it when a user browses for the webpage having Map. The last line of newly added code block did this job.
Making Marker a Button to Show Information Window
However in the above code blocks, we have set default status of information window ‘open’. But if the website user has closed this window, he will not find a way to open it again. Let’s make your marker a button to open this information window if user wants to open it once again. For this, we need to add some lines of code in our initialize() function and the function will then look like this:
function initialize()
{
    var cenLatlng = new google.maps.LatLng(000000,111111);
    var myOptions = {
                       zoom: 15,
                       center: cenLatlng,
                       mapTypeId: google.maps.MapTypeId.ROADMAP
                    }

    var map = new google.maps.Map(document.getElementById("map_canvas"),myOptions);

    var myLatlng = new google.maps.LatLng(000000,111111);
    var marker = new google.maps.Marker({
                                          position: myLatlng,
                                          map: map,
                                          title:"Cherisys Technologies"
                                       });

    var contentString = '<div id="content" style="margin-left:15px;
			margin-top:3px;overflow:hidden;">'+
                           '<div id="bodyContent">'+
                 	    	'<img src="images/logo.jpg" style="width:172px;height:45px;"
			alt="WebStreet.in"/>' +
         		    	'<br><font style="color:darkblue;font:11px tahoma;
			margin-left:5px;">Your Trusted IT Solutions Provider</font>'+
			'<br><br><div style="font:13px verdana;color:darkgreen;
			margin-left:5px;">Plot 9A, Street 11<br>Zakir Nagar West' +
		      	'<br>New Delhi - 110025<br>India<br><br>+91-9760599879<br>+
			91-9718441975<br>info@cherisys.com<br><br>'+
     		       	'<a href="ContactForm.aspx" style="color:#00303f;
			font:bold 12px verdana;" title="click to contact">
			Contact Form</a></div>' +
                           '</div>'+
                           '</div>';

    var infowindow = new google.maps.InfoWindow({
                                                  content: contentString,
                                                  width:192,
                                                  height:100
                                               });

    infowindow.open(map,marker);

    // Start of newly added code block
    google.maps.event.addListener(marker, 'click', function() {
		                            infowindow.open(map,marker);
     	                                 });
    // End of newly added code block
}
In the newly added code block, I have handled click event of marker as button and added a line of code to open information window. Simultaneously, I have changed the title (tooltip) of marker from ‘Cherisys Technologies’ to ‘click here to view contact details’.
Adjusting Center Point of Canvas (Map)
Now you might have a Map with all the functionality added to it. But the position of marker may create some disturbances because of the size of your information window. To eliminate such disturbances, you can adjust the position of marker at your map canvas (which is the center point at present).
To do it, hold your mouse left button and move the Map to the required position, when you have got a fine view analyze the area which comes to the center of canvas (it might be a point different from your marker’s point). With keeping this area (of center point) in your mind, go back to the opened browser window (which has been left open in step 4). Put your cursor to the point which you have analyzed as a new center of your map, click right mouse button and choose ‘What’s here’, you will see the Latitude and Longitude values of new center points in search text field. Make a note of these values and make these changes in your initialize() function.
var cenLatlng = new google.maps.LatLng(000000,111111);
Find this line of code (this is thought to be the first line of initialize() function), replace old values of center point with newly found values (Latitude and Longitude) and now get excited while running your program.
Points to Ponder
Don’t forget to get your own API Key and remember it’s free from Google and also don’t forget to get the values of Latitudes and Longitudes as per your location. NOW COME TO YOUR EXCITEMENT AND EMBRACE GOOGLE!
Final Words
I hope you find the stuff helpful. Thanks for reading. Good luck!