
ASP.NET MVC Web App on 3-Tier for Beginners – Part 2
4.76/5 (25 votes)
ASP.NET MVC Web App on 3-tier for beginners
Introduction
This article is the continuation of Part 1. In the first article, we saw understanding of requirements and then breaking them into objects, then finding out the relationships among them and finally designing and implementing the database. Now, let us see how to create a solution, then add multiple projects to it and then add desired references to the respective projects.
2: Analysis and Design (Creating Solution and Projects)
Create a new project in Visual Studio as LinkHubUI, choose desired path and click OK.

Select Empty project, check the MVC check box and click on OK.


Now, we will add some list of tasks which will make us implement the project easily. We will add a text file, right click on project, add Add New Item and name it as ToDoList.txt.

This ToDoList contains the list of tasks that we need to perform.

This is a step-by-step process to implement the layered architecture in MVC. I’ve done a little hard work on it to give you these steps. So, I’m sure this is very much helpful for you when you are implementing a project for the first time.
Now our first task is creating a solution with all projects.
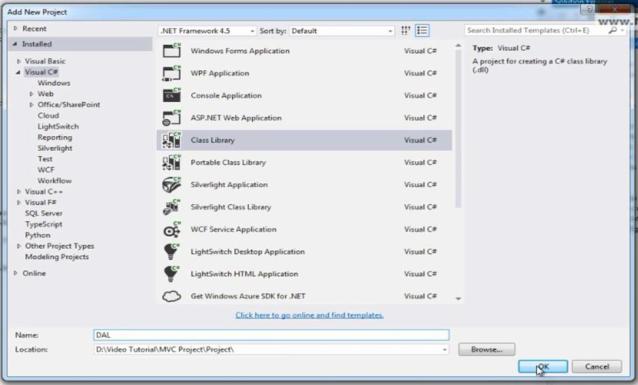
Right click on solution and add new project. Choose from C# -> Class Library and name it as BOL (Business Object Layer).

Remove Class1.cs file from BOL project.

Add one more Class Library project and name it as BLL (Business Logic Layer) and delete Class1.cs from BLL project.

Finally, add one more new Class Library project and name it as DAL (Data Access Layer) and delete Class1.cs file from DAL.
Our Project Architecture

Now, if we look at our architecture, you can see that UI is interacting with BLL and BOL.
So, I need to add BLL.dll and BOL.dll in UI.

BLL is interacting with BOL and DAL. Add BOL.dll and DAL.dll references to BLL.

DAL is interacting with BOL. Add BOL.dll reference to DAL.
If I try to add reference of BLL.dll for DAL, there will be an error (Circular Dependency).

So, we should add the references moving from left to right as per our Arch (Start from Left layer and see with what layer it is interacting with in right and add the DLL along with common object layer which is on top). Save All and Rebuild Solution.

Now, we are set with all projects and DLLs. We are done with the first step in ToDoList. In our next article, we will see creating BOL with the help of Entity Framework.
3: Implementing All the Layers
Creating Business Object Layer (BOL)
What actually BOL is and how do we create Business Objects? Actually, BOL is nothing but almost a replica of your database tables in the form of Classes. So, for one table in database, we need to have one Class in our BOL or we will have an equivalent Class for each table.
As, we know, that table is nothing but a relation and Class’s instance is an object. So, Object Relation Mapping (ORM or OR Mapping) is done in BOL. Now, let us take an example tbl_Department table (Relation) which has got Did (Department ID), DName (Department Name) and Description as columns.
So, I’m going to create an equivalent class for tbl_Department with properties as Did of type int, DName and Description of type string. So, we can say Relation, Object and Mapping between them. I can call it as OR Mapping.
Previously, we used to write these classes. But, with the help of Entity Framework, we will be generating these classes automatically. Below slid is for single table. What about the tables with 1 to many Relationship?

Now let us say we have tbl_Department and tbl_Employee table and one Department can contain n number of employees if I’ve this relation as shown below. How are we going to implement these as classes?
It is very simple, we are going to create a class tbl_Department. As we know, department contains n number of employees. So, we will have list of tbl_Employee as a property in tbl_Department class. And tbl_Employee is another class for table tbl_Employee. And also we know that each and every Employee belongs to particular department. So, tbl_Employee class contains one extra property, i.e., object of tbl_Department.
So for one-to-many relationship below is the class structure. Finally what about many-to-many relationship?

We know that last relationship is many-to-many.

Let us take an example of Student and Course. One student can opt for n number of courses and one course can be opted by n number of students. In this scenario, we need to have an extra class to show many to many relationship between tbl_Student and tbl_Course i.e., tbl_Student_Course. Now you can see that a student opted for a course is described by Sid and Cid in class tbl_Student_Course.
And also we are mapping tbl_student and tbl_Course in class tbl_Student_Course. One student can opt for n number of courses. So, tbl_Student class has List of tbl_Student_Course. And one course can be opted by n number of students.So, tbl_Course class has List of tbl_Student_Course.
This is bit logical for many-to-many relationship. Anyway, we need not to worry much about writing all these code as our Entity Framework is going to generate these kind of classes automatically.

Now let us implement BOL. Right click on BOL and select Add New Item -> Select ADO.NET Entity Model and name it as LinkHubModel.edmx and click on Add.

Select Generate model from database and click on Next.

Click on New Connection. Set your connection and Select database and Click Next.


Select Entity Framework 6 and click Next.

Now select all the tables and you can see that Model Namespace is LinkHubDbModel -> Click Finish.

You may see this security warning twice. Say OK.

Now, you can observe classes that it has generated for each table.

For tbl_Category, it has generated the properties CategoryId, CategoryName and CategoryDesc.
As we know that one category contains list of Urls, I get List of tbl_Url.
namespace BOL
{
    using System;
    using System.Collections.Generic;

    public partial class tbl_Category
    {
        public tbl_Category()
        {
            this.tbl_Url = new HashSet<tbl_Url>();
        }

        public int CategoryId { get; set; }
        public string CategoryName { get; set; }
        public string CategoryDesc { get; set; }

        public virtual ICollection<tbl_Url> tbl_Url { get; set; }
    }
}
For tbl_Users, the properties UserId, UserEmail, Password and Role has been generated.
One user can upload n number of Urls. Again, I’ve a list of Urls.
namespace BOL
{
    using System;
    using System.Collections.Generic;

    public partial class tbl_User
    {
        public tbl_User()
        {
            this.tbl_Url = new HashSet<tbl_Url>();
        }

        public int UserId { get; set; }
        public string UserEmail { get; set; }
        public string Password { get; set; }
        public string Role { get; set; }

        public virtual ICollection<tbl_Url> tbl_Url { get; set; }
    }
}
Same logic it is following that we learned earlier and let us look into Url class. Class tbl_Url has properties UrlId, UrlTitle, Url, UrlDesc and so on. As we know that each Url belongs to a particular category and it is uploaded by a particular User. So, it is following the same rule.
namespace BOL
{
    using System;
    using System.Collections.Generic;

    public partial class tbl_Url
    {
        public int UrlId { get; set; }
        public string UrlTitle { get; set; }
        public string Url { get; set; }
        public string UrlDesc { get; set; }
        public Nullable<int> CategoryId { get; set; }
        public Nullable<int> UserId { get; set; }
        public string IsApproved { get; set; }

        public virtual tbl_Category tbl_Category { get; set; }
        public virtual tbl_User tbl_User { get; set; }
    }
}
We’ll get these 3 classes. These are our Business objects. Now I’ll rebuild the BOL project. As we know, we are going to use these Business objects in UI (User Interface). I need connection string in UI which is available in BOL project -> App.config file. Copy the connectionStrings section and paste it in web.config of UI (We will cover this in our next article) and Rebuild the solution. This is a very important step because my UI is going to interact with BOL and we’ve generated the BOL with the help of Entity Framework.
If we look into TODO list, we are done with Creating BOL and Adding connection string in UI.

Thanks for reading.
