
RIATasks: A Simple Silverlight CRUD Example (using View Model)
4.98/5 (71 votes)
An example of a Silverlight Application that implements Create, Read, Update, and Delete using web services
A Simple Silverlight CRUD Example
Live example: http://silverlight.adefwebserver.com/RIATasks/
Also see: Silverlight RIA Tasks 2: Dynamic View Models

The reason for this tutorial, is that I have noticed my friends are getting stuck when trying to learn Silverlight. They spend a lot of time "learning about Silverlight" but have a hard time actually getting started.
I also wanted to show them how to use View Model Style programming because I believe that using View Model, you will write LESS CODE (you probably didn't expect that one!). Don't believe me? Let me show you...

Silverlight is different because it communicates with the website that launches it using asynchronous communication. Learning how to design applications this way can be a bit challenging.
So I created an end-to-end example, that achieves these goals:
- Creates, Reads, Updates, and Deletes records from the database
- Implements Forms based security
- Implements "Granular Security" ("only allow User One to see, edit, and create their own Tasks")
- Implements View Model Style
View Model Style

View Model Style allows a programmer to create an application that has absolutely no UI (user interface). The programmer only creates a View Model and a Model. A designer with no programming ability at all, is then able to start with a blank page and completely create the View (UI) in Microsoft Expression Blend 4 (or higher). If you are new to View Model Style it is suggested that you read Silverlight View Model Style : An (Overly) Simplified Explanation for an introduction.
The Application

First, let's look at the sample application.
When you first start the application, you are "Logged Out". You can use the drop down to log in as User One or User Two.

Click the Add button to add a new Task.

Clicking the Update button will save the Task.

- Clicking on the Task in the list box will display the Task.
- Clicking the Update button will save any changes
- Clicking the Delete button will delete the Task.
Create The Application
We will now create the Application. You will need:
- Visual Studio 2010 (or higher)
- Expression Blend 4 (or higher)
- SQL Server (2005 or higher)
Setting Up The Database

Create a new database called RIATasks

Create a table called Tasks, using the following script:
SET ANSI_NULLS ON
GO
SET QUOTED_IDENTIFIER ON
GO
IF NOT EXISTS (SELECT * FROM sys.objects WHERE object_id = OBJECT_ID(N'[dbo].[Tasks]') AND type in (N'U'))
BEGIN
CREATE TABLE [dbo].[Tasks](
    [TaskID] [int] IDENTITY(1,1) NOT NULL,
    [TaskName] [nvarchar](50) NOT NULL,
    [TaskDescription] [nvarchar](max) NOT NULL,
    [UserID] [int] NOT NULL,
 CONSTRAINT [PK_Tasks] PRIMARY KEY CLUSTERED
(
    [TaskID] ASC
)WITH (PAD_INDEX  = OFF, STATISTICS_NORECOMPUTE  = OFF, IGNORE_DUP_KEY = OFF, ALLOW_ROW_LOCKS  = ON, ALLOW_PAGE_LOCKS  = ON) ON [PRIMARY]
) ON [PRIMARY]
END
GO
IF NOT EXISTS (SELECT * FROM sys.indexes WHERE object_id = OBJECT_ID(N'[dbo].[Tasks]') AND name = N'IX_Tasks_UserID')
CREATE NONCLUSTERED INDEX [IX_Tasks_UserID] ON [dbo].[Tasks]
(
    [UserID] ASC
)WITH (PAD_INDEX  = OFF, STATISTICS_NORECOMPUTE  = OFF, SORT_IN_TEMPDB = OFF, IGNORE_DUP_KEY = OFF,
DROP_EXISTING = OFF, ONLINE = OFF, ALLOW_ROW_LOCKS  = ON, ALLOW_PAGE_LOCKS  = ON) ON [PRIMARY]
GO

You will also need to set security so that you will be able to connect to the database in the next step.
(If SQL server is too hard for you to set it up, you can cover similar material in: Silverlight View Model Style File Manager and View Model Style: Silverlight Video Player)
Create The Web Application Project

Open Visual Studio and select File then New Project...

Create a Silverlight Application project.

Accept the defaults and click OK.

The project will be created.
Enable Forms Authentication

We need to set-up the web application to use Forms Authentication. When the user logs in, they will create an encrypted authentication 'token' in their web browser, that contains their UserID. This 'token' will be used by the Silverlight application when making web service calls. The web service methods (created in a later step) will check this 'token' to enforce security.
Open the Web.config file.

Add <authentication mode="Forms"/>
Create Default Page

Create a Web Form page called Default.aspx in the RIATasks.Web project.

Open the RIATasksTestPage.aspx page and switch to Source view.

Copy everything from <!DOCTYPE to the end of the page...

... and paste it in the source for the Default.aspx page, replacing everything from <!DOCTYPE to the end of the page.
We need to convert the Div tag the Silverlight control is in, to a Panel control so that it can be programmatically hidden if the user is not logged in.
- Replace: <div id="silverlightControlHost">
- With: <asp:panel id="silverlightControlHost" runat="server">
- Replace: </div>
- With: </asp:panel>
Now, we need to add a drop-down so a user can log in (in a real application you would use a normal Login Form).
Insert the following code in the page under the Form tag:
<asp:DropDownList ID="ddlUser" runat="server" AutoPostBack="True"
onselectedindexchanged="ddlUser_SelectedIndexChanged">
<asp:ListItem Selected="True" Value="0">Logged Out</asp:ListItem>
<asp:ListItem Value="1">User One</asp:ListItem>
<asp:ListItem Value="2">User Two</asp:ListItem>
</asp:DropDownList>

Open the Default.aspx.cs file and replace ALL the code with the following code:
using System;
using System.Collections.Generic;
using System.Linq;
using System.Web;
using System.Web.UI;
using System.Web.UI.WebControls;
using System.Web.Security;

namespace RIATasks.Web
{
    public partial class Default : System.Web.UI.Page
    {
        protected void Page_Load(object sender, EventArgs e)
        {
            if (!Page.IsPostBack)
            {
                LogOut();
            }
        }

        #region ddlUser_SelectedIndexChanged
        protected void ddlUser_SelectedIndexChanged(object sender, EventArgs e)
        {
            int intSelectedUser = Convert.ToInt32(ddlUser.SelectedValue);
            if (intSelectedUser > 0)
            {
                LogUserIntoSite(Convert.ToInt32(ddlUser.SelectedValue));
            }
            else
            {
                LogOut();
            }
        }
        #endregion

        #region LogUserIn
        private void LogUserIntoSite(int intUser)
        {
            // Log the user into the site
            FormsAuthenticationTicket ticket = new FormsAuthenticationTicket(1,
              intUser.ToString(),
              DateTime.Now,
              DateTime.Now.AddDays(30),
              false,
              "Role One",
              FormsAuthentication.FormsCookiePath);

            // Encrypt the ticket.
            string encTicket = FormsAuthentication.Encrypt(ticket);

            // Create the cookie.
            Response.Cookies.Add(new HttpCookie(FormsAuthentication.FormsCookieName, encTicket));

            // Show the Silverlight control
            silverlightControlHost.Visible = true;
        }
        #endregion

        #region LogOut
        protected void LogOut()
        {
            FormsAuthentication.SignOut();

            // Hide the Silverlight control
            silverlightControlHost.Visible = false;
        }
        #endregion
    }
}

Right-click on the Default.aspx page and select Set As Start Page...
Hit F5 to run the project.

The project will run and open in the web browser.
You will be able to change the drop down to log in as a user.
Close the web browser.
Create the Data Layer

Add a Linq to SQL class to the RIATaks.Web site called RIATasksDB.dbml.
Note: You could use Entity Framework instead of Linq to SQL (or any other data access technology). We use Linq to SQL only because it is easier to set-up.

Select the Server Explorer.

Create a connection to the RIATasks database, and drag the Tasks table to the Object Relational Designer surface.

The data layer is complete.
Save and close the file.
Create The Web Service

Add a Web Service file to the RIATaks.Web site called Webservice.asmx.
Open the WebService.asmx.cs file that is created and replace ALL the code with the following code:
using System;
using System.Collections.Generic;
using System.Linq;
using System.Web;
using System.Web.Services;

namespace RIATasks.Web
{
    [WebService(Namespace = "http://OpenLightGroup.org/")]
    [WebServiceBinding(ConformsTo = WsiProfiles.BasicProfile1_1)]
    [System.ComponentModel.ToolboxItem(false)]
    public class WebService : System.Web.Services.WebService
    {
        #region GetCurrentUserID
        private int GetCurrentUserID()
        {
            int intUserID = -1;
            if (HttpContext.Current.User.Identity.IsAuthenticated)
            {
                // Get the current user
                intUserID = Convert.ToInt32(HttpContext.Current.User.Identity.Name);
            }
            return intUserID;
        }
        #endregion

        // Web Methods

        #region GetTasks
        [WebMethod]
        public List<Task> GetTasks()
        {
            // Create a collection to hold the results
            List<Task> colResult = new List<Task>();

            RIATasksDBDataContext DB = new RIATasksDBDataContext();

            var colTasks = from Tasks in DB.Tasks
                           where Tasks.UserID == GetCurrentUserID()
                           select Tasks;

            // Loop thru the Tasks
            foreach (var item in colTasks)
            {
                // Create a Task
                Task tmpTask = new Task();

                // Set only the TaskID and the Name
                // We do this because Description could be
                // a large amount of data that will slow down
                // the application and we don't need it now
                tmpTask.TaskID = item.TaskID;
                tmpTask.TaskName = item.TaskName;

                // Add to the final results
                colResult.Add(tmpTask);
            }

            return colResult;
        }
        #endregion

        #region GetTask
        [WebMethod]
        public Task GetTask(int TaskID)
        {
            RIATasksDBDataContext DB = new RIATasksDBDataContext();

            var result = (from Tasks in DB.Tasks
                          where Tasks.TaskID == TaskID
                          where Tasks.UserID == GetCurrentUserID()
                          select Tasks).FirstOrDefault();

            return result;
        }
        #endregion

        #region DeleteTask
        [WebMethod]
        public string DeleteTask(int TaskID)
        {
            string strError = "";
            RIATasksDBDataContext DB = new RIATasksDBDataContext();

            try
            {
                var result = (from Tasks in DB.Tasks
                              where Tasks.TaskID == TaskID
                              where Tasks.UserID == GetCurrentUserID()
                              select Tasks).FirstOrDefault();

                if (result != null)
                {
                    DB.Tasks.DeleteOnSubmit(result);
                    DB.SubmitChanges();
                }
            }
            catch (Exception ex)
            {
                strError = ex.Message;
            }

            return strError;
        }
        #endregion

        #region UpdateTask
        [WebMethod]
        public string UpdateTask(Task objTask)
        {
            string strError = "";
            RIATasksDBDataContext DB = new RIATasksDBDataContext();

            try
            {
                var result = (from Tasks in DB.Tasks
                              where Tasks.TaskID == objTask.TaskID
                              where Tasks.UserID == GetCurrentUserID()
                              select Tasks).FirstOrDefault();

                if (result != null)
                {
                    result.TaskDescription = objTask.TaskDescription;
                    result.TaskName = objTask.TaskName;

                    DB.SubmitChanges();
                }
            }
            catch (Exception ex)
            {
                strError = ex.Message;
            }

            return strError;
        }
        #endregion

        #region InsertTask
        [WebMethod]
        public Task InsertTask(Task objTask)
        {
            RIATasksDBDataContext DB = new RIATasksDBDataContext();

            try
            {
                Task InsertTask = new Task();

                InsertTask.TaskDescription = objTask.TaskDescription;
                InsertTask.TaskName = objTask.TaskName;
                InsertTask.UserID = GetCurrentUserID();

                DB.Tasks.InsertOnSubmit(InsertTask);
                DB.SubmitChanges();

                // Set the TaskID
                objTask.TaskID = InsertTask.TaskID;
            }
            catch (Exception ex)
            {
                // Log the error
                objTask.TaskID = -1;
                objTask.TaskDescription = ex.Message;
            }

            return objTask;
        }
        #endregion
    }
}
Note that the web service methods call GetCurrentUserID(), that uses Convert.ToInt32(HttpContext.Current.User.Identity.Name), to get the current user.
The current UserID is set when the user logs in and creates a authentication "token". The user's web browser passes this token on all requests, including the web service requests that will be made by the Silverlight application.

To check that everything is set up correctly, you can right-click on the WebService.asmx file, and select View in Browser.

The web methods will display.
Note: You could use WCF instead. We use .asmx web services because they are easier to deploy.
The Silverlight Project

We will now complete the RIATasks Silverlight project. first, we need to create a reference, from the Silverlight project, to the web service we just created.
Then, we need to make a Model to call the web service we created, and an ICommand support class, that will allow us to easily raise events in the View Model.
Create the Web Service Reference

In the Silverlight Project, Right-click on References and select Add Service Reference...

- Click the Discover button
- Enter wsRIATasks for Namespace
- Click the OK button
The connection between the Silverlight project and the website is complete. We will implement code, in a later step, that will use this reference to call the web service we created.
Add References
Add a Reference to Microsoft.VisualBasic
ICommand Support Class

Add a new folder and call it Classes. and then right-click on it and select New Item...

Create a class called DelegateCommand.cs.
Replace ALL the code with the following code:
using System.Windows.Input;
using System;

// From http://johnpapa.net/silverlight/5-simple-steps-to-commanding-in-silverlight/
namespace RIATasks
{
    public class DelegateCommand : ICommand
    {
        Func<object, bool> canExecute;
        Action<object> executeAction;
        bool canExecuteCache;

        public DelegateCommand(Action<object> executeAction, Func<object, bool> canExecute)
        {
            this.executeAction = executeAction;
            this.canExecute = canExecute;
        }

        #region ICommand Members

        public bool CanExecute(object parameter)
        {
            bool temp = canExecute(parameter);

            if (canExecuteCache != temp)
            {
                canExecuteCache = temp;
                if (CanExecuteChanged != null)
                {
                    CanExecuteChanged(this, new EventArgs());
                }
            }

            return canExecuteCache;
        }

        public event EventHandler CanExecuteChanged;

        public void Execute(object parameter)
        {
            executeAction(parameter);
        }

        #endregion
    }
}
This class allows us to easily invoke ICommands. You can get more information on this class at: http://johnpapa.net/silverlight/5-simple-steps-to-commanding-in-silverlight/
The Model

Create a folder called Models, and a class called TasksModel.cs.
Replace all the code with the following code:
using Microsoft.VisualBasic;
using System.Linq;
using System;
using System.Collections.Generic;
using System.ServiceModel;
using RIATasks.wsRIATasks;

namespace RIATasks
{
    public class TasksModel
    {
        #region GetTask
        public static void GetTask(int TaskID, EventHandler<GetTaskCompletedEventArgs> eh)
        {
            // Set up web service call
            WebServiceSoapClient WS = new WebServiceSoapClient();

            // Set the EndpointAddress
            WS.Endpoint.Address = new EndpointAddress(GetBaseAddress());

            WS.GetTaskCompleted += eh;
            WS.GetTaskAsync(TaskID);
        }
        #endregion

        #region GetTasks
        public static void GetTasks(EventHandler<GetTasksCompletedEventArgs> eh)
        {
            // Set up web service call
            WebServiceSoapClient WS = new WebServiceSoapClient();

            // Set the EndpointAddress
            WS.Endpoint.Address = new EndpointAddress(GetBaseAddress());

            WS.GetTasksCompleted += eh;
            WS.GetTasksAsync();
        }
        #endregion

        #region DeleteTask
        public static void DeleteTask(int TaskID, EventHandler<DeleteTaskCompletedEventArgs> eh)
        {
            // Set up web service call
            WebServiceSoapClient WS = new WebServiceSoapClient();

            // Set the EndpointAddress
            WS.Endpoint.Address = new EndpointAddress(GetBaseAddress());

            WS.DeleteTaskCompleted += eh;
            WS.DeleteTaskAsync(TaskID);
        }
        #endregion

        #region UpdateTask
        public static void UpdateTask(Task objTask, EventHandler<UpdateTaskCompletedEventArgs> eh)
        {
            // Set up web service call
            WebServiceSoapClient WS = new WebServiceSoapClient();

            // Set the EndpointAddress
            WS.Endpoint.Address = new EndpointAddress(GetBaseAddress());

            WS.UpdateTaskCompleted += eh;
            WS.UpdateTaskAsync(objTask);
        }
        #endregion

        #region InsertTask
        public static void InsertTask(Task objTask, EventHandler<InsertTaskCompletedEventArgs> eh)
        {
            // Set up web service call
            WebServiceSoapClient WS = new WebServiceSoapClient();

            // Set the EndpointAddress
            WS.Endpoint.Address = new EndpointAddress(GetBaseAddress());

            WS.InsertTaskCompleted += eh;
            WS.InsertTaskAsync(objTask);
        }
        #endregion

        // Utility

        #region GetBaseAddress
        private static Uri GetBaseAddress()
        {
            // Get the web address of the .xap that launched this application
            string strBaseWebAddress = App.Current.Host.Source.AbsoluteUri;
            // Find the position of the ClientBin directory
            int PositionOfClientBin =
                App.Current.Host.Source.AbsoluteUri.ToLower().IndexOf(@"/clientbin");
            // Strip off everything after the ClientBin directory
            strBaseWebAddress = Strings.Left(strBaseWebAddress, PositionOfClientBin);
            // Create a URI
            Uri UriWebService = new Uri(String.Format(@"{0}/WebService.asmx", strBaseWebAddress));
            // Return the base address
            return UriWebService;
        }
        #endregion
    }
}
Note: GetBaseAddress() is a method that determines where the user launched the .xap (that the Silverlight application is contained in), and uses that to determine where the WebService.asmx file is at. The Web Service methods use that address to call the Web Service.
We have now created methods in the Model that communicate with the methods created in the Web Service created earlier.

Create a folder called ViewModels, and add class called MainPageModel.cs.
Replace all the code with the following code:
using System;
using System.Collections.ObjectModel;
using System.ComponentModel;
using System.Windows.Input;
using System.Windows;
using RIATasks.wsRIATasks;

namespace RIATasks
{
    public class MainPageModel : INotifyPropertyChanged
    {
        public MainPageModel()
        {
            // Set the command property
            GetTasksCommand = new DelegateCommand(GetTasks, CanGetTasks);
            GetTaskCommand = new DelegateCommand(GetTask, CanGetTask);
            DeleteTaskCommand = new DelegateCommand(DeleteTask, CanDeleteTask);
            UpdateTaskCommand = new DelegateCommand(UpdateTask, CanUpdateTask);
            AddNewTaskCommand = new DelegateCommand(AddNewTask, CanAddNewTask);

            // The following line prevents Expression Blend
            // from showing an error when in design mode
            if (!DesignerProperties.IsInDesignTool)
            {
                // Get the Tasks for the current user
                GetTasks();

                // Set Visibility
                HasCurrentTask = Visibility.Collapsed;
                AddVisibility = Visibility.Visible;
                UpdateVisibility = Visibility.Collapsed;
                DeleteVisibility = Visibility.Collapsed;
            }
        }


        // Utility

        #region INotifyPropertyChanged
        public event PropertyChangedEventHandler PropertyChanged;

        private void NotifyPropertyChanged(String info)
        {
            if (PropertyChanged != null)
            {
                PropertyChanged(this, new PropertyChangedEventArgs(info));
            }
        }
        #endregion
    }
}
This code implements INotifyPropertyChanged that will be used by Properties (created in a later step), to automatically notify the View when they have been updated.
The constructor, MainPageModel(), sets up some ICommands (that will be fully implemented in a later step). It also calls the GetTasks(), method, that will call the Model (that will then call the web service), and retrieve any Tasks for the logged in user.
Note: You will see wavy red lines underneath most of the lines in the code because it sets properties and commands that have not been created yet.
Add the following code to the class:
// Properties

        #region CurrentTask
        private Task _CurrentTask = new Task();
        public Task CurrentTask
        {
            get { return _CurrentTask; }
            private set
            {
                if (CurrentTask == value)
                {
                    return;
                }
                _CurrentTask = value;
                this.NotifyPropertyChanged("CurrentTask");
            }
        }
        #endregion

        #region AddVisibility
        private Visibility _AddVisibility = Visibility.Visible;
        public Visibility AddVisibility
        {
            get { return _AddVisibility; }
            private set
            {
                if (AddVisibility == value)
                {
                    return;
                }
                _AddVisibility = value;
                this.NotifyPropertyChanged("AddVisibility");
            }
        }
        #endregion

        #region UpdateVisibility
        private Visibility _UpdateVisibility = Visibility.Visible;
        public Visibility UpdateVisibility
        {
            get { return _UpdateVisibility; }
            private set
            {
                if (UpdateVisibility == value)
                {
                    return;
                }
                _UpdateVisibility = value;
                this.NotifyPropertyChanged("UpdateVisibility");
            }
        }
        #endregion

        #region DeleteVisibility
        private Visibility _DeleteVisibility = Visibility.Visible;
        public Visibility DeleteVisibility
        {
            get { return _DeleteVisibility; }
            private set
            {
                if (DeleteVisibility == value)
                {
                    return;
                }
                _DeleteVisibility = value;
                this.NotifyPropertyChanged("DeleteVisibility");
            }
        }
        #endregion

        #region HasTasks
        private Visibility _HasTasks = Visibility.Collapsed;
        public Visibility HasTasks
        {
            get { return _HasTasks; }
            private set
            {
                if (HasTasks == value)
                {
                    return;
                }
                _HasTasks = value;
                this.NotifyPropertyChanged("HasTasks");
            }
        }
        #endregion

        #region HasCurrentTask
        private Visibility _HasCurrentTask = Visibility.Collapsed;
        public Visibility HasCurrentTask
        {
            get { return _HasCurrentTask; }
            private set
            {
                if (HasCurrentTask == value)
                {
                    return;
                }
                _HasCurrentTask = value;
                this.NotifyPropertyChanged("HasCurrentTask");
            }
        }
        #endregion

        #region Message
        private string _Message;
        public string Message
        {
            get { return _Message; }
            private set
            {
                if (Message == value)
                {
                    return;
                }
                _Message = value;
                this.NotifyPropertyChanged("Message");
            }
        }
        #endregion
This looks like a lot of code, but it is only Properties that will hold values that will be set and consumed by the View. All of them raise NotifyPropertyChanged when they are changed.Add the following code to the class:
        // Collections

        #region colTasks
        private ObservableCollection<Task> _colTasks
            = new ObservableCollection<Task>();
        public ObservableCollection<Task> colTasks
        {
            get { return _colTasks; }
            private set
            {
                if (colTasks == value)
                {
                    return;
                }
                _colTasks = value;
                this.NotifyPropertyChanged("colTasks");
            }
        }
        #endregion
This is like a Property, but it holds a Collection of Tasks instead of a single value.
Add the following code to the class:
        // Operations

        #region GetTasks
        private void GetTasks()
        {
            // Clear the current Tasks
            colTasks.Clear();
            // Call the Model to get the collection of Tasks
            TasksModel.GetTasks((Param, EventArgs) =>
            {
                if (EventArgs.Error == null)
                {
                    // loop thru each item
                    foreach (var Task in EventArgs.Result)
                    {
                        // Add to the colTasks collection
                        colTasks.Add(Task);
                    }

                    // Count the records returned
                    if (colTasks.Count == 0)
                    {
                        // If there are no records, indicate that
                        Message = "No Records Found";

                        // Set HasCurrentTask
                        HasCurrentTask = Visibility.Collapsed;

                        // We have no Tasks so set HasTasks
                        HasTasks = Visibility.Collapsed;
                    }
                    else
                    {
                        // We have Tasks so set HasTasks
                        HasTasks = Visibility.Visible;
                    }
                }
            });
        }
        #endregion

        #region GetTask
        private void GetTask(int intTaskID)
        {
            // Call the Model to get the Task
            TasksModel.GetTask(intTaskID, (Param, EventArgs) =>
            {
                if (EventArgs.Error == null)
                {
                    // Set the CurrentTask Property
                    CurrentTask = EventArgs.Result;

                    // Set Visibility
                    HasCurrentTask = Visibility.Visible;
                    AddVisibility = Visibility.Visible;
                    UpdateVisibility = Visibility.Visible;
                    DeleteVisibility = Visibility.Visible;
                }
            });
        }
        #endregion

        #region DeleteTask
        private void DeleteTask(Task objTask)
        {
            // Call the Model to delete the Task
            TasksModel.DeleteTask(objTask.TaskID, (Param, EventArgs) =>
            {
                if (EventArgs.Error == null)
                {
                    // Set the Error Property
                    Message = EventArgs.Result;

                    // Set current Task to null
                    CurrentTask = null;

                    // Update the Tasks list
                    GetTasks();

                    // Set Visibility
                    HasCurrentTask = Visibility.Collapsed;
                    AddVisibility = Visibility.Visible;
                    UpdateVisibility = Visibility.Collapsed;
                    DeleteVisibility = Visibility.Collapsed;
                }
            });
        }
        #endregion

        #region UpdateTask
        private void UpdateTask(Task objTask)
        {
            // Call the Model to UpdateTask the Task
            TasksModel.UpdateTask(objTask, (Param, EventArgs) =>
            {
                if (EventArgs.Error == null)
                {
                    // Set the Error Property
                    Message = EventArgs.Result;

                    // Update the Tasks list
                    GetTasks();

                    // Set Visibility
                    HasCurrentTask = Visibility.Visible;
                    AddVisibility = Visibility.Visible;
                    UpdateVisibility = Visibility.Visible;
                    DeleteVisibility = Visibility.Visible;
                }
            });
        }
        #endregion

        #region InsertTask
        private void InsertTask(Task objTask)
        {
            // Call the Model to Insert the Task
            TasksModel.InsertTask(objTask, (Param, EventArgs) =>
            {
                if (EventArgs.Error == null)
                {
                    // Set the CurrentTask Property
                    CurrentTask = EventArgs.Result;

                    // Update the Tasks list
                    GetTasks();

                    // Set Visibility
                    HasCurrentTask = Visibility.Visible;
                    AddVisibility = Visibility.Visible;
                    UpdateVisibility = Visibility.Visible;
                    DeleteVisibility = Visibility.Visible;
                }
            });
        }
        #endregion

        #region SetToNewTask
        private void SetToNewTask()
        {
            // Create a empty Task
            // so form will be blank
            Task objTask = new Task();

            // Set TaskID = -1 so we know it's
            // a new Task
            objTask.TaskID = -1;

            // Set the CurrentTask Property
            CurrentTask = objTask;

            // Set Visibility
            HasCurrentTask = Visibility.Visible;
            AddVisibility = Visibility.Collapsed;
            UpdateVisibility = Visibility.Visible;
            DeleteVisibility = Visibility.Collapsed;
        }
        #endregion
These are the operations that the View Model will perform. These are the methods that do the actual work. Mostly these methods simply call the methods in the Model.
Add the following code to the class: // Commands
#region GetTasksCommand
public ICommand GetTasksCommand { get; set; }
public void GetTasks(object param)
{
GetTasks();
}
private bool CanGetTasks(object param)
{
return true;
}
#endregion
#region GetTaskCommand
public ICommand GetTaskCommand { get; set; }
public void GetTask(object param)
{
// Get the Task that was passed as a parameter
Task objTask = (Task)param;
// Call GetTask to get and set
// the CurrentTask property
GetTask(objTask.TaskID);
}
private bool CanGetTask(object param)
{
// Only allow this ICommand to fire
// if a Task was passed as a parameter
return ((param as Task) != null);
}
#endregion
#region DeleteTaskCommand
public ICommand DeleteTaskCommand { get; set; }
public void DeleteTask(object param)
{
if (CurrentTask.TaskID == -1)
{
// This is a new Task
SetToNewTask();
}
else
{
// This is an Existing Task
DeleteTask(CurrentTask);
}
}
private bool CanDeleteTask(object param)
{
// Do not allow if there is no Current Task
return (CurrentTask != null);
}
#endregion
#region UpdateTaskCommand
public ICommand UpdateTaskCommand { get; set; }
public void UpdateTask(object param)
{
if (CurrentTask.TaskID == -1)
{
// This is a new Task
InsertTask(CurrentTask);
}
else
{
// This is an Update
UpdateTask(CurrentTask);
}
}
private bool CanUpdateTask(object param)
{
// Do not allow if there is no Current Task
return (CurrentTask != null);
}
#endregion
#region AddNewTaskCommand
public ICommand AddNewTaskCommand { get; set; }
public void AddNewTask(object param)
{
SetToNewTask();
}
private bool CanAddNewTask(object param)
{
return true;
}
#endregion
These are the ICommands. They will be called from the View.

In Visual Studio, select Build, then Build RIATasks.
The project should build without any errors.


Open the MainPage.xaml file in Expression Blend 4 (or higher).

The project will open in Expression Blend.

Click on LayoutRoot in the Objects and Timeline window, and in the Properties window, type DataContext in the Search box.
Next, Click the New button next to DataContext.

Select MainPageModel and click OK.

Click the Data tab and expand MainPageModel (under the Data Context section).
You will all the public Properties, Collections, and ICommands that are in the MainPageModel.
Create Sample Data

It will be easier to design the form if we are also able to see sample data.
In the Data window, Click on the Create sample data icon.

Select Create Sample Data from Class…

Select the MainPageModel and click OK

You will now see the MainPageModelSampleData class.
Build the View

Click on colTasks in the Sample Data section...

...and drop it on the page.

It will create a ListBox with sample data. Note: At run-time the real data will show not the Sample Data.

In the Properties for the ListBox, set the HorizontalAlignment to Left, and the VerticalAlignment to Top

Right-click on the ListBox and select:
Edit additional Templates > Edit Generated Items > Edit Current

Click on the third TextBlock in the Objects and Timeline window

In the Properties for the TextBlock, select Advanced options next to Text

Select Data Binding

We see that this is bound to the TaskName. This is the only TextBlock that we want to show in the ListBox

In the Objects and Timeline window, delete the other three TextBlocks

Click the Return scope icon

The ListBox is now formatted

Now, select the Grid control

Draw a Grid next to the ListBox

Hover the mouse near the edge of the Grid, and click with the left mouse button, to make cells

From the Tools Bar, grab a TextBox

Draw a TextBox on the Grid

From the Data window, grab TaskName

Drag TaskName onto the TextBox

In the Properties for the TextBox:
- Set the Width and Height to Auto
- Set Horizontal and Vertical Alignment
- Set all Margins to 0

Draw another TextBox on the Grid

In the Properties for the TextBox:
- Set the Width and Height to Auto
- Set Horizontal and Vertical Alignment
- Set all Margins to 0

From the Data window, drag TaskDescription onto the TextBox

Drag TextBlocks onto the Grid for Name and Description labels, and set their Text Properties.

Click on Button in the Tools Bar

Draw a Button above the ListBox

Set the Content of the button to Add

Add an Update and Delete button
(we will set the button's Click events in a later step)
Setting Visibility
We now have all the controls on the page, we will now hook up the Visibility for the various controls

Click on the Grid in the Objects and Timeline window

In the Properties for the Grid, select Advanced options for Visibility

Select Data Binding...
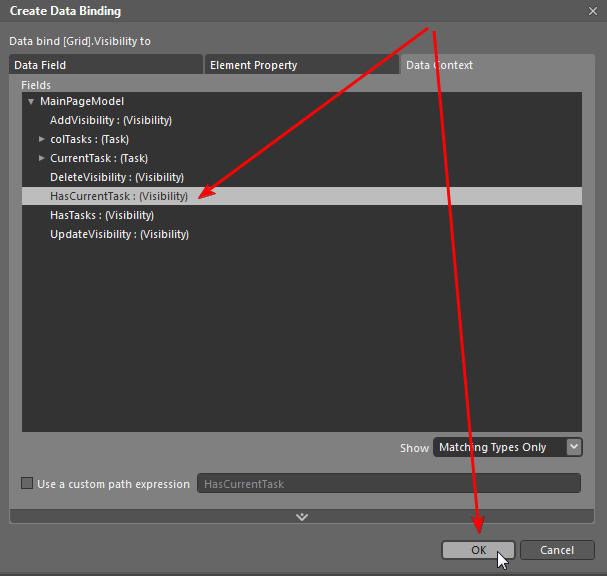
Bind to HasCurrentTask and click OK

Hook up the remaining Visibility Properties according to the diagram above.

Note: If binding the Visibility causes some elements to disappear in Design mode, you can edit the sample data file...

...and set them to Visible
Using Behaviors
We will now use the InvokeCommandAction behavior to allow the buttons to raise ICommands in the View Model.
Add Button

Get an InvokeCommandAction Behavior.

Drop it on the Add button in the Objects and Timeline window

In the Properties for the Behavior:
- Select Click for EventName
- Click Data bind icon next to Command (under Common Properties)

Select the Data Context tab and then select AddNewTaskCommand and click OK.

Add InvokeCommandAction Behaviors to the Update and Delete buttons according to the diagram above.
Selecting A Task From The ListBox

- Drop an InvokeCommandAction behavior to the ListBox.
- Set the EventName to SelectionChanged
- Click Data bind next to Command

Select GetTaskCommand and click OK

Click Advanced options next to CommandParameter

Select the SelectedItem from the ListBox and click OK
Add Styling

See the article at this link to obtain the ResourceDictionary for the style, and the directions on how to apply it.
Build And Run The Project

In the Projects window, right-click on the RIATasks.Web project and select Startup Project

Right-click on the Default.aspx page and select Startup
Hit F5 to Build and Run the project

The project is complete.
Use View Model When You Want To Write Less Code
Bindings combined with INotifyPropertyChanged, can save you from writing a lot of code. Using View Model allows you to leverage a lot of the helpful features in Microsoft Expressions Blend. View Model is also a simple pattern to follow, so you can quickly and easily implement Properties, Collections and ICommands.
The actual "custom code" is contained in the "Operations" section of the View Model. You will see that it is not a lot of code and most of it is simply calling the Model and setting a Property in the View Model. Also note, that when an object such as "Task" is set as the current Task selected, we never need to split out each of the fields in the Task object and process each separately, we just pass the actual "Task" object between the Model, View Model, and View.
It is very helpful that we can expose Properties, such as custom objects like Task and Visibility, to the View as they are, and let the Designer worry about how to actually implement them. Even if we are also the Designer, we can use the drag and drop features of Expression Blend to quickly, and accurately assemble the UI.
The programmer can simply concentrate on getting the data in and out of the View Model, through the Model, and enforcing business rules. This allows the Programmer to focus on a clear easily testable task. The UI issues are abstracted away.
This I believe is where a programmer will discover that they will use LESS CODE than if they did not use View Model. At the very least, many programmers I have worked with, find the experience more enjoyable because they can focus on the procedural logic.
Updated 7/14/2010: Removed Rx Extensions