
J2EE - NetBeans, JSF, Persistence API
This article is a simple tutorial for anyone who wants to learn basics of J2EE. Step-by-step introduction on how to make a simple enterprise application in NetBeans.
This is first part of 3:
This article was writtenn back when Java Beans component model was still cool. Spring was an alternative then. Nowadays different technologies are available and the state of art, but this article can serve as a reference for Java Beans J2EE development.
I spend most of my time with .NET technologies but I am aware of that J2EE is very powerful and number one technology in the enterprise application world, so I decided that I should learn some basics of J2EE. You can download the source code here. The source code covers as well parts 2 and 3 of this article.
This is a simple tutorial on "How to build simple enterprise web application on top of DB" using Java Persistence API, JSF, NetBeans and Derby Database. We will create application that allows the management of "Companies and their Products".
What you will need (get the latest versions)
- NetBeans 6.7.1 + UML tools. I used 6.7.1 because it supported the UML modelling tools with reverse engineer and code generation. The package was not so far ported for the newer versions of NetBeans.
- J2EE
- Application server - I used GlassFish 2.1
- Derby Database (Java DB is SUN's version of this Open Source database)
You can just download the NetBeans Bundle which already includes everything. Just keep in mind that it was tested on the 6.7.1/GlassFish 2.1 version and some setting might not work on the newer versions.
Technologies & Recommended Reading
- Java Persistence API - will helps us with Object - Relational Mapping - it will transfer the Java Objects to the tables in the database.
- Entity Bean - represents the object (Company, Product) and its fields (Name, Description) which are later represented as columns in data table.
- Session Bean - rather represents all the actions which can be done with the Entity Beans (Create new product, List products of company...)
- JSF - web application framework used for speedup an ease GUI creation. I use the 1.2 version, which is build on top of JSP (a lower layer technology for building dynamic web apps).
Create the Projects
In NetBeans select New -> New Project -> Java EE -> Enterprise Application. Later you will be asked to specify Application Server, here you can select the installed GlassFish instance.

In the last tab you can specify the names for the EJB and Web Application Module. That is because NetBeans will create two modules. The EJB module will take care of your "Model and Control", the Web Application Module will take care of the "View".
If you wish to model you Entity Beans with NetBeans UML tool than select New Project -> UML -> Java-Platform Model -> Finish, and later you can create your Class Diagram.
Start with Modelling
First we want to create our Entity Beans - objects which represent some real world entities, which will be stored in the database. In our application there are 2: Company and Product. Here is the class diagram which we want to create.

From this diagram we can generate the Entity classes. Right click the UML project -> Generate Code. You should obtain following classes:
public class Company {

    private int id;
    private String description;
    private String name;
    private List<product> products;

    public Company () {
    }

    public int getId () {
        return id;
    }

    public void setId (int val) {
       id = val;
    }

    public String getName () {
        return name;
    }

    public void setName (String val) {
       name = val;
    }

    public List<product> getProducts() {
        return products;
    }

    public void setProducts(List<product> products) {
        this.products = products;
    }

    public String getDescription () {
        return description;
    }

    public void setDescription (String val) {
        this.description = val;
    }
}
public class Product {

    private int id;
    private String description;
    private String name;

    public Product () {
    }

    public String getDescription () {
        return description;
    }

    public void setDescription (String val) {
        description = val;
    }

    public int getId () {
        return id;
    }

    public void setId (int val) {
        id = val;
    }

    public String getName () {
        return name;
    }

    public void setName (String val) {
        name = val;
    }
}
Also you can write the classes and use the Reverse Engineer to obtain the class diagram.
Creating Entity Beans from Classes
To convert the the class to Entity Beans you have to do two simple steps - add annotations and implement the Serializable interface.
public class Company implements Serializable {

    @Id
    @GeneratedValue(strategy=GenerationType.IDENTITY)
    @Column(name="companyID",nullable=false)
    private int id;

    @Column(name="companyDescription")
    private String description;

    @Column(name="companyName")
    private String name;

    @ManyToMany
    private List<product> products;

    ...and all the setters and getter...
}
It is quite self-explanatory. The class has to be annotated as @Entity, and has to have at least one @Id field. Then we can specify the name of the column which will be created in the database, and also strategy for generating the IDs value.
You will notice that there will the NetBeans light bulb telling you that there is no Persistence Unit - now we will create one.

Creating the Persistence Unit
Persistence Unit will perform the object - relational mapping for us. To create one we will first create a database.
On the "Services" pane localize Databases -> Java DB -> Create Database and specify the demanded details.

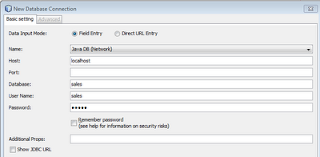
Now when we have the Database, we can create Database Connection which will be used by the Persistence Unit to connect to the DB.
Databases -> New Connection.
Now go back and right click EJB Module of you application and select New -> Persistence Unit.

Before we continue with Session Beans we will prepare a Named Query. Named queries are static queries which are later compiled to SQL and used by Persistence Unit. We will use a simple queries getting all the companies in the table. We place the query above the class definition.
@Entity
@NamedQuery(
    name="Company.getAllCompanies",
    query="SELECT c FROM Company c"
)
public class Company implements Serializable {

}
Now that you have finished the Persistance Unit you can try to deploy the project. Of course there is no functionality so far created, but during the deployment the database should be created for you. You can check the resulted database in the Services tab.

Session Beans
Now we will create the Session Bean, which will provide method and actions which we can perform with our Entity Beans.
Go to Enterprise Beans -> New -> Session Bean, than specify the package and leave the standard settings.

You can notice that the newly created Bean implements interface ending with "Local".
Now we will add the first method which will return all the companies in the database. NetBeans tells you how to do this - Context Menu -> Insert Code -> Add Bussiness Method.

The method will be defined in the interface and method stub created in the implementation. Now you can edit the code like this:
@Stateless
public class SalesSessionBean implements SalesSessionLocal {

    @PersistenceContext
    private EntityManager em;

    public List<company> getAllCompanies() {
        List<company> companies = em.createNamedQuery(
            "Company.getAllCompanies").getResultList();
        return companies;
    }
}
Notice that we defined EntityManager which is a class which manages Persistance Context. Persistance Context is basket managing your Entities(objects representing Company, Product...). Classes which are managed by the Entity Manager are our Entity Beans. In the method you can see that we all calling Named Query which we have created before.
Backing Beans
Now we will create a middle layer between the Session Bean and JSP site representing the GUI - this layer is a Backing Bean. Backing bean is a Java class which manages and is accessible from the actual JSP page. Create new class in the Web Module (New -> Java Class) and name it SalesBack. Now here is the implementation:
public class SalesBack {

    @EJB
    SalesSessionLocal ssl;

    public List<company> getAllCompanies(){
        return ssl.getAllCompanies();
    }
}
You can see that the class basically references the Session Bean (Be careful you have to reference the interface, not the actual implementation). Than in the method we simply calling the method of the Session Bean. From this it seems that this layer is not needed, but actually it is quiet helpful as you will see later.
Faces Configuration
In order to be able to use just create Backing Bean in your JSP pages, you will need to perform some changes to faces-config.xml file. Open the file and add the following into the faces-config element:
<managed-bean>
           <managed-bean-name>sales</managed-bean-name>
           <managed-bean-class>sales.back.SalesBack</managed-bean-class>
           <managed-bean-scope>session</managed-bean-scope>
</managed-bean>
Be sure to check the Backing Bean class (including the package name). Later you can reference this Backing Bean as "sales" in your JSP page.
JSF Page
Now we will show what advantages/components brings Java Server Faces and how to use them. First we will create simple page just showing a table of all companies in stored in the DB. On the Web Module create a new JSP page with JSF. (New -> JSF JSP Page). After you create the page you can see that it contains two @taglib directives referencing the JSF framework TAGs.
JSP technology can be extended by "custom tags". When we register the prefixes using the taglib directory, we introduce all the custom tags which come with the JSF framework. First group with prefix "f" named "Core" references all the components which are independent on the renderer (e.g. converters, validators). The second group with prefix "h" named "HTML" introduces all the HTML tags and components that brings JSF to create nice GUI and functional GUI (buttons, tables, grids...).
OK, so now lets put in the code which will show the table of companies.
            <h1><h:outputtext value="Companies List"></h:outputtext></h1>
            <h:datatable value="#{sales.allCompanies}" var="item">
                <h:column>
                    <f:facet name="header"><h:outputtext value="Name"></h:outputtext>
                    <h:outputtext value="#{item.name}">
                </h:outputtext>
                <h:column>
                    <f:facet name="header"><h:outputtext value="Description">
                    </h:outputtext>
                    <h:outputtext value="#{item.description}">
                </h:outputtext>
            </f:facet>
</h:column></f:facet></h:column></h:datatable>
The main advantage of JSF is that it lets us bind the content of some HTML components to the properties/fields in the Backing Bean. Because in our Backing Bean we had a method called "getAllCompanies" than here we can reference the result of this method as "#{sales.allCompanies}". This binding is done on the "<datatable>" component by setting the value attribute. Notice that the second attribute var lets you set the "name" for one row of the binded collection. Later in the columns definitions you can address one company in the collection by this name (here "item").
Faces Servlet Configuration in web.xml
Ok now that you have created the JSP file is time to try it. Before you will have to tell the application server, that if the user navigates to your page, the page contains Faces elements and has to be processed using the Faces Servlet. Open the web.xml and alter the Faces Servlet settings this way:
<servlet>
        <servlet-name>Faces Servlet</servlet-name>
        <servlet-class>javax.faces.webapp.FacesServlet</servlet-class>
        <load-on-startup>1</load-on-startup>
</servlet>
<servlet-mapping>
        <servlet-name>Faces Servlet</servlet-name>
        <url-pattern>*.jsf</url-pattern>
</servlet-mapping>
Important part is the Mapping configuration. Basically you are saying that each file ending jsf will be processed by the Faces Servlet. Now if the name of the file you created was "companies.jsp", than in the browser you will reference it by "companies.jsf". Now run the project, and in the browser type the path to "companies.jsf" and you should get following result.

Obviously the companies table is empty. So go ahead and using NetBeans (Services -> Databases) run some SQL INSERT statements and you should be able to see the inserted data in your table.
INSERT INTO SALES.COMPANY (companyname, companydescription) values('First company',
    'Sales bananas');
INSERT INTO SALES.COMPANY (companyname, companydescription) values('Second company',
    'Sales oranges');

In the next post I will finish this application and provide some additional functionality to edit the company details and add and remove products of a company.