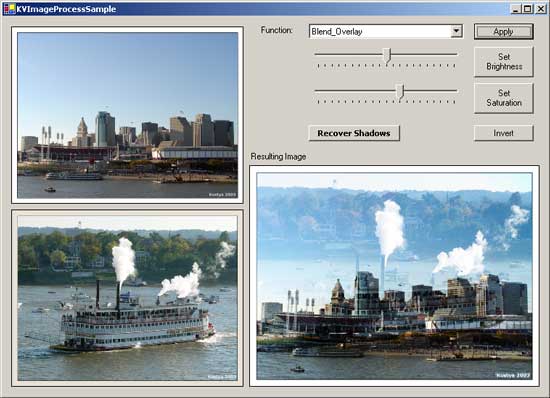
Introduction
I was working on a project where I had to render some graphics. At some point in my development, I realized that it would be very helpful to be able to control how one image is rendered over the other.
Normally, pixels are simply drawn on top of each other and the only control you have over the process is alpha channels. You can also use color matrices to scale, translate or rotate the colors of the source image before rendering it on top of the background, but you cannot do things like �take the color of background, invert it and multiply it by the color of foreground� or �resulting color = source XOR destination�. I wanted to be able to tell my drawing routines, how the pixels from the two images are to be blended together.
I remembered that GDI has raster operations (ROPs) that you could specify in BitBlt and StretchBlt functions. So at first, I was set to try and imitate those raster operations with GDI+. I could import GDI32.DLL and call the above-mentioned functions directly, but I quickly discovered that the limited set of ROPs is not good enough for me and that ROPs available in BitBlt are just too ugly to be very useful for any kind of digital image processing. I wanted the capability of extending existing and/or providing of my own blending functions.
Finally, I thought that it would it be very cool to be able to do image blending modes just like in Photoshop: overlay, multiply, screen, color dodge and so on.
As a result, this article does not have anything to do with alpha blending of images. There are plenty of articles that talk about alpha blending. In fact, my code completely ignores alpha channels at this stage of development. Most of this article is about controlling how to separate images that are blended together, pixel by pixel.
What�s the big idea with blending?
Well, there is no big idea. Everything is very simple. We take a pixel from a background image and a pixel from the source image and combine them together using some set of rules or a formula.
There are basically only 2 types of situations here.
First is when the same formula applies to every channel of the image (red, green and blue). In this case we can define a prototype function as:
private delegate byte PerChannelProcessDelegate(ref byte nSrc, ref byte nDst);
The function takes source byte and destination byte and returns the resulting byte. Following is the example of such a function:
private byte BlendDarken(ref byte Src, ref byte Dst)
{
return ((Src < Dst) ? Src : Dst);
}
Second type of function is the one that takes all the RGB data for both source and destination pixels and calculates the resulting R, G and B values. I defined a delegate for this type of function as follows:
private delegate void RGBProcessDelegate(byte sR, byte sG, byte sB,
                               ref byte dR, ref byte dG, ref byte dB);
Resulting values are returned in dR, dG and dB parameters. Below is an example of a function of this type:
private void BlendHue(byte sR, byte sG, byte sB,
ref byte dR, ref byte dG, ref byte dB)
{
ushort sH, sL, sS, dH, dL, dS;
RGBToHLS(sR, sG, sB, out sH, out sL, out sS);
RGBToHLS(dR, dG, dB, out dH, out dL, out dS);
HLSToRGB(sH, dL, dS, out dR, out dG, out dB);
}
RGB values are first converted into HLS (Hue, Luminosity, Saturation) color space and then recombined and converted back into RGB space using luminosity and saturation of background (destination) pixel and hue of source pixel.
Using these two types of functions, we can describe pretty much any kind of blending of 2 pixels in RGB color space.
Applying blending functions to images
In order to apply any of the functions described above to images, I have defined 2 separate processing functions, one for each type of blending function.
First one applies any specified per-channel processing function to blend each channel of the source and destination images.
private Bitmap PerChannelProcess(ref Image destImg,
          int destX, int destY, int destWidth, int destHeight,
          ref Image srcImg, int srcX, int srcY,
          PerChannelProcessDelegate ChannelProcessFunction)
{
    Bitmap dst = new Bitmap(destImg);
    Bitmap src = new Bitmap(srcImg);

    BitmapData dstBD =
        dst.LockBits( new Rectangle(destX, destY, destWidth, destHeight),
        ImageLockMode.ReadWrite, PixelFormat.Format24bppRgb);
    BitmapData srcBD =
        src.LockBits( new Rectangle(srcX, srcY, destWidth, destHeight),
        ImageLockMode.ReadWrite, PixelFormat.Format24bppRgb);

    int dstStride = dstBD.Stride;
    int srcStride = srcBD.Stride;

    System.IntPtr dstScan0 = dstBD.Scan0;
    System.IntPtr srcScan0 = srcBD.Scan0;

    unsafe
    {
        byte *pDst = (byte *)(void *)dstScan0;
        byte *pSrc = (byte *)(void *)srcScan0;

        for(int y = 0; y < destHeight; y++)
        {
            for(int x = 0; x < destWidth * 3; x++)
            {
                pDst[x + y * dstStride] =
                    ChannelProcessFunction(ref pSrc[x + y * srcStride],
                                ref pDst[x + y * dstStride]);
            }
        }
    }

    src.UnlockBits(srcBD);
    dst.UnlockBits(dstBD);

    return dst;
}
Specified areas of the source and destination images are locked with LockBits methods and then processes byte by byte. PerChannelProcessDelegate function is passed as the last parameter and is applied to each channel of each pixel of the source and destination images.
Second function does almost the same thing, but it takes second type of blending functions as a parameter (RGBProcessDelegate) and it processes data one pixel at the time.
private Bitmap RGBProcess(ref Image destImg,
    int destX, int destY, int destWidth, int destHeight,
    ref Image srcImg, int srcX, int srcY,
    RGBProcessDelegate RGBProcessFunction)
{
    Bitmap dst = new Bitmap(destImg);
    Bitmap src = new Bitmap(srcImg);

    BitmapData dstBD =
        dst.LockBits( new Rectangle(destX, destY, destWidth, destHeight),
        ImageLockMode.ReadWrite, PixelFormat.Format24bppRgb);
    BitmapData srcBD =
        src.LockBits( new Rectangle(srcX, srcY, destWidth, destHeight),
        ImageLockMode.ReadWrite, PixelFormat.Format24bppRgb);

    int dstStride = dstBD.Stride;
    int srcStride = srcBD.Stride;

    System.IntPtr dstScan0 = dstBD.Scan0;
    System.IntPtr srcScan0 = srcBD.Scan0;

    unsafe
    {
        byte *pDst = (byte *)(void *)dstScan0;
        byte *pSrc = (byte *)(void *)srcScan0;

        for(int y = 0; y < destHeight; y++)
        {
            for(int x = 0; x < destWidth; x++)
            {
                RGBProcessFunction(
                    pSrc[x * 3 + 2 + y * srcStride],
                    pSrc[x * 3 + 1 + y * srcStride],
                    pSrc[x * 3 + y * srcStride],
                    ref pDst[x * 3 + 2 + y * dstStride],
                    ref pDst[x * 3 + 1 + y * dstStride],
                    ref pDst[x * 3 + y * dstStride]
                    );
            }
        }
    }

    src.UnlockBits(srcBD);
    dst.UnlockBits(dstBD);

    return dst;
}
As you can see, all the above methods are defined as private and are only presented here to show you how my code deals with blending, internally.
Publicly, my class exposes BlendImages method (with a few overloaded versions) that has the following signature:
public void BlendImages(Image destImage,
int destX, int destY, int destWidth, int destHeight,
Image srcImage, int srcX, int srcY, BlendOperation BlendOp)
Everything is pretty straightforward here. The only new item is BlendOperation parameter. BlendOperation is defined as an enumeration and used to specify which blending function to apply to the images. Following blend operation values are currently defined:
SourceCopy
ROP_MergePaint
ROP_NOTSourceErase
ROP_SourceAND
ROP_SourceErase
ROP_SourceInvert
ROP_SourcePaint
Blend_Darken
Blend_Multiply
Blend_ColorBurn
Blend_Lighten
Blend_Screen
Blend_ColorDodge
Blend_Overlay
Blend_SoftLight
Blend_HardLight
Blend_PinLight
Blend_Difference
Blend_Exclusion
Blend_Hue
Blend_Saturation
Blend_Color
Blend_Luminosity
I have to say that while I tried my best to get all of the blending modes to be as close to what Photoshop blending modes produce, I have not succeeded with a few of them. Adobe creators do not publish the exact math behind their blending modes and people like us are just left to guess about the formulae.
There isn�t much information about this subject on the Internet and I want to specifically thank Jens Gruschel for compiling and publishing the list of blending mode formulas.
Basic color adjustment functions
Aside from the image blending functionality provided by my sample class, I have included a few useful color adjustment functions. All of these functions make use of ColorMatrix functionality provided by GDI+. It�s fast, powerful and easy to use. Following method is called from every image color adjustment function:
public void ApplyColorMatrix(ref Image img, ColorMatrix colMatrix)
{
    Graphics gr = Graphics.FromImage(img);
    ImageAttributes attrs = new ImageAttributes();
    attrs.SetColorMatrix(colMatrix);
    gr.DrawImage(img, new Rectangle(0, 0, img.Width, img.Height),
        0, 0, img.Width, img.Height, GraphicsUnit.Pixel, attrs);
    gr.Dispose();
}
Following are the color matrices used in my class.
ColorMatrix cMatrix = new ColorMatrix(new float[][] {
new float[] {-1.0f, 0.0f, 0.0f, 0.0f, 0.0f },
new float[] { 0.0f,-1.0f, 0.0f, 0.0f, 0.0f },
new float[] { 0.0f, 0.0f,-1.0f, 0.0f, 0.0f },
new float[] { 0.0f, 0.0f, 0.0f, 1.0f, 0.0f },
new float[] { 1.0f, 1.0f, 1.0f, 0.0f, 1.0f }
} );
ColorMatrix cMatrix = new ColorMatrix(new float[][] {
new float[] { 1.0f, 0.0f, 0.0f, 0.0f, 0.0f },
new float[] { 0.0f, 1.0f, 0.0f, 0.0f, 0.0f },
new float[] { 0.0f, 0.0f, 1.0f, 0.0f, 0.0f },
new float[] { 0.0f, 0.0f, 0.0f, 1.0f, 0.0f },
new float[] { adjValueR, adjValueG, adjValueB, 0.0f, 1.0f }
} );
Brightness matrix simply translates colors in each channel by specified values. -1.0f will result in complete darkness (black), 1.0f will result in pure white colors.
ColorMatrix cMatrix = new ColorMatrix(new float[][] {
new float[] { (1.0f-sat)*rweight+sat,
(1.0f-sat)*rweight, (1.0f-sat)*rweight, 0.0f, 0.0f },
new float[] { (1.0f-sat)*gweight,
(1.0f-sat)*gweight+sat, (1.0f-sat)*gweight, 0.0f, 0.0f },
new float[] { (1.0f-sat)*bweight,
(1.0f-sat)*bweight, (1.0f-sat)*bweight+sat, 0.0f, 0.0f },
new float[] { 0.0f, 0.0f, 0.0f, 1.0f, 0.0f },
new float[] { 0.0f, 0.0f, 0.0f, 0.0f, 1.0f }
} );
Saturation matrix makes use of weights that are assigned to each RGB channel. Weights correspond to sensitivity of our eyes to color channels. The standard NTSC weights are defined as 0.299f (red), 0.587f (green) and 0.144f (blue). sat is the value for saturation. There are several interesting values for saturation. Value of 0.0f converts an image to grayscale (desaturates the image), value of 1.0f converts matrix into identity matrix (no color change) and value of �1.0f will result in complementary colors for the image.
Putting it all together
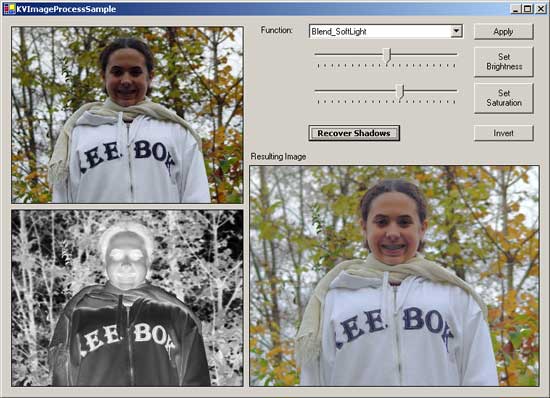
In the demo application, I have included some code that shows how my ImageBlender ;-) class can be used to improve shadow areas of an image. Original image of my daughter Leah has her face almost completely in the shadows. Applying a number of simple image processing/blending steps can recover some of the detail in the shadow areas of the image.

Following is the code that produces the above result:
KVImage.ImageBlender ib = new KVImage.ImageBlender();
Image imgLeah = Image.FromFile(@"..\..\leah.jpg");
pic1.Image = new Bitmap(imgLeah,
pic1.ClientSize.Width, pic1.ClientSize.Height);
Image imgTemp = new Bitmap(imgLeah);
ib.Desaturate(imgTemp);
ib.Invert(imgTemp);
pic2.Image = new Bitmap(imgTemp,
pic2.ClientSize.Width, pic2.ClientSize.Height);
ib.BlendImages(imgLeah, imgTemp,
KVImage.ImageBlender.BlendOperation.Blend_SoftLight);
ib.AdjustBrightness(imgLeah, 0.075f);
pic3.Image = new Bitmap(imgLeah,
pic3.ClientSize.Width, pic3.ClientSize.Height);
imgTemp.Dispose();
imgLeah.Dispose();
Of course, this is just a very basic example, but I think it demonstrates well, the potential power of image blending modes.
Room for improvement
There are tons of things that can be improved in my code: more comments, speed optimizations, added flexibility, addition of alpha channel processing, blending opacities, selections and channel masking. I will attempt to add some of these things in the future versions of my class.
Thank you for taking the time to read this article and I hope that you find it useful.
